


python pyenv
Have you ever wanted to contribute to a project that supports multiple versions of Python but aren’t sure how you would easily test all the versions? Are you ever curious about the latest and greatest versions of Python? Maybe you’d like to try out these new features, but you don’t want to worry about messing up your development environment. Luckily, managing multiple version of Python doesn’t have to be confusing if you use pyenv.
您是否曾经想过为支持多个Python版本的项目做出贡献,但是不确定如何轻松测试所有版本? 您是否对Python的最新和最佳版本感到好奇? 也许您想尝试这些新功能,但是您不必担心搞乱您的开发环境。 幸运的是,如果您使用pyenv ,则管理多个版本的Python不必感到困惑。
This article will provide you with a great overview of how to maximize your time spent working on projects and minimize the time spent in headaches trying to use the right version of Python.
本文将为您提供有关如何最大程度地花时间在项目上并最大程度地减少尝试使用正确版本的Python的时间的概述。
In this article, you’ll learn how to:
在本文中,您将学习如何:
- Install multiple versions of Python
- Install the latest development version of Python
- Switch between the installed versions
- Use virtual environments with
pyenv - Activate different Python versions and virtual environments automatically
- 安装多个版本的Python
- 安装最新的Python开发版本
- 在安装的版本之间切换
- 在
pyenv使用虚拟环境 - 自动激活不同的Python版本和虚拟环境
Free Bonus: Click here to get access to a chapter from Python Tricks: The Book that shows you Python’s best practices with simple examples you can apply instantly to write more beautiful + Pythonic code.
免费红利: 单击此处可访问Python技巧的一章:该书通过简单的示例向您展示了Python的最佳实践,您可以立即应用这些示例编写更精美的Pythonic代码。
为什么要使用pyenv ? (Why Use pyenv?)
pyenv is a wonderful tool for managing multiple Python versions. Even if you already have Python installed on your system, it is worth having pyenv installed so that you can easily try out new language features or help contribute to a project that is on a different version of Python.
pyenv是管理多个Python版本的绝佳工具。 即使您已经在系统上安装了Python,也值得安装pyenv以便您可以轻松地尝试新的语言功能或帮助为使用其他版本的Python的项目做出贡献。
为什么不使用系统Python? (Why Not Use System Python?)
“System Python” is the Python that comes installed on your operating system. If you’re on Mac or Linux, then by default, when you type python in your terminal, you get a nice Python REPL.
“系统Python”是操作系统上安装的Python。 如果您使用的是Mac或Linux,则默认情况下,当您在终端中键入python时,会得到一个不错的Python REPL。
So, why not use it? One way to look at it is that this Python really belongs to the operating system. After all, it came installed with the operating system. That’s even reflected when you run which:
那么,为什么不使用它呢? 一种看待它的方式是该Python确实属于操作系统。 毕竟,它是随操作系统一起安装的。 当您运行甚至反映了which :
 $ which python
$ which python
/usr/bin/python
/usr/bin/python
Here, python is available to all users as evidenced by its location /usr/bin/python. Chances are, this isn’t the version of Python you want either:
在这里, python对所有用户可用,其位置/usr/bin/python证明了这一点。 可能是,这不是您想要的Python版本:
To install a package into your system Python, you have to run sudo pip install. That’s because you’re installing the Python package globally, which is a real problem if another user comes along and wants to install a slightly older version of the package.
要将软件包安装到系统Python中,必须运行sudo pip install 。 那是因为您要在全球范围内安装Python软件包,如果另一个用户出现并想安装该软件包的稍旧版本,这将是一个真正的问题。
Problems with multiple versions of the same package tend to creep up on you and bite you when you least expect it. One common way this problem presents itself is a popular and stable package suddenly misbehaving on your system. After hours of troubleshooting and Googling, you may find that you’ve installed the wrong version of a dependency, and it’s ruining your day.
同一软件包的多个版本的问题会逐渐蔓延到您,并在您最不期望的时候咬住您。 出现此问题的一种常见方式是突然流行在您的系统上的流行且稳定的软件包。 经过数小时的故障排除和谷歌搜索,您可能会发现安装了错误版本的依赖项,这毁了您的一天。
Even if your Python version is installed in /usr/local/bin/python3, you’re still not safe. You will run into the same permissions and flexibility problems described above.
即使您的Python版本安装在/usr/local/bin/python3 ,您仍然不安全。 您将遇到上述相同的权限和灵活性问题。
In addition, you don’t really have much control over what version of Python comes installed on your OS. If you want to use the latest features in Python, and you’re on Ubuntu for example, you might just be out of luck. The default versions might be too old, which means you’ll just have to wait for a new OS to come out.
另外,您实际上对操作系统上安装的Python版本没有太多控制权。 例如,如果您想使用Python中的最新功能,而您正在使用Ubuntu,那么您可能就不走运了。 默认版本可能太旧,这意味着您只需要等待新的操作系统问世。
Finally, some operating systems actually use the packaged Python for operation. Take yum for example, which makes heavy use of Python to do its job. If you install a new version of Python and aren’t careful to install it into your user space, you could seriously damage your ability to use your OS.
最后,某些操作系统实际上使用打包的Python进行操作。 以yum为例,它大量使用Python来完成其工作。 如果您安装了新版本的Python,并且不小心将其安装到用户空间中,则可能会严重损害您使用操作系统的能力。
包管理器呢? (What About a Package Manager?)
The next logical place to look is package managers. Programs such as apt, yum, brew, or port are typical next options. After all, this is how you install most packages to your system. Unfortunately, you’ll find some of the same problems using a package manager.
下一个合乎逻辑的地方是程序包管理器。 下一步是典型的程序,如apt , yum , brew或port 。 毕竟,这是将大多数软件包安装到系统的方式。 不幸的是,使用包管理器会发现一些相同的问题。
By default, package managers tend to install their packages into the global system space instead of the user space. Again, these system level packages pollute your development environment and make it hard to share a workspace with others.
默认情况下,程序包管理器倾向于将其程序包安装到全局系统空间而不是用户空间中。 同样,这些系统级程序包会污染您的开发环境,并使其很难与他人共享工作区。
Once again, you still don’t have control over what version of Python you can install. It’s true some repositories give you a greater selection, but by default, you’re looking at whatever version of Python your particular vendor is up to on any given day.
再一次,您仍然无法控制可以安装哪个版本的Python。 的确,有些存储库为您提供了更多选择,但是默认情况下,您正在查看特定供应商在特定日期所支持的Python版本。
Even if you do install Python from a package manager, consider what would happen if you’re writing a package and want to support and test on Python 3.4 – 3.7.
即使您确实从程序包管理器安装Python,也要考虑如果编写程序包并希望在Python 3.4 – 3.7上进行支持和测试会发生什么。
What would happen on your system when you type python3? How would you switch quickly between the different versions? You can certainly do it, but it is tedious and prone to error. Nevermind the fact that if you want PyPy, Jython, or Miniconda, then you’re probably just out of luck with your package manager.
当您键入python3时,系统上会发生什么? 您如何在不同版本之间快速切换? 您当然可以做到,但是这很繁琐并且容易出错。 没关系,如果您想要PyPy,Jython或Miniconda,那么您的软件包管理器可能就不走运了。
With these constraints in mind, let’s recap the criteria that would let you install and manage Python versions easily and flexibly:
考虑到这些限制,让我们回顾一下可以轻松灵活地安装和管理Python版本的条件:
- Install Python in your user space
- Install multiple versions of Python
- Specify the exact Python version you want
- Switch between the installed versions
- 在您的用户空间中安装Python
- 安装多个版本的Python
- 指定所需的确切Python版本
- 在安装的版本之间切换
pyenv lets you do all of these things and more.
pyenv可让您做所有这些事情,甚至更多。
安装pyenv (Installing pyenv)
Before you install pyenv itself, you’re going to need some OS-specific dependencies. These dependencies are mostly development utilities written in C and are required because pyenv installs Python by building from source. For a more detailed breakdown and explanation of the build dependencies, you can check out the official docs. In this tutorial, you’ll see the most common ways to install these dependencies.
在安装pyenv本身之前,您将需要一些特定于操作系统的依赖项。 这些依赖关系大部分是用C编写的开发实用程序,是必需的,因为pyenv通过从源代码构建来安装Python。 有关构建依赖项的更详细的细分和解释,您可以查看官方文档。 在本教程中,您将看到安装这些依赖项的最常用方法。
Note: Unfortunately, pyenv does not support Windows at the time of this writing.
注意:不幸的是,在撰写本文时, pyenv不支持Windows。
建立依赖关系 (Build Dependencies)
pyenv builds Python from source, which means you’ll need build dependencies to actually use pyenv. The build dependencies vary by platform. If you are on Ubuntu/Debian and want to install the build dependencies, you could use the following:
pyenv从源代码构建Python,这意味着您需要构建依赖项才能实际使用pyenv 。 构建依赖关系因平台而异。 如果您使用的是Ubuntu / Debian,并且要安装构建依赖项,则可以使用以下命令:
 $ sudo apt-get install -y make build-essential libssl-dev zlib1g-dev $ sudo apt-get install -y make build-essential libssl-dev zlib1g-dev
libbz2-dev libreadline-dev libsqlite3-dev wget curl llvm libncurses5-dev
libbz2-dev libreadline-dev libsqlite3-dev wget curl llvm libncurses5-dev
libncursesw5-dev xz-utils tk-dev libffi-dev liblzma-dev python-openssl

libncursesw5-dev xz-utils tk-dev libffi-dev liblzma-dev python-openssl
This uses Apt to install all the build dependencies. Let this run, and you’ll be ready to go for Debian systems.
这将使用Apt安装所有构建依赖项。 运行此命令,您就可以开始使用Debian系统了。
If you use Fedora/CentOS/RHEL, you could use yum to install your build dependencies:
如果使用Fedora / CentOS / RHEL ,则可以使用yum安装构建依赖项:
This command will install all the build dependencies for Python using yum.
该命令将使用yum为Python安装所有构建依赖项。
macOS users can use the following command:
macOS用户可以使用以下命令:
 $ brew install readline xz
$ brew install readline xz
This command relies on Homebrew and installs the few dependencies for macOS users.
此命令依赖Homebrew并为macOS用户安装一些依赖项。
If you’re instead using openSUSE then you would run the following:
如果您使用的是openSUSE,则可以运行以下命令:
Once again, this command installs all the Python build dependencies for your system.
再次,此命令将为您的系统安装所有Python构建依赖项。
Finally, for Alpine users, you can use this:
最后,对于Alpine用户,您可以使用以下命令:
 $ apk add libffi-dev ncurses-dev openssl-dev readline-dev $ apk add libffi-dev ncurses-dev openssl-dev readline-dev
tk-dev xz-dev zlib-dev

tk-dev xz-dev zlib-dev
This command uses apk as the package manager and will install all build dependencies for Python on Alpine.
此命令使用apk作为包管理器,并将在Alpine上安装Python的所有构建依赖项。
使用pyenv安装程序 (Using the pyenv-installer)
After you’ve installed the build dependencies, you’re ready to install pyenv itself. I recommend using the pyenv-installer project:
安装构建依赖项后,就可以安装pyenv本身了。 我建议使用pyenv-installer项目 :
This will install pyenv along with a few plugins that are useful:
这将安装pyenv以及一些有用的插件:
pyenv: The actualpyenvapplicationpyenv-virtualenv: Plugin forpyenvand virtual environmentspyenv-update: Plugin for updatingpyenvpyenv-doctor: Plugin to verify thatpyenvand build dependencies are installedpyenv-which-ext: Plugin to automatically lookup system commands
-
pyenv:实际的pyenv应用程序 -
pyenv-virtualenv:用于pyenv和虚拟环境的插件 -
pyenv-update:用于更新pyenv插件 -
pyenv-doctor:用于验证是否已安装pyenv和构建依赖项的插件 -
pyenv-which-ext:自动查找系统命令的插件
Note: The above command is the same as downloading the pyenv-installer script and running it locally. So if you’d like to see exactly what you’re running, you can view the file yourself. Alternatively, if you really don’t want to run a script, you can checkout the manual installation instructions.
注意:上面的命令与下载pyenv-installer脚本并在本地运行它相同。 因此,如果您想确切查看正在运行的内容,则可以自己查看文件。 另外,如果您确实不想运行脚本,则可以查看手动安装说明。
At the end of the run, you should see something like this:
运行结束时,您应该会看到类似以下内容:
 WARNING: seems you still have not added 'pyenv' to the load path.

WARNING: seems you still have not added 'pyenv' to the load path.

# Load pyenv automatically by adding
# Load pyenv automatically by adding
# the following to ~/.bashrc:

# the following to ~/.bashrc:

export PATH="$HOME/.pyenv/bin:$PATH"
export PATH="$HOME/.pyenv/bin:$PATH"
eval "$(pyenv init -)"
eval "$(pyenv init -)"
eval "$(pyenv virtualenv-init -)"
eval "$(pyenv virtualenv-init -)"
The output will be based on your shell. But you should follow the instructions to add pyenv to your path and to initialize pyenv/pyenv-virtualenv auto completion. Once you’ve done this, you need to reload your shell:
输出将基于您的外壳。 但是您应该按照说明将pyenv添加到您的路径,并初始化pyenv / pyenv-virtualenv自动完成功能。 完成此操作后,需要重新加载外壳程序:
That’s it. You now have pyenv and four useful plugins installed.
而已。 现在,您已经安装了pyenv和四个有用的插件。
使用pyenv安装Python (Using pyenv to Install Python)
Now that you have pyenv installed, installing Python is the next step. You have many versions of Python to choose from. If you wanted to see all the available CPython 3.6 through 3.8, you can do this:
现在您已经安装了pyenv ,下一步就是安装Python。 您有许多版本的Python可供选择。 如果要查看所有可用的CPython 3.6至3.8,可以执行以下操作:
 $ pyenv install --list $ pyenv install --list | grep | grep " 3.[678]"
" 3.[678]"
  3.6.0
  3.6.0
  3.6-dev
  3.6-dev
  3.6.1
  3.6.1
  3.6.2
  3.6.2
  3.6.3
  3.6.3
  3.6.4
  3.6.4
  3.6.5
  3.6.5
  3.6.6
  3.6.6
  3.6.7
  3.6.7
  3.6.8
  3.6.8
  3.7.0
  3.7.0
  3.7-dev
  3.7-dev
  3.7.1
  3.7.1
  3.7.2
  3.7.2
  3.8-dev
  3.8-dev
The above shows all the Python versions that pyenv knows about that match the regular expression. In this case, that is all available CPython versions 3.6 through 3.8. Likewise, if you wanted to see all the Jython versions, you could do this:
上面显示了pyenv知道的所有与正则表达式匹配的Python版本。 在这种情况下,这是所有可用的CPython版本3.6到3.8。 同样,如果您想查看所有Jython版本,则可以执行以下操作:
Again, you can see all the Jython versions that pyenv has to offer. If you want to see all the versions, you can do the following:
同样,您可以看到pyenv必须提供的所有Jython版本。 如果要查看所有版本,可以执行以下操作:
 $ pyenv install --list
$ pyenv install --list
...
...
# There are a lot
# There are a lot
Once you find the version you want, you can install it with a single command:
找到所需版本后,可以使用单个命令进行安装:
Having Problems? The pyenv documentation has great installation notes as well as a useful FAQ along with common build problems.
This will take a while because pyenv is building Python from source, but once it’s done, you’ll have Python 3.7.2 available on your local machine. If you don’t want to see all the output, just remove the -v flag. Even development versions of CPython can be installed:
这将花费一些时间,因为pyenv从源代码构建Python,但是一旦完成,您将在本地计算机上使用Python 3.7.2。 如果您不想查看所有输出,只需删除-v标志。 甚至可以安装CPython的开发版本:
 $ pyenv install $ pyenv install 3.8-dev
3 .8-dev
Pro Tip: If you’ve been using pyenv for a while and don’t see the version you’re looking for, you may need to run pyenv update to update the tool and make sure you have access to the latest versions.
专家提示:如果您使用pyenv已有一段时间,但没有找到所需的版本,则可能需要运行pyenv update来更新该工具,并确保可以访问最新版本。
For the rest of the tutorial, the examples assume you’ve installed 3.6.8 and 2.7.15, but you’re free to substitute these values for the Python versions you actually installed. Also note that the system Python version in the examples is 2.7.12.
在本教程的其余部分中,示例假定您已经安装了3.6.8和2.7.15 ,但是您可以随意将这些值替换为实际安装的Python版本。 另请注意,示例中的系统Python版本是2.7.12 。
安装位置 (Installation Location)
As mentioned before, pyenv works by building Python from source. Each version that you have installed is located nicely in your pyenv root directory:
如前所述, pyenv通过从源代码构建Python来工作。 您安装的每个版本都位于pyenv根目录中:
All of your versions will be located here. This is handy because removing these versions is trivial:
您所有的版本都将位于此处。 这很方便,因为删除这些版本很简单:
 $ rm -rf ~/.pyenv/versions/2.7.15
$ rm -rf ~/.pyenv/versions/2.7.15
Of course pyenv also provides a command to uninstall a particular Python version:
当然, pyenv还提供了用于卸载特定Python版本的命令:
使用新的Python (Using Your New Python)
Now that you’ve installed a couple of different Python versions, let’s see some basics on how to use them. First, check what versions of Python you have available:
现在,您已经安装了两个不同的Python版本,让我们看一下如何使用它们的一些基础知识。 首先,检查可用的Python版本:
 $ pyenv versions
$ pyenv versions
* system (set by /home/realpython/.pyenv/version)
* system (set by /home/realpython/.pyenv/version)
  2.7.15
  2.7.15
  3.6.8
  3.6.8
  3.8-dev
  3.8-dev
The * indicates that the system Python version is active currently. You’ll also notice that this is set by a file in your root pyenv directory. This means that, by default, you are still using your system Python:
*表示system Python版本当前处于活动状态。 您还会注意到,这是由pyenv根目录中的文件设置的。 这意味着,默认情况下,您仍在使用系统Python:
If you try to confirm this using which, you’ll see this:
如果您尝试使用which来确认,您将看到:
 $ which python
$ which python
/home/realpython/.pyenv/shims/python
/home/realpython/.pyenv/shims/python
This might be surprising, but this is how pyenv works. pyenv inserts itself into your PATH and from your OS’s perspective is the executable that is getting called. If you want to see the actual path, you can run the following:
这可能令人惊讶,但这就是pyenv工作方式。 pyenv将自身插入到PATH并且从操作系统的角度来看,正在被调用的可执行文件。 如果要查看实际路径,可以运行以下命令:
If, for example, you wanted to use version 2.7.15, then you can use the global command:
例如,如果要使用版本2.7.15,则可以使用global命令:
 $ pyenv global $ pyenv global 2.7.15
2 .7.15
$ python -V
$ python -V
Python 2.7.15

Python 2.7.15

$ pyenv versions
$ pyenv versions
  system
  system
* 2.7.15 (set by /home/realpython/.pyenv/version)
* 2.7.15 (set by /home/realpython/.pyenv/version)
  3.6.8
  3.6.8
  3.8-dev
  3.8-dev
Pro Tip: A great way to get peace of mind that the version of Python you just installed is working properly is to run the built-in test suite:
专家提示:让您放心,刚安装的Python版本运行正常的一种好方法是运行内置的测试套件:
This will kick off lots of internal Python tests that will verify your installation. You can just kick back and watch the tests pass.
这将启动许多内部Python测试,这些测试将验证您的安装。 您可以放心观看测试通过。
If you ever want to go back to the system version of Python as the default, you can run this:
如果您想返回默认的Python系统版本,则可以运行以下命令:
 $ pyenv global system
$ pyenv global system
$ python -V
$ python -V
Python 2.7.12
Python 2.7.12
You can now switch between different versions of Python with ease. This is just the beginning. If you have many versions that you want to switch between, typing these commands consistently is tedious. This section goes over the basics, but a better workflow is described in working with multiple environments.
现在,您可以轻松地在不同版本的Python之间切换。 这仅仅是开始。 如果要切换的版本很多,那么连续输入这些命令将很麻烦。 本节介绍了基础知识,但在多个环境中使用时,描述了更好的工作流程。
探索pyenv命令 (Exploring pyenv Commands)
pyenv offers many commands. You can see a complete list of all available commands with this:
pyenv提供了许多命令。 您可以使用以下命令查看所有可用命令的完整列表:
This outputs all command names. Each command has a --help flag that will give you more detailed information. For example, if you wanted to see more information on the shims command you could run the following:
这将输出所有命令名称。 每个命令都有一个--help标志,它将为您提供更多详细信息。 例如,如果您想查看有关shims命令的更多信息,则可以运行以下命令:
 $ pyenv shims --help
$ pyenv shims --help
Usage: pyenv shims [--short]

Usage: pyenv shims [--short]

List existing pyenv shims
List existing pyenv shims
The help message describes what the command is used for and any options you can use in conjunction with the command. In the following sections, you’ll find a quick, high-level overview of the most used commands.
帮助消息描述了该命令的用途以及可以与该命令结合使用的所有选项。 在以下各节中,您将快速,概括地了解最常用的命令。
install (install)
You’ve already seen the install command above. This command can be used to install a specific version of Python. For example, if you wanted to install 3.6.8 you would use this:
您已经在上面看到了install命令。 该命令可用于安装特定版本的Python。 例如,如果要安装3.6.8 ,则可以使用以下命令:
The output shows us pyenv downloading and installing Python. Some of the common flags you may want to use are the following:
输出显示了pyenv下载和安装Python。 您可能要使用的一些常见标志如下:
| Flag | 旗 | Description | 描述 |
|---|---|---|---|
-l/--list-l/--list | Lists all available Python versions for installation | 列出所有可用的Python版本以进行安装 | |
-g/--debug-g/--debug | Builds a debug version of Python | 构建Python的调试版本 | |
-v/--verbose-v/--verbose | Verbose mode: print compilation status to stdout | 详细模式:将编译状态打印到标准输出 |
versions (versions)
The versions command displays all currently installed Python versions:
versions命令显示当前所有已安装的Python版本:
 $ pyenv versions
$ pyenv versions
* system (set by /home/realpython/.pyenv/version)
* system (set by /home/realpython/.pyenv/version)
  2.7.15
  2.7.15
  3.6.8
  3.6.8
  3.8-dev
  3.8-dev
This output shows not only that 2.7.15, 3.6.8, 3.8-dev, and your system Python are installed, but also shows you that the system Python is active. If you only care about the current active version, you can use the following command:
此输出不仅表明2.7.15 , 3.6.8 , 3.8-dev ,和你的system的Python安装,同时也说明你的system Python是积极的。 如果只关心当前的活动版本,则可以使用以下命令:
This command is similar to versions but only shows you the current active Python version.
此命令与versions相似,但仅显示当前的活动Python版本。
which (which)
The which command is helpful for determining the full path to a system executable. Because pyenv works by using shims, this command allows you to see the full path to the executable pyenv is running. For example, if you wanted to see where pip is installed, you could run this:
which命令有助于确定系统可执行文件的完整路径。 由于pyenv通过使用垫片来工作,因此该命令允许您查看pyenv可执行文件正在运行的完整路径。 例如,如果您想查看pip的安装位置,则可以运行以下命令:
 $ pyenv which pip
$ pyenv which pip
/home/realpython/.pyenv/versions/3.6.8/bin/pip
/home/realpython/.pyenv/versions/3.6.8/bin/pip
The output displays the full system path for pip. This can be helpful when you’ve installed command-line applications.
输出显示pip的完整系统路径。 当您安装了命令行应用程序时,这可能会有所帮助。
global (global)
The global command sets the global Python version. This can be overridden with other commands, but is useful for ensuring you use a particular Python version by default. If you wanted to use 3.6.8 by default, then you could run this:
global命令设置全局Python版本。 可以用其他命令覆盖它,但是对于确保默认情况下使用特定的Python版本很有用。 如果要默认使用3.6.8 ,则可以运行以下命令:
This command sets the ~/.pyenv/version to 3.6.8. For more information, see the section on specifying your Python version.
此命令将~/.pyenv/version为3.6.8 。 有关更多信息,请参见有关指定Python版本的部分。
local (local)
The local command is often used to set an application-specific Python version. You could use it to set the version to 2.7.15:
local命令通常用于设置特定于应用程序的Python版本。 您可以使用它将版本设置为2.7.15 :
 $ pyenv $ pyenv local local 2.7.15
2 .7.15
This command creates a .python-version file in your current directory. If you have pyenv active in your environment, this file will automatically activate this version for you.
此命令在当前目录中创建一个.python-version文件。 如果您的环境中有pyenv处于活动状态,则此文件将自动为您激活该版本。
shell (shell)
The shell command is used to set a shell-specific Python version. For example, if you wanted to test out the 3.8-dev version of Python, you can do this:
shell命令用于设置特定于Shell的Python版本。 例如,如果您想测试3.8-dev版本的Python,则可以执行以下操作:
This command activates the version specified by setting the PYENV_VERSION environment variable. This command overwrites any applications or global settings you may have. If you want to deactivate the version, you can use the --unset flag.
该命令激活通过设置PYENV_VERSION环境变量指定的版本。 该命令将覆盖您可能拥有的所有应用程序或全局设置。 如果要停用版本,可以使用--unset标志。
指定您的Python版本 (Specifying Your Python Version)
One of the more confusing parts of pyenv is how exactly the python command gets resolved and what commands can be used to modify it. As mentioned in the commands, there are 3 ways to modify which version of python you’re using. So how do all these commands interact with one another? The resolution order looks a little something like this:
pyenv最令人困惑的部分之一是python命令如何被准确解析以及可以使用哪些命令对其进行修改。 如命令中所述,有3种方法可以修改您使用的python版本。 那么,所有这些命令如何相互交互? 解决顺序看起来像这样:
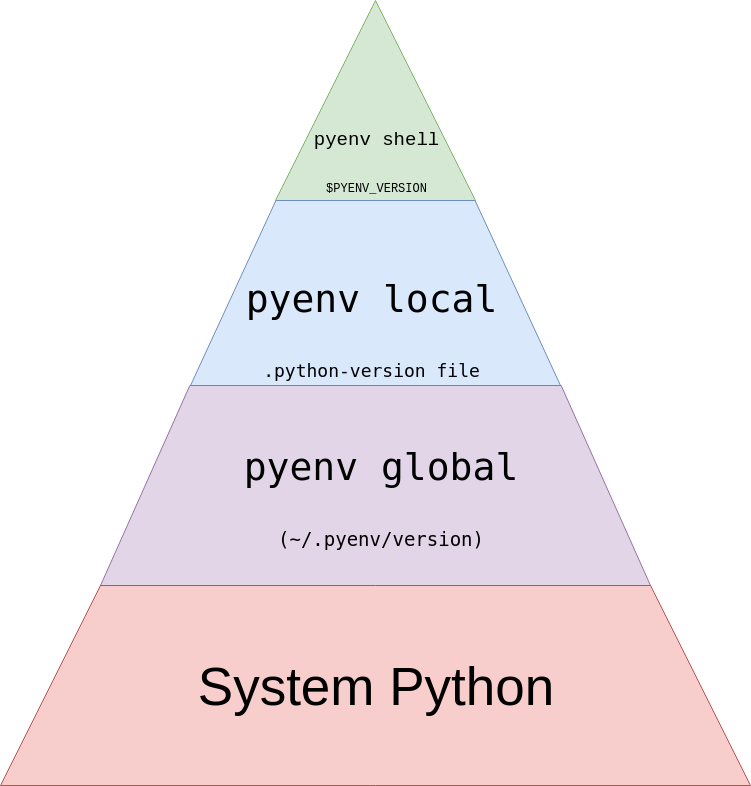
This pyramid is meant to be read from top to bottom. The first of these options that pyenv can find is the option it will use. Let’s see a quick example:
该金字塔应从上至下阅读。 pyenv可以找到的第一个选项是它将使用的选项。 让我们看一个简单的例子:
 $ pyenv versions
$ pyenv versions
* system (set by /home/realpython/.pyenv/version)
* system (set by /home/realpython/.pyenv/version)
  2.7.15
  2.7.15
  3.6.8
  3.6.8
  3.8-dev
  3.8-dev
Here, your system Python is being used as denoted by the *. To exercise the next most global setting, you use global:
在这里,您的system Python正以*表示使用。 要使用下一个最全局的设置,请使用global :
You can see that now pyenv wants to use 3.6.8 as our Python version. It even indicates the location of the file it found. That file does indeed exist, and you can list its contents:
您可以看到pyenv现在希望使用3.6.8作为我们的Python版本。 它甚至指示找到的文件的位置。 该文件确实存在,您可以列出其内容:
 $ cat ~/.pyenv/version
$ cat ~/.pyenv/version
3.6.8
3.6.8
Now, let’s create a .python-version file with local:
现在,让我们使用local创建一个.python-version文件:
Here again, pyenv indicates how it would resolve our python command. This time it comes from ~/.python-version. Note that the searching for .python-version is recursive:
再次, pyenv指出它将如何解决我们的python命令。 这次来自~/.python-version 。 请注意,搜索.python-version是递归的:
 $ mkdir subdirectory
$ mkdir subdirectory
$ $ cd subdirectory
cd subdirectory
$ ls -la $ ls -la # Notice no .python-version file
# Notice no .python-version file
. ..
. ..
$ pyenv versions
$ pyenv versions
  system
  system
* 2.7.15 (set by /home/realpython/.python-version)
* 2.7.15 (set by /home/realpython/.python-version)
  3.6.8
  3.6.8
  3.8-dev
  3.8-dev
Even though there isn’t a .python-version in subdirectory, the version is still set to 2.7.15 because .python-version exists in a parent directory.
即使subdirectory没有.python-version ,该版本仍设置为2.7.15因为父目录中存在.python-version 。
Finally, you can set the Python version with shell:
最后,您可以使用shell设置Python版本:
All this did is set the $PYENV_VERSION environment variable:
所有这些都设置了$PYENV_VERSION环境变量:
 $ $ echo echo $PYENV_VERSION
$PYENV_VERSION
3.8-dev
3.8-dev
If you’re feeling overwhelmed by the options, the section on working with multiple environments goes over an opinionated process for managing these files, mostly using local.
如果您对这些选项感到不知所措,则有关使用多个环境的部分将介绍一个专心管理这些文件的过程,主要是使用local 。
虚拟环境和pyenv (Virtual Environments and pyenv)
Virtual environments are a big part of managing Python installations and applications. If you haven’t heard of virtual environments before, you can check out Python Virtual Environments: A Primer.
虚拟环境是管理Python安装和应用程序的重要组成部分。 如果您以前从未听说过虚拟环境,则可以查看Python Virtual Environments:A Primer 。
Virtual environments and pyenv are a match made in heaven. pyenv has a wonderful plugin called pyenv-virtualenv that makes working with multiple Python version and multiple virtual environments a breeze. If you’re wondering what the difference is between pyenv, pyenv-virtualenv, and tools like virtualenv or venv, then don’t worry. You’re not alone.
虚拟环境和pyenv是天作之合。 pyenv有一个很棒的插件,称为pyenv-virtualenv ,可以轻松地使用多个Python版本和多个虚拟环境。 如果您想知道pyenv , pyenv-virtualenv和virtualenv或venv类的工具之间有什么区别,那么请不要担心。 你不是一个人。
Here’s what you need to know:
这是您需要了解的内容:
- pyenv manages multiple versions of Python itself.
- virtualenv/venv manages virtual environments for a specific Python version.
- pyenv-virtualenv manages virtual environments for across varying versions of Python.
- pyenv管理Python本身的多个版本。
- virtualenv / venv管理特定Python版本的虚拟环境。
- pyenv-virtualenv管理跨不同版本的Python的虚拟环境。
If you’re a die-hard virtualenv or venv user, don’t worry: pyenv plays nicely with either. In fact, you can keep the same workflow you’ve had if you’d prefer, though I think pyenv-virtualenv makes for a nicer experience when you’re switching between multiple environments that require different Python versions.
如果您是顽固的virtualenv或venv用户,请不要担心: pyenv可以很好地与任何一个玩。 实际上,如果愿意,您可以保持与以前相同的工作流程,尽管我认为pyenv-virtualenv在需要不同Python版本的多个环境之间切换时会带来更好的体验。
The good news is that since you used the pyenv-installer script to install pyenv, you already have pyenv-virtualenv installed and ready to go.
好消息是,由于您使用pyenv-installer脚本安装pyenv ,因此您已经安装了pyenv-virtualenv并可以使用。
创建虚拟环境 (Creating Virtual Environments)
Creating a virtual environment is a single command:
创建虚拟环境是一个命令:
Technically, the <python_version> is optional, but you should consider always specifying it so that you’re certain of what Python version you’re using.
从技术上讲, <python_version>是可选的,但是您应该考虑始终指定它,以便确定所使用的Python版本。
The <environment_name> is just a name for you to help keep your environments separate. A good practice is to name your environments the same name as your project. For example, if you were working on myproject and wanted to develop against Python 3.6.8, you would run this:
<environment_name>只是一个名称,可帮助您将环境分开。 良好的做法是为您的环境命名与项目相同的名称。 例如,如果您正在开发myproject并想针对Python 3.6.8进行开发,则可以运行以下命令:
 $ pyenv virtualenv $ pyenv virtualenv 3.6.8 myproject
3 .6.8 myproject
The output includes messages that show a couple of extra Python packages getting installed, namely wheel, pip, and setuptools. This is strictly for convenience and just sets up a more full featured environment for each of your virtual environments.
输出中包含显示一些额外的Python软件包安装信息的消息,即wheel , pip和setuptools 。 严格来说,这是为了方便起见,只是为您的每个虚拟环境设置了一个功能更全的环境。
激活您的版本 (Activating Your Versions)
Now that you’ve created your virtual environment, using it is the next step. Normally, you should activate your environments by running the following:
现在您已经创建了虚拟环境,下一步就是使用它。 通常,您应该通过运行以下命令激活环境:
You’ve seen the pyenv local command before, but this time, instead of specifying a Python version, you specify an environment. This creates a .python-version file in your current working directory and because you ran eval "$(pyenv virtualenv-init -)" in your environment, the environment will automatically be activated.
您之前已经看过pyenv local命令,但是这次,您没有指定Python版本,而是指定了环境。 这将在当前工作目录中创建一个.python-version文件,并且由于您在环境中运行了eval "$(pyenv virtualenv-init -)" ,该环境将被自动激活。
You can verify this by running the following:
您可以通过运行以下命令进行验证:
 $ pyenv which python
$ pyenv which python
/home/realpython/.pyenv/versions/myproject/bin/python
/home/realpython/.pyenv/versions/myproject/bin/python
You can see a new version has been created called myproject and the python executable is pointing to that version. If you look at any executable this environment provides, you will see the same thing. Take, for example, pip:
您可以看到已经创建了一个名为myproject的新版本,并且python可执行文件指向该版本。 如果查看此环境提供的任何可执行文件,您将看到相同的内容。 以pip为例:
If you did not configure eval "$(pyenv virtualenv-init -)" to run in your shell, you can manually activate/deactivate your Python versions with this:
如果您没有配置eval "$(pyenv virtualenv-init -)"在外壳中运行,则可以使用以下方法手动激活/停用Python版本:
 $ pyenv activate <environment_name>
$ pyenv activate <environment_name>
$ pyenv deactivate
$ pyenv deactivate
The above is what pyenv-virtualenv is doing when it enters or exits a directory with a .python-version file in it.
上面是pyenv-virtualenv进入或退出带有.python-version文件的目录时的.python-version 。
使用多种环境 (Working With Multiple Environments)
Putting everything you’ve learned together, you can work effectively with multiple environments. Let’s assume you have the following versions installed:
将您学到的所有内容放在一起,即可在多个环境中有效地工作。 假设您安装了以下版本:
Now you want to work on two different, aptly named, projects:
现在,您要处理两个不同的,恰当地命名的项目:
- project1 supports Python 2.7 and 3.6.
- project2 supports Python 3.6 and experiments with 3.8-dev.
- project1支持Python 2.7和3.6。
- project2支持Python 3.6和3.8-dev的实验。
You can see that, by default, you are using the system Python, which is indicated by the * in the pyenv versions output. First, create a virtual environment for the first project:
您可以看到,默认情况下,您使用的是系统Python,在pyenv versions输出中由*表示。 首先,为第一个项目创建一个虚拟环境:
 $ $ cd project1/
cd project1/
$ pyenv which python
$ pyenv which python
/usr/bin/python
/usr/bin/python
$ pyenv virtualenv $ pyenv virtualenv 3.6.8 project1
3 .6.8 project1
...
...
$ pyenv $ pyenv local project1
local project1
$ python -V
$ python -V
/home/realpython/.pyenv/versions/project1/bin/python
/home/realpython/.pyenv/versions/project1/bin/python
Finally, notice that when you cd out of the directory, you default back to the system Python:
最后,请注意,当您从目录中cd离开时,您将默认返回到系统Python:
You can follow the above steps and create a virtual environment for project2:
您可以按照上述步骤为project2创建虚拟环境:
 $ $ cd project2/
cd project2/
$ pyenv which python
$ pyenv which python
/usr/bin/python
/usr/bin/python
$ pyenv virtualenv $ pyenv virtualenv 3.8-dev project2
3 .8-dev project2
...
...
$ pyenv $ pyenv local local 3.8-dev
3 .8-dev
$ pyenv which python
$ pyenv which python
/home/realpython/.pyenv/versions/3.8-dev/bin/python
/home/realpython/.pyenv/versions/3.8-dev/bin/python
These are one time steps for your projects. Now, as you cd between the projects, your environments will automatically activate:
这些是您项目的一个步骤。 现在,当您在项目之间进行cd ,您的环境将自动激活:
No more remembering to activate environments: you can switch between all your projects, and pyenv will take care of automatically activating the correct Python versions and the correct virtual environments.
无需再记住要激活环境了:您可以在所有项目之间切换,而pyenv将负责自动激活正确的Python版本和正确的虚拟环境。
同时激活多个版本 (Activating Multiple Versions Simultaneously)
As described in the example above, project2 uses experimental features in 3.8. Suppose you wanted to ensure that your code still works on Python 3.6. If you try running python3.6, you’ll get this:
如以上示例中所述, project2使用3.8中的实验功能。 假设您想确保您的代码仍可在Python 3.6上运行。 如果尝试运行python3.6 ,则会得到以下信息:
 $ $ cd project2/
cd project2/
$ python3.6 -V
$ python3.6 -V
pyenv: python3.6: command not found

pyenv: python3.6: command not found

The `python3.6' command exists in these Python versions:
The `python3.6' command exists in these Python versions:
  3.6.8
  3.6.8
  3.6.8/envs/project1
  3.6.8/envs/project1
  project1
  project1
pyenv informs you that, while Python 3.6 is not available in the current active environment, it is available in other environments. pyenv gives you a way to activate multiple environments at once using a familiar command:
pyenv通知您,虽然Python 3.6在当前活动环境中不可用,但在其他环境中可用。 pyenv提供了一种使用熟悉的命令一次激活多个环境的方法:
This indicates to pyenv that you would like to use the virtual environment project2 as the first option. So if a command, for example python, can be resolved in both environments, it will pick project2 before 3.6.8. Let’s see what happens if you run this:
这向pyenv表示您要使用虚拟环境project2作为第一个选项。 因此,如果可以在两个环境中都解析命令(例如python , project2在3.6.8之前选择project2 。 让我们看看运行此命令会发生什么:
 $ python3.6 -V
$ python3.6 -V
Python 3.6.8
Python 3.6.8
Here, pyenv attempts to find the python3.6 command, and because it finds it in an environment that is active, it allows the command to execute. This is extremely useful for tools like tox that require multiple versions of Python to be available on your PATH in order to execute.
在这里, pyenv尝试查找python3.6命令,并且由于它是在活动的环境中找到的,因此它允许命令执行。 这对于诸如tox之类的工具非常有用,该工具要求PATH上必须有多个Python版本才能执行。
Pro Tip: If you’re using tox and pyenv, you should checkout the tox-pyenv package.
专家提示:如果您使用的是tox和pyenv ,则应签出tox-pyenv软件包。
Suppose that in the above example, you’ve found a compatibility problem with your library and would like to do some local testing. The testing requires that you install all the dependencies. You should follow the steps to create a new environment:
假设在上面的示例中,您发现库的兼容性问题,并且希望进行一些本地测试。 该测试要求您安装所有依赖项。 您应该按照以下步骤创建新环境:
Once you’re satisfied with your local testing, you can easily switch back to your default environment:
对本地测试感到满意后,可以轻松切换回默认环境:
 $ pyenv $ pyenv local project2 local project2 3.6.8
3 .6.8
结论 (Conclusion)
You can now more easily contribute to a project that wants to support multiple environments. You can also more easily test out the latest and greatest Python versions without having to worry about messing up your development machine, all with a wonderful tool: pyenv.
现在,您可以更轻松地为想要支持多个环境的项目做出贡献。 您也可以使用一个出色的工具pyenv ,更轻松地测试最新和最好的Python版本,而不必担心搞乱您的开发机器。
You’ve seen how pyenv can help you:
您已经了解了pyenv如何pyenv您提供帮助:
- Install multiple versions of Python
- Switch between the installed versions
- Use virtual environments with
pyenv - Activate different Python versions and virtual environments automatically
- 安装多个版本的Python
- 在安装的版本之间切换
- 在
pyenv使用虚拟环境 - 自动激活不同的Python版本和虚拟环境
If you still have questions, feel free to reach out either in the comments section or on Twitter. Additionally, the pyenv documentation is a great resource.
如果您仍有疑问,请随时在评论部分或Twitter上与我们联系。 另外, pyenv文档是一个很好的资源。
奖励:在命令提示符下显示环境名称 (Bonus: Displaying Your Environment Name in Your Command Prompt)
If you’re like me and constantly switching between various virtual environments and Python versions, it’s easy to get confused about which version is currently active. I use oh-my-zsh and the agnoster theme, which by default makes my prompt look like this:
如果您像我一样,并且不断在各种虚拟环境和Python版本之间切换,则很容易对当前哪个版本处于活动状态感到困惑。 我使用oh-my-zsh和agnoster主题 ,默认情况下,其提示如下所示:

At a glance, I don’t know which Python version is active. To figure it out, I would have to run python -V or pyenv version. To help reduce my time spent on figuring out my active Python environment, I add the pyenv virtual environment I’m using to my prompt:
乍一看,我不知道哪个Python版本处于活动状态。 为了弄清楚,我必须运行python -V或pyenv version 。 为了帮助减少花在弄清楚我的活动Python环境上的时间,我在pyenv添加了我正在使用的pyenv虚拟环境:
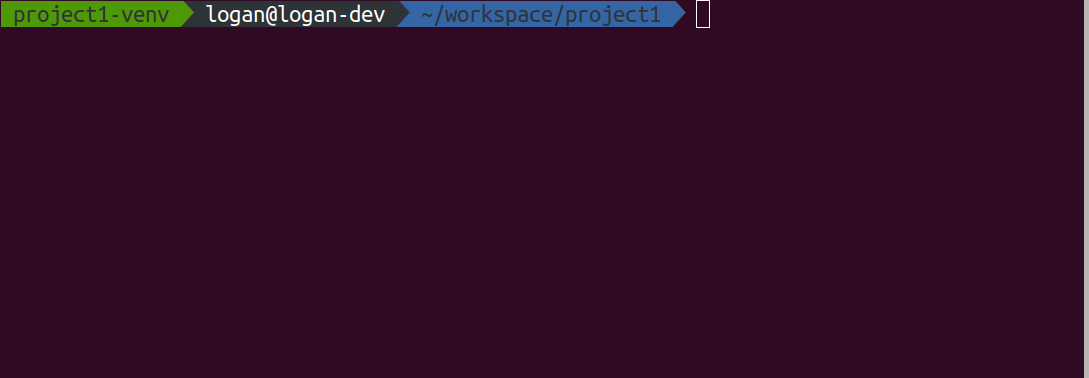
My Python version in this case is project1-venv and is displayed immediately at the beginning of the prompt. This allows me to quickly see what version of Python I’m using right away. If you’d like to use this too, you can use my agnoster-pyenv theme.
在这种情况下,我的Python版本是project1-venv并在提示的开头立即显示。 这使我可以快速查看自己正在使用的Python版本。 如果您也想使用它,可以使用我的agnoster-pyenv主题 。
翻译自: https://www.pybloggers.com/2019/03/managing-multiple-python-versions-with-pyenv/
python pyenv


 254
254

 被折叠的 条评论
为什么被折叠?
被折叠的 条评论
为什么被折叠?
 到【灌水乐园】发言


