


Python has been largely used for numerical and scientific applications in the last years. However, to perform numerical computations in an efficient manner, Python relies on external libraries, sometimes implemented in other languages, such as the NumPy library, which is partly implemented using the Fortran language.
近年来,Python已广泛用于数值和科学应用程序。 但是,为了高效地执行数值计算,Python依赖于外部库,有时以其他语言实现,例如NumPy库,该库部分使用Fortran语言实现。
Due to these dependencies, sometimes it isn’t trivial to set up an environment for numerical computations, linking all the necessary libraries. It’s common for people to struggle to get things working in workshops involving the use of Python for machine learning, especially when they are using an operating system that lacks a package management system, such as Windows.
由于这些依赖关系,有时为链接所有必需的库建立用于数值计算的环境并非易事。 人们通常很难在涉及使用Python进行机器学习的研讨会上使事情正常进行,特别是当他们使用缺少软件包管理系统的操作系统(例如Windows)时。
In this article, you’ll:
在本文中,您将:
- Walk through the details for setting up a Python environment for numerical computations on a Windows operating system
- Be introduced to Anaconda, a Python distribution proposed to circumvent these setup problems
- See how to install the distribution on a Windows machine and use its tools to manage packages and environments
- Use the installed Python stack to build a neural network and train it to solve a classic classification problem
- 逐步详细介绍如何设置Python环境以在Windows操作系统上进行数值计算
- 引入Anaconda,这是一个Python发行版,旨在解决这些设置问题
- 了解如何在Windows计算机上安装发行版并使用其工具来管理软件包和环境
- 使用已安装的Python堆栈构建神经网络并对其进行训练,以解决经典的分类问题
Free Bonus: Click here to get access to a Conda cheat sheet with handy usage examples for managing your Python environment and packages.
免费奖金: 单击此处可访问Conda速查表,并提供用于管理Python环境和软件包的便捷用法示例。
介绍Anaconda和Conda (Introducing Anaconda and Conda)
Since 2011, Python has included pip, a package management system used to install and manage software packages written in Python. However, for numerical computations, there are several dependencies that are not written in Python, so the initial releases of pip could not solve the problem by themselves.
自2011年以来,Python包含了pip ,这是一个软件包管理系统,用于安装和管理以Python编写的软件包。 但是,对于数值计算,有一些不是用Python编写的依赖项,因此pip的初始发行版无法自行解决问题。
To circumvent this problem, Continuum Analytics released Anaconda, a Python distribution focused on scientific applications and Conda, a package and environment management system, which is used by the Anaconda distribution. It’s worth noticing that the more recent versions of pip can handle external dependencies using wheels, but, by using Anaconda, you’ll be able to install critical libraries for data science more smoothly. (You can read more on this discussion here.)
为了解决这个问题,Continuum Analytics发布了Anaconda (这是一个专注于科学应用程序的Python发行版)和Conda (一种软件包和环境管理系统),该发行版由Anaconda发行版使用。 值得注意的是,较新版本的pip可以使用wheel处理外部依赖关系,但是,通过使用Anaconda,您将能够更加顺利地安装用于数据科学的关键库。 (您可以在此处阅读有关此讨论的更多信息 。)
Although Conda is tightly coupled to the Anaconda Python Distribution, the two are distinct projects with different goals:
尽管Conda与Anaconda Python发行版紧密结合,但这两个是具有不同目标的不同项目:
-
Anaconda is a full distribution of the software in the PyData ecosystem, including Python itself along with binaries for several third-party open-source projects. Besides Anaconda, there’s also Miniconda, which is a minimal Python distribution including basically Conda and its dependencies so that you can install only the packages you need, from scratch
-
Conda is a package, dependency, and environment management system that could be installed without the Anaconda or Miniconda distribution. It runs on Windows, macOS, and Linux and was created for Python programs, but it can package and distribute software for any language. The main purpose is to solve external dependencies issues in an easy way, by downloading pre-compiled versions of software.
In this sense, it is more like a cross-platform version of a general purpose package manager such as APT or YUM, which helps to find and install packages in a language-agnostic way. Also, Conda is an environment manager, so if you need a package that requires a different version of Python, by using Conda, it is possible to set up a separate environment with a totally different version of Python, maintaining your usual version of Python on your default environment.
Anaconda是PyData生态系统中软件的完整发行版,包括Python本身以及几个第三方开源项目的二进制文件。 除了Anaconda外,还有Miniconda ,这是一个最小的Python发行版,基本上包括Conda及其依赖项,因此您可以从头开始仅安装所需的软件包。
-
Conda是一个软件包,依赖项和环境管理系统,无需安装Anaconda或Miniconda即可安装。 它可以在Windows,macOS和Linux上运行,并且是为Python程序创建的,但是可以打包和分发适用于任何语言的软件。 主要目的是通过下载预编译的软件版本来轻松解决外部依赖项问题。
从这个意义上讲,它更像是通用软件包管理器(例如APT或YUM)的跨平台版本,它有助于以与语言无关的方式查找和安装软件包。 另外,Conda是环境经理,因此,如果您需要一个需要使用不同版本Python的软件包,则可以通过使用Conda来设置使用完全不同版本的Python的单独环境,并在该版本上维持您通常的Python版本您的默认环境。
There’s a lot of discussion regarding the creation of another package management system for the Python ecosystem. It’s worth mentioning that Conda’s creators pushed Python standard packaging to the limit and only created a second tool when it was clear that it was the only reasonable way forward.
关于为Python生态系统创建另一个包管理系统的讨论很多。 值得一提的是,Conda的创建者将Python标准包装推到了极限,并且仅在明确这是唯一合理的发展途径时才创建了第二个工具。
Curiously, even Guido van Rossum, at his speech at the inaugural PyData meetup in 2012, said that, when it comes to packaging, “it really sounds like your needs are so unusual compared to the larger Python community that you’re just better off building your own.” (You can watch a video of this discussion.) More information about this discussion can be found here and here.
奇怪的是,甚至是Guido van Rossum在2012年首届PyData大会上的演讲中说:“在包装方面,“听起来与大型Python社区相比,您的需求是如此不寻常,以至于您境况变得更好建立自己的。” (您可以观看此讨论的视频 。)有关此讨论的更多信息,请在此处和此处 。
Anaconda and Miniconda have become the most popular Python distributions, widely used for data science and machine learning in various companies and research laboratories. They are free and open source projects and currently include 1400+ packages in the repository. In the following section, we’ll go through the installation of the Miniconda Python distribution on a Windows machine.
Anaconda和Miniconda已成为最受欢迎的Python发行版,已在各种公司和研究实验室中广泛用于数据科学和机器学习。 它们是免费的开源项目,目前在存储库中包含1400多个软件包。 在下一节中,我们将介绍在Windows计算机上安装Miniconda Python发行版的过程。
安装Miniconda Python发行版 (Installing the Miniconda Python Distribution)
In this section, you’ll see step-by-step how to set up a data science Python environment on Windows. Instead of the full Anaconda distribution, you’ll be using Miniconda to set up a minimal environment containing only Conda and its dependencies, and you’ll use that to install the necessary packages.
在本节中,您将逐步了解如何在Windows上设置数据科学Python环境。 您将使用Miniconda而不是完整的Anaconda发行版来设置一个仅包含Conda及其依赖项的最小环境,并使用该环境安装必要的软件包。
The installation processes for Miniconda and Anaconda are very similar. The basic difference is that Anaconda provides an environment with a lot of pre-installed packages, many of which are never used. (You can check the list here.) Miniconda is minimalist and clean, and it allows you to easily install any of Anaconda’s packages.
Miniconda和Anaconda的安装过程非常相似。 基本的区别是Anaconda为环境提供了许多预安装的软件包,其中许多从未使用过。 (您可以在此处查看列表。)Miniconda简约而简洁,它使您可以轻松安装Anaconda的任何软件包。
In this article, the focus will be on using the command line interface (CLI) to set up the packages and environments. However, it’s possible to use Conda to install Anaconda Navigator, a graphical user interface (GUI), if you wish.
在本文中,重点将放在使用命令行界面(CLI)设置程序包和环境上。 但是,可以根据需要使用Conda安装Anaconda Navigator (图形用户界面,GUI)。
Miniconda can be installed using an installer available here. You’ll notice there are installers for Windows, macOS, and Linux, and for 32-bit or 64-bit operating systems. You should consider the appropriate architecture according to your Windows installation and download the Python 3.x version (at the time of writing this article, 3.7).
可以使用此处提供的安装程序来安装Miniconda。 您会注意到有用于Windows,macOS和Linux以及32位或64位操作系统的安装程序。 您应该根据Windows安装情况考虑合适的体系结构,并下载Python 3.x版本(在撰写本文时为3.7)。
There’s no reason to use Python 2 on a fresh project anymore, and if you do need Python 2 on some project you’re working on, due to some library that has not been updated, it is possible to set up a Python 2 environment using Conda, even if you installed the Miniconda Python 3.x distribution, as you will see in the next section.
不再有理由在新项目上使用Python 2,并且如果确实需要在正在处理的某些项目上使用Python 2,由于某些库尚未更新,则可以使用以下命令设置Python 2环境Conda,即使您安装了Miniconda Python 3.x发行版,也将在下一部分中看到。
After the download finishes, you just have to run the installer and follow the installation steps:
下载完成后,您只需运行安装程序并按照安装步骤操作:
- Click on Next on the welcome screen:
- 在欢迎屏幕上单击下一步:

- Click on I Agree to agree to the license terms:
- 单击我同意同意许可条款:

- Choose the installation type and click Next. Another advantage of using Anaconda or Miniconda is that it is possible to install the distribution using a local account. (It isn’t necessary to have an administrator account.) If this is the case, choose Just Me. Otherwise, if you have an administrator account, you may choose All Users:
- 选择安装类型,然后单击下一步。 使用Anaconda或Miniconda的另一个优点是可以使用本地帐户安装发行版。 (不必拥有管理员帐户。)在这种情况下,请选择Just Me。 否则,如果您具有管理员帐户,则可以选择“所有用户”:

- Choose the install location and click Next. If you’ve chosen to install just for you, the default location will be the folder Miniconda3 under your user’s personal folder. It’s important not to use spaces in the folder names in the path to Miniconda, since many Python packages have problems when spaces are used in folder names:
- 选择安装位置,然后单击下一步。 如果您选择仅为您安装,则默认位置将是用户个人文件夹下的Miniconda3文件夹。 在Miniconda路径中的文件夹名称中不要使用空格,这一点很重要,因为在文件夹名称中使用空格时,许多Python软件包都会出现问题:

- In Advanced Installation Options, the suggestion is to use the default choices, which are to not add Anaconda to the PATH environment variable and to register Anaconda as the default Python. Click Install to begin installation:
- 在“高级安装选项”中,建议使用默认选项,即不将Anaconda添加到PATH环境变量中,并将Anaconda注册为默认Python。 单击安装开始安装:

- Wait while the installer copies the files:
- 等待安装程序复制文件:

- When the installation completes, click on Next:
- 安装完成后,单击“下一步”:

- Click on Finish to finish the installation and close the installer:
- 单击完成以完成安装并关闭安装程序:

As Anaconda was not included in the PATH environment variable, its commands won’t work in the Windows default command prompt. To use the distribution, you should start its own command prompt, which can be done by clicking on the Start button and on Anaconda Prompt under Anaconda3 (64 bit):
由于Anaconda未包含在PATH环境变量中,因此其命令在Windows默认命令提示符下将不起作用。 要使用发行版,您应该启动自己的命令提示符,可以通过单击“开始”按钮和Anaconda3(64位)下的Anaconda Prompt来完成:

When the prompt opens, you can check if Conda is available by running conda --version:
当提示打开时,您可以通过运行conda --version来检查Conda是否可用:
 (base) C:UsersIEUser>conda --version
(base) C:UsersIEUser> conda --version
conda 4.5.11
conda 4.5.11
To get more information about the installation, you can run conda info:
要获取有关安装的更多信息,可以运行conda info :
Now that you have Miniconda installed, let’s see how Conda environments work.
现在您已经安装了Miniconda,让我们看看Conda环境如何工作。
了解Conda环境 (Understanding Conda Environments)
When you start developing a project from scratch, it’s recommended that you use the latest versions of the libraries you need. However, when working with someone else’s project, such as when running an example from Kaggle or Github, you may need to install specific versions of packages or even another version of Python due to compatibility issues.
从头开始开发项目时,建议您使用所需库的最新版本。 但是,在处理其他人的项目时,例如从Kaggle或Github运行示例时,由于兼容性问题,您可能需要安装特定版本的软件包,甚至是另一版本的Python。
This problem may also occur when you try to run an application you’ve developed long ago, which uses a particular library version that does not work with your application anymore due to updates.
当您尝试运行很久以前开发的应用程序时,也可能会出现此问题,该应用程序使用的特定库版本由于更新而不再适用于您的应用程序。
Virtual environments are a solution to this kind of problem. By using them, it is possible to create multiple environments, each one with different versions of packages. A typical Python set up includes Virtualenv, a tool to create isolated Python virtual environments, widely used in the Python community.
虚拟环境是解决此类问题的一种方法。 通过使用它们,可以创建多个环境,每个环境具有不同版本的软件包。 典型的Python设置包括Virtualenv ,这是一种用于创建隔离的Python虚拟环境的工具,该工具在Python社区中广泛使用。
Conda includes its own environment manager and presents some advantages over Virtualenv, especially concerning numerical applications, such as the ability to manage non-Python dependencies and the ability to manage different versions of Python, which is not possible with Virtualenv. Besides that, Conda environments are entirely compatible with default Python packages that may be installed using pip.
Conda包括自己的环境管理器,并提供了一些优于Virtualenv的优势,尤其是在数字应用程序方面,例如,管理非Python依赖项的能力以及管理不同版本的Python的能力,这是Virtualenv所无法实现的。 除此之外,Conda环境与可以使用pip安装的默认Python软件包完全兼容。
Miniconda installation provides Conda and a root environment with a version of Python and some basic packages installed. Besides this root environment, it is possible to set up additional environments including different versions of Python and packages.
Miniconda安装为Conda和根环境提供了Python版本和一些基本软件包。 除此根环境外,还可以设置其他环境,包括不同版本的Python和软件包。
Using the Anaconda prompt, it is possible to check the available Conda environments by running conda env list:
使用Anaconda提示符,可以通过运行conda env list来检查可用的Conda环境:
 (base) C:UsersIEUser>conda env list
(base) C:UsersIEUser> conda env list
# conda environments:
# conda environments:
#
#
base                  *  C:UsersIEUserMiniconda3
base                  *  C:UsersIEUserMiniconda3
This base environment is the root environment, created by the Miniconda installer. It is possible to create another environment, named otherenv, by running conda create --name otherenv:
此基本环境是由Miniconda安装程序创建的根环境。 通过运行conda create --name otherenv可以创建另一个名为otherenv环境:
As notified after the environment creation process is finished, it is possible to activate the otherenv environment by running conda activate otherenv. You’ll notice the environment has changed by the indication between parentheses in the beginning of the prompt:
如环境创建过程完成后所通知,可以通过运行conda activate otherenv来激活otherenv环境。 您会注意到提示开头的括号之间的指示表明环境已发生变化:
 (base) C:UsersIEUser>conda activate otherenv

(base) C:UsersIEUser> conda activate otherenv

(otherenv) C:UsersIEUser>
(otherenv) C:UsersIEUser>
You can open the Python interpreter within this environment by running python:
您可以通过运行python在此环境中打开Python解释器:
The environment includes Python 3.7.0, the same version included in the root base environment. To exit the Python interpreter, just run quit():
该环境包括Python 3.7.0,与根基础环境中包含的相同版本。 要退出Python解释器,只需运行quit() :
 >>> quit()

>>> quit()

(otherenv) C:UsersIEUser>
(otherenv) C:UsersIEUser>
To deactivate the otherenv environment and go back to the root base environment, you should run deactivate:
要停用otherenv环境并返回到根基本环境,应运行deactivate :
As mentioned earlier, Conda allows you to easily create environments with different versions of Python, which is not straightforward with Virtualenv. To include a different Python version within an environment, you have to specify it by using python=<version> when running conda create. For example, to create an environment named py2 with Python 2.7, you have to run conda create --name py2 python=2.7:
如前所述,Conda允许您使用不同版本的Python轻松创建环境,这对于Virtualenv而言并不简单。 要在环境中包含其他Python版本,必须在运行conda create时使用python=<version>进行指定。 例如,要使用Python 2.7创建一个名为py2的环境,您必须运行conda create --name py2 python=2.7 :
 (base) C:UsersIEUser>conda create --name py2 python=2.7
(base) C:UsersIEUser> conda create --name py2 python=2.7
Solving environment: done

Solving environment: done

## Package Plan ##

## Package Plan ##

  environment location: C:UsersIEUserMiniconda3envspy2

  environment location: C:UsersIEUserMiniconda3envspy2

  added / updated specs:
  added / updated specs:
    - python=2.7


    - python=2.7


The following NEW packages will be INSTALLED:

The following NEW packages will be INSTALLED:

    certifi:        2018.8.24-py27_1
    certifi:        2018.8.24-py27_1
    pip:            10.0.1-py27_0
    pip:            10.0.1-py27_0
    python:         2.7.15-he216670_0
    python:         2.7.15-he216670_0
    setuptools:     40.2.0-py27_0
    setuptools:     40.2.0-py27_0
    vc:             9-h7299396_1
    vc:             9-h7299396_1
    vs2008_runtime: 9.00.30729.1-hfaea7d5_1
    vs2008_runtime: 9.00.30729.1-hfaea7d5_1
    wheel:          0.31.1-py27_0
    wheel:          0.31.1-py27_0
    wincertstore:   0.2-py27hf04cefb_0

    wincertstore:   0.2-py27hf04cefb_0

Proceed ([y]/n)? y

Proceed ([y]/n)? y

Preparing transaction: done
Preparing transaction: done
Verifying transaction: done
Verifying transaction: done
Executing transaction: done
Executing transaction: done
#
#
# To activate this environment, use
# To activate this environment, use
#
#
#     $ conda activate py2
#     $ conda activate py2
#
#
# To deactivate an active environment, use
# To deactivate an active environment, use
#
#
#     $ conda deactivate


#     $ conda deactivate


(base) C:UsersIEUser>
(base) C:UsersIEUser>
As shown by the output of conda create, this time some new packages were installed, since the new environment uses Python 2. You can check the new environment indeed uses Python 2 by activating it and running the Python interpreter:
如conda create的输出所示,由于新环境使用Python 2,因此这次安装了一些新软件包。您可以通过激活它并运行Python解释器来检查新环境是否确实在使用Python 2:
Now, if you run conda env list, you should see the two environments that were created, besides the root base environment:
现在,如果您运行conda env list ,则除了根基础环境之外,还应该看到创建的两个环境:
 (py2) C:UsersIEUser>conda env list
(py2) C:UsersIEUser> conda env list
# conda environments:
# conda environments:
#
#
base                     C:UsersIEUserMiniconda3
base                     C:UsersIEUserMiniconda3
otherenv                 C:UsersIEUserMiniconda3envsotherenv
otherenv                 C:UsersIEUserMiniconda3envsotherenv
py2               *  C:UsersIEUserMiniconda3envspy2


py2               *  C:UsersIEUserMiniconda3envspy2


(py2) C:UsersIEUser>
(py2) C:UsersIEUser>
In the list, the asterisk indicates the activated environment. It is possible to remove an environment by running conda remove --name <environment name> --all. Since it is not possible to remove an activated environment, you should first deactivate the py2 environment, to remove it:
在列表中,星号表示激活的环境。 可以通过运行conda remove --name <environment name> --all来删除环境。 由于无法删除已激活的环境,因此您首先应停用py2环境以将其删除:
Now that you’ve covered the basics of managing environments with Conda, let’s see how to manage packages within the environments.
既然您已经了解了使用Conda管理环境的基础知识,那么让我们看看如何在环境中管理软件包。
了解Conda的基本软件包管理 (Understanding Basic Package Management With Conda)
Within each environment, packages of software can be installed using the Conda package manager. The root base environment created by the Miniconda installer includes some packages by default that are not part of Python standard library.
在每种环境中,都可以使用Conda软件包管理器来安装软件包。 Miniconda安装程序创建的根基础环境默认包含一些不属于Python标准库的软件包。
The default installation includes the minimum packages necessary to use Conda. To check the list of installed packages in an environment, you just have to make sure it is activated and run conda list. In the root environment, the following packages are installed by default:
默认安装包括使用Conda所需的最少软件包。 要检查环境中已安装软件包的列表,只需确保已激活它并运行conda list 。 在根环境中,默认情况下安装以下软件包:
 (base) C:UsersIEUser>conda list
(base) C:UsersIEUser> conda list
# packages in environment at C:UsersIEUserMiniconda3:
# packages in environment at C:UsersIEUserMiniconda3:
#
#
# Name                    Version                   Build  Channel
# Name                    Version                   Build  Channel
asn1crypto                0.24.0                   py37_0
asn1crypto                0.24.0                   py37_0
ca-certificates           2018.03.07                    0
ca-certificates           2018.03.07                    0
certifi                   2018.8.24                py37_1
certifi                   2018.8.24                py37_1
cffi                      1.11.5           py37h74b6da3_1
cffi                      1.11.5           py37h74b6da3_1
chardet                   3.0.4                    py37_1
chardet                   3.0.4                    py37_1
conda                     4.5.11                   py37_0
conda                     4.5.11                   py37_0
conda-env                 2.6.0                         1
conda-env                 2.6.0                         1
console_shortcut          0.1.1                         3
console_shortcut          0.1.1                         3
cryptography              2.3.1            py37h74b6da3_0
cryptography              2.3.1            py37h74b6da3_0
idna                      2.7                      py37_0
idna                      2.7                      py37_0
menuinst                  1.4.14           py37hfa6e2cd_0
menuinst                  1.4.14           py37hfa6e2cd_0
openssl                   1.0.2p               hfa6e2cd_0
openssl                   1.0.2p               hfa6e2cd_0
pip                       10.0.1                   py37_0
pip                       10.0.1                   py37_0
pycosat                   0.6.3            py37hfa6e2cd_0
pycosat                   0.6.3            py37hfa6e2cd_0
pycparser                 2.18                     py37_1
pycparser                 2.18                     py37_1
pyopenssl                 18.0.0                   py37_0
pyopenssl                 18.0.0                   py37_0
pysocks                   1.6.8                    py37_0
pysocks                   1.6.8                    py37_0
python                    3.7.0                hea74fb7_0
python                    3.7.0                hea74fb7_0
pywin32                   223              py37hfa6e2cd_1
pywin32                   223              py37hfa6e2cd_1
requests                  2.19.1                   py37_0
requests                  2.19.1                   py37_0
ruamel_yaml               0.15.46          py37hfa6e2cd_0
ruamel_yaml               0.15.46          py37hfa6e2cd_0
setuptools                40.2.0                   py37_0
setuptools                40.2.0                   py37_0
six                       1.11.0                   py37_1
six                       1.11.0                   py37_1
urllib3                   1.23                     py37_0
urllib3                   1.23                     py37_0
vc                        14                   h0510ff6_3
vc                        14                   h0510ff6_3
vs2015_runtime            14.0.25123                    3
vs2015_runtime            14.0.25123                    3
wheel                     0.31.1                   py37_0
wheel                     0.31.1                   py37_0
win_inet_pton             1.0.1                    py37_1
win_inet_pton             1.0.1                    py37_1
wincertstore              0.2                      py37_0
wincertstore              0.2                      py37_0
yaml                      0.1.7                hc54c509_2

yaml                      0.1.7                hc54c509_2

(base) C:UsersIEUser>
(base) C:UsersIEUser>
To manage the packages, you should also use Conda. Next, let’s see how to search, install, update, and remove packages using Conda.
要管理软件包,您还应该使用Conda。 接下来,让我们看看如何使用Conda搜索,安装,更新和删除软件包。
搜索和安装软件包 (Searching and Installing Packages)
Packages are installed from repositories called channels by Conda, and some default channels are configured by the installer. To search for a specific package, you can run conda search <package name>. For example, this is how you search for the keras package (a machine learning library):
软件包由Conda从称为通道的存储库中安装,某些默认通道由安装程序配置。 要搜索特定的软件包,可以运行conda search <package name> 。 例如,这是您搜索keras包(机器学习库)的方式:
According to the previous output, there are different versions of the package and different builds for each version, such as for Python 3.5 and 3.6.
根据先前的输出,该软件包有不同的版本,并且每个版本都有不同的内部版本,例如Python 3.5和3.6。
The previous search shows only exact matches for packages named keras. To perform a broader search, including all packages containing keras in their names, you should use the wildcard *. For example, when you run conda search *keras*, you get the following:
先前的搜索仅显示名为keras软件包的完全匹配。 要进行更广泛的搜索,包括名称中包含keras所有软件包,应使用通配符* 。 例如,当您运行conda search *keras* ,将得到以下信息:
 (base) C:UsersIEUser>conda search *keras*
(base) C:UsersIEUser> conda search *keras*
Loading channels: done
Loading channels: done
# Name                  Version           Build  Channel
# Name                  Version           Build  Channel
keras                     2.0.8  py35h15001cb_0  pkgs/main
keras                     2.0.8  py35h15001cb_0  pkgs/main
keras                     2.0.8  py36h65e7a35_0  pkgs/main
keras                     2.0.8  py36h65e7a35_0  pkgs/main
keras                     2.1.2          py35_0  pkgs/main
keras                     2.1.2          py35_0  pkgs/main
keras                     2.1.2          py36_0  pkgs/main
keras                     2.1.2          py36_0  pkgs/main
keras                     2.1.3          py35_0  pkgs/main
keras                     2.1.3          py35_0  pkgs/main
keras                     2.1.3          py36_0  pkgs/main

keras                     2.1.3          py36_0  pkgs/main

... (more)

... (more)

keras-applications           1.0.2          py35_0  pkgs/main
keras-applications           1.0.2          py35_0  pkgs/main
keras-applications           1.0.2          py36_0  pkgs/main
keras-applications           1.0.2          py36_0  pkgs/main
keras-applications           1.0.4          py35_0  pkgs/main

keras-applications           1.0.4          py35_0  pkgs/main

... (more)

... (more)

keras-base                2.2.0          py35_0  pkgs/main
keras-base                2.2.0          py35_0  pkgs/main
keras-base                2.2.0          py36_0  pkgs/main

keras-base                2.2.0          py36_0  pkgs/main

... (more)
... (more)
As the previous output shows, there are some other keras related packages in the default channels.
如先前的输出所示,默认通道中还有一些其他与keras相关的软件包。
To install a package, you should run conda install <package name>. By default, the newest version of the package will be installed in the active environment. So, let’s install the package keras in the environment otherenv that you’ve already created:
要安装软件包,您应该运行conda install <package name> 。 默认情况下,该软件包的最新版本将安装在活动环境中。 因此,让我们在已经创建的otherenv环境中安装keras软件包:
Conda manages the necessary dependencies for a package when it is installed. Since the package keras has a lot of dependencies, when you install it, Conda manages to install this big list of packages.
安装后,Conda会管理软件包的必要依赖关系。 由于软件包keras具有很多依赖性,因此在安装时,Conda设法安装了这一大软件包列表。
It’s worth noticing that, since the keras package’s newest build uses Python 3.6 and the otherenv environment was created using Python 3.7, the package python version 3.6.6 was included as a dependency. After confirming the installation, you can check that the Python version for the otherenv environment is downgraded to the 3.6.6 version.
值得注意的是,由于keras软件包的最新版本使用Python 3.6,并且otherenv环境是使用Python 3.7创建的,因此软件包python版本3.6.6作为依赖项包含在内。 确认安装后,您可以检查otherenv环境的Python版本是否已降级为3.6.6版本。
Sometimes, you don’t want packages to be downgraded, and it would be better to just create a new environment with the necessary version of Python. To check the list of new packages, updates, and downgrades necessary for a package without installing it, you should use the parameter --dry-run. For example, to check the packages that will be changed by the installation of the package keras, you should run the following:
有时,您不希望软件包降级,最好使用必要的Python版本创建一个新环境。 要在不安装软件包的情况下检查其必需的新软件包,更新和降级列表,应使用--dry-run参数。 例如,要检查软件包keras的安装将更改的软件包,应运行以下命令:
 (otherenv) C:UsersIEUser>conda install keras --dry-run
(otherenv) C:UsersIEUser> conda install keras --dry-run
However, if necessary, it is possible to change the default Python of a Conda environment by installing a specific version of the package python. To demonstrate that, let’s create a new environment called envpython:
但是,如有必要,可以通过安装特定版本的python软件包来更改Conda环境的默认Python。 为了证明这一点,让我们创建一个称为envpython的新环境:
As you saw before, since the root base environment uses Python 3.7, envpython is created including this same version of Python:
如您所见,由于根基础环境使用Python 3.7, envpython创建了envpython ,其中包括相同版本的Python:
 (base) C:UsersIEUser>conda activate envpython

(base) C:UsersIEUser> conda activate envpython

(envpython) C:UsersIEUser>python
(envpython) C:UsersIEUser> python
Python 3.7.0 (default, Jun 28 2018, 08:04:48) [MSC v.1912 64 bit (AMD64)] :: Anaconda, Inc. on win32
Python 3.7.0 (default, Jun 28 2018, 08:04:48) [MSC v.1912 64 bit (AMD64)] :: Anaconda, Inc. on win32
Type "help", "copyright", "credits" or "license" for more information.
Type "help", "copyright", "credits" or "license" for more information.
>>> quit()

>>> quit()

(envpython) C:UsersIEUser>
(envpython) C:UsersIEUser>
To install a specific version of a package, you can run conda install <package name>=<version>. For example, this is how you install Python 3.6 in the envpython environment:
要安装特定版本的软件包,可以运行conda install <package name>=<version> 。 例如,这是在envpython环境中安装Python 3.6的envpython :
In case you need to install more than one package in an environment, it is possible to run conda install only once, passing the names of the packages. To illustrate that, let’s install numpy, scipy, and matplotlib, basic packages for numerical computation in the root base environment:
如果您需要在一个环境中安装多个软件包,则只需传递一次软件包名称即可运行一次conda install 。 为了说明这一点,让我们在根基础环境中安装numpy , scipy和matplotlib用于数值计算的基本软件包:
 (envpython) C:UsersIEUser>deactivate

(envpython) C:UsersIEUser> deactivate

(base) C:UsersIEUser>conda install numpy scipy matplotlib
(base) C:UsersIEUser> conda install numpy scipy matplotlib
Solving environment: done

Solving environment: done

## Package Plan ##

## Package Plan ##

  environment location: C:UsersIEUserMiniconda3

  environment location: C:UsersIEUserMiniconda3

  added / updated specs:
  added / updated specs:
    - matplotlib
    - matplotlib
    - numpy
    - numpy
    - scipy


    - scipy


The following packages will be downloaded:

The following packages will be downloaded:

    package                    |            build
    package                    |            build
    ---------------------------|-----------------
    ---------------------------|-----------------
    libpng-1.6.34              |       h79bbb47_0         1.3 MB
    libpng-1.6.34              |       h79bbb47_0         1.3 MB
    mkl_random-1.0.1           |   py37h77b88f5_1         267 KB
    mkl_random-1.0.1           |   py37h77b88f5_1         267 KB
    intel-openmp-2019.0        |              117         1.7 MB
    intel-openmp-2019.0        |              117         1.7 MB
    qt-5.9.6                   |   vc14h62aca36_0        92.5 MB
    qt-5.9.6                   |   vc14h62aca36_0        92.5 MB
    matplotlib-2.2.3           |   py37hd159220_0         6.5 MB
    matplotlib-2.2.3           |   py37hd159220_0         6.5 MB
    tornado-5.1                |   py37hfa6e2cd_0         668 KB
    tornado-5.1                |   py37hfa6e2cd_0         668 KB
    pyqt-5.9.2                 |   py37ha878b3d_0         4.6 MB
    pyqt-5.9.2                 |   py37ha878b3d_0         4.6 MB
    pytz-2018.5                |           py37_0         232 KB
    pytz-2018.5                |           py37_0         232 KB
    scipy-1.1.0                |   py37h4f6bf74_1        13.5 MB
    scipy-1.1.0                |   py37h4f6bf74_1        13.5 MB
    jpeg-9b                    |       hb83a4c4_2         313 KB
    jpeg-9b                    |       hb83a4c4_2         313 KB
    python-dateutil-2.7.3      |           py37_0         260 KB
    python-dateutil-2.7.3      |           py37_0         260 KB
    numpy-base-1.15.1          |   py37h8128ebf_0         3.9 MB
    numpy-base-1.15.1          |   py37h8128ebf_0         3.9 MB
    numpy-1.15.1               |   py37ha559c80_0          37 KB
    numpy-1.15.1               |   py37ha559c80_0          37 KB
    mkl_fft-1.0.4              |   py37h1e22a9b_1         120 KB
    mkl_fft-1.0.4              |   py37h1e22a9b_1         120 KB
    kiwisolver-1.0.1           |   py37h6538335_0          61 KB
    kiwisolver-1.0.1           |   py37h6538335_0          61 KB
    pyparsing-2.2.0            |           py37_1          96 KB
    pyparsing-2.2.0            |           py37_1          96 KB
    cycler-0.10.0              |           py37_0          13 KB
    cycler-0.10.0              |           py37_0          13 KB
    freetype-2.9.1             |       ha9979f8_1         470 KB
    freetype-2.9.1             |       ha9979f8_1         470 KB
    icu-58.2                   |       ha66f8fd_1        21.9 MB
    icu-58.2                   |       ha66f8fd_1        21.9 MB
    sqlite-3.24.0              |       h7602738_0         899 KB
    sqlite-3.24.0              |       h7602738_0         899 KB
    sip-4.19.12                |   py37h6538335_0         283 KB
    sip-4.19.12                |   py37h6538335_0         283 KB
    ------------------------------------------------------------
    ------------------------------------------------------------
                                           Total:       149.5 MB

                                           Total:       149.5 MB

The following NEW packages will be INSTALLED:

The following NEW packages will be INSTALLED:

    blas:            1.0-mkl
    blas:            1.0-mkl
    cycler:          0.10.0-py37_0
    cycler:          0.10.0-py37_0
    freetype:        2.9.1-ha9979f8_1
    freetype:        2.9.1-ha9979f8_1
    icc_rt:          2017.0.4-h97af966_0
    icc_rt:          2017.0.4-h97af966_0
    icu:             58.2-ha66f8fd_1
    icu:             58.2-ha66f8fd_1
    intel-openmp:    2019.0-117
    intel-openmp:    2019.0-117
    jpeg:            9b-hb83a4c4_2
    jpeg:            9b-hb83a4c4_2
    kiwisolver:      1.0.1-py37h6538335_0
    kiwisolver:      1.0.1-py37h6538335_0
    libpng:          1.6.34-h79bbb47_0
    libpng:          1.6.34-h79bbb47_0
    matplotlib:      2.2.3-py37hd159220_0
    matplotlib:      2.2.3-py37hd159220_0
    mkl:             2019.0-117
    mkl:             2019.0-117
    mkl_fft:         1.0.4-py37h1e22a9b_1
    mkl_fft:         1.0.4-py37h1e22a9b_1
    mkl_random:      1.0.1-py37h77b88f5_1
    mkl_random:      1.0.1-py37h77b88f5_1
    numpy:           1.15.1-py37ha559c80_0
    numpy:           1.15.1-py37ha559c80_0
    numpy-base:      1.15.1-py37h8128ebf_0
    numpy-base:      1.15.1-py37h8128ebf_0
    pyparsing:       2.2.0-py37_1
    pyparsing:       2.2.0-py37_1
    pyqt:            5.9.2-py37ha878b3d_0
    pyqt:            5.9.2-py37ha878b3d_0
    python-dateutil: 2.7.3-py37_0
    python-dateutil: 2.7.3-py37_0
    pytz:            2018.5-py37_0
    pytz:            2018.5-py37_0
    qt:              5.9.6-vc14h62aca36_0
    qt:              5.9.6-vc14h62aca36_0
    scipy:           1.1.0-py37h4f6bf74_1
    scipy:           1.1.0-py37h4f6bf74_1
    sip:             4.19.12-py37h6538335_0
    sip:             4.19.12-py37h6538335_0
    sqlite:          3.24.0-h7602738_0
    sqlite:          3.24.0-h7602738_0
    tornado:         5.1-py37hfa6e2cd_0
    tornado:         5.1-py37hfa6e2cd_0
    zlib:            1.2.11-h8395fce_2

    zlib:            1.2.11-h8395fce_2

Proceed ([y]/n)?
Proceed ([y]/n)?
Now that you’ve covered how to search and install packages, let’s see how to update and remove them using Conda.
既然您已经了解了如何搜索和安装软件包,让我们看看如何使用Conda更新和删除它们。
更新和删除软件包 (Updating and Removing Packages)
Sometimes, when new packages are released, you need to update them. To do so, you may run conda update <package name>. In case you wish to update all the packages within one environment, you should activate the environment and run conda update --all.
有时,当发布新软件包时,您需要对其进行更新。 为此,您可以运行conda update <package name> 。 如果您希望在一个环境中更新所有软件包,则应激活该环境并运行conda update --all 。
To remove a package, you can run conda remove <package name>. For example, this is how you remove numpy from the root base environment:
要删除软件包,可以运行conda remove <package name> 。 例如,这是从根基本环境中删除numpy的方法:
It’s worth noting that when you remove a package, all packages that depend on it are also removed.
值得注意的是,当您删除软件包时,所有依赖于该软件包的软件包也会被删除。
使用频道 (Using Channels)
Sometimes, you won’t find the packages you want to install on the default channels configured by the installer. For example, this is how you install pytorch, another machine learning package:
有时,在安装程序配置的默认频道上找不到要安装的软件包。 例如,这是您安装另一个机器学习包pytorch :
 (base) C:UsersIEUser>conda search pytorch
(base) C:UsersIEUser> conda search pytorch
Loading channels: done

Loading channels: done

PackagesNotFoundError: The following packages are not available from current channels:

PackagesNotFoundError: The following packages are not available from current channels:

  - pytorch

  - pytorch

Current channels:

Current channels:

  - https://repo.anaconda.com/pkgs/main/win-64
  - https://repo.anaconda.com/pkgs/main/win-64
  - https://repo.anaconda.com/pkgs/main/noarch
  - https://repo.anaconda.com/pkgs/main/noarch
  - https://repo.anaconda.com/pkgs/free/win-64
  - https://repo.anaconda.com/pkgs/free/win-64
  - https://repo.anaconda.com/pkgs/free/noarch
  - https://repo.anaconda.com/pkgs/free/noarch
  - https://repo.anaconda.com/pkgs/r/win-64
  - https://repo.anaconda.com/pkgs/r/win-64
  - https://repo.anaconda.com/pkgs/r/noarch
  - https://repo.anaconda.com/pkgs/r/noarch
  - https://repo.anaconda.com/pkgs/pro/win-64
  - https://repo.anaconda.com/pkgs/pro/win-64
  - https://repo.anaconda.com/pkgs/pro/noarch
  - https://repo.anaconda.com/pkgs/pro/noarch
  - https://repo.anaconda.com/pkgs/msys2/win-64
  - https://repo.anaconda.com/pkgs/msys2/win-64
  - https://repo.anaconda.com/pkgs/msys2/noarch

  - https://repo.anaconda.com/pkgs/msys2/noarch

To search for alternate channels that may provide the conda package you're
To search for alternate channels that may provide the conda package you're
looking for, navigate to

looking for, navigate to

    https://anaconda.org

    https://anaconda.org

and use the search bar at the top of the page.
and use the search bar at the top of the page.
In this case, you may search for the package here. If you search for pytorch, you’ll get the following results:
在这种情况下,您可以在此处搜索软件包。 如果搜索pytorch ,将得到以下结果:

The channel pytorch has a package named pytorch with version 0.4.1. To install a package from a specific channel you can use the -c <channel> parameter with conda install:
通道pytorch有一个名为pytorch的软件包,版本为0.4.1 。 要从特定渠道安装软件包,可以在conda install使用-c <channel>参数:
Alternatively, you can add the channel, so that Conda uses it to search for packages to install. To list the current channels used, you can run conda config --get channels:
或者,您可以添加频道,以便Conda使用它搜索要安装的软件包。 要列出当前使用的通道,可以运行conda config --get channels :
 (base) C:UsersIEUser>conda config --get channels
(base) C:UsersIEUser> conda config --get channels
--add channels 'defaults'   # lowest priority

--add channels 'defaults'   # lowest priority

(base) C:UsersIEUser>
(base) C:UsersIEUser>
The Miniconda installer includes only the defaults channels. When more channels are included, it is necessary to set the priority of them to determine from which channel a package will be installed in case it is available from more than one channel.
Miniconda安装程序仅包括defaults通道。 如果包含更多通道,则有必要设置它们的优先级,以确定从一个以上的通道安装软件包的情况(如果有多个通道可用)。
To add a channel with the lowest priority to the list, you should run conda config --append channels <channel name>. To add a channel with the highest priority to the list, you should run conda config --prepend channels <channel name>. It is recommended to add new channels with low priority, to keep using the default channels prior to the others. So, alternatively, you can install pytorch, adding the pytorch channel and running conda install pytorch:
要将最低优先级的频道添加到列表中,应运行conda config --append channels <channel name> 。 要将具有最高优先级的频道添加到列表中,应运行conda config --prepend channels <channel name> 。 建议添加低优先级的新通道,以继续使用默认通道。 因此,或者,您可以安装pytorch ,添加pytorch通道并运行conda install pytorch :
Not all packages are available on Conda channels. However, this is not a problem, since you also can use pip to install packages inside Conda environments. Let’s see how to do this.
并非所有软件包都在Conda频道上提供。 但是,这不是问题,因为您还可以使用pip在Conda环境中安装软件包。 让我们看看如何做到这一点。
在Conda环境中使用pip (Using pip Inside Conda Environments)
Sometimes, you may need pure Python packages and, generally, these packages are not available on Conda’s channels. For example, if you search for unipath, a package to deal with file paths in Python, Conda won’t be able to find it.
有时,您可能需要纯Python软件包,通常,这些软件包在Conda的渠道上不可用。 例如,如果您搜索unipath ,这是一个处理Python中文件路径的软件包,那么Conda将无法找到它。
You could search for the package here and use another channel to install it. However, since unipath is a pure Python package, you could use pip to install it, as you would do on a regular Python setup. The only difference is that you should use pip installed by the Conda package pip. To illustrate that, let’s create a new environment called newproject. As mentioned before, you can do this running conda create:
您可以在此处搜索该软件包,然后使用另一个渠道进行安装。 但是,由于unipath是一个纯Python软件包,因此可以像常规Python安装一样使用pip来安装它。 唯一的区别是,你应该使用pip由康达软件包安装pip 。 为了说明这一点,让我们创建一个称为newproject的新环境。 如前所述,您可以运行conda create来执行此操作:
 conda create --name newproject
conda create --name newproject
Next, to have pip installed, you should activate the environment and install the Conda package pip:
接下来,要安装pip ,您应该激活环境并安装Conda软件包pip :
Finally, use pip to install the package unipath:
最后,使用pip安装软件包unipath :
 (newproject) C:UsersIEUser>pip install unipath
(newproject) C:UsersIEUser> pip install unipath
Collecting unipath
Collecting unipath
Installing collected packages: unipath
Installing collected packages: unipath
Successfully installed unipath-1.1
Successfully installed unipath-1.1
You are using pip version 10.0.1, however version 18.0 is available.
You are using pip version 10.0.1, however version 18.0 is available.
You should consider upgrading via the 'python -m pip install --upgrade pip' command.

You should consider upgrading via the 'python -m pip install --upgrade pip' command.

(newproject) C:UsersIEUser>
(newproject) C:UsersIEUser>
After installation, you can list the installed packages with conda list and check that Unipath was installed using pip:
安装后,您可以使用conda list列出已安装的软件包,并使用pip检查Unipath是否已安装:
It’s also possible to install packages from a version control system (VCS) using pip. For example, let’s install supervisor, version 4.0.0dev0, available in a Git repository. As Git is not installed in the newproject environment, you should install it first:
也可以使用pip从版本控制系统(VCS)安装软件包。 例如,让我们安装Git存储库中可用的supervisor (版本4.0.0dev0)。 由于新newproject环境中未安装Git,因此应首先安装它:
 (newproject) C:UsersIEUser> conda install git
(newproject) C:UsersIEUser> conda install git
Then, install supervisor, using pip to install it from the Git repository:
然后,使用pip安装supervisor ,以从Git存储库安装它:
After the installation finishes, you can see that supervisor is listed in the installed packages list:
安装完成后,你可以看到, supervisor在已安装的软件包列表中列出:
 (newproject) C:UsersIEUser>conda list
(newproject) C:UsersIEUser> conda list
#
#
# Name                    Version                   Build  Channel
# Name                    Version                   Build  Channel
certifi                   2018.8.24                py37_1
certifi                   2018.8.24                py37_1
git                       2.18.0               h6bb4b03_0
git                       2.18.0               h6bb4b03_0
meld3                     1.0.2                     <pip>
meld3                     1.0.2                     <pip>
pip                       10.0.1                   py37_0
pip                       10.0.1                   py37_0
python                    3.7.0                hea74fb7_0
python                    3.7.0                hea74fb7_0
setuptools                40.2.0                   py37_0
setuptools                40.2.0                   py37_0
supervisor                4.0.0.dev0                <pip>

supervisor                4.0.0.dev0                <pip>

... (more)
... (more)
Now that you know the basics of using environments and managing packages with Conda, let’s create a simple machine learning example to solve a classic problem using a neural network.
既然您已经知道使用环境和使用Conda管理软件包的基础知识,那么让我们创建一个简单的机器学习示例,以使用神经网络解决经典问题。
一个简单的机器学习示例 (A Simple Machine Learning Example)
In this section, you’ll set up the environment using Conda and train a neural network to function like an XOR gate.
在本部分中,您将使用Conda设置环境并训练神经网络,使其像XOR门一样起作用。
An XOR gate implements the digital logic exclusive OR operation, which is widely used in digital systems. It takes two digital inputs, that can be equal to 0, representing a digital false value or 1, representing a digital true value and outputs 1 (true) if the inputs are different or 0 (false), if the inputs are equal. The following table (referred as a truth table in the digital systems terminology) summarizes the XOR gate operation:
XOR门执行数字逻辑异或运算 ,该运算在数字系统中被广泛使用。 它需要两个数字输入,它们可以等于0 (代表数字假值)或1 (代表数字真值),如果输入不同,则输出1 ( 真 ),如果输入相等,则输出0 ( 假 )。 下表(在数字系统术语中称为真值表 )总结了XOR门操作:
| Input A | 输入A | Input B | 输入B | Output: A XOR B | 输出:A XOR B |
|---|---|---|---|---|---|
| 0 | 0 | 0 | 0 | 0 | 0 |
| 0 | 0 | 1 | 1个 | 1 | 1个 |
| 1 | 1个 | 0 | 0 | 1 | 1个 |
| 1 | 1个 | 1 | 1个 | 0 | 0 |
The XOR operation can be interpreted as a classification problem, given that it takes two inputs and should classify them in one of two classes represented by 0 or 1, depending on whether the inputs are equal to each other or different from one another.
异或运算可以解释为分类问题,因为它接受两个输入,并应根据输入是否相等或彼此不同,将它们分类为0或1表示的两个类别之一。
It is commonly used as a first example to train a neural network because it is simple and, at the same time, demands a nonlinear classifier, such as a neural network. The neural network will use only the data from the truth table, without knowledge about where it came from, to “learn” the operation performed by the XOR gate.
由于它简单且同时需要非线性分类器(例如神经网络),因此通常用作训练神经网络的第一个示例。 神经网络将仅使用真值表中的数据,而无需知道其来源,以“学习” XOR门执行的操作。
To implement the neural network, let’s create a new Conda environment, named nnxor:
为了实现神经网络,让我们创建一个新的Conda环境,名为nnxor :
Then, let’s activate it and install the package keras:
然后,让我们激活它并安装软件包keras :
 (base) C:UsersIEUser>conda activate nnxor

(base) C:UsersIEUser> conda activate nnxor

(nnxor) C:UsersIEUser>conda install keras
(nnxor) C:UsersIEUser> conda install keras
keras is a high-level API that makes easy-to-implement neural networks on top of well-known machine learning libraries, such as TensorFlow.
keras是一种高级API,可在TensorFlow等著名的机器学习库的基础上使神经网络易于实现。
You’ll train the following neural network to act as an XOR gate:
您将训练以下神经网络充当XOR门:
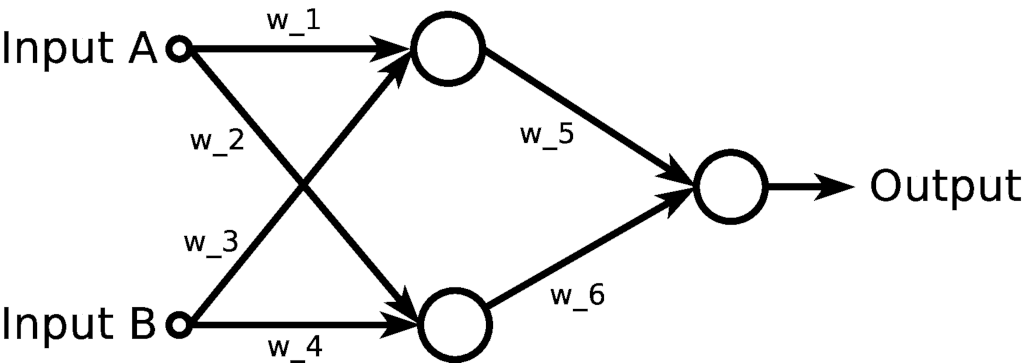
The network takes two inputs, A and B, and feeds them to two neurons, represented by the big circles. Then, it takes the outputs of these two neurons and feeds them to an output neuron, which should provide the classification according to the XOR truth table.
该网络接受两个输入A和B,并将它们输入到以大圆圈表示的两个神经元。 然后,它获取这两个神经元的输出并将它们馈送到输出神经元,该输出神经元应根据XOR真值表提供分类。
In brief, the training process consists of adjusting the values of the weights w_1 until w_6, so that the output is consistent with the XOR truth table. To do so, input examples will be fed, one at a time, the output will be calculated according to current values of the weights and, by comparing the output with the desired output, given by the truth table, the values of the weights will be adjusted in a step-by-step process.
简而言之,训练过程包括调整权重w_1的值直到w_6,以使输出与XOR真值表一致。 为此,将输入一个输入示例,一次输入一个,将根据权重的当前值来计算输出,并且通过将输出与真值表给出的所需输出进行比较,权重的值将逐步调整。
To organize the project, you’ll create a folder named nnxor within Windows user’s folder (C:UsersIEUser) with a file named nnxor.py to store the Python program to implement the neural network:
为了组织项目,您将在Windows用户文件夹( C:UsersIEUser )中创建一个名为nnxor的文件夹, C:UsersIEUser包含一个名为nnxor.py的文件,以存储用于实现神经网络的Python程序:

In the nnxor.py file, you’ll define the network, perform the training, and test it:
在nnxor.py文件中,您将定义网络,进行训练并对其进行测试:
First, you import numpy, initialize a random seed, so that you can reproduce the same results when running the program again, and import the keras objects you’ll use to build the neural network.
首先,导入numpy ,初始化一个随机种子,以便在再次运行该程序时可以重现相同的结果,并导入将用于构建神经网络的keras对象。
Then, you define an X array, containing the 4 possible A-B sets of inputs for the XOR operation and a y array, containing the outputs for each of the sets of inputs defined in X.
然后,您定义一个X数组,其中包含XOR操作的4种可能的AB输入集,以及一个y数组,其中包含X定义的每组输入的输出。
The next five lines define the neural network. The Sequential() model is one of the models provided by keras to define a neural network, in which the layers of the network are defined in a sequential way. Then you define the first layer of neurons, composed of two neurons, fed by two inputs, defining their activation function as a sigmoid function in the sequence. Finally, you define the output layer composed of one neuron with the same activation function.
接下来的五行定义了神经网络。 Sequential()模型是keras提供的用于定义神经网络的模型之一,其中网络的层是以顺序的方式定义的。 然后,定义神经元的第一层,该神经元由两个神经元组成,由两个输入提供反馈,将其激活功能定义为序列中的S型函数 。 最后,定义由具有相同激活功能的一个神经元组成的输出层。
The following two lines define the details about the training of the network. To adjust the weights of the network, you’ll use the Stochastic Gradient Descent (SGD) with the learning rate equal to 0.1, and you’ll use the mean squared error as a loss function to be minimized.
以下两行定义了有关网络训练的详细信息。 要调整网络的权重,您将使用学习率等于0.1的随机梯度下降 (SGD),并将均方误差用作将损失最小化的损失函数。
Finally, you perform the training by running the fit() method, using X and y as training examples and updating the weights after every training example is fed into the network (batch_size=1). The number of epochs represents the number of times the whole training set will be used to train the neural network.
最后,您可以通过运行fit()方法(使用X和y作为训练示例)并在将每个训练示例馈入网络( batch_size=1 )之后更新权重来执行训练。 epochs数表示将整个训练集用于训练神经网络的次数。
In this case, you’re repeating the training 5000 times using a training set containing 4 input-output examples. By default, each time the training set is used, the training examples are shuffled.
在这种情况下,您将使用包含4个输入输出示例的训练集来重复训练5000次。 默认情况下,每次使用训练集时,都会对训练示例进行混洗。
On the last line, after the training process has finished, you print the predicted values for the 4 possible input examples.
在最后一行中,训练过程完成后,您将打印4个可能的输入示例的预测值。
By running this script, you’ll see the evolution of the training process and the performance improvement as new training examples are fed into the network:
通过运行此脚本,您将看到培训过程的演变以及新培训示例输入网络后的性能改进:
 (nnxor) C:UsersIEUser>(nnxor) C:UsersIEUser> cd nnxor

cd nnxor

(nnxor) C:UsersIEUsernnxor>python nnxor.py
(nnxor) C:UsersIEUsernnxor> python nnxor.py
Using TensorFlow backend.
Using TensorFlow backend.
Epoch 1/5000
Epoch 1/5000
2018-09-16 09:49:05.987096: I tensorflow/core/platform/cpu_feature_guard.cc:141] Your CPU supports instructions that this TensorFlow binary was not compiled to use: AVX AVX2
2018-09-16 09:49:05.987096: I tensorflow/core/platform/cpu_feature_guard.cc:141] Your CPU supports instructions that this TensorFlow binary was not compiled to use: AVX AVX2
2018-09-16 09:49:05.993128: I tensorflow/core/common_runtime/process_util.cc:69] Creating new thread pool with default inter op setting: 2. Tune using inter_op_parallelism_threads for best performance.
2018-09-16 09:49:05.993128: I tensorflow/core/common_runtime/process_util.cc:69] Creating new thread pool with default inter op setting: 2. Tune using inter_op_parallelism_threads for best performance.
4/4 [==============================] - 0s 39ms/step - loss: 0.2565
4/4 [==============================] - 0s 39ms/step - loss: 0.2565
Epoch 2/5000
Epoch 2/5000
4/4 [==============================] - 0s 0us/step - loss: 0.2566
4/4 [==============================] - 0s 0us/step - loss: 0.2566
Epoch 3/5000
Epoch 3/5000
4/4 [==============================] - 0s 0us/step - loss: 0.2566
4/4 [==============================] - 0s 0us/step - loss: 0.2566
Epoch 4/5000
Epoch 4/5000
4/4 [==============================] - 0s 0us/step - loss: 0.2566
4/4 [==============================] - 0s 0us/step - loss: 0.2566
Epoch 5/5000
Epoch 5/5000
4/4 [==============================] - 0s 0us/step - loss: 0.2566
4/4 [==============================] - 0s 0us/step - loss: 0.2566
Epoch 6/5000
Epoch 6/5000
4/4 [==============================] - 0s 0us/step - loss: 0.2566
4/4 [==============================] - 0s 0us/step - loss: 0.2566
After the training finishes, you can check the predictions the network gives for the possible input values:
训练结束后,您可以检查网络给出的可能输入值的预测:
As you defined X = np.array([[0, 0], [0, 1], [1, 0], [1, 1]]), the expected output values are 0, 1, 1, and 0, which is consistent with the predicted outputs of the network, given you should round them to obtain binary values.
如你定义X = np.array([[0, 0], [0, 1], [1, 0], [1, 1]])预期的输出值是0 , 1 , 1 ,和0 ,如果您应该对它们进行四舍五入以获得二进制值,则这与网络的预测输出是一致的。
从这往哪儿走 (Where To Go From Here)
Data science and machine learning applications are emerging in the most diverse areas, attracting more people. However, setting up an environment for numerical computation can be a complicated task, and it’s common to find users having trouble in data science workshops, especially when using Windows.
数据科学和机器学习应用程序正在最多样化的领域出现,吸引了更多的人。 但是,设置用于数值计算的环境可能是一项复杂的任务,并且经常在数据科学研讨会上(尤其是在使用Windows时)发现有麻烦的用户。
In this article, you’ve covered the basics of setting up a Python numerical computation environment on a Windows machine using the Anaconda Python distribution.
在本文中,您已经介绍了使用Anaconda Python发行版在Windows机器上设置Python数值计算环境的基础知识。
Free Bonus: Click here to get access to a Conda cheat sheet with handy usage examples for managing your Python environment and packages.
免费奖金: 单击此处可访问Conda速查表,并提供用于管理Python环境和软件包的便捷用法示例。
Now that you have a working environment, it’s time to start working with some applications. Python is one of the most used languages for data science and machine learning, and Anaconda is one of the most popular distributions, used in various companies and research laboratories. It provides several packages to install libraries that Python relies on for data acquisition, wrangling, processing, and visualization.
现在您已经有了一个工作环境,是时候开始使用某些应用程序了。 Python是用于数据科学和机器学习的最常用语言之一,而Anaconda是最受欢迎的发行版之一,已在各种公司和研究实验室中使用。 它提供了几个软件包来安装Python用来进行数据采集,处理,处理和可视化的库。
Fortunately there are a lot of tutorials about these libraries available at Real Python, including the following:
幸运的是,在Real Python上有很多关于这些库的教程 ,包括以下内容:
- NumPy tutorials
- Python Plotting With Matplotlib (Guide)
- Python Histogram Plotting: NumPy, Matplotlib, Pandas & Seaborn
- Pure Python vs NumPy vs TensorFlow Performance Comparison
- Python Pandas: Tricks & Features You May Not Know
- Fast, Flexible, Easy, and Intuitive: How to Speed Up Your Pandas Projects
- Pythonic Data Cleaning With NumPy and Pandas
- NumPy教程
- 使用Matplotlib进行Python绘图(指南)
- Python直方图绘图:NumPy,Matplotlib,Pandas和Seaborn
- 纯Python vs NumPy vs TensorFlow性能比较
- Python熊猫:您可能不知道的技巧和功能
- 快速,灵活,轻松和直观:如何加快熊猫项目
- 使用NumPy和Pandas进行Pythonic数据清理
Also, if you’d like a deeper understanding of Anaconda and Conda, check out the following links:
另外,如果您想进一步了解Anaconda和Conda,请查看以下链接:
翻译自: https://www.pybloggers.com/2018/10/setting-up-python-for-machine-learning-on-windows/


 5454
5454

 被折叠的 条评论
为什么被折叠?
被折叠的 条评论
为什么被折叠?
 到【灌水乐园】发言


