


在github上找数据
This is the fifth and final post in a series of posts on how to build a Data Science Portfolio.
这是有关如何构建数据科学产品组合的一系列文章中的第五篇也是最后一篇文章。
In the previous posts in our portfolio series, we talked about how to build a storytelling project, how to create a data science blog, how to create a machine learning project, and how to construct a portfolio.
在投资组合系列的前几篇文章中,我们讨论了如何构建讲故事的项目 , 如何创建数据科学博客 , 如何创建机器学习项目以及如何构建投资组合 。
In this post, we’ll discuss how to present and share your portfolio. You’ll learn how to showcase your work on Github, a popular site that hosts code repositories, data, and interactive explorations. In the first part of the post, we’ll cover how to upload your work to Github. In the second part of the post, we’ll cover how to present your work on Github, and how to impress hiring managers.
在这篇文章中,我们将讨论如何展示和共享您的投资组合。 您将学习如何在Github上展示您的工作, Github是一个受欢迎的网站,托管代码库,数据和交互式探索。 在文章的第一部分,我们将介绍如何将您的作品上传到Github。 在文章的第二部分,我们将介绍如何在Github上展示您的工作,以及如何给招聘经理留下深刻的印象。
Before diving into this post, you should have a couple of projects that you want to showcase. If you need some inspiration, you can consult our previous posts via the links above.
在开始这篇文章之前,您应该有几个要展示的项目。 如果您需要灵感,可以通过上面的链接查询我们以前的帖子。
第一部分– git和Github教程 (Part One – git and Github tutorial)
Github is built around a technology called git, a distributed version control system. This may sound intimidating, but all it means is that it lets you create checkpoints of your code at various points in time, then switch between those checkpoints at will. For example, let’s say I have the following Python script, taken from the scikit-learn examples:
Github是基于名为git的技术构建的,该技术是分布式版本控制系统。 这听起来可能令人生畏,但这仅意味着它使您可以在各个时间点创建代码的检查点,然后随意在这些检查点之间进行切换。 例如,假设我有以下Python脚本,摘自scikit-learn示例 :
lr lr = = linear_modellinear_model .. LinearRegressionLinearRegression ()
()
boston boston = = datasetsdatasets .. load_bostonload_boston ()
()
y y = = bostonboston .. target

target

predicted predicted = = cross_val_predictcross_val_predict (( lrlr , , bostonboston .. datadata , , yy , , cvcv == 1010 ))
I now make a checkpoint using git, and add some more lines to the code. In the below code, we:
我现在使用git创建一个检查点,并在代码中添加更多行。 在下面的代码中,我们:
- Change the dataset
- Change the number of CV folds
- Show a plot
- 更改数据集
- 更改简历的倍数
- 显示情节
If we make another checkpoint with git, we’ll be able to go back to the first checkpoint whenever we want, and switch between the two freely. A checkpoint is more commonly known as a commit, and we’ll be using that term going forward.
如果我们使用git创建另一个检查点,则可以随时返回到第一个检查点,并在两个之间自由切换。 检查点通常称为提交,我们将继续使用该术语。
We can upload the commits to Github, which enables other people to see our code. git is much more powerful than just a commit system, and you should try our git course if you want to learn more. However, for the purposes of uploading your portfolio, it’s fine to think of it this way.
我们可以将提交上传到Github,其他人可以看到我们的代码。 git不仅具有提交系统的强大功能,而且如果您想了解更多信息,请尝试我们的git课程 。 但是,出于上传您的投资组合的目的,可以这样考虑。
设置git和Github (Setting up git and Github)
In order to create a commit with git and upload it to Github, you first need to install and configure git. The full instructions are here, but we’ll summarize the steps here:
为了使用git创建提交并将其上传到Github,首先需要安装和配置git。 完整的说明在这里 ,但是我们将在这里总结步骤:
- Install git using this link
- Open the terminal application on your computer
- Set up your git email by typing
git config --global user.email YOUR_EMAIL. ReplaceYOUR_EMAILwith an email account. - Set up your git name by typing
git config --global user.name YOUR_NAME. ReplaceYOUR_NAMEwith your full name, likeJohn Smith.
- 使用此链接安装git
- 打开计算机上的终端应用程序
- 通过键入
git config --global user.email YOUR_EMAIL设置您的git电子邮件。 用电子邮件帐户替换YOUR_EMAIL。 - 通过输入
git config --global user.name YOUR_NAME设置您的git名称。 将您的全名替换为YOUR_NAME,例如John Smith。
Once you’ve done this, git is setup and configured. Next, we need to create an account on Github, then configure git to work with Github:
完成此操作后,将设置并配置git。 接下来,我们需要在Github上创建一个帐户,然后配置git以与Github一起使用:
- Create a Github account. Ideally, you should use the same email you used earlier to configure git.
- Create an SSH key
- Add the key to your Github account
The above setup will let you push commits to Github, and pull commits from Github.
上面的设置将允许您将提交推送到Github,并从Github提取提交。
创建一个仓库 (Creating a repository)
Commits in git occur inside of a repository. A repository is analogous to the folder your project is in. For this part of the tutorial, we’ll use a folder with a file structure like this:
git提交发生在存储库内部。 存储库类似于项目所在的文件夹。对于本教程的这一部分,我们将使用具有以下文件结构的文件夹:
loans │ README.md │ main.py │ └───data │ test.csv │ train.csvloans │ README.md │ main.py │ └───data │ test.csv │ train.csv
You can download the zip file of the folder yourself here and use it in the next steps. You can extract it with any program that unzips files.
您可以在此处自己下载文件夹的zip文件,并在下一步中使用它。 您可以使用任何解压缩文件的程序将其解压缩。
The git repository in the above diagram would be the project folder, or loans. In order to create commits, we first need to initialize the folder as a git repository. We can do this by navigating to the folder, then typing git init:
上图中的git存储库将是project文件夹,或者是loans 。 为了创建提交,我们首先需要将文件夹初始化为git仓库。 我们可以通过导航到该文件夹,然后输入git init来做到这一点:
This will create a folder called .git inside the loans folder. You’ll get output indicating that the repository was initialized properly.
这将在loans文件夹中创建一个名为.git的文件夹。 您将获得输出,指示存储库已正确初始化。
git uses the .git folder to store information about commits:
git使用.git文件夹来存储有关提交的信息:
loans │ README.md │ main.py └───.git │ └───data │ test.csv │ train.csvloans │ README.md │ main.py └───.git │ └───data │ test.csv │ train.csv
The contents of the .git folder aren’t necessary to explore in this tutorial, but you may want to look through and see if you can figure out how the commit data is stored.
.git文件夹的内容在本教程中不是必需探索的,但是您可能需要浏览一下,看看是否可以确定提交数据的存储方式。
After we’ve initialized the repository, we need to add files to a potential commit. This adds files to a staging area. When we’re happy with the files in the staging area, we can generate a commit. We can do this using git add:
初始化存储库后,我们需要将文件添加到潜在的提交中。 这会将文件添加到暂存区域。 当我们对登台区域中的文件感到满意时,我们可以生成一个提交。 我们可以使用git add来做到这一点:
The above command will add the README.md file to the staging area. This doesn’t change the file on disk, but tells git that we want to add the current state of the file to the next commit. We can check the status of the staging area with git status:
上面的命令会将README.md文件添加到暂存区域。 这不会更改磁盘上的文件,但会告诉git我们要将文件的当前状态添加到下一次提交。 我们可以使用git status来检查临时区域的git status :
$ git status
On branch master

Initial commit

Changes to be committed:
  $  git status
On branch master

Initial commit

Changes to be committed:
  (use ( use "git rm --cached <file>..." to unstage"git rm --cached <file>..." to unstage )

        new file:   README.md

Untracked files:
  )

        new file:   README.md

Untracked files:
  (use ( use "git add <file>..." to include "git add <file>..." to include in what will be committedin  what will be committed )

        data/
        main.py)

        data/
        main.py
You’ll see that we’ve added the README.md file to the staging area, but there are still some untracked files, that haven’t been added. We can add all the files with git add ..
您会看到我们已经将README.md文件添加到了暂存区域,但是仍然有一些未跟踪的文件尚未添加。 我们可以使用git add .添加所有文件git add . 。
After we’ve added all the files to the staging area, we can create a commit using git commit:
将所有文件添加到暂存区之后,我们可以使用git commit创建一个git commit :
The -m option specifies a commit message. You can look back on commit messages later to see what files and changes are contained in a commit. A commit takes all the files from the staging area, and leaves the staging area empty.
-m选项指定提交消息。 您可以稍后查看提交消息,以查看提交中包含哪些文件和更改。 提交将从暂存区中取出所有文件,并将暂存区留空。
对存储库进行更改 (Making changes to a repository)
When we make further changes to a repository, we can add the changed files to the staging area and make a second commit. This allows us to keep a history of the repository over time. We can add changes to a commit the same way we did before. Lets say we change the README.md file. We’d first run git status to see what changed:
当我们对存储库进行进一步更改时,可以将更改后的文件添加到登台区域并进行第二次提交。 这使我们可以保留一段时间的存储库历史记录。 我们可以像以前一样对提交添加更改。 假设我们更改了README.md文件。 我们首先运行git status来看看有什么变化:
$ git status
On branch master
Changes not staged $  git status
On branch master
Changes not staged for commit:
  for  commit:
  (use ( use "git add <file>..." to update what will be committed"git add <file>..." to update what will be committed )
  )
  (use ( use "git checkout -- <file>..." to discard changes "git checkout -- <file>..." to discard changes in working directoryin  working directory )

        modified:   README.md

no changes added to commit )

        modified:   README.md

no changes added to commit (use ( use "git add" and/or "git add" and/or "git commit -a""git commit -a" ))
We can then see exactly what changed with git diff. If the changes are what we expected, we can add these changes to a new commit:
然后,我们可以确切地看到git diff发生了什么变化。 如果更改是我们所期望的,则可以将这些更改添加到新提交中:
And then we can commit again:
然后我们可以再次提交:
$ git commit -m $  git commit -m "Update README.md"
"Update README.md"
[master 5bec608] Update README.md
 1 file changed, 1 insertion[ master 5bec608] Update README.md
 1 file changed, 1 insertion (+( + ))
You may have noticed that the word master appears after many of these commands are executed. master is the name of the branch that we’re currently on. Branches allow multiple people to work on a repository at once, or one person to work on multiple features at the same time. Branches are extremely powerful, but we won’t dive into them here. If you’re interested in learning more, our Dataquest interactive git tutorial covers working with multiple branches in detail.
您可能已经注意到,在执行了许多命令后,将出现单词master 。 master是我们当前所在分支的名称。 分支允许多个人同时处理一个存储库,或者一个人同时处理多个功能。 分支机构非常强大,但是我们在这里不会深入探讨它们。 如果您想了解更多信息,我们的Dataquest 交互式git教程将详细介绍如何使用多个分支。
For now, it’s enough to know that the primary branch in a repository is called master. We’ve made all of our changes so far to the master branch. We’ll be pushing master to Github, and this is what other people will see.
现在,只需知道存储库中的主分支称为master 。 到目前为止,我们已经对master分支进行了所有更改。 我们将master推向Github,这是其他人会看到的。
推向Github (Pushing to Github)
Once you’ve created a commit, you’re ready to push your repository to Github. In order to do this, you first need to create a public repository in the Github interface.
创建提交后,就可以将存储库推送到Github了。 为此,您首先需要在Github界面中创建一个公共存储库 。
You can do this by:
您可以通过以下方式做到这一点:
- Clicking the “+” icon in the top right of the Github interface, then “New Repository”.
- 单击Github界面右上角的“ +”图标,然后单击“新存储库”。
Create a Github repository.
创建一个Github存储库。
- Enter a name for the repository, and optionally enter a description. Then, decide if you want it to be public or private. If it’s public, anyone can see it immediately. You can change a repository from public to private, or vice versa, at any time. It’s recommended to keep the repository private until it’s ready to share. Note that creating a private repository requires a paid plan. When you’re ready, click “Create Repository” to finalize.
- 输入存储库的名称,并选择输入说明。 然后,确定您希望它是公开的还是私有的。 如果是公开的,任何人都可以立即看到。 您可以随时将存储库从公共更改为私有,反之亦然。 建议将存储库保持私有状态,直到可以共享为止。 请注意,创建私有存储库需要付费计划 。 准备就绪后,单击“创建存储库”完成。
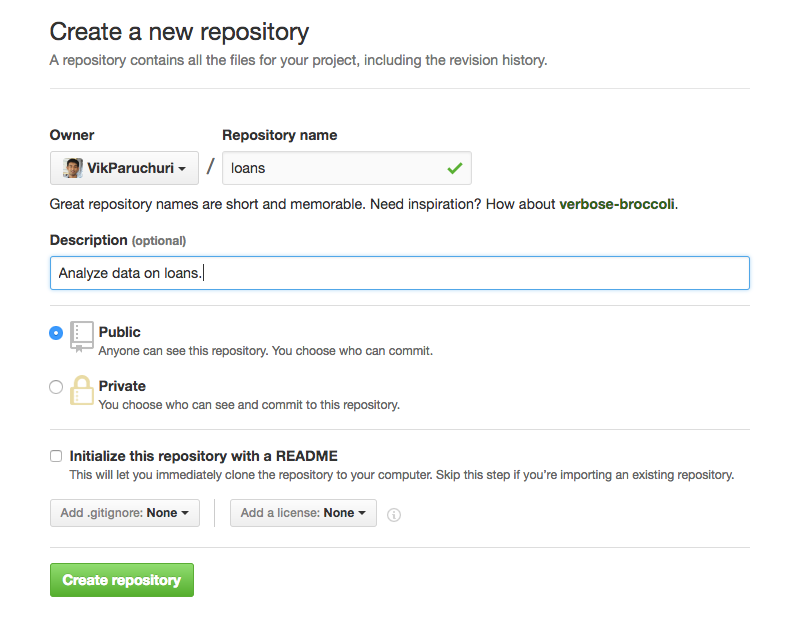
Finalize repository creation.
完成存储库创建。
After creating the repo, you’ll see a screen like this:
创建存储库后,您将看到如下屏幕:
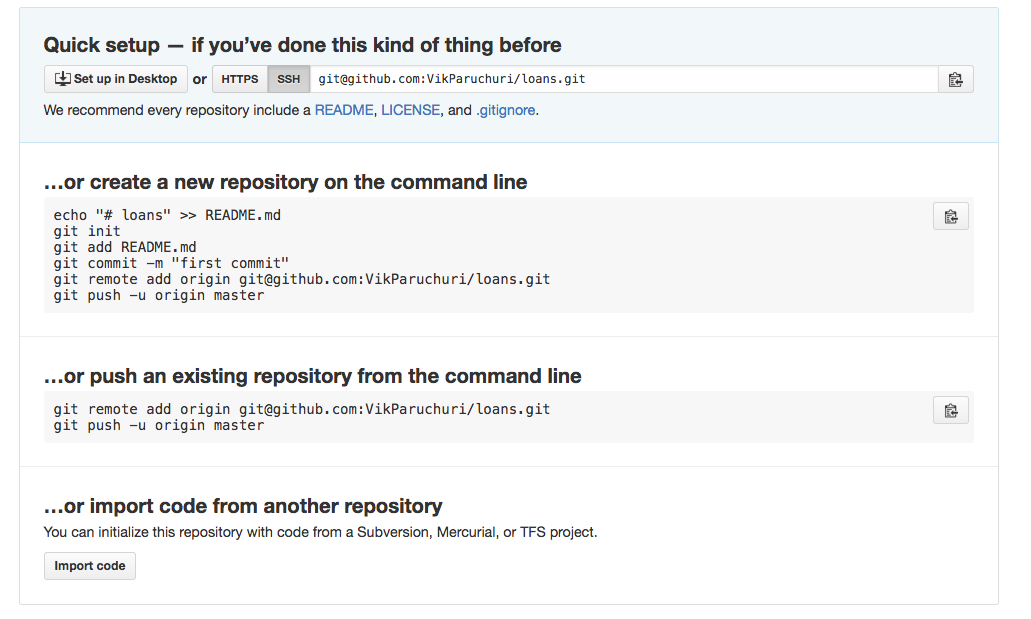
The options for using the repository.
使用存储库的选项。
Look under the “…or push an existing repository from the command line” section, and copy the two lines there. Then run them in the command line:
在“ ...或从命令行推送现有存储库”部分下,然后将两行复制到那里。 然后在命令行中运行它们:
If you reload the page on Github corresponding to your repo (https://github.com/YOUR_GITHUB_USERNAME/YOUR_GIT_REPO_NAME), you should now see the files you added. By default, the README.md will be rendered in the repository:
如果您在Github上重新加载与您的仓库(https://github.com/YOUR_GITHUB_USERNAME/YOUR_GIT_REPO_NAME)相对应的页面,现在应该看到添加的文件。 默认情况下, README.md将在存储库中呈现:
Viewing the project files and README.
查看项目文件和自述文件。
Congratulations! You’ve now pushed a repository to Github. If you want to make it public, you can follow these instructions.
恭喜你! 现在,您已将存储库推送到Github。 如果要使其公开,可以按照以下说明进行操作 。
第二部分–介绍您的投资组合 (Part Two – Presenting your portfolio)
Now that you know how to create and upload a repository, we’ll cover how to present it. Before we go through this section, it may be useful to look at some example projects:
现在您知道了如何创建和上传存储库,我们将介绍如何显示它。 在阅读本节之前,查看一些示例项目可能会很有用:
要求 (Requirements)
It’s important to make sure anyone can install and run your work. Even if your work is a Jupyter notebook, there may be packages other people need to install. You can list out all the packages your project is using with pip freeze if you’re using a virtual environment. You’ll get output like this:
确保任何人都可以安装和运行您的工作非常重要。 即使您的工作是Jupyter笔记本,也可能会有其他人需要安装的软件包。 如果您使用的是虚拟环境,则可以列出您的项目使用的所有带有pip freeze的软件包。 您将获得如下输出:
$ pip freeze
$  pip freeze
DjangoDjango ==1.10.5
== 1.10.5
MechanicalSoupMechanicalSoup ==0.6.0
== 0.6.0
PillowPillow ==4.0.0== 4.0.0
The output is the library name, then a version number. The above output tells us that we have Django version 1.10.5 installed, for example.
输出是库名称,然后是版本号。 上面的输出告诉我们,例如,我们安装了Django 1.10.5版。
You’ll want to copy these requirements into a folder in your project called requirements.txt. The file should look like this:
您将需要将这些需求复制到项目中的文件夹requirements.txt 。 该文件应如下所示:
Now, anyone can install the requirements for your project using pip install -r requirements.txt. This will install the exact version of the libraries that we have on our machine. If you want to instead install whatever the latest version of each library is, you can leave off the version numbers in requirements.txt:
现在,任何人都可以使用pip install -r requirements.txt项目的pip install -r requirements.txt 。 这将安装我们机器上具有的库的确切版本。 如果您想安装每个库的最新版本,则可以省略requirements.txt的版本号:
Django MechanicalSoup PillowDjango MechanicalSoup Pillow
If you want to make a requirements.txt file, but didn’t use a virtualenv for your project, you’ll want to manually look through the libraries you imported in your project, and add them to requirements.txt without version numbers, like:
如果您想制作一个requirements.txt文件,但未在项目中使用virtualenv,则需要手动浏览在项目中导入的库,然后将它们添加到requirements.txt而无需版本号,例如:
路径 (Paths)
It’s common when you’re working locally to hardcode absolute paths to data files, like /Users/vik/Documents/data.csv. Other people who want to run your project won’t have those same paths on their computer, so they won’t be able to run your project.
在本地工作时,通常会硬编码数据文件的绝对路径,例如/Users/vik/Documents/data.csv 。 想要运行您的项目的其他人的计算机上没有相同的路径,因此他们将无法运行您的项目。
You can fairly easily replace these with relative paths, which allow people who have the data in the same folder as your project, but don’t have the same absolute paths, to use your code.
您可以相当容易地用相对路径替换这些路径,这使拥有与项目在相同文件夹中但没有相同绝对路径的人可以使用您的代码。
Let’s say we have this code:
假设我们有以下代码:
with with openopen (( "/Users/vik/Documents/data.csv""/Users/vik/Documents/data.csv" ) ) as as ff :
    :
    data data = = ff .. readread ()()
Let’s say our project code is at /Users/vik/Documents/Project.ipynb. We can replace the code with a relative path, like:
假设我们的项目代码位于/Users/vik/Documents/Project.ipynb 。 我们可以将代码替换为相对路径,例如:
It’s generally a good idea to put the data in the same folder as your project, or in a subfolder, to make relative paths and loading the data easier.
通常,将数据与项目放置在同一文件夹或子文件夹中是一个好主意,以使相对路径和数据加载更加容易。
附加文件 (Additional files)
By default, running git add . and git commit -m "Message"" will add all the files in a folder to a git commit. However, there are many artifact files that you don’t want added. Here’s an example folder:
默认情况下,运行git add . 和git commit -m "Message""会将文件夹中的所有文件添加到git commit中。但是,您不想添加许多工件文件。这是一个示例文件夹:
loans │ __pycache__ │ main.py │ main.pyc │ temp.json │ └───data │ test.csv │ train.csvloans │ __pycache__ │ main.py │ main.pyc │ temp.json │ └───data │ test.csv │ train.csv
Note files like __pycache__, main.pyc, and temp.json. The main code of the project is in main.py, and the data is in data/test.csv, and data/train.csv. For someone to run the project, those are the only files they need.
注意文件__pycache__ , main.pyc和temp.json 。 项目的主要代码在main.py ,数据在data/test.csv和data/train.csv 。 对于某人运行项目,这些是他们唯一需要的文件。
Folders like __pycache__ and main.pyc are automatically generated by Python when we run code or install packages. These enable Python scripts and package installation to be faster and more reliable. However, these files aren’t part of your project, and thus shouldn’t be distributed to others.
当我们运行代码或安装软件包时,Python会自动生成__pycache__和main.pyc类的文件夹。 这些使Python脚本和软件包安装更快,更可靠。 但是,这些文件不是您的项目的一部分,因此不应分发给其他人。
We can ignore files like this with a .gitignore file. We can add a .gitignore file to our folder:
我们可以使用.gitignore文件忽略此类文件。 我们可以将.gitignore文件添加到我们的文件夹中:
The content of the .gitignore file is a list of files to ignore.
.gitignore文件的内容是要忽略的文件列表。
We can create a .gitignore file, then add *.pyc and __pycache__ to ignore the generated files in our folder:
我们可以创建一个.gitignore文件,然后添加*.pyc和__pycache__以忽略文件夹中生成的文件:
*.pyc __pycache__*.pyc __pycache__
This still leaves the temp.json file. We can add another line to ignore this file:
仍然留下了temp.json文件。 我们可以添加另一行以忽略此文件:
This will ensure that these files are not tracked by git, and added to new git commits when you run git add .. However, if you’ve already added the files to a git commit before, you’ll need to remove them first with git rm temp.json --cached. It’s recommended to create a .gitignore file as soon as possible, and to add entries for temporary files quickly.
这将确保git不会跟踪这些文件,并在运行git add .时将其添加到新的git commit中git add . 。 但是,如果您之前已经将文件添加到git commit中,则需要首先使用git rm temp.json --cached删除它们。 建议尽快创建.gitignore文件,并快速添加临时文件的条目。
You can find a good starter gitignore file here. It’s usually recommended to use this as your .gitignore file, then add new entries as needed.
您可以在此处找到一个好的入门gitignore文件。 通常建议将此文件用作.gitignore文件,然后根据需要添加新条目。
It’s a good idea to ignore any dynamic, generated, or temporary files. You should only commit your source code, documentation, and data (depending on how large your data is – we’ll cover this in another section).
最好忽略任何动态,生成或临时文件。 您只应提交源代码,文档和数据(取决于数据的大小,我们将在另一部分中介绍)。
密钥或文件 (Secret keys or files)
Many projects use secret keys to access resources. A good example is api keys, such as AWS_ACCESS_KEY="3434ffdsfd". You absolutely don’t want to share your secret keys with other people – this allows them to access your resources, and could cost you money.
许多项目使用秘密密钥来访问资源。 api密钥就是一个很好的例子,例如AWS_ACCESS_KEY="3434ffdsfd" 。 您绝对不想与其他人共享您的秘密密钥-这使他们可以访问您的资源,并且可能会花钱。
Here’s some example code that uses a secret key:
这是一些使用密钥的示例代码:
import import forecastio

forecastio

forecast forecast = = forecastioforecastio .. load_forecastload_forecast (( "34343434fdfddf""34343434fdfddf" , , 37.7749337.77493 , , -- 122.41942122.41942 ))
In the above code, "34343434fdfddf" is a secret key that we’re passing into a library to get a weather forecast. If we commit the code as is, anyone browsing Github will be able to see our secret data.
在上面的代码中, "34343434fdfddf"是一个秘密密钥,我们将其传递给图书馆以获取天气预报。 如果我们按原样提交代码,则浏览Github的任何人都可以看到我们的秘密数据。
Fortunately, there’s an easy way to fix this, and enable anyone using the project to supply their own keys, so they can still run the code.
幸运的是,有一种简单的方法可以解决此问题,并使使用该项目的任何人都可以提供自己的密钥,以便他们仍然可以运行代码。
First, we create a file called settings.py, with the following lines:
首先,我们创建一个名为settings.py的文件,其中包含以下几行:
The above code defines a key called API_KEY. It also tries to import from a file called private.py, and doesn’t do anything if the file doesn’t exist.
上面的代码定义了一个称为API_KEY的密钥。 它还尝试从名为private.py的文件导入,如果该文件不存在,则不执行任何操作。
We then need to add a private.py with the following content:
然后,我们需要添加具有以下内容的private.py :
API_KEY API_KEY = = "34343434fdfddf""34343434fdfddf"Then, we need to add private.py to .gitignore so it doesn’t get committed:
然后,我们需要将private.py添加到.gitignore以使其不会被提交:
Then, we modify our original code:
然后,我们修改原始代码:
import import settings

settings

forecast forecast = = forecastioforecastio .. load_forecastload_forecast (( settingssettings .. API_KEYAPI_KEY , , 37.7749337.77493 , , -- 122.41942122.41942 ))
All the changes we’ve made above result in the following:
我们上面所做的所有更改都会导致以下结果:
- The code imports the settings file
- The settings file imports the
private.pyfile- This overwrites the
API_KEYvariable in the settings file with theAPI_KEYdefined in the private file
- This overwrites the
- The code uses
API_KEYfrom the settings file, which equals"34343434fdfddf"
- 代码导入设置文件
- 设置文件导入
private.py文件- 这将覆盖
API_KEY在设置文件变量与API_KEY私人文件中定义
- 这将覆盖
- 该代码使用来自设置文件的
API_KEY,它等于"34343434fdfddf"
The next time you make a git commit, private.py will be ignored. However, if someone else looks at your repository, they’ll see that they need to fill out settings.py with their own settings to get things to work properly. So everything will work for you, you won’t share your secret keys with others, and things will work for others.
下次您进行git commit时, private.py将被忽略。 但是,如果你的资料库别人的容貌,他们会看到,他们需要填写settings.py用自己的设置,以获得东西正常工作。 因此,一切都会为您工作,您不会与他人共享您的密钥,事情也会为他人工作。
大型或受限数据文件 (Large or restricted data files)
It’s important to look at the user agreement when you’re downloading a data file. Some files are not allowed to be redistributed. Some files are also too large to make downloading useful. Other files are updated quickly, and distributing them doesn’t make sense – you want the user to download a fresh copy.
在下载数据文件时,请务必阅读用户协议,这一点很重要。 某些文件不允许重新分发。 有些文件也太大,无法进行下载。 其他文件会快速更新,而分发它们没有任何意义-您希望用户下载新副本。
In cases like these, it makes sense to add the data files to the .gitignore file. This ensures that the data file won’t be included in the repository. It’s important to have information on how to download the data in the README.md, though. We’ll cover this in the next section.
在这种情况下,将数据文件添加到.gitignore文件是有意义的。 这样可以确保数据文件不会包含在存储库中。 不过,在README.md获取有关如何下载数据的信息非常重要。 我们将在下一部分中对此进行介绍。
自述文件 (The README file)
The README file is very critical to your project. The README is usually named README.md, and is in Markdown format. Github will automatically parse Markdown format and render it.
自述文件对您的项目非常重要。 README通常名为README.md ,其格式为Markdown 。 Github将自动解析Markdown格式并进行渲染。
Your README file should describe:
您的自述文件应描述:
- The goals of your project
- Your though process and methods in creating the project
- How to install your project
- How to run your project
- 项目目标
- 您创建项目的过程和方法
- 如何安装您的项目
- 如何运行您的项目
You want an average technically competent stranger to be able to read your README file and then run the project on their own. This ensures that more technical hiring managers can reproduce your work and check your code. You can find good README examples here and here.
您希望普通的技术熟练的陌生人能够读取您的README文件,然后自己运行该项目。 这样可以确保更多的技术招聘经理可以复制您的工作并检查您的代码。 您可以在此处和此处找到良好的README示例。
It’s important to go through the installation steps yourself in a new folder or on a new computer, to make sure everything works.
请务必在新文件夹或新计算机上亲自执行安装步骤,以确保一切正常。
The README is also the first and potentially only thing someone will look at, because Github renders it below the repository file view. It’s important to “sell” what the project is, why you made it, and what’s interesting about it. Here’s an example:
自述文件也是人们首先要看的东西,可能也是唯一的东西,因为Github将其呈现在存储库文件视图下。 重要的是“出售”项目是什么,为什么创建它以及它的有趣之处。 这是一个例子:
Your README should be more extensive and go into more depth than the above example, but this is a good starting point. Ideally, you’d also want:
与上述示例相比,您的自述文件应该更广泛,更深入,但这是一个很好的起点。 理想情况下,您还需要:
- Some bullet points with interesting observations you found in exploration
- Any interesting charts or diagrams you created
- Information about the model, such as algorithm
- Error rates and other information about the predictions
- Any notes about real-world usage of the model
- 在探索中发现一些有趣的观察点
- 您创建的任何有趣的图表或图表
- 有关模型的信息,例如算法
- 错误率和有关预测的其他信息
- 有关模型实际使用情况的任何说明
The summary here is that the README is the best way to sell your project, and you shouldn’t neglected. Don’t spend a lot of effort making a good project, then have people skip looking through it because they don’t find it interesting!
此处的摘要是自述文件是销售项目的最佳方法,您不应忽视。 不要花很多精力去做一个好的项目,然后让人们跳过它,因为他们并不觉得它有趣!
内联说明 (Inline explanations)
If you’re writing Python script files, you’ll want to include lots of inline comments to make your logic easier to follow. You don’t want to share something like this:
如果要编写Python脚本文件,则需要包含许多内联注释,以使逻辑更容易理解。 您不想共享以下内容:
def def count_performance_rowscount_performance_rows ():
    ():
    counts counts = = {}
    {}
    with with openopen (( osos .. pathpath .. joinjoin (( settingssettings .. PROCESSED_DIRPROCESSED_DIR , , "Performance.txt""Performance.txt" ), ), 'r''r' ) ) as as ff :
        :
        for for ii , , line line in in enumerateenumerate (( ff ):
            ):
            if if i i == == 00 :
                :
                continue
            continue
            loan_idloan_id , , date date = = lineline .. splitsplit (( "|""|" )
            )
            loan_id loan_id = = intint (( loan_idloan_id )
            )
            if if loan_id loan_id not not in in countscounts :
                :
                countscounts [[ loan_idloan_id ] ] = = {
                    {
                    "foreclosure_status""foreclosure_status" : : FalseFalse ,
                    ,
                    "performance_count""performance_count" : : 0
                0
                }
            }
            countscounts [[ loan_idloan_id ][][ "performance_count""performance_count" ] ] += += 1
            1
            if if lenlen (( datedate .. stripstrip ()) ()) > > 00 :
                :
                countscounts [[ loan_idloan_id ][][ "foreclosure_status""foreclosure_status" ] ] = = True
    True
    return return countscounts
A better alternative is:
更好的选择是:
In the above, it’s much more clear what the function is doing, and why. It’s important to reduce the mental effort of following your logic as much as possible. Reading code is time consuming, and not everyone looking through your project will make that investment. Comments make things smoother, and ensure that more people read through your project.
在上面,更清楚了该函数的作用以及原因。 尽可能减少遵循逻辑的精力很重要。 读取代码非常耗时,并非每个人都在浏览您的项目都可以进行这项投资。 注释使事情变得更顺畅,并确保更多的人阅读您的项目。
Jupyter笔记本 (Jupyter notebooks)
Jupyter notebooks, like this one, are automatically rendered by Github, so people can view them in the browser. It’s important to verify a few things for every notebook you upload:
像这样的 Jupyter笔记本由Github自动渲染,因此人们可以在浏览器中查看它们。 为您上传的每个笔记本验证几件事很重要:
- Make sure it looks good when it renders in the interface
- Make sure explanations are frequent, and it’s clear what’s happening at each step
- A good ratio is no more than 2 code cells per markdown cell
- Ensure all explanations in the notebook are clear and easy to follow. You can learn more about this in our previous blog post.
- Make sure the README links to the notebook, and briefly explains what you did in the notebook
- 确保它在界面中呈现时看起来不错
- 确保解释频繁,并且清楚每一步都在发生什么
- 一个好的比率是每个降价单元不超过2个代码单元
- 确保笔记本中的所有说明均清晰易懂。 您可以在我们以前的博客文章中了解更多信息 。
- 确保自述文件链接到笔记本,并简要说明您在笔记本中所做的操作
The second and last steps is especially important. You want people to be able to easily figure out that your analysis is in the notebook, and what analysis you did. A notebook with only code cells is very hard to follow, and doesn’t demonstrate your data science skills. Employers are looking for people who can code and communicate effectively.
第二步也是最后一步特别重要。 您希望人们能够轻松地确定您的分析在笔记本中以及您进行了哪些分析。 仅具有代码单元的笔记本很难遵循,也无法证明您的数据科学技能。 雇主正在寻找可以进行有效编码和沟通的人员。
公开您的作品 (Making your work public)
After you’ve followed all the steps above, you’ll want to do a final review of your project, then set it public! You can do this from the repository settings button:
完成上述所有步骤后,您将需要对项目进行最终审查,然后将其设置为公开! 您可以从存储库设置按钮执行此操作:
The repository settings button is at the right.
存储库设置按钮在右侧。
下一步 (Next Steps)
You now know how to put projects on Github, and hopefully have a few projects you can upload. The next step is to add your projects to your resume and portfolio pages. Some things to consider:
现在,您知道了如何在Github上放置项目,并希望可以上传一些项目。 下一步是将您的项目添加到简历和投资组合页面。 要考虑的一些事情:
- If you have a blog, write about each project as a separate post that goes into depth about how you built it, and what you found
- Add your projects to your LinkedIn profile
- Add your projects to your AngelList profile
- List your projects on your resume
- If you have a personal website, make a portfolio page that lists your projects
- 如果您有博客,则将每个项目写为一个单独的帖子,深入探讨其构建方式和发现的内容
- 将您的项目添加到您的LinkedIn个人资料
- 将您的项目添加到您的AngelList个人资料
- 在简历中列出您的项目
- 如果您有个人网站,请制作一个列出您的项目的投资组合页面
翻译自: https://www.pybloggers.com/2017/01/how-to-present-your-data-science-portfolio-on-github/
在github上找数据


 1599
1599


 被折叠的 条评论
为什么被折叠?
被折叠的 条评论
为什么被折叠?
 到【灌水乐园】发言


