


This post is a bit lengthy. If you prefer, signup to get the full PDF here. 📖
这篇文章有点冗长。 如果愿意,请在此处注册以获取完整的PDF。 📖
After Particle's Mesh deprecation announcement, many have been left to figure out how to deploy their low power sensor networks. There was always the option of using Particle's Built in Bluetooth stack but as it stands today it's not secure.
在宣布“粒子网”即将弃用之后,许多人被遗忘了如何部署其低功率传感器网络。 始终可以选择使用Particle的内置蓝牙堆栈,但是就目前而言,它并不安全。
Previously I had helped form a very simple nRF SDK-based hub and spoke IoT deployment. Unfortunately, it was closed source and the company is no longer around.
以前,我曾帮助组建一个非常简单的基于nRF SDK的中心,并负责IoT部署。 不幸的是,它是封闭资源,公司不再存在。
So what's a guy to do?
那一个人要做什么?
Build another one and make it open. (BSD licensed to be exact!) Open and free for anyone to use adopt and improve upon. Plus if you're building a product that's using the code, you don't have to share your improvements or proprietary code with anyone.
建立另一个并使其打开。 (确切地说,BSD被许可!)任何人均可免费使用和改进。 另外,如果您要构建使用该代码的产品, 则不必与任何人共享您的改进或专有代码。
In this post I'll be talking about how to get started with Pyrinas. It uses Nordic's time tested SDK as a basis for the kernel of the system. The main concept of Pyrinas is to abstract as much IoT cruft away so you can focus on your application.
在这篇文章中,我将讨论如何开始使用Pyrinas。 它使用Nordic经过时间考验的SDK作为系统内核的基础。 Pyrinas的主要概念是将尽可能多的物联网残骸抽象化,以便您专注于应用程序。
So without further ado, let's chat about what Pyrinas is and what it isn't.
因此,事不宜迟,让我们闲聊一下Pyrinas是什么,什么不是。
什么是pyrinas (What Pyrinas is)
Is an embedded "kernel", written in C. It's open and permissive IoT development environment you can use for anything you want. Seriously. It's BSD licensed and can be used in closed source applications.
是用C语言编写的嵌入式“内核”。它是开放的,允许的物联网开发环境,您可以将其用于任何您想要的东西。 说真的 它已获得BSD许可,可以在封闭源应用程序中使用。
Using the power of Bluetooth 5.0 Long Range, Pyrinas allows you to communicate with many peripheral devices at one time. Currently Pyrinas has been tested with 3 simultaneous peripheral connections. Theoretically, it can support up to 20 simultaneous connections. (Thanks to Nordic's S140 Softdevice)
借助Bluetooth 5.0 Long Range的强大功能,Pyrinas允许您一次与许多外围设备进行通信。 目前,Pyrinas已通过3个同时外围设备连接进行了测试。 从理论上讲,它最多可以支持20个同时连接。 (感谢Nordic的S140软设备 )
Pyrinas transports its data in two ways
Pyrinas通过两种方式传输数据
- In a familiar string format used by Particle 以粒子使用的熟悉的字符串格式
- A custom Protocol Buffer for raw data transmission. 用于原始数据传输的自定义协议缓冲区。
That way you have a choice of how you want to process and publish your data!
这样,您可以选择如何处理和发布数据!
皮里纳斯不是什么 (What Pyrinas isn't)
- Pyrinas is not a RTOS (real time operating system). If you have a need to run multiple threaded applications on embedded, Pyrinas is not for you. Pyrinas不是RTOS(实时操作系统)。 如果您需要在嵌入式系统上运行多个线程应用程序,那么Pyrinas不适合您。
- Pyrinas, at this time, does not support Mesh. Pyrinas目前不支持网格。
- An OS for every single kind of Bluetooth SoC on the market. Due to the tight coupling with Nordic's nRF SDK, Pyrinas only works with Nordic's SoCs. 市场上每种蓝牙SoC的操作系统。 由于与Nordic的nRF SDK紧密结合,Pyrinas仅与Nordic的SoC一起使用。
A turnkey solution for IoT. Pyrinas is early on it it's development process. The aim is for it to become a viable option for anyone to develop and publish IoT applications the way they want to. There's no vendor lock in. There's no surprises.
物联网的交钥匙解决方案。 Pyrinas的开发过程还很早。 目的是使它成为任何人以自己想要的方式开发和发布IoT应用程序的可行选择。 没有供应商锁定。没有惊喜。
您需要的东西 (Things you'll need)
There are a few things you'll need in order to get going with Pyrinas.
要开始使用Pyrinas,需要做一些事情。
- At least 2 Particle Xenons 至少2个粒子氙
- At least 1 nRF Development board or J-link programmer 至少1个nRF开发板或J-link编程器
- Associated USB cables 关联的USB电缆
入门实例 (Getting started with an example)
Getting started with Pyrinas involves two repositories.
Pyrinas入门涉及两个存储库。
The OS directory has all the source, SDK dependencies and toolchain you need to use Pyrinas.
OS目录包含使用Pyrinas所需的所有源代码,SDK依赖项和工具链。
The template is where you add all your application code. The template provides a starting point for you and your project.
您可以在模板中添加所有应用程序代码。 该模板为您和您的项目提供了一个起点。
Here's how everything goes together:
这是所有事物结合在一起的方式:
Clone the OS directory to some place on your machine:
将OS目录克隆到计算机上的某个位置:
git clone https://github.com/pyrinas-iot/pyrinas-os.git --recurse-submodulesOnce complete, change directories to pyrinas-os and run make setup
完成后,将目录更改为pyrinas-os并运行make setup
cd pyrinas-os
make setup
This will download your toolchain and SDK dependencies.
这将下载您的工具链和SDK依赖项。
In order to use OTA DFU, you will need to also generate the DFU key for the process:
为了使用OTA DFU,您还需要为该过程生成DFU密钥:
make gen_keyThe files generated by this process will be used later.
此过程生成的文件将在以后使用。
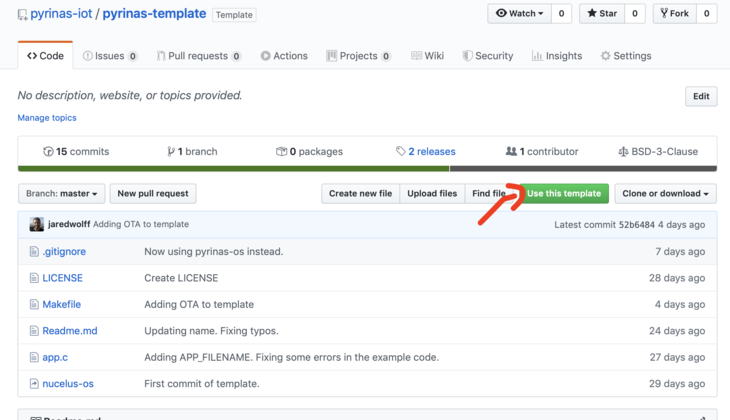
Next, we'll want to use the template to make two new projects. In this example we'll have one "hub" and one "sensor." Simply navigate to the template repository and click the Use this template button.
接下来,我们将要使用模板创建两个新项目。 在此示例中,我们将有一个“集线器”和一个“传感器”。 只需导航至模板存储库 ,然后单击“ 使用此模板”按钮。
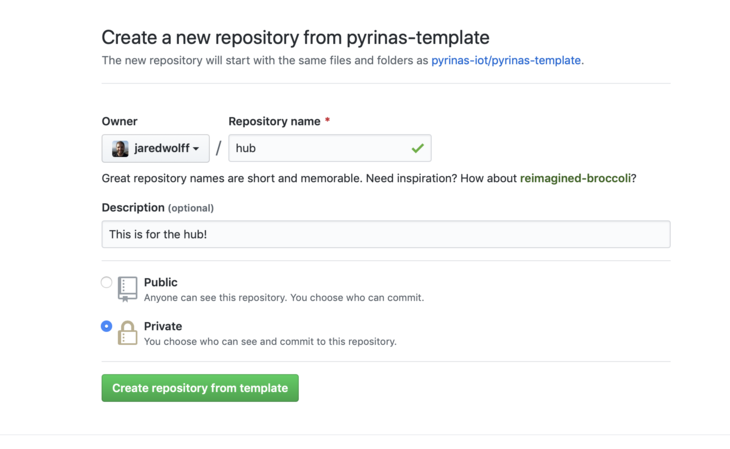
Then name your new repository. Click the Create repository from template button when you're happy with everything.
然后命名您的新存储库。 对所有内容感到满意后,请单击“ 从模板创建存储库”按钮。
Then clone your repository to the same directory as pyrinas-os. Make sure you replace <your username> and <repo name> with your own.
然后将您的存储库克隆到pyrinas-os目录。 确保将<your username>和<repo name>替换为您自己的。
cd ..
git clone https://github.com/<your username>/<repo name>.git hub
After this is done, go back and create a new repository from the template. We'll be using this one for the sensor node.
完成此操作后,返回并根据模板创建一个新的存储库。 我们将使用此传感器节点。
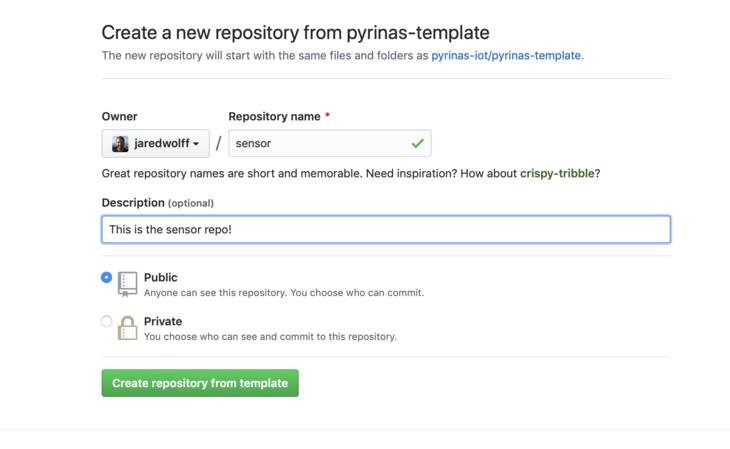
Clone this repository once you're done setting it up in the same place as your hub and pyrinas-os repositories.
完成设置后,请在与hub和pyrinas-os存储库相同的位置上克隆该存储库。
Now that we have all our repositories, let's start with our sensor node.
现在我们有了所有的存储库,让我们从传感器节点开始。
设置传感器节点存储库 (Setting up the sensor node repository)
Open up the sensor repository using a program like Microsoft's VS Code. If you have the command line shortcuts you can use code to open it from the terminal:
使用Microsoft的VS Code等程序打开传感器存储库。 如果您具有命令行快捷方式,则可以使用code从终端打开它:
code sensorBefore we do anything we'll need to set up the symbolic link to pyrinas-os. Make sure you're in the sensor directory and then run ln -s ../pyrinas-os/ using the terminal.
在做任何事情之前,我们需要建立到pyrinas-os的符号链接。 确保您位于sensor目录中,然后使用终端运行ln -s ../pyrinas-os/ 。
cd sensor
ln -s ../pyrinas-os/ .
This allows your project to use all the code, SDK and toolchains within the pyrinas-os repository! As an added bonus you can do this as many times as you want. Have multiple Pyrinas projects? No problem.
这使您的项目可以使用pyrinas-os存储库中的所有代码,SDK和工具链! 作为额外的奖励,您可以根据需要执行多次。 有多个Pyrinas项目? 没问题。
Alright! Now, let's check out the Makefile. You'll want to customize some of the definitions within the file:
好的! 现在,让我们检查一下Makefile。 您需要自定义文件中的一些定义:
# Start: Your configuration!

# Set this to the directory of pyrinas-os
# If you used a symbolic link this points to
# the `pyrinas-os` folder in this repository
OS_DIR := pyrinas-os

# This should be the serial number of your Jlink programmer.
# To find simply run `jlinkexe`
PROG_SERIAL=1234678

# This is your debugger port for Jlink's RTT. If you
# have mulitple, you will have to change this on each app
# your're using
PROG_PORT=19021

# This is where you set your board type. Here are the supported boards:
# xenon - Particle Xenon
BOARD=xenon

# This is where you can name your app something. Make it specific
APP_FILENAME=pyrinas-template

# This determines whether or not you're using debug mode
# Comment this out or change to false
DEBUG=true

# End: Your Configuration
For example, you may want to setup your programmer serial. This allows you to use multiple programmers at the same time. (Very helpful in debugging both devices at the same time) To get your programmer's serial plug in your development board and run jlinkexe.
例如,您可能要设置您的编程器序列号。 这使您可以同时使用多个程序员。 (这对同时调试两个设备非常有帮助)要在开发板上插入程序员的串行插头并运行jlinkexe 。
jlinkexe
SEGGER J-Link Commander V6.62a (Compiled Jan 31 2020 12:59:22)
DLL version V6.62a, compiled Jan 31 2020 12:59:05

Connecting to J-Link via USB...O.K.
Firmware: J-Link OB-SAM3U128-V2-NordicSemi compiled Jan 21 2020 17:30:48
Hardware version: V1.00
S/N: 581758669
License(s): RDI, FlashBP, FlashDL, JFlash, GDB
VTref=3.300V


Type "connect" to establish a target connection, '?' for help
J-Link>
Find the S/N area. This is your serial number!
找到信噪比区域。 这是您的序列号!
Alternatively you can look at the sticker on your development kit. It will contain the serial number for your device.
另外,您可以查看开发套件上的贴纸。 它将包含您设备的序列号。
For the PROG_PORT you want to use different ports for each device you're simultaneously debugging. I've found 19021 and 19020 are perfectly good options for most two-device debugging sessions.
对于PROG_PORT您要对要同时调试的每个设备使用不同的端口。 我发现19021和19020是大多数两设备调试会话的理想选择。
The Makefile also includes the ability to choose a board. In our case there's only one option: xenon. Future revisions of Pyrinas will have multiple options.
Makefile还具有选择电路板的功能。 在我们的案例中,只有一个选择: xenon 。 未来的Pyrinas版本将有多种选择。
APP_FILENAME is the name of your app. We'll rename ours to pyrinas-sensor
APP_FILENAME是您的应用程序的名称。 我们将其重命名为pyrinas-sensor
Finally, DEBUG is used to halt execution either on an error or restart. For production this should be commented out or set to false. We can leave it as is for now.
最后, DEBUG用于在发生错误或重新启动时暂停执行。 对于生产,应将其注释掉或设置为false 。 我们现在可以保留它。
The Makefile is also the source for some of the most important commands you'll need during development:
Makefile还是开发过程中需要的一些最重要命令的源代码:
make build- builds your app.make build构建您的应用程序。make clean- cleans all remnants of your app.make clean-清除应用程序的所有残余。make debug- opens up thejlinkexedebugger console.make debug-打开jlinkexe调试器控制台。make erase- erases the chip attached to your programmer.make erase-擦除连接到编程器的芯片。make flash- flashes the current app to your connected device.make flash-将当前应用程序闪烁到所连接的设备。make flash_softdevice- flashes the soft_devicemake flash_softdevice刷新soft_devicemake rtt- opens up the debug console.make rtt打开调试控制台。make ota- generates a zip file used for BLE DFUmake ota生成用于BLE DFU的zip文件
基本传感器节点代码 (Basic sensor node code)

Now that we have some of the basics out of the way, let's create a very simple application that publishes on a set interval. If you look at app.c, you'll see some code in the setup() function. Let's delete all the commented out code. (We'll use it later for the hub though)
现在我们已经掌握了一些基础知识,让我们创建一个非常简单的应用程序,该应用程序以固定的时间间隔发布。 如果查看app.c ,则会在setup()函数中看到一些代码。 让我们删除所有注释掉的代码。 (不过我们稍后会在集线器中使用它)
Your code should now look something like:
您的代码现在应类似于:
#include "app.h"

void setup()
{
  BLE_STACK_PERIPH_DEF(init);

  // Configuration for ble stack
  ble_stack_init(&init);

  // Start advertising
  advertising_start();
}

void loop()
{
}
Now let's create a timer that we'll use to publish on a set interval. Under #include "app.h" create a new timer:
现在,让我们创建一个计时器,将其用于按设定的时间间隔发布。 在#include "app.h"创建一个新计时器:
#include "app.h"

timer_define(m_sensor_timer);
We also need to set it up in the setup() function:
我们还需要在setup()函数中进行setup() :
// Sensor timer
timer_create(&m_sensor_timer, TIMER_REPEATED, sensor_timer_evt);
You'll notice that timer_create is referring to a event callback called sensor_timer_evt. We'll need to create that guy as well:
您会注意到, timer_create引用了一个名为sensor_timer_evt的事件回调。 我们还需要创建那个人:
static void sensor_timer_evt() {
	// We'll come back in a sec
}
The last thing is to start the timer. Let's do that underneath timer_create:
最后一件事是启动计时器。 让我们在timer_create下面进行操作:
// Start
timer_start(&m_sensor_timer, 1000);
This will start our repeating timer on a 1 second interval. (timer_start is configured using milliseconds)
这将以1秒的间隔启动我们的重复计时器。 ( timer_start使用毫秒配置)
Now, inside sensor_timer_evt we'll publish some data. First though we need to make sure that Bluetooth is connected using ble_is_connected.
现在,在sensor_timer_evt内部,我们将发布一些数据。 首先,尽管我们需要确保使用ble_is_connected连接了蓝牙。
static void sensor_timer_evt
{
  // Check if we're connected
  if (ble_is_connected())
  {
    // Sends "ping" with the event name of "data"
    ble_publish("data", "ping");
  }
}
Inside the if statement, we'll use ble_publish. The first argument is the name of the event and the second is the value.
在if语句中,我们将使用ble_publish 。 第一个参数是事件的名称,第二个参数是值。
Next, in order to receive messages from the other end we'll need to setup a callback:
接下来,为了接收来自另一端的消息,我们需要设置一个回调:
// Configuration for ble stack
ble_stack_init(&init);

// Setup BLE callback
ble_subscribe("data", ble_evt);
We'll define ble_evt at the top of the file:
我们将在文件顶部定义ble_evt :
static void ble_evt(char *name, char *data)
{
  NRF_LOG_INFO("%s: %s", name, data);
}
In this case we'll use NRF_LOG_INFO to print out the message from the hub.
在这种情况下,我们将使用NRF_LOG_INFO从集线器中打印出消息。
Finally, in order to get the MAC address easily, we'll have to add a call to print it out in setup().
最后,为了轻松获得MAC地址,我们必须添加一个调用以在setup()中将其打印出来。
// Print the address
util_print_device_address();
In the end your file should look something like this:
最后,您的文件应如下所示:
#include "app.h"

timer_define(m_sensor_timer);

// Catch events sent over Bluetooth
static void ble_evt(char *name, char *data)
{
  NRF_LOG_INFO("%s: %s", name, data);
}

static void sensor_timer_evt()
{
  // Check if we're connected
  if (ble_is_connected())
  {
    // Sends "ping" with the event name of "data"
    ble_publish("data", "ping");
  }
}

void setup()
{
  BLE_STACK_PERIPH_DEF(init);

  // Configuration for ble stack
  ble_stack_init(&init);

  // Setup BLE callback
  ble_subscribe("data", ble_evt);

  // Start advertising
  advertising_start();

  // Sensor sensor timer.
  timer_create(&m_sensor_timer, TIMER_REPEATED, sensor_timer_evt);

  // Start
  timer_start(&m_sensor_timer, 1000);

  // Print the address
  util_print_device_address();
}

void loop()
{
}
Next, we'll program it to some hardware!
接下来,我们将其编程为一些硬件!
闪烁基本传感器代码: (Flashing the basic sensor code:)
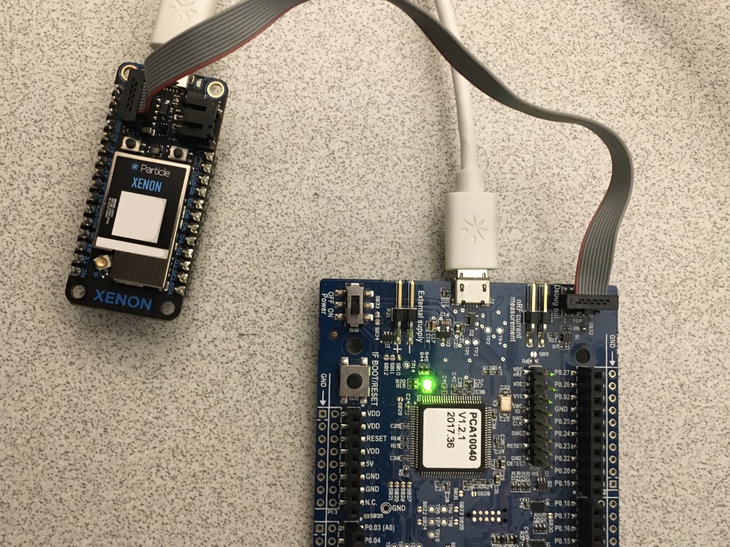
For this step you'll need to have a Xenon handy. You'll also need a programmer, programming cable and two Micro-B USB cables. Here's a picture of everything connected:
对于此步骤,您需要方便地使用氙气。 您还需要编程器,编程电缆和两条Micro-B USB电缆。 这是所有连接的图片:
Once connected and powered run these commands:
连接并通电后,运行以下命令:
make erase
make flash_softdevice
make flash
make debug
Then in a separate terminal window run
然后在单独的终端窗口中运行
make rttmake debug and make rtt will create a debugging session. You can issue commands in the make debug terminal to control the device as well. For instance, r followed by Enter will restart the device. (By far my most common use case).
make debug和make rtt将创建一个调试会话。 您也可以在make debug终端中发出命令来控制设备。 例如, r后跟Enter将重新启动设备。 (到目前为止,这是我最常用的用例)。
If you've flashed everything successfully, your device should start blinking green. That's a good sign!
如果成功闪烁了所有内容,则设备应开始闪烁绿色。 这是一个好兆头!
Additionally, if you take a look at the make rtt side your output should be similar to this:
另外,如果您看一看make rtt端,您的输出应该类似于以下内容:
###RTT Client: Connecting to J-Link RTT Server via localhost:19021 ...
###RTT Client: Connected.

SEGGER J-Link V6.62a - Real time terminal output
J-Link OB-SAM3U128-V2-NordicSemi compiled Jan 21 2020 17:30:48 V1.0, SN=581758669
Process: JLinkExe
<info> app_timer: RTC: initialized.
<info> app: Boot count: 4
<info> app: Pyrinas started.
<info> app: Address: 11:22:33:44:55:66
Take note of the address displayed above. We'll need that for the hub code!
记下上面显示的地址。 对于集线器代码,我们将需要它!
设置中心存储库 (Setting up the hub repository)

If you haven't already, clone your hub repository locally. We'll want to do some of the same steps as we did with the sensor repo like:
如果还没有,请在本地克隆中心存储库。 我们想要执行与传感器回购相同的一些步骤,例如:
- Setting up the symbolic link 设置符号链接
-
Setting your
PROG_SERIAL设定您的
PROG_SERIALSetting
PROG_PORTto a port not used by the sensor setup.19020in this case is fine.将
PROG_PORT设置为传感器设置未使用的端口。 在这种情况下19020就可以了。Setting
APP_FILENAMEtopyrinas-hub将
APP_FILENAME设置为pyrinas-hub
If you need a reminder how any of these steps work, go back and review the earlier section.
如果您需要提醒这些步骤的工作方式,请返回并查看前面的部分。
Next, we'll want to open app.c and uncomment the central/hub based code. Plus you'll want to remove the default un-commented code. Your setup() should look something like this:
接下来,我们要打开app.c并取消注释基于中央/集线器的代码。 另外,您将要删除默认的未注释代码。 您的setup()应该看起来像这样:
void setup()
{
  // Default config for central mode
  BLE_STACK_CENTRAL_DEF(init);

  // Add an addresses to scan for
  ble_gap_addr_t first = {
      .addr_type = BLE_GAP_ADDR_TYPE_RANDOM_STATIC,
      .addr = {0x81, 0x64, 0x4C, 0xAD, 0x7D, 0xC0}};
  init.config.devices[0] = first;

  ble_gap_addr_t second = {
      .addr_type = BLE_GAP_ADDR_TYPE_RANDOM_STATIC,
      .addr = {0x7c, 0x84, 0x9d, 0x32, 0x8d, 0xe4}};
  init.config.devices[1] = second;

  // Increment the device_count
  init.config.device_count = 2;

  // Configuration for ble stack
  ble_stack_init(&init);

  // Start scanning.
  scan_start();
}
You'll notice immediately that there are two clients/devices defined here. Let's remove the second one. Should you, in the future, want to connect more devices this is an example of how to do it.
您会立即注意到,这里定义了两个客户端/设备。 让我们删除第二个。 将来,如果您想连接更多设备,这将是一个示例。
Reminder: also make sure that you change the init.config.device_count to 1.
提醒:还请确保将init.config.device_count更改为1 。
Then, you'll want to update the .addr field in ble_gap_addr_t first to match the address we got earlier from make rtt:
然后,你将要更新的.addr现场ble_gap_addr_t first ,以匹配我们从前面拿到了地址make rtt :
// Add an addresses to scan for
ble_gap_addr_t first = {
    .addr_type = BLE_GAP_ADDR_TYPE_RANDOM_STATIC,
    .addr = {0x11,0x22,0x33,0x44,0x55,0x66}};
init.config.devices[0] = first;
The address field uses raw bytes, so it has to be represented that way. Remove the : and place 0x in front of each byte. We end up going from 11:22:33:44:55:66 to {0x11,0x22,0x33,0x44,0x55,0x66}
地址字段使用原始字节,因此必须以这种方式表示。 删除:并将0x放在每个字节的前面。 我们最终从11:22:33:44:55:66转到{0x11,0x22,0x33,0x44,0x55,0x66}
Now before we flash anything, let's also set up the Bluetooth event handler. As with earlier we'll use ble_subscribe to attach an event handler:
现在,在闪烁所有内容之前,我们还要设置蓝牙事件处理程序。 与之前一样,我们将使用ble_subscribe附加事件处理程序:
// Setup BLE callback
ble_subscribe("data", ble_evt);

Then place the function at the top of the file:

// Catch events sent over Bluetooth
static void ble_evt(char *name, char *data)
{
  NRF_LOG_INFO("%s: %s", name, data);

  ble_publish("data", "pong");
}
You'll notice we're printing out the message using NRF_LOG_INFO. We're also sending a message back to the sensor in the form of ble_publish("data","pong"); In other-words we're playing a game of ping-pong between the two devices!
您会注意到我们正在使用NRF_LOG_INFO打印消息。 我们还将以ble_publish("data","pong");的形式将消息发送回传感器ble_publish("data","pong"); 换句话说,我们正在两个设备之间玩乒乓球游戏!
In the end your code should look something like this:
最后,您的代码应如下所示:
#include "app.h"

// Catch events sent over Bluetooth
static void ble_evt(char *name, char *data)
{
  NRF_LOG_INFO("%s: %s", name, data);

  ble_publish("data", "pong");
}

void setup()
{
  // Default config for central mode
  BLE_STACK_CENTRAL_DEF(init);

  // Add an addresses to scan for
  ble_gap_addr_t first = {
      .addr_type = BLE_GAP_ADDR_TYPE_RANDOM_STATIC,
      .addr = {0x11, 0x22, 0x33, 0x44, 0x55, 0x66}};
  init.config.devices[0] = first;

  // Increment the device_count
  init.config.device_count = 1;

  // Configuration for ble stack
  ble_stack_init(&init);

  // Setup BLE callback
  ble_subscribe("data", ble_evt);

  // Start scanning.
  scan_start();
}

void loop()
{
}
Reminder: make sure you set ble_gap_addr_t first or the two devices will not connect!
提醒:请确保ble_gap_addr_t first设置ble_gap_addr_t first否则两个设备将无法连接!
To program, connect the Xenon to program as you did before. We'll flash it using the same methods as before:
要编程,请像以前一样将Xenon连接到程序。 我们将使用与以前相同的方法对其进行闪烁:
make erase
make flash_softdevice
make flash
make debug
Then in a separate terminal window run
然后在单独的终端窗口中运行
make rttThen take a look at each of the make rtt screens. There should be some output! For the hub it should look something like this:
然后看一下每个make rtt屏幕。 应该有一些输出! 对于集线器,它应该看起来像这样:
Process: JLinkExe
<info> app: Boot count: 4
<info> app: Pyrinas started.
<info> ble_m_central: Connected to handle 0x0
<info> ble_m_central: Protobuf Service discovered
<info> app: data: ping
<info> app: data: ping
And the sensor side like this:
传感器侧是这样的:
Process: JLinkExe
<info> app_timer: RTC: initialized.
<info> app: Boot count: 4
<info> app: Pyrinas started.
<info> app: Address: 11:22:33:44:55:66
<info> ble_m_periph: Notifications enabled!
<info> app: data: pong
<info> app: data: pong
The ping and pong messages should continue until you stop them. Awesome! If you get any warnings like this one:
ping和pong消息应继续,直到您停止它们为止。 太棒了! 如果收到这样的警告:
Unable to write. Notifications not enabled!Use the reset button on either of the devices. This should fix the problem.
使用任一设备上的重置按钮。 这应该可以解决问题。
Side note: the pairing process for Bluetooth is inherently insecure. Once the pairing process is complete though, the devices are secure. (With the caveat that no one was sniffing the pairing process!) There may be improvements on security in the future.
旁注:蓝牙的配对过程本质上是不安全的 。 但是,一旦配对过程完成,设备便是安全的。 (请注意,没有人会嗅探配对过程!)将来可能会提高安全性。
Congrats! 🎉If you've made it this far, you've deployed your first Pyrinas hub and sensor client!
恭喜! 🎉如果到目前为止,您已经部署了第一个Pyrinas集线器和传感器客户端!
For more information about what Pyrinas can do you should check out the header files under pyrinas-os/include/. Also, Pyrinas can do anything that you'd normally be able to do with Nordic's SDK. Nordic's Infocenter is a great resource for learning more about what the SDK has to offer.
有关Pyrinas可以执行的操作的更多信息,请查看pyrinas-os/include/下的头文件。 此外,Pyrinas可以执行您通常使用Nordic SDK可以执行的任何操作。 Nordic的信息中心是一个很好的资源,可用于了解有关SDK必须提供的内容的更多信息。
pyrinas的未来会怎样? (What does the future hold for Pyrinas?)

All future tasks for Pyrinas are shared openly on the Github Repo. Here are some of the high level improvements on the roadmap:
有关Pyrinas的所有未来任务在Github Repo上公开共享。 以下是路线图上的一些高级改进:
- Particle Boron + LTE support - That's right! Cellular will be coming to Pyrinas. As of this writing, the first board to support Pyrinas LTE will be Particle's Boron. 粒子硼+ LTE支持-是的! Cellular将会来到Pyrinas。 在撰写本文时,第一个支持Pyrinas LTE的板将是Particle的Boron。
- MQTT (over TLS) and HTTPS support - Once we have cellular, we need something to communicate with. That's where MQTT and HTTPS come in. They're some of the most popular protocols for IoT today. MQTT(通过TLS)和HTTPS支持-一旦有了蜂窝,就需要与之通信。 这就是MQTT和HTTPS出现的地方。它们是当今物联网中最受欢迎的协议之一。
Built in remote OTA support - As it stands today, devices programmed with Pyrinas uses Nordic's Secure Bootloader. That means they can be updated over the air by a computer or cellphone nearby. This isn't sustainable for long term deployments though!
内置的远程OTA支持-如今,使用Pyrinas编程的设备使用Nordic的Secure Bootloader。 这意味着它们可以通过附近的计算机或手机通过无线方式进行更新。 但是,这对于长期部署而言是不可持续的!
Instead, you will be able to push updates to Pyrinas devices over the Cloud. Yup. No reason to get off your couch, you can deploy your updates from anywhere.
相反,您将能够通过云将更新推送到Pyrinas设备。 对。 没有理由下车,您可以在任何地方部署更新。
- Dynamic configuration and management - adding and removing devices from a Pyrinas system currently takes some effort. In future revisions, it will be easier to add and remove devices on the fly. This allows for remote device management with zero headaches. 动态配置和管理-从Pyrinas系统中添加和删除设备目前需要一些努力。 在将来的版本中,动态添加和删除设备将更加容易。 这样可以实现零麻烦的远程设备管理。
Support for pre-certified modules and other development boards based on Nordic's nRF52840. Currently the Xenon is the only supported board. Development boards aren't great for full production though. Stay tuned for support for pre-certified modules from vendors like Fanstel and more..
支持基于Nordic nRF52840的预认证模块和其他开发板。 目前,氙气是唯一受支持的主板。 虽然开发板不适用于全面生产。 请继续关注Fanstel等供应商对预认证模块的支持。
Support for more development environments. Currently Pyrinas supports Mac only.
支持更多开发环境。 目前Pyrinas 仅支持Mac。
观星! (Star and Watch!)
This is only the tip of the iceberg! Stay tuned for more updates and make you you star and watch the repository.
这只是冰山一角! 请继续关注更多更新,让您注视并观看存储库 。
Or, better yet, looking to help out? Contributions are welcome!
或者,更好的是,寻求帮助吗? 欢迎捐款!
You can read other articles on my blog, jaredwolff.com
您可以在我的博客jaredwolff.com上阅读其他文章
翻译自: https://www.freecodecamp.org/news/meet-pyrinas-an-iot-development-kit-for-your-particle-xenon/


 859
859

 被折叠的 条评论
为什么被折叠?
被折叠的 条评论
为什么被折叠?
 到【灌水乐园】发言


