


一:nginx后端健康检查ngx_http_upstream_module
nginx自带健康检查的缺陷 :
- Nginx只有当有访问时后,才发起对后端节点探测。
- 如果本次请求中,节点正好出现故障,Nginx依然将请求转交给故障的节点,然后再转交给健康的节点处理。所以不会影响到这次请求的正常进行。但是会影响效率,因为多了一次转发
- 自带模块无法做到预警
- 被动健康检查
upstream cluster{
    server 172.16.0.23:80  max_fails=1 fail_timeout=10s;
    server 172.16.0.24:80  max_fails=1 fail_timeout=10s;
   # max_fails=1和fail_timeout=10s 表示在单位周期为10s钟内,中达到1次连接失败,那么接将把节点标记为不可用,并等待下一个周期(同样时常为fail_timeout)再一次去请求,判断是否连接是否成功。
   # fail_timeout为10s,max_fails为1次。
}
server {
    listen 80;
    server_name xxxxxxx.com;
    location / {
      proxy_pass         http://cluster;
    }
}
二.使用第三访模块nginx_upstream_check_module
- 区别于nginx自带的非主动式的心跳检测,淘宝开发的tengine自带了一个提供主动式后端服务器心跳检测模块
- 若健康检查包类型为http,在开启健康检查功能后,nginx会根据设置的间隔向指定的后端服务器端口发送健康检查包,并根据期望的HTTP回复状态码来判断服务是否健康。
- 后端真实节点不可用,则请求不会转发到故障节点
- 故障节点恢复后,请求正常转发
三.升级步骤:
1.查看本机使用的版本,nginx -v,如果版本不想变,那就下载指定的版本的nginx包到本机/app/tools目录下
]# nginx -v
nginx version: nginx/1.26.0
]# wget http://nginx.org/download/nginx-1.26.0.tar.gz
]# tar -xvf nginx-1.26.0.tar.gz
2.下载nginx_upstream_check_module模块
wget https://codeload.github.com/yaoweibin/nginx_upstream_check_module/zip/master.zip
unzip master
3.在新下载的ngin-1.26的目录下,把nginx_upstream_check_module补丁打进来,查看本机已安装nginx的编译参数,然后拷贝,然后在后面加上--add-module=../nginx_upstream_check_module-master,由于编译需要依赖库,先安装下面几个库 pcre-devel openssl openssl-devel,然后./configure ,然后再make
]# nginx -V
nginx version: nginx/1.26.0
built by gcc 4.8.5 20150623 (Red Hat 4.8.5-44) (GCC)
built with OpenSSL 1.0.2k-fips  26 Jan 2017
TLS SNI support enabled
configure arguments: --prefix=/etc/nginx --sbin-path=/usr/sbin/nginx --modules-path=/usr/lib64/nginx/modules --conf-path=/etc/nginx/nginx.conf --error-log-path=/var/log/nginx/error.log --http-log-path=/var/log/nginx/access.log --pid-path=/var/run/nginx.pid --lock-path=/var/run/nginx.lock --http-client-body-temp-path=/var/cache/nginx/client_temp --http-proxy-temp-path=/var/cache/nginx/proxy_temp --http-fastcgi-temp-path=/var/cache/nginx/fastcgi_temp --http-uwsgi-temp-path=/var/cache/nginx/uwsgi_temp --http-scgi-temp-path=/var/cache/nginx/scgi_temp --user=nginx --group=nginx --with-compat --with-file-aio --with-threads --with-http_addition_module --with-http_auth_request_module --with-http_dav_module --with-http_flv_module --with-http_gunzip_module --with-http_gzip_static_module --with-http_mp4_module --with-http_random_index_module --with-http_realip_module --with-http_secure_link_module --with-http_slice_module --with-http_ssl_module --with-http_stub_status_module --with-http_sub_module --with-http_v2_module --with-mail --with-mail_ssl_module --with-stream --with-stream_realip_module --with-stream_ssl_module --with-stream_ssl_preread_module --with-cc-opt='-O2 -g -pipe -Wall -Wp,-D_FORTIFY_SOURCE=2 -fexceptions -fstack-protector-strong --param=ssp-buffer-size=4 -grecord-gcc-switches -m64 -mtune=generic -fPIC' --with-ld-opt='-Wl,-z,relro -Wl,-z,now -pie'

nginx-1.26.0]# patch -p1 < ../nginx_upstream_check_module-master/check_1.20.1+.patch
nginx-1.26.0]# yum -y install pcre-devel openssl openssl-devel
nginx-1.26.0]# ./configure --prefix=/etc/nginx --sbin-path=/usr/sbin/nginx --modules-path=/usr/lib64/nginx/modules --conf-path=/etc/nginx/nginx.conf --error-log-path=/var/log/nginx/error.log --http-log-path=/var/log/nginx/access.log --pid-path=/var/run/nginx.pid --lock-path=/var/run/nginx.lock --http-client-body-temp-path=/var/cache/nginx/client_temp --http-proxy-temp-path=/var/cache/nginx/proxy_temp --http-fastcgi-temp-path=/var/cache/nginx/fastcgi_temp --http-uwsgi-temp-path=/var/cache/nginx/uwsgi_temp --http-scgi-temp-path=/var/cache/nginx/scgi_temp --user=nginx --group=nginx --with-compat --with-file-aio --with-threads --with-http_addition_module --with-http_auth_request_module --with-http_dav_module --with-http_flv_module --with-http_gunzip_module --with-http_gzip_static_module --with-http_mp4_module --with-http_random_index_module --with-http_realip_module --with-http_secure_link_module --with-http_slice_module --with-http_ssl_module --with-http_stub_status_module --with-http_sub_module --with-http_v2_module --with-mail --with-mail_ssl_module --with-stream --with-stream_realip_module --with-stream_ssl_module --with-stream_ssl_preread_module --with-cc-opt='-O2 -g -pipe -Wall -Wp,-D_FORTIFY_SOURCE=2 -fexceptions -fstack-protector-strong --param=ssp-buffer-size=4 -grecord-gcc-switches -m64 -mtune=generic -fPIC' --with-ld-opt='-Wl,-z,relro -Wl,-z,now -pie' --add-module=../nginx_upstream_check_module-master
nginx-1.26.0]# make
#然后核对下生成的nginx版本,编译参数是否正确
]# objs/nginx -V
nginx version: nginx/1.26.0
built by gcc 4.8.5 20150623 (Red Hat 4.8.5-44) (GCC)
built with OpenSSL 1.0.2k-fips  26 Jan 2017
TLS SNI support enabled
configure arguments: --prefix=/etc/nginx --sbin-path=/usr/sbin/nginx --modules-path=/usr/lib64/nginx/modules --conf-path=/etc/nginx/nginx.conf --error-log-path=/var/log/nginx/error.log --http-log-path=/var/log/nginx/access.log --pid-path=/var/run/nginx.pid --lock-path=/var/run/nginx.lock --http-client-body-temp-path=/var/cache/nginx/client_temp --http-proxy-temp-path=/var/cache/nginx/proxy_temp --http-fastcgi-temp-path=/var/cache/nginx/fastcgi_temp --http-uwsgi-temp-path=/var/cache/nginx/uwsgi_temp --http-scgi-temp-path=/var/cache/nginx/scgi_temp --user=nginx --group=nginx --with-compat --with-file-aio --with-threads --with-http_addition_module --with-http_auth_request_module --with-http_dav_module --with-http_flv_module --with-http_gunzip_module --with-http_gzip_static_module --with-http_mp4_module --with-http_random_index_module --with-http_realip_module --with-http_secure_link_module --with-http_slice_module --with-http_ssl_module --with-http_stub_status_module --with-http_sub_module --with-http_v2_module --with-mail --with-mail_ssl_module --with-stream --with-stream_realip_module --with-stream_ssl_module --with-stream_ssl_preread_module --with-cc-opt='-O2 -g -pipe -Wall -Wp,-D_FORTIFY_SOURCE=2 -fexceptions -fstack-protector-strong --param=ssp-buffer-size=4 -grecord-gcc-switches -m64 -mtune=generic -fPIC' --with-ld-opt='-Wl,-z,relro -Wl,-z,now -pie' --add-module=../nginx_upstream_check_module-master
4.配置nginx配置文件,调用模块
upstream web_group {
server 10.0.0.7:80;
server 10.0.0.8:80;
check interval=3000 rise=2 fall=5 timeout=1000 type=http;
# 每隔三秒检查后端真实节点状态,成功2次为up状态,失败5次为down状态,超时时间为1秒,检查类型为http
check_http_send "HEAD / HTTP/1.0\r\nHost: $http_host\r\n\r\n";
check_http_expect_alive http_2xx http_3xx;
# 返回2xx,3xx状态码为正常状态,其它状态码为down状态
}
server {
listen 80;
#server_name proxy.tom.com session.tom.com;
server_name _;
location / {
proxy_pass http://web_group;
proxy_buffers 32 4k;
proxy_set_header Host $http_host;
proxy_set_header X-Forwarded-For $proxy_add_x_forwarded_for;
}
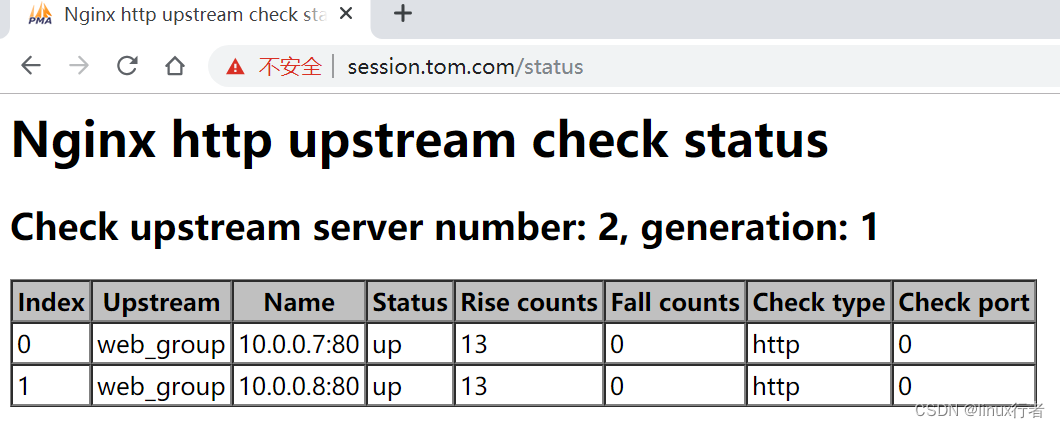
location /status {
check_status;
access_log off;
}
}5.nginx -t 验证配置文件是否正确
6.平滑迁移升级Nginx
kill 信号说明:
- TERM:快速关闭;
- Quit 从容关闭;
- HUP 平滑重启,重新加载配置文件;
- USR1:重新打开日志文件,在切割日志时用途较大
- USR2:平滑升级可执行程序
- WINCH:从容关闭工作进程
nginx-1.26.0]# whereis nginx
nginx: /usr/sbin/nginx

#备份老的nginx
nginx-1.26.0]# cp /usr/sbin/nginx /usr/sbin/nginx.back

#cp -f复制并替换
nginx-1.26.0]# cp -f objs/nginx /usr/sbin/nginx

#执行平滑升级信号,若不清楚Nginx.pid的路径,可查看nginx配置文件,里面有对应的路径,/etc/nginx/nginx.conf里面 pid /run/nginx.pid;
nginx-1.26.0]# kill -USR2 `cat /run/nginx.pid`

#nginx就会出现一个老的pid和新的pid号
nginx-1.26.0]# ll /run/nginx*
-rw-r--r-- 1 root root 5 Sep 25 13:32 nginx.pid
-rw-r--r-- 1 root root 5 Sep 25 13:27 nginx.pid.oldbin

#从容关闭老的nginx进程
nginx-1.26.0]# kill -WINCH `cat /run/nginx.pid.oldbin`

#从容关闭老的nginx进程
nginx-1.26.0]# kill -QUIT `cat /run/nginx.pid.oldbin`
7. 访问测试


 5409
5409


 被折叠的 条评论
为什么被折叠?
被折叠的 条评论
为什么被折叠?
 到【灌水乐园】发言


