
wordpress 水印
Do you want to add watermark to your images in WordPress? Many photographers and artists use watermark to prevent misuse of their images. In this article, we will show you how to automatically add watermark to images in WordPress.
是否要在WordPress中为图像添加水印? 许多摄影师和艺术家使用水印来防止滥用其图像。 在本文中,我们将向您展示如何向WordPress中的图像自动添加水印。

方法1:使用Envira Gallery将水印添加到WordPress中的图像 (Method 1: Adding Watermark to Images in WordPress Using Envira Gallery)
Envira Gallery is the best WordPress gallery plugin in the market. It allows you to create beautiful and mobile friendly image galleries into your WordPress site.
Envira Gallery是市场上最好的WordPress Gallery插件 。 它使您可以在WordPress网站中创建美观且易于移动的图片库。
Envira comes with a watermarking addon that makes it easy to add watermark to your WordPress images.
Envira带有水印插件 ,可轻松为您的WordPress图像添加水印。
WPBeginner readers can use the Envira Gallery coupon code: WPB25 to get 25% Off on their purchase.
WPBeginner读者可以使用Envira Gallery优惠券代码: WPB25享受25%的折扣。
First thing you need to do is install and activate the Envira Gallery plugin. For more details, see our step by step guide on how to install a WordPress plugin.
您需要做的第一件事是安装并激活Envira Gallery插件。 有关更多详细信息,请参阅有关如何安装WordPress插件的分步指南。
Upon activation, you need to visit Envira Gallery » Settings page to enter your license key.
激活后,您需要访问Envira Gallery»设置页面以输入许可证密钥。
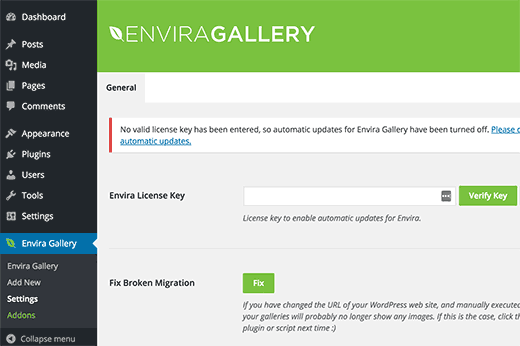
You can get this key from your account dashboard on Envira Gallery website.
您可以从Envira Gallery网站上的帐户仪表板上获取此密钥。
After verifying your license key, you can head over to Envira Gallery » Addons page. Scroll down or search to locate the Watermarking Addon, and then install and activate it.
验证许可证密钥后,您可以转到Envira Gallery»插件页面。 向下滚动或搜索以找到“水印附加组件”,然后安装并激活它。
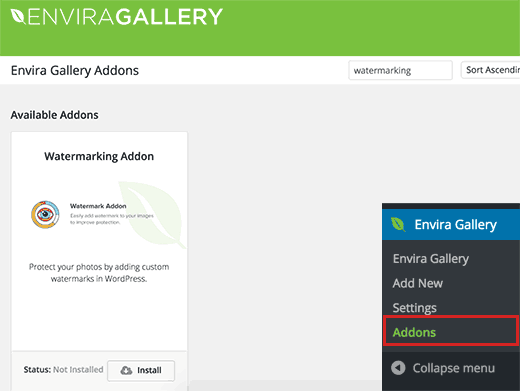
You are now ready to add your images into responsive galleries with watermark. Simply go to Envira Gallery » Add New to create your first image gallery.
现在您可以将图像添加到带有水印的响应式画廊中。 只需转到Envira Gallery»添加新创建您的第一个图像库。
Scroll down on the page and you will notice the watermarking tab. Clicking on it will show you settings for watermarking.
向下滚动页面,您会注意到水印选项卡。 单击它会显示给您加水印的设置。
You need to click on the checkbox next to ‘Enabled’ to see more options.
您需要单击“已启用”旁边的复选框以查看更多选项。
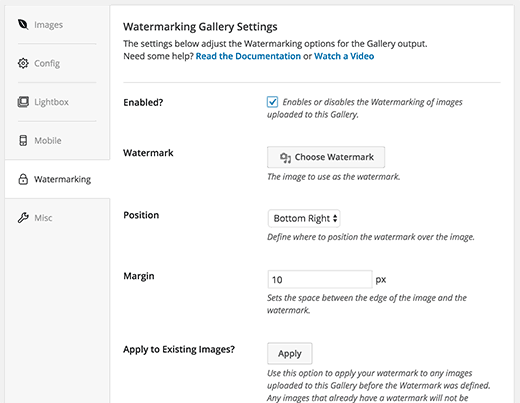
After that click on ‘Choose Watermark’ button and upload an image that you want to use as watermark. You can also change position and margin of the watermark image.
之后,单击“选择水印”按钮,然后上传要用作水印的图像。 您还可以更改水印图像的位置和边距。
After adding a watermark image, you can now move on to adding images into this gallery. Scroll up, and then click on ‘Select files from computer’ or ‘Select files from other sources’ button.
添加水印图像后,您现在可以继续将图像添加到此图库中。 向上滚动,然后单击“从计算机选择文件”或“从其他来源选择文件”按钮。
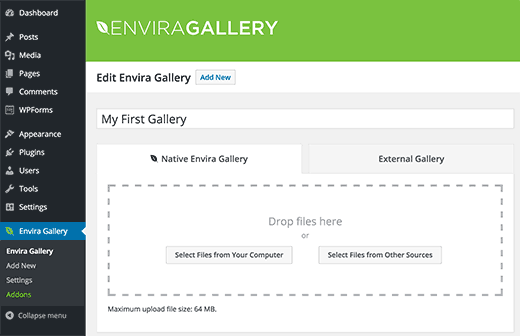
For detailed instructions, see our guide on how to easily create responsive WordPress image galleries with Envira.
有关详细说明,请参阅有关如何使用Envira轻松创建响应式WordPress图像库的指南。
After adding a few images to your gallery, you can publish it.
将一些图像添加到图库后,即可发布它。
Now you can add this image gallery into any WordPress post or page. Simply edit a post or page and then click on the ‘Add Gallery’ button.
现在,您可以将此图库添加到任何WordPress 帖子或页面中 。 只需编辑帖子或页面,然后单击“添加图库”按钮。

Clicking on the button will bring up a popup where you need to select the image gallery you just created and then click on the insert button.
单击该按钮将弹出一个弹出窗口,您需要在其中选择刚刚创建的图像库,然后单击插入按钮。
You will notice the Envira Gallery shortcode appear in the post editor. You can now save or publish your post/page.
您会发现Envira Gallery 短代码出现在帖子编辑器中。 您现在可以保存或发布您的帖子/页面。
Go ahead and visit your website to see the watermarked image gallery in action.
继续并访问您的网站以查看带有水印的图像画廊。

方法2:使用简易水印将水印添加到WordPress中的图像 (Method 2: Adding Watermark to Images in WordPress Using Easy Watermark)
First thing you need to do is install and activate the Easy Watermark plugin. For more details, see our step by step guide on how to install a WordPress plugin.
您需要做的第一件事是安装并激活Easy Watermark插件。 有关更多详细信息,请参阅有关如何安装WordPress插件的分步指南。
Upon activation, you need to go to Settings » Easy Watermark page to configure plugin settings.
激活后,您需要进入设置»简易水印页面来配置插件设置。
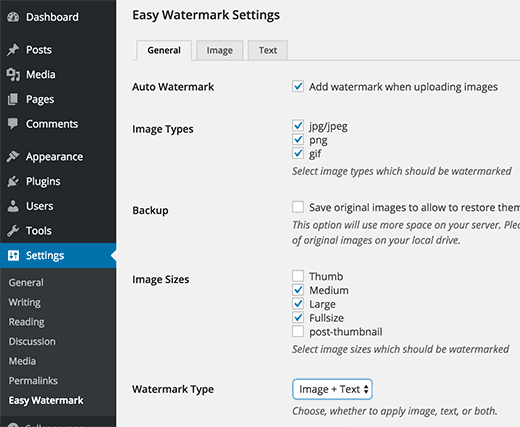
The settings page is divided into three tabs. The first option on the General settings tab is to automatically add watermark to all image uploads. You can also choose which image file types to auto watermark.
设置页面分为三个选项卡。 常规设置标签上的第一个选项是自动将水印添加到所有图像上传中。 您还可以选择要自动加水印的图像文件类型。
Next option is backup, you should check this if you want to save original uploads on your server too. You can also select which image sizes to add watermark to.
下一个选项是备份,如果您也想在服务器上保存原始上传文件,则应选中此选项。 您还可以选择要添加水印的图像尺寸。
You also need to select watermark type. The plugin allows you to add text, image, or both to be used as watermark.
您还需要选择水印类型。 该插件可让您添加文本,图像或同时添加两者,以用作水印。
Review rest of the options on the page, and then click on save changes button to store your settings.
查看页面上的其余选项,然后单击“保存更改”按钮以存储您的设置。
Now you can click on the Image tab on the plugin’s settings page. This is where you can upload the image you want to be used as watermark.
现在,您可以单击插件设置页面上的图像选项卡。 您可以在此处上载要用作水印的图像。

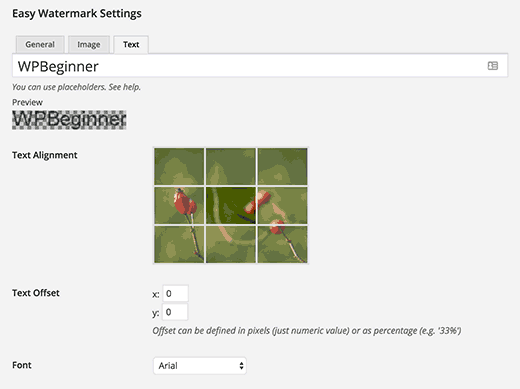
If you selected image+text or just the text as your watermark type, then you need to click on the text tab.
如果选择图像+文本或仅文本作为水印类型,则需要单击文本选项卡。
Here you can add the text you want to be displayed as watermark. You can select font, font size, watermark alignment, transparency, and color.
在这里,您可以添加要显示为水印的文本。 您可以选择字体,字体大小,水印对齐方式,透明度和颜色。
Don’t forget to click on the save changes button to store your settings.
不要忘记单击“保存更改”按钮来存储您的设置。
You can now add watermark to images you add to your WordPress site.
现在,您可以为添加到WordPress网站的图像添加水印。
在WordPress中的旧图像中添加水印 (Adding Watermark to Your Old Images in WordPress)
To add watermark on the old images, you need to go to Media » Easy Watermark click on start button under Bulk Watermark section.
要在旧图像上添加水印,您需要转到Media»Easy Watermark,然后单击Bulk Watermark部分下的开始按钮。
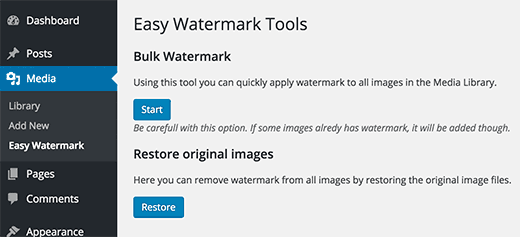
Important: Please note that this process is irreversible. We strongly urge you to backup your WordPress site particularly your media uploads directory.
重要提示:请注意,此过程是不可逆的。 我们强烈建议您备份WordPress网站,尤其是您的媒体上传目录。
If you selected the option to keep a backup of your original uploads, then you can also use the restore option on this page, which will remove watermark from all images that have them.
如果您选择了保留原始上传文件备份的选项,那么您还可以使用此页面上的还原选项,该选项将从具有水印的所有图像中删除水印。
手动向图像添加水印 (Adding Watermark to Images Manually)
In case you don’t want to automatically add watermark to all uploaded images, Easy Watermark gives you the manual option as well.
如果您不想将水印自动添加到所有上传的图像中,Easy Watermark也会为您提供手动选项。
First thing you need to do is to go to Settings » Easy Watermark and make sure that the checkbox next to Automatically add watermark to images is unchecked.
您需要做的第一件事是转到“设置”»“简单水印” ,并确保未选中“自动向图像添加水印”旁边的复选框。
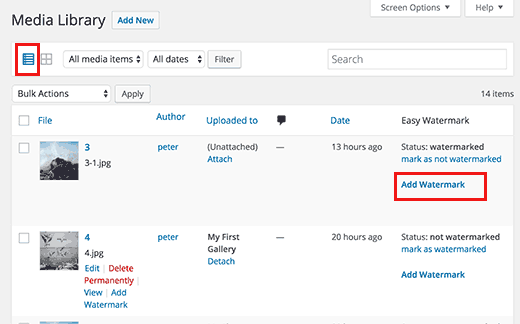
After that you can go to Media » Library. You will need to switch to the list view to see the Add Watermark option next to each image in the library.
之后,您可以转到Media»Library 。 您将需要切换到列表视图,以查看库中每个图像旁边的“添加水印”选项。
We hope this article helped you add you add watermark to images in WordPress. If you come across any issues, don’t forget to check our guide on common WordPress image issues and how to fix them.
我们希望本文能帮助您为WordPress中的图像添加水印。 如果您遇到任何问题,请不要忘记查看有关常见WordPress图像问题以及如何解决它们的指南。
If you liked this article, then please subscribe to our YouTube Channel for WordPress video tutorials. You can also find us on Twitter and Facebook.
如果您喜欢这篇文章,请订阅我们的YouTube频道 WordPress视频教程。 您也可以在Twitter和Facebook上找到我们。
翻译自: https://www.wpbeginner.com/plugins/how-to-automatically-add-watermark-to-images-in-wordpress/
wordpress 水印


 本文介绍如何在WordPress中自动为图像添加水印,包括使用EnviraGallery和EasyWatermark插件的方法,以及如何为旧图像批量添加水印。


 2354
2354

 被折叠的 条评论
为什么被折叠?


