


主画布 子画布
Done it before with PHP, but now that JavaScript is all-powerful, let's see how we can manipulate images in an HTML <canvas>.
以前使用PHP进行过处理,但是现在JavaScript具备了强大的功能,让我们看看如何在HTML <canvas>处理图像。
像素操纵 (Pixel manipulation)
The simplest way to fiddle with image data is to take each pixel and change the value of one or more of its channels: red, green, blue and alpha (transparency), also known as R, G, B and A for short. The results may vary from mostly useless to "wow, that sepia was easy, I'm totally doing it for all my thumbnails!"
处理图像数据的最简单方法是获取每个像素并更改其一个或多个通道的值:红色,绿色,蓝色和alpha(透明度),也简称为R,G,B和A。 结果可能有所不同,从几乎没有用到“哇,棕褐色很容易,我为所有缩略图完全做到了!”
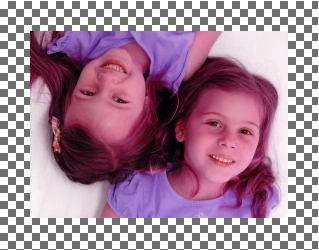
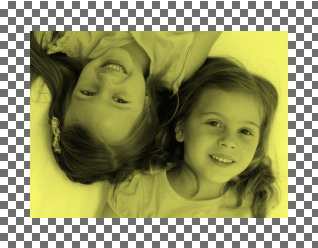
A trivial example is to just swap some values. E.g. take the amount of B and assign it to G.
一个简单的例子就是交换一些值。 例如,取B的数量并将其分配给G。
rgb(100, 50, 30, 255) becomes rgb(100, 30, 50, 255)
rgb(100, 50, 30, 255)变为rgb(100, 30, 50, 255)
回呼 (Callbacks)
For the purpose of this demo I've isolated the part that deals with the canvas API (loading an image file, reading and writing pixels) from the actual pixel manipulation. The manipulation itself is in the form of simple callback functions.
出于本演示的目的,我从实际的像素操作中隔离了涉及canvas API(加载图像文件,读取和写入像素)的部分。 操作本身采用简单的回调函数的形式。
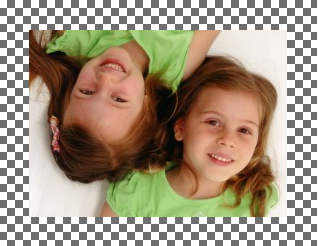
The example above (B to G and G to B) is written as
上面的示例(B到G和G到B)写为
function (r, g, b) {
  return [r, b, g, 255];
}
Here we ignore alpha, because we don't need it and hardcode it to 255. Here's the result:
这里我们忽略了alpha,因为我们不需要它并将其硬编码为255。结果如下:
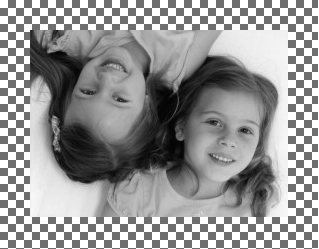
from the original:
从原来的:
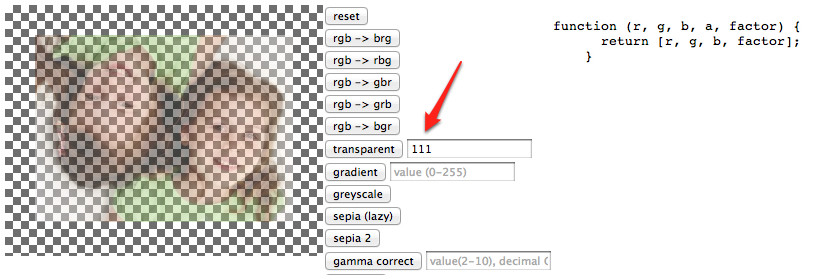
Let's say you want to touch alpha and make an image partially transparent. Here's the callback:
假设您要触摸Alpha并使图像部分透明。 这是回调:
function (r, g, b, a, factor) {
  return [r, g, b, factor];
}
Here we let the user specify a factor in other words how transparent should the image be. We use this as a value for the alpha channel.
在这里,我们让用户指定一个factor ,换句话说,图像的透明度。 我们将其用作Alpha通道的值。
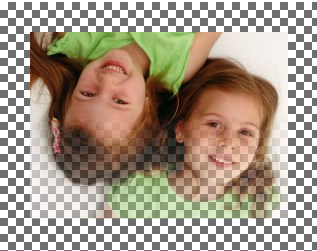
The result of calling this with factor of 111:
以111的因子调用此结果:
And the most complicated form of callback is taking into account where this pixel is in the overall image. Here's a gradient:
回调的最复杂形式是考虑此像素在整个图像中的位置。 这是一个渐变:
function (r, g, b, a, factor, i) {
  var total = this.original.data.length;
  return [r, g, b, factor + 255 * (total - i) / total];
}
And the result of calling this with factor of 111:
并将其称为111的结果:
this refers to an object of our own design which you'll see in a bit. It keeps some info in case the callbacks need as is the case above.
this指的是我们自己设计的对象,您稍后会看到。 它保留一些信息,以防需要回调,就像上面的情况一样。
帆布部分 (The canvas part)
For the canvas stuff I started by copying an old post to load an image into a canvas. This constructor was born:
对于画布,我首先复制了一个旧帖子以将图像加载到画布中。 这个构造函数诞生了:
function CanvasImage(canvas, src) {
  // load image in canvas
  var context = canvas.getContext('2d');
  var i = new Image();
  var that = this;
  i.onload = function(){
    canvas.width = i.width;
    canvas.height = i.height;
    context.drawImage(i, 0, 0, i.width, i.height);

    // remember the original pixels
    that.original = that.getData();
  };
  i.src = src;

  // cache these
  this.context = context;
  this.image = i;
}
You use this by passing a reference to a canvas element somewhere on the page and a URL to an image. The image has to be on the same domain for the image data part to work.
通过将对画布元素的引用传递给页面上的某个地方,并将图像的URL作为传递来使用它。 图像必须在同一域中,图像数据部分才能正常工作。
var transformador = new CanvasImage(
  $('canvas'),
  '/wp-content/uploads/2008/05/zlati-nathalie.jpg'
);
The constructor creates a new Image object and once it's loaded it draws it into the canvas. Then it remembers some stuff for later such as the canvas context, the image object and the original image data. `this` is the same `this` that pixel manipulator callbacks have access to.
构造函数将创建一个new Image对象,并将其加载到画布中。 然后,它会记住一些内容,例如画布context , image对象和original图像数据。 “ this”与像素操纵器回调可以访问的“ this”相同。
Then you have three simple methods to get, set and reset the image data into the canvas:
然后,您可以通过三种简单的方法来获取,设置图像数据并将其重置到画布中:
CanvasImage.prototype.getData = function() {
  return this.context.getImageData(0, 0, this.image.width, this.image.height);
};

CanvasImage.prototype.setData = function(data) {
  return this.context.putImageData(data, 0, 0);
};

CanvasImage.prototype.reset = function() {
  this.setData(this.original);
}
The "brains" of the whole thing is the transform() method. It takes the pixel manipulator callback and a factor which is essentially a configuration setting for the manipulator. Then it loops through all pixels, passes olddata rgba channel values to the callback and uses the return values from the callback as newdata. At the end the new data is written back to canvas.
整个过程的“大脑”就是transform()方法。 它需要像素操纵器回调和一个factor ,该factor本质上是操纵器的配置设置。 然后,它遍历所有像素,将olddata rgba通道值传递给回调,并将回调的返回值用作newdata 。 最后,新数据将写回到画布上。
CanvasImage.prototype.transform = function(fn, factor) {
  var olddata = this.original;
  var oldpx = olddata.data;
  var newdata = this.context.createImageData(olddata);
  var newpx = newdata.data
  var res = [];
  var len = newpx.length;
  for (var i = 0; i < len; i += 4) {
   res = fn.call(this, oldpx[i], oldpx[i+1], oldpx[i+2], oldpx[i+3], factor, i);
   newpx[i]   = res[0]; // r
   newpx[i+1] = res[1]; // g
   newpx[i+2] = res[2]; // b
   newpx[i+3] = res[3]; // a
  }
  this.setData(newdata);
};
Pretty simple, right? The only confusing part could be the i += 4 increment in the loop. See, the data returned by canvas' getImageData().data is an array with 4 elements for each pixel.
很简单,对吧? 唯一令人困惑的部分可能是循环中的i += 4增量。 看到,画布的getImageData().data data返回的getImageData().data是一个数组,每个像素有4个元素。
Imagine an image with only two pixels - red and blue and no transparency. The data for this image is
想象一个只有两个像素的图像-红色和蓝色且没有透明度。 该图像的数据是
[
  255, 0, 0, 255,
  0, 0, 255, 255
]
And this is it. You use the objects created by ImageCanvas constructor like so:
就是这样。 您可以像这样使用ImageCanvas构造函数创建的对象:
transformador.transform(function(r, g, b, a, factor, i) {
  // image magic here
  return [r, g, b, a];
}, factor);
Feel free to play in the console with this on the demo page
在演示页面上随意在控制台中播放
回调(续)(Callbacks (contd.))
The rest of the code for the demo is just the setting up pixel-fiddling callbacks and creating some UI to use them. Let's check out a few.
该演示的其余代码仅是设置像素摆弄的回调并创建一些UI来使用它们。 让我们看看一些。
灰度 (Greyscale)
Grey is equal amounts of r, g, b. So you can simply average the three values to get a single value:
灰色等于r,g,b的数量。 因此,您可以简单地对这三个值求平均值即可得到一个值:
var agv = (r + g + b) / 3;
This is good enough, but there's a secret formula that does a better job for humans, because it takes into account our species' sensitivity to the different channels. The result:
这已经足够好了,但是有一个秘诀对人类更好,因为它考虑了我们物种对不同渠道的敏感性。 结果:
function(r, g, b) {
  var avg = 0.3  * r + 0.59 * g + 0.11 * b;
  return [avg, avg, avg, 255];
}
棕褐色 (Sepia)
A lazy sepia is to make a greyscale version and then add some color to it - equal amounts of rgb to each pixel. I add 100 to red and 50 to green and I like it, but you can play with different values.
惰性的棕褐色将制作灰度版本,然后为其添加一些颜色-每个像素的rgb数量相等。 我将100加到红色,将50加到绿色,我很喜欢,但您可以使用不同的值。
function(r, g, b) {
  var avg = 0.3  * r + 0.59 * g + 0.11 * b;
  return [avg + 100, avg + 50, avg, 255];
}
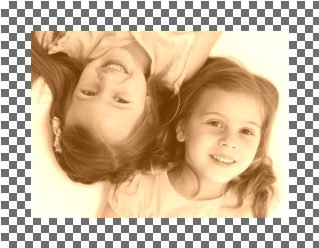
There's a second sepia callback which is supposed to be better, but I don't like it as much.
还有第二个棕褐色回调,应该会更好,但是我不太喜欢它。
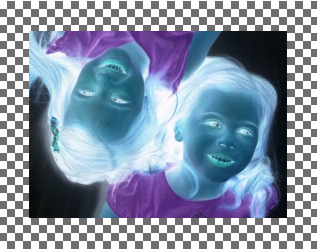
负(反转) (Negative (invert))
Subtracting each channel from 255 gives you a negated image:
从255中减去每个通道,您得到的图像将为负数:
function(r, g, b) {
  return [255 - r, 255 - g, 255 - b, 255];
}
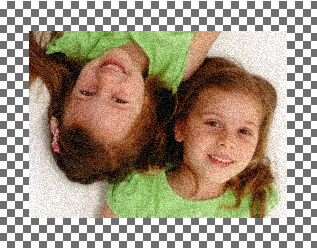
噪声 (Noise)
Noise is kind of fun, you take a random value between -factor and factor and add it to each channel:
噪声很有趣,您可以在-factor和factor之间取一个随机值,并将其添加到每个通道:
function(r, g, b, a, factor) {
  var rand =  (0.5 - Math.random()) * factor;
  return [r + rand, g + rand, b + rand, 255];
}
Noise with factor of 55:
噪声系数为55:
轮到你 (Your turn)
I'm leaving some of these manipulator callbacks for your source exploration and then to your imagination. What can you think of?
我将其中一些操纵器回调留给您进行源探索,然后让您发挥想象力。 你能想到什么?
Go nuts with those callbacks in the console! Your basic "template" again is:
在控制台中对那些回调大加赞赏! 您的基本“模板”再次是:
transformador.transform(function(r, g, b, a, factor, i) {
  // image magic here...
  return [r, g, b, a];
});
Try e.g. - blue to 255. Or make it black and white (not greyscale, make each pixel either 0,0,0 or 255,255,255)
尝试使用-蓝色到255。或者将其设置为黑白(不是灰度,将每个像素设置为0,0,0或255,255,255)
Tell your friends about this post on Facebook and Twitter
在Facebook和Twitter上告诉您的朋友有关此帖子的信息
主画布 子画布


 558
558


 被折叠的 条评论
为什么被折叠?
被折叠的 条评论
为什么被折叠?
 到【灌水乐园】发言


