


有趣的排序图片
Here are some examples of image manipulation using the GD library, more specifically these are pixel operations. Pixel operation meaning doing something to a pixel in an image with regards to this pixel only, not taking into account the neighbours.
以下是使用GD库进行图像处理的一些示例,更具体地说,这些示例是像素操作。 像素运算意味着仅针对该像素对图像中的像素执行某项操作,而不考虑邻居。
An example pixel operation is making a negative image. You take every pixel in an image and substitute it with its opposite color pixel.
示例像素操作正在制作负片图像。 您将图像中的每个像素都用其相反颜色的像素替换。
OK, so how is this thing working. Pretty simple. I take a PNG image, go through every pixel of this image and call a function passing the pixel as a parameter. The callback function returns a new pixel. I take all returned pixels and create a new image.
好的,这是怎么工作的。 很简单我拍摄一个PNG图像,遍历该图像的每个像素,然后调用将像素作为参数传递的函数。 回调函数返回一个新像素。 我获取所有返回的像素并创建一个新图像。
像素类 (Pixel class)
To get started I have a pixel class. It simply contains three integer values, the values of red, green and blue the pixel has.
首先,我有一个像素类。 它仅包含三个整数值,即像素具有的红色,绿色和蓝色值。
<?php
class Pixel {
    function Pixel($r, $g, $b)
    {
        $this->r = ($r > 255) ? 255 : (($r < 0) ? 0 : (int)($r));
        $this->g = ($g > 255) ? 255 : (($g < 0) ? 0 : (int)($g));
        $this->b = ($b > 255) ? 255 : (($b < 0) ? 0 : (int)($b));
    }
}
?>
This class has only one method, the constructor of the class, which takes care to sanitize the RGB values.
该类只有一个方法,即该类的构造函数,该方法要清理RGB值。
To create a red pixel, you simply do:
要创建红色像素,只需执行以下操作:
<?php
$red = new Pixel(255, 0, 0);
?>
像素运算类和主要方法 (The pixel operations class and main method)
Then I have a class that will do the actual operations, I call the Image_PixelOperations. I didn't go through making a nice interface for reading and writing different file formats, I was thinking that this class can be developed further and based on PEAR's Image_Transform, which has tools for opening, validating, displaying, writing image files. What I needed the most was a simple method that opens a PNG, goes through every pixel, calls a function, gets a new pixel and writes the pixel to a new image. Hence, the pixelOperation method:
然后,我有一个将执行实际操作的类,我将其称为Image_PixelOperations。 我没有通过一个很好的界面来读取和写入不同的文件格式,我想可以基于PEAR的Image_Transform进一步开发此类,该类具有用于打开,验证,显示和写入图像文件的工具。 我最需要的是一个简单的方法,该方法可以打开PNG,遍历每个像素,调用函数,获取新像素并将像素写入新图像。 因此, pixelOperation方法:
<?php
class Image_PixelOperations {

    function pixelOperation(
            $input_image,
            $output_image,
            $operation_callback,
            $factor = false
            )
    {

        $image = imagecreatefrompng($input_image);
        $x_dimension = imagesx($image);
        $y_dimension = imagesy($image);
        $new_image = imagecreatetruecolor($x_dimension, $y_dimension);

        if ($operation_callback == 'contrast') {
            $average_luminance = $this->getAverageLuminance($image);
        } else {
            $average_luminance = false;
        }

        for ($x = 0; $x < $x_dimension; $x++) {
            for ($y = 0; $y < $y_dimension; $y++) {

                $rgb = imagecolorat($image, $x, $y);
                $r = ($rgb >> 16) & 0xFF;
                $g = ($rgb >> 8) & 0xFF;
                $b = $rgb & 0xFF;

                $pixel = new Pixel($r, $g, $b);
                $pixel = call_user_func(
                    $operation_callback,
                    $pixel,
                    $factor,
                    $average_luminance
                );

                $color = imagecolorallocate(
                    $image,
                    $pixel->r,
                    $pixel->g,
                    $pixel->b
                );
                imagesetpixel($new_image, $x, $y, $color);
            }

        }

        imagepng($new_image, $output_image);
    }
}

?>
The method takes a filename, it is not doing any validation, it assumes it's a valid PNG file. The second parameter is the output filename. The third is the callback function that will be called on every pixel and the last parameter is any additional parameter we want to pass to the callback function. The average luminance is something specific to the "contrast" operation, so it's no too important for what pixelOrerations does.
该方法采用文件名,未进行任何验证,并假定它是有效的PNG文件。 第二个参数是输出文件名。 第三个是将在每个像素上调用的回调函数,最后一个参数是我们要传递给回调函数的任何其他参数。 平均亮度是“对比度”操作所特有的,因此对pixelOrerations所做的操作并不重要。
增加噪音 (Adding noise)
Time for writing the first callback, the addNoise method. Adding noise to an image means adding a random value to each channel of a pixel. (If you're wondering, the value of red in a pixel is called a channel, and so are the blue and the green). Here goes the addNoise implementation.
是时候编写第一个回调,即addNoise方法。 向图像添加噪声意味着向像素的每个通道添加随机值。 (如果您想知道,像素中红色的值称为通道,蓝色和绿色也称为通道)。 这里是addNoise实现。
<?php
    function addNoise($pixel, $factor)
    {
        $random = mt_rand(-$factor, $factor);
        return new Pixel(
                    $pixel->r + $random,
                    $pixel->g + $random,
                    $pixel->b + $random
                );
    }
?>
What we have here is generation of a random value in a user-specified range and adding the random value to the pixel. User-specified range is a number between 0 and 255, where 0 means less noise and 255 means more noise. Well, 0 means no noise and 255 means a lot of noise, 255 is not a boundary, you can go above and the more you go the more you get noise only and pretty much nothing of the original image.
这里我们所要做的是生成用户指定范围内的随机值,并将该随机值添加到像素中。 用户指定的范围是介于0到255之间的数字,其中0表示较少的噪声,而255表示较多的噪声。 好吧,0表示没有噪点,而255表示很多噪点,255不是边界,您可以越过该点,并且越走越多,您只会得到噪点而几乎没有原始图像。
Let's test! I have the simplest of HTML forms:
让我们测试! 我有最简单HTML表单:
<form method="get">
    <input name="image" />
    <input type="submit" />
</form>
I specify the image name in the form and submit.
我在表单中指定图像名称并提交。
Then if something was submitted I create an object on the pixel operation class:
然后,如果提交了一些东西,我在像素操作类上创建一个对象:
<?php
if (!empty($_GET['image'])) {

    $po =& new Image_PixelOperations();

}
?>
Then I display the original image, call the pixelOperation method and display the result:
然后显示原始图像,调用pixelOperation方法并显示结果:
<?php
    echo 'Original: <br /><img src="'. $_GET['image'] .'" />';
    echo '<hr />';

    // noise
    $noise = 100;
    $po->pixelOperation($_GET['image'], 'result_noise.png', array($po, 'addNoise'), $noise);
    echo '<br />Add noise (factor '. $noise .'): <br /><img src="result_noise.png" />';
    echo '<hr />';

?>
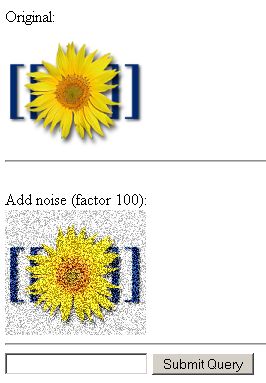
The result is:
结果是:

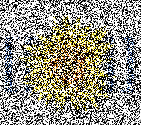
Adding more or less noise gives the following results where the first one has a noise factor of 20 and the second one, 500: and
如果第一个噪声系数为20,第二个噪声系数为500,则添加或多或少的噪声会得到以下结果:
亮度 (Brightness)
Next, adjusting brightness. This is nothing but adding the same integer to each channel of each and every pixel. If we add, we brighten the image, if we substract, we darken the image. The callback method is:
接下来,调整亮度。 这不过是向每个像素的每个通道添加相同的整数而已。 如果添加,则使图像变亮;如果减去,则使图像变暗。 回调方法是:
<?php
    function adjustBrightness($pixel, $factor)
    {

        return new Pixel(
                    $pixel->r + $factor,
                    $pixel->g + $factor,
                    $pixel->b + $factor
                );
    }
?>
To test this, we do:
为了测试这一点,我们这样做:
<?php
    $brightness = 50;
    $po->pixelOperation($_GET['image'], 'result_bright.png', array($po, 'adjustBrightness'), $brightness);
    echo '<br />Brighten: <br /><img src="result_bright.png" />';
    $brightness = -50;
    $po->pixelOperation($_GET['image'], 'result_dark.png', array($po, 'adjustBrightness'), $brightness);
    echo '<br />Darken: <br /><img src="result_dark.png" />';
    echo '<hr />';
?>


Which gives us: and
这给了我们:
交换颜色 (Swap colors)
Next, colors swapping. This means for example take the amount of red in a pixel and replace it with the amount of blue in the same pixel. So there are these possibilities for swapping:
接下来,进行颜色交换。 例如,这意味着获取一个像素中的红色数量,并用同一像素中的蓝色数量替换它。 因此,存在以下交换可能性:
- RGB to RBG RGB转RBG
- RGB to BGR RGB到BGR
- RGB to BRG RGB到BRG
- RGB to GBR RGB转GBR
- RGB to GRB RGB转GRB
The method definition is pretty simple:
方法定义非常简单:
<?php
    function swapColors($pixel, $factor)
    {

        switch ($factor) {
            case 'rbg':
                return new Pixel(
                            $pixel->r,
                            $pixel->b,
                            $pixel->g
                        );
                break;
            case 'bgr':
                return new Pixel(
                            $pixel->b,
                            $pixel->g,
                            $pixel->r
                        );
                break;
            case 'brg':
                return new Pixel(
                            $pixel->b,
                            $pixel->r,
                            $pixel->g
                        );
                break;
            case 'gbr':
                return new Pixel(
                            $pixel->g,
                            $pixel->b,
                            $pixel->r
                        );
                break;
            case 'grb':
                return new Pixel(
                            $pixel->g,
                            $pixel->r,
                            $pixel->b
                        );
                break;
            default:
                return $pixel;
        }

    }

?>


Testing the different possibilities gives us: RGB to RBG: RGB to BGR: RGB to BRG: RGB to GBR: RGB to GRB:
测试不同的可能性给我们:RGB到RBG:RGB到BGR:RGB到BRG:RGB到GBR:RGB到GRB:
消除和增强色彩 (Removing and boosting colors)
Next, we have two more methods. One that sets a channel to zero (for example "no red!") the other one maximizes a channel. Or two channels. So we have six options for each method:
接下来,我们还有两种方法。 一个将一个频道设置为零(例如“ no red!”),另一个将频道最大化。 或两个频道。 因此,每种方法有六个选项:
- Removing (or maximizing) red 消除(或最大化)红色
- Removing (or maximizing) green去除(或最大化)绿色
- Removing (or maximizing) blue去除(或最大化)蓝色
- Removing (or maximizing) red and green at the same time同时移除(或最大化)红色和绿色
- Removing (or maximizing) red and blue删除(或最大化)红色和蓝色
- Removing (or maximizing) green and blue去除(或最大化)绿色和蓝色
(It doesn't make much sense to remove all three channels or to maximize them. Why?)
(删除所有三个通道或最大化它们并没有多大意义。为什么?)
The implementation:
实现:
<?php
    function removeColor($pixel, $factor)
    {

        if ($factor == 'r' ) {
            $pixel->r = 0;
        }
        if ($factor == 'g' ) {
            $pixel->g = 0;
        }
        if ($factor == 'b' ) {
            $pixel->b = 0;
        }
        if ($factor == 'rb' || $factor == 'br') {
            $pixel->r = 0;
            $pixel->b = 0;
        }
        if ($factor == 'rg' || $factor == 'gr') {
            $pixel->r = 0;
            $pixel->g = 0;
        }
        if ($factor == 'bg' || $factor == 'gb') {
            $pixel->b = 0;
            $pixel->g = 0;
        }

        return $pixel;
    }

    function maxColor($pixel, $factor)
    {

        if ($factor == 'r' ) {
            $pixel->r = 255;
        }
        if ($factor == 'g' ) {
            $pixel->g = 255;
        }
        if ($factor == 'b' ) {
            $pixel->b = 255;
        }
        if ($factor == 'rb' || $factor == 'br') {
            $pixel->r = 255;
            $pixel->b = 255;
        }
        if ($factor == 'rg' || $factor == 'gr') {
            $pixel->r = 255;
            $pixel->g = 255;
        }
        if ($factor == 'bg' || $factor == 'gb') {
            $pixel->b = 255;
            $pixel->g = 255;
        }

        return $pixel;
    }

?>


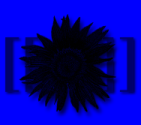


And the tests: Remove red: Remove green: Remove blue: Remove red and green: Remove green and blue: Remove red and blue: Maximize red: Maximize green: Maximize blue: Maximize red and green: Maximize green and blue: Maximize red and blue:
和测试:删除红色:删除绿色:删除蓝色:删除红色和绿色:删除绿色和蓝色:删除红色和蓝色:最大化红色:最大化绿色:最大化蓝色:最大化红色和绿色:最大化绿色和蓝色:最大化红色和蓝色:
负 (Negative)
This one is pretty easy, negate the channel. The logic is - you have a lot of red? Nah, I'll use the opposite, less red.
这很简单,取消频道。 逻辑是-您有很多红色? 不,我要使用相反的红色。
<?php
    function negative($pixel)
    {
        return new Pixel(
                    255 - $pixel->g,
                    255 - $pixel->r,
                    255 - $pixel->b
                );
    }
?>

The test gives us:
该测试为我们提供了:
灰度 (Greyscale)
I don't know if you know it, but the gray is a color that has equal amounts of R, G and B. Darker shades of gray have a log of R, G and B, the lighter shades have less. To greyscale an image we take the average of the amounts of R, G and B and set the three channels to the average.
我不知道您是否知道,但灰色是具有相等数量的R,G和B的颜色。较深的灰色阴影具有R,G和B的对数,较浅的阴影具有R,G和B的对数。 要对图像进行灰度处理,我们取R,G和B数量的平均值,然后将三个通道设置为平均值。
<?php
    function greyscale($pixel)
    {

        $pixel_average = ($pixel->r + $pixel->g + $pixel->b) / 3;

        return new Pixel(
                    $pixel_average,
                    $pixel_average,
                    $pixel_average
                );
    }
?>

Test:
测试:
黑和白 (Black and White)
Unlike greyscale that has shades, B&W has only two colors black (0, 0, 0) and white (255, 255, 255). We use a factor here to determine where the boundary would be, meaning what do you consider black and what white. The simplest logic is that we sum R+G+B and if it's closer to 255+255+255 than it is to 0 (0+0+0), then we call it white, otherwise it is black. Using a factor gives us some more flexibility of drawing the line between black and white (This reflects the subjectivity of real life 😉 )
与具有阴影的灰度不同,B&W仅具有黑色(0、0、0)和白色(255、255、255)两种颜色。 我们在这里使用一个因素来确定边界将在哪里,这意味着您将黑色和白色视为什么。 最简单的逻辑是,我们对R + G + B求和,如果它更接近255 + 255 + 255,而不是接近0(0 + 0 + 0),则我们将其称为白色,否则为黑色。 使用一个因子使我们在绘制黑白之间有更大的灵活性(这反映了现实生活的主观性😉)
<?php
    function blackAndWhite($pixel, $factor)
    {
        $pixel_total = ($pixel->r + $pixel->g + $pixel->b);

        if ($pixel_total > (((255 + $factor) / 2) * 3)) {
            // white
            $pixel->r = 255;
            $pixel->g = 255;
            $pixel->b = 255;
        } else {
            $pixel->r = 0;
            $pixel->g = 0;
            $pixel->b = 0;
        }

        return $pixel;
    }

?>

Test with factor 20:
用系数20进行测试:
夹 (Clip)
At this point I started hunting the web for ideas for more pixel manipulations (I'm still open, BTW, post a comment with anything you find). I found this clipping thing described somewhere. I'm not sure how useful it is (maybe I didn't get it right). It is in essence removing boundary values and replacing them with pure 0 or 255. So you have (5, 155, 250), this will become (0, 155, 255). Again, there is a factor to give you flexibility in drawing the line. I'm not convinced how useful this is, the only thing I can think of is decreased file size, because the new image uses less colors. Anyway, here's the implementation and the test.
在这一点上,我开始在网上寻找更多像素操作的想法(顺便说一句,顺便说一句,发表您发现的内容发表评论)。 我发现某个地方描述了这种剪辑的东西。 我不确定它的用处(也许我没弄对)。 从本质上讲,它是除去边界值并将其替换为纯0或255。因此,您拥有(5,155,250),它将变为(0,155,255)。 同样,有一个因素可以使您灵活地画线。 我不相信这有多有用,我唯一能想到的就是减小文件大小,因为新图像使用的颜色更少。 无论如何,这是实现和测试。
<?php
    function clip($pixel, $factor)
    {
        if ($pixel->r > 255 - $factor) {
            $pixel->r = 255;
        }
        if ($pixel->r < $factor) {
            $pixel->r = 0;
        }
        if ($pixel->g > 255 - $factor) {
            $pixel->g = 255;
        }
        if ($pixel->g < $factor) {
            $pixel->g = 0;
        }
        if ($pixel->b > 255 - $factor) {
            $pixel->b = 255;
        }
        if ($pixel->b < $factor) {
            $pixel->b = 0;
        }

        return $pixel;
    }
?>

Clipping with factor 100:
裁剪系数为100:
调整对比度 (Adjusting contrast)
This is not a pure pixel operation because it takes into account all the pixels in an image in order to decide how to manipulate a given pixel. The contrast adjustment needs the so called average luminance. In order to calculate the average luminance, you need a formula, which I copied, so the implementation is:
这不是纯像素操作,因为它会考虑图像中的所有像素,以便决定如何操作给定像素。 对比度调整需要所谓的平均亮度。 为了计算平均亮度,您需要复制一个公式,因此实现为:
<?php
    function getAverageLuminance($image)
    {

        $luminance_running_sum = 0;

        $x_dimension = imagesx($image);
        $y_dimension = imagesy($image);

        for ($x = 0; $x < $x_dimension; $x++) {
            for ($y = 0; $y < $y_dimension; $y++) {

                $rgb = imagecolorat($image, $x, $y);
                $r = ($rgb >> 16) & 0xFF;
                $g = ($rgb >> 8) & 0xFF;
                $b = $rgb & 0xFF;

                $luminance_running_sum += (0.30 * $r) + (0.59 * $g) + (0.11 * $b);

            }

        }

        $total_pixels = $x_dimension * $y_dimension;

        return $luminance_running_sum / $total_pixels;
    }

?>
The actual contrast callback is simple:
实际的对比回调很简单:
<?php
    function contrast($pixel, $factor, $average_luminance)
    {

        return new Pixel(
            $pixel->r * $factor + (1 - $factor) * $average_luminance,
            $pixel->g * $factor + (1 - $factor) * $average_luminance,
            $pixel->b * $factor + (1 - $factor) * $average_luminance
            );
    }
?>


Tests with decreased and increased contrast (factors 0.5 and 1.5):
对比度降低和升高的测试(系数0.5和1.5):
盐和胡椒 (Salt and Pepper)
I got the idea from this page. It's basically sprinkling random white (salt) and black (pepper) pixels. The implementation:
我从这个页面上得到了这个主意。 它基本上是在随机散布白色(盐)和黑色(胡椒粉)像素。 实现:
<?php
    function saltAndPepper($pixel, $factor)
    {

        $black = (int)($factor/2 + 1);
        $white = (int)($factor/2 - 1);

        $random = mt_rand(0, $factor);

        $new_channel = false;

        if ($random == $black) {
            $new_channel = 0;
        }
        if ($random == $white) {
            $new_channel = 255;
        }

        if (is_int($new_channel)) {

            return new Pixel($new_channel, $new_channel, $new_channel);

        } else {
            return $pixel;
        }
    }
?>

Test with factor 20:
用系数20进行测试:
伽玛校正 (Gamma correction)
<?php
    function gamma($pixel, $factor)
    {

        return new Pixel(
                pow($pixel->r / 255, $factor) * 255,
                pow($pixel->g / 255, $factor) * 255,
                pow($pixel->b / 255, $factor) * 255
            );
    }
?>

Test with factor 2.2:
用系数2.2进行测试:
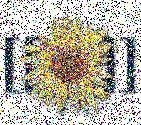
随机化 (Randomize)
This is just picking a random function from the ones described above a calling it with a random factor. The result? Well, a scientific way to create worst (or better, it's all how you look at it) colorful noise 😉
这只是从上述函数中选择一个随机函数,然后使用随机因子调用它。 结果? 嗯,一种科学的方法来创建最糟糕的(或更好的,这就是您所看到的)多彩噪音😉
下一个? (Next?)
I thought of two functions that might be useful. One of them is to snap a pixel to a predefined color. I mean if a pixel is close to something we want, make it closer. This might be useful when for example you want to change the color scheme of your website and you want to alter all images to make them pinkier for example. So far the experiments are going well, but the results ate not too promising 😉
我想到了两个可能有用的功能。 其中之一是将像素捕捉到预定义的颜色。 我的意思是,如果像素接近我们想要的东西,请使其更接近。 例如,当您想要更改网站的配色方案并且想要更改所有图像以使其更粉红色时,这可能很有用。 到目前为止,实验进展顺利,但结果并不令人满意
The other function would be to replace a color with another one, while also using proximity. For example take all very very light shades of gray and make them white.
另一个功能是用另一种颜色替换颜色,同时也使用接近度。 例如,将所有非常非常浅的灰色调成白色。
Then there are the filters to do, another set of operations which take into account not only the current pixel but also the neighbours. Examples - blur, edge detect, etc.
然后是要执行的过滤器,这是另一组操作,不仅要考虑当前像素,还要考虑邻居。 示例-模糊,边缘检测等
BTW, the full source for this posting is here. Extending it is easy, you just need to define a callback function for a new effect and pass it in a call to pixelOperation. I'll be happy if you post the results here.
顺便说一句,此发布的完整资源在这里。 扩展起来很容易,您只需要定义一个用于新效果的回调函数,并将其传递给对pixelOperation的调用即可。 如果您将结果发布在这里,我会很高兴。
-----------------
-----------------
更新表格2005-09-21: (Update form 2005-09-21:)
Thanks to Laurens Holst who posted this comment about the sensitivity of the human eye to the different colors! So I created a new greyscaling function using the formula he suggested. In my original function I just take the average of the R, G and B, while now these colors come each with a coeficient. Then I divide by the sum of the coeficients.
感谢Laurens Holst ,他发表了有关人眼对不同颜色的敏感性的评论! 因此,我使用他建议的公式创建了一个新的灰度函数。 在我的原始函数中,我只取R,G和B的平均值,而现在这些颜色各具有一个系数。 然后,我除以系数之和。
The result is better!
结果更好!
Here's the experiment with the same Wiki image (the second greyscale image is using the new formula)
这是使用相同Wiki图像的实验(第二个灰度图像使用的是新公式)
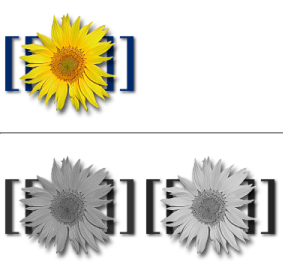
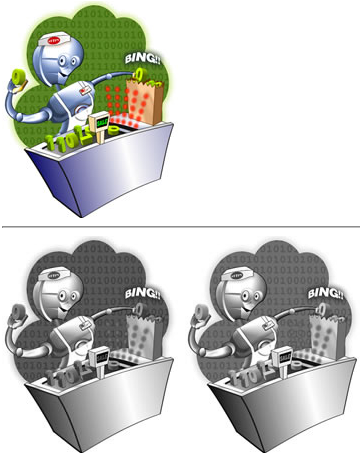
The new image looks just a bit brighter, nothing special. But I tried with another image I found on SitePoint and it looks like the second image is not only brighter but contains more human-eye-readable information. Take a lcoser look at what looks like a display on a cash register. The second greyscale image looks more "informative".
新图像看起来更亮一点,没什么特别的。 但是,我尝试了在SitePoint上找到的另一幅图像,看起来第二幅图像不仅更亮,而且包含了更多人眼可读的信息。 lcoser看一下收银机上显示的内容。 第二个灰度图像看起来更“信息丰富”。
Here's the source of the new greyscale function:
这是新的灰度功能的来源:
<?php
function greyscale2($pixel)
{

    $pixel_average =
        ( 0.3  * $pixel->r
        + 0.59 * $pixel->g
        + 0.11 * $pixel->b) / (0.3 + 0.59 + 0.11);

    return new Pixel(
                $pixel_average,
                $pixel_average,
                $pixel_average
            );

}
?>
Tell your friends about this post on Facebook and Twitter
在Facebook和Twitter上告诉您的朋友有关此帖子的信息
有趣的排序图片


 71
71

 被折叠的 条评论
为什么被折叠?
被折叠的 条评论
为什么被折叠?
 到【灌水乐园】发言


