


ssis excel
源文件 (Source Files)
为了演示,我有一个Excel文件,其中每月包含销售数据。 每个工作表包含每月数据。开发环境 (Development environment)
- SQL Server 2014 Developer Edition ( or SQL Server 2014 Express) SQL Server 2014开发人员版(或SQL Server 2014 Express)
- SQL Server Data Tools for Visual Studio 2013 适用于Visual Studio 2013SQL Server数据工具
- Excel 2010 (32 bits) Excel 2010(32位)
If you could not install any Excel instance of Microsoft, you can download Microsoft Access Database Engine (choose 32 or 64 bit).
如果无法安装Microsoft的任何Excel实例,则可以下载Microsoft Access数据库引擎 (选择32或64位)。
开发SSIS包 (Develop SSIS package)
步骤1-建立资料夹以储存Excel档案 (Step 1 - Create a folder to store Excel file)
第2步-创建Excel示例文件 (Step 2 - Create Excel example file)
Excel文件包含2015年10月至12月的销售数据,共有3张纸,每3个月一次。 它们具有相同的结构。步骤3-在SQL数据库服务器中创建临时表 (Step 3 - Create a staging table in SQL Database Server)
USE Demo
GO
CREATE TABLE Stg_SalesDataInMutipleSheets
(
TransactionDate date,
ProductCategory nvarchar(50),
ProductSubCategory nvarchar(50),
ProductName nvarchar(100),
Price decimal,
Quantity int,
TotalAmount decimal
)
步骤4-建立SSIS套件 (
Step 4 - Create SSIS package)
4.1 Create a new SSIS project and then a new SSIS loader with name AA_LoadSalesData_Monthly4.1创建一个新的SSIS项目,然后创建一个名称为AA_LoadSalesData_Monthly的新SSIS加载器
Because we need to pass the folder path / file name dynamically, we need to create some variables:
因为我们需要动态传递文件夹路径/文件名,所以我们需要创建一些变量:
OLEDBConnectionString: connection string to SQL Database Server
OLEDBConnectionString :与SQL数据库服务器的连接字符串
Value: Data Source=HSSSC1PCL01198\SQLS
值:数据源= HSSSC1PCL01198 \ SQLS ERVER2014; 初始目录=演示;提供程序= SQLN CLI11.1;在 集成安全性= SSPI;
Data Source: database server name Initial Catalog: database name Provider: the driver to connect to SQL Database Server. You need to change the value to meet your environment. I use SQLNCLI11.1 because SQL Server Engine is 2014. If your version is lower than SQL 2012 version, it should be 10.0 / 10.1 Integrated Security: means that I use Window Authentication mode while connection to SQL Database Server.SourcePath: path to folder which contains our Excel files
SourcePath :包含我们的Excel文件的文件夹的路径
Value: D:\SSIS-Practice\Lo
值:D:\ SSIS-Practice \ Lo ad_Multipl e_Sheets \ S ource_File s
ExcelFile: Excel file name. By default, we assign path of example file.
ExcelFile :Excel文件名。 默认情况下,我们分配示例文件的路径。
Value: D:\SSIS-Practice\Lo
值:D:\ SSIS-Practice \ Lo ad_Multipl e_Sheets \ S ource_File s \ AA_Sales _Data_2015 .xlsx
SheetName: contains name of each sheet in Excel file. When SSIS package reads Excel file, it will scan every sheet and get sheet name, and then assign the value to this variable. Assign Sheet1$ by default.
SheetName :包含Excel文件中每个工作表的名称。 当SSIS包读取Excel文件时,它将扫描每个工作表并获取工作表名称,然后将值分配给此变量。 默认情况下分配Sheet1 $。
SSIS package uses the connection configurations to make connection, which we create them in Connection Manager pane.
SSIS包使用连接配置进行连接,我们在“连接管理器”窗格中创建它们。
Create OLEDB Connection and assign OLEDBConnectionString variable to ConnectionString property.
创建OLEDB连接,并将OLEDBConnectionString变量分配给ConnectionString属性。
Create Excel Connection and assign ExcelFile variable to ServerName property
创建Excel连接并将ExcelFile变量分配给ServerName属性
4.3.1 Drag and drop Execute SQL Task to truncate table Stg_SalesDataInMutip
4.3.1拖放执行SQL任务以截断表Stg_SalesDataInMutip leSheets
4.3.2 Drag and drop Foreach Loop Container component. Double click to open Foreach Loop editor.
4.3.2拖放Foreach循环容器组件。 双击打开Foreach Loop编辑器。
On Collection
收款时
Connection: we select new connection
连接:我们选择新的连接
Configure ADO.NET Connection Manager window appears, then we click on New button. Connection Manager window appears, select Microsoft Office 12.0 Access Database Engine OLE DB Provider. Because the Excel file is 2007 (xlsx format), we need to select this option. If Excel is lower version such as 2003 Excel, we select Microsoft Jet 4.0 OLE DB Provider.
出现“配置ADO.NET连接管理器”窗口,然后单击“新建”按钮。 出现“连接管理器”窗口,选择“ Microsoft Office 12.0 Access数据库引擎OLE DB提供程序”。 因为Excel文件是2007(xlsx格式),所以我们需要选择此选项。 如果Excel是较低版本(例如2003 Excel),则选择Microsoft Jet 4.0 OLE DB提供程序。
Enter path of Excel example file for Server or file name
输入服务器或文件名的Excel示例文件的路径
Click OK to back Foreach Loop Editor window. Select Tables for Schema
单击“确定”返回“ Foreach循环编辑器”窗口。 选择架构表
On Variable Mapping, we have setup the variable mapping with SheetName variable to index 2
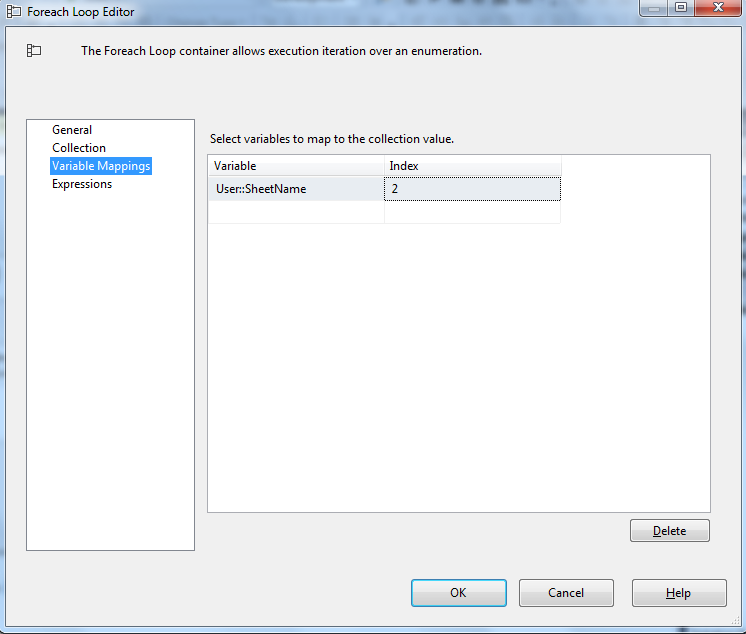
在变量映射上,我们使用SheetName变量将变量映射设置为索引2
On Connection Manage pane, a new connection is appeared. Change name it as Schema
在“连接管理”窗格上,出现一个新的连接。 将其更改为架构
4.3.3 Verify sheet name
4.3.3验证工作表名称
Sometimes, Excel file includes some invalid sheet name so we need additional step to verify before loading data. Remember we name sheet as AA-<month name>
有时,Excel文件包含一些无效的工作表名称,因此在加载数据之前,我们需要执行其他步骤来进行验证。 请记住,我们将工作表命名为AA- <月份名称>
Drag and drop Script Task component into Foreach Loop Container. Double click to open Script Task Editor then select as below
将脚本任务组件拖放到Foreach循环容器中。 双击打开脚本任务编辑器,然后选择如下
Click on Edit Script button and add the C# code to verify sheet name
单击“编辑脚本”按钮并添加C#代码以验证工作表名称
public void Main()
{
             // TODO: Add your code here

           Dts.TaskResult = (int)ScriptResults.Success;
           String sheetname = Dts.Variables["User::SheetName"].Value.ToString();
           try
            {
                if (sheetname.Trim().Contains("AA-"))
                {
                    Dts.Variables["User::IsValidateSheetName"].Value = true;
                }
                else
                {
                    Dts.Variables["User::IsValidateSheetName"].Value = false;
                }
            }
            catch
            {
                Dts.Variables["User::IsValidateSheetName"].Value = false;
            }
}
4.4 Define Data Flow4.4定义数据流Drag and drop Data Flow Task component into Foreach Loop Container. Data Flow loads data from each sheet to staging table. Connect Task Script with Data Flow and double-click on line connector to open Precedence Constraint Editor. We only load valid sheets based on user define variable IsValidateSheetName
将数据流任务组件拖放到Foreach循环容器中。 数据流将数据从每张工作表加载到登台表。 将Task Script与Data Flow连接起来,然后双击线路连接器以打开Precedence Constraint Editor。 我们仅根据用户定义的变量IsValidateSheetName加载有效的工作表
4.4.1 Define Excel Source
4.4.1定义Excel源
Drag and drop Excel Source component. Double click to open Excel Source Editor.
拖放Excel Source组件。 双击打开Excel Source Editor。
On Connection Manger tab
在“连接管理器”选项卡上
Data Access mode: Table name or view name variable
数据访问方式:表名称或视图名称变量
Variable name: User::SheetName
变量名称:User :: SheetName
On Column table: select columns we want to transfer data. In this example, we select all columns.
在“列”表上:选择我们要传输数据的列。 在此示例中,我们选择所有列。
4.4.2 Define OLE DB Destination
4.4.2定义OLE DB目标
Drag and drop OLE DB Destination component and double-click to open OLE DB Destination Editor
拖放OLE DB Destination组件,然后双击以打开OLE DB Destination Editor。
On Connection Manager:
在连接管理器上:
Data access mode: Table or view - fast load
数据访问模式:表或视图-快速加载
Name of the table or the view: Stg_SalesDataInMutip
表或视图的名称:Stg_SalesDataInMutip leSheets
On Mappings: map Input Columns and Destination Columns
在映射上:映射输入列和目标列
Finally, we have SSIS package as below
最后,我们有如下的SSIS包
()
Run package
Press F5 to execute SSIS package运行包
按F5执行SSIS包结论 (Conclusions)
上面的包很简单。 显然,在任何实际项目中实现它时,我们都会有许多步骤。 目的是为您提供解决方案,以防您必须加载多张Excel文件的数据。 关键问题之一是Excel连接,也许您会面对它。 确保您已安装Excel或必须安装数据库引擎,这是我前面提到的。ssis excel


 1571
1571


 被折叠的 条评论
为什么被折叠?
被折叠的 条评论
为什么被折叠?
 到【灌水乐园】发言


