


Here is how to use MFC's automatic Radio Button handling in your dialog boxes and forms. Beginner programmers usually start with a OnClick handler for each radio button and that's just not the right way to go. MFC has a very cool system for handling this, but the documentation is a bit unclear, and it helps to see the whole system in action.
这是在对话框和窗体中使用MFC自动单选按钮处理的方法。 初学者通常从每个单选按钮的OnClick处理程序开始,但这并不是正确的方法。 MFC有一个非常酷的系统来处理此问题,但是文档尚不清楚,它有助于查看整个系统的运行情况。
I'll also show a useful technique of creating an enumeration variable to simplify identification and processing of the selected option. And I'll describe how to disable sub-items that are related to just one of the radio-button options to give your U/I that truly professional look.
我还将展示一种创建枚举变量的有用技术,以简化对选定选项的识别和处理。 我将介绍如何禁用与单选按钮选项之一相关的子项,以使您的U / I具有
But when there are only two or three options, it's usually best to show a set of Radio Buttons in your dialog (BTW... Never use a radio button when there is only one option -- use a checkbox instead).
但是,当只有两个或三个选项时,通常最好在对话框中显示一组单选按钮(顺便说一句,当只有一个选项时,切勿使用单选按钮,而应使用复选框)。
MFC provides the tools, but the Wizard support is a bit finicky -- you need to do things in the right order if you want the Wizard to work for you, You can also add the radio-group handling manually, but it's worth knowing The MFC way.
MFC提供了这些工具,但对向导的支持有些复杂-如果希望向导为您工作,则需要按正确的顺序进行操作,也可以手动添加单选组处理,但这是值得了解
1个 (1)
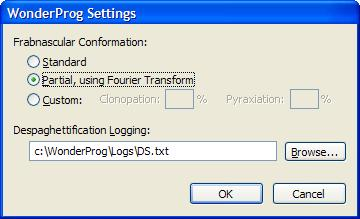
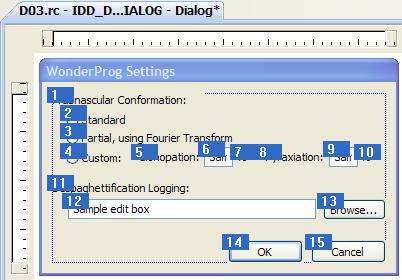
使用对话框编辑器设计表单。In the example, there are three radio buttons. There are some additional settings related to only the third option ("Custom").
在示例中,有三个单选按钮。 还有一些仅与第三个选项(“自定义”)相关的其他设置。
2 (2)
设置选项卡顺序。It's important that the radio buttons are numbered sequentially. To set the tab order, use the menu command
请务必对单选按钮进行顺序编号,这一点很重要。 要设置选项卡顺序,请使用菜单命令
Format / Tab Order (Ctrl+D)
格式/制表符顺序(Ctrl + D)
Click on each control in the order you want them. In particular, make sure that the radio buttons have sequential numbers.
单击每个控件所需的顺序。 特别是,请确保单选按钮具有序号。
3 (3)
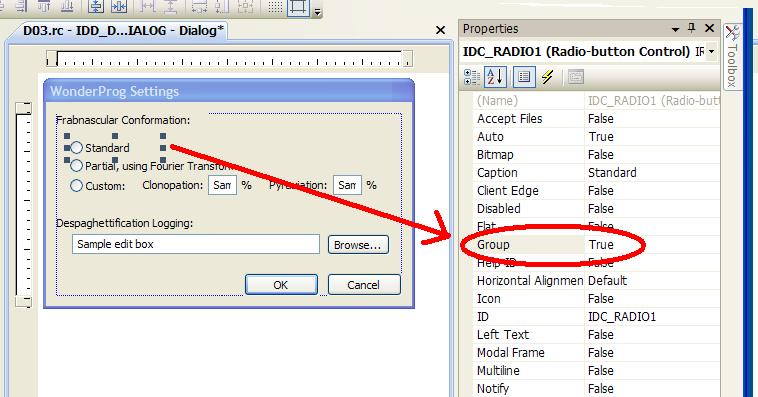
Set the Group attribute to True for the first button only.
组”属性设置为True 。
Click on the other items to verify that "Group" is set to False.
单击其他项目以验证“组”设置为False。
4 (4)
您需要在DDataExchange函数中添加DDX_Radio行。 让我们为您做向导吧。In the Dialog Editor:
在对话框编辑器中:
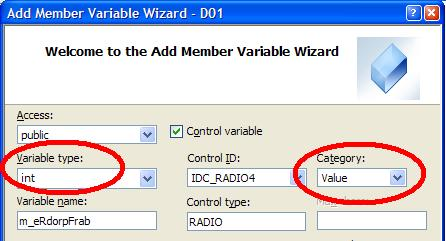
Right-click the top radio button and choose Add Variable... Set (in this order):
右键单击顶部的单选按钮,然后选择“ 添加变量...集”(按此顺序):
Category: Value
类别: 价值
Variable type: int
变量类型: int
Variable name: m_eRdoGrpFrab
变量名称: m_eRdoGrpFrab
My DoDataExchange function now looks like:
我的DoDataExchange函数现在看起来像:
void CMyOptsDlg::DoDataExchange(CDataExchange* pDX)
{
	CDialog::DoDataExchange(pDX);
	DDX_Radio(pDX, IDC_RADIO1, m_eRdoGrpFrab);  // <<--- Note
	DDX_Text(pDX, IDC_EDIT3, m_sLogFile);
}
that can be set to 0, 1, or 2 (Standard, Partial, or Custom). When you run the dialog, you'll simply set it like so:
可以设置为0,1或2(标准,部分,或自定义)。 运行对话框时,只需像这样进行设置:
	CMyOptsDlg dlg;
	dlg.m_eRdoGrpFrab= 0; // or 0,1, or 2
	int nResp= dlg.DoModal();
	if (nResp == IDOK) {
		... etc...
[step="" title="An Additional Slightly Advanced (but very useful) Technique"][/step]You can use the literal values 0,1, and 2 in your programming, but this is a perfect time to use the more advanced technique of setting up an enumerated datatype; there are only three options, so give each one a name. It makes your code self-documenting and it's cool to see the names (rather than arbitrary integers) when debugging. Add this to the header for the dialog:
[step =“” title =“是一种稍微高级的附加技巧,但非常有用)”] [/ step]您可以在编程中使用文字值0,1和2,但这是使用更多文字的绝佳时机建立枚举数据类型的先进技术; 只有三个选项,所以给每个选项起一个名字。 它使您的代码具有自我说明性,并且在调试时看到名称(而不是任意整数)很酷。 将此添加到对话框的标题:
	//int m_eRdoGrpFrab;  // the Wizard added this... change to:
	typedef enum { FrabStd=0, FrabPartial=1, FrabCustom=2 } FrabOpts;
	FrabOpts m_eRdoGrpFrab;
DDX_Radio(pDX, IDC_RADIO1, (int&)m_eRdoGrpFrab); // <<--- Note (int&) cast
	dlg.m_eRdoGrpFrab= CMyOptsDlg::FrabPartial;
	...
	if (dlg.m_eRdoGrpFrab==CMyOptsDlg::FrabCustom ) {
	...
[step="" title="About that Automatic Enabling..."][/step]Lookin
[step =“” title =“关于该自动启用...”] [/ step]查看 g在图1-1中的示例中,请注意,当选择第一个或第二个单选按钮时,与“自定义”相关的输入项将被禁用。 这是很好的U / I设计。 用户无法修改这些设置,因为除非选择了“自定义”,否则它们毫无意义。 而且您应该要禁用标签以及控件。 这种一
In order to disable those other controls, do the following:
为了禁用那些其他控件,请执行以下操作:
1) First, make sure the tab order is correct/sequential for the entire set.
1)首先,请确保整组的跳位顺序正确/顺序。
2) Give a symbolic name (other than IDC_STATIC) to the first and last label.
2)在第一个和最后一个标签上使用符号名称(IDC_STATIC除外)。
3) Double-click each radio button to have the wizard provide an OnClick handler.
3)双击每个单选按钮,使向导提供一个OnClick处理程序。
I usually collapse my code so that it looks like this:
我通常折叠我的代码,使其看起来像这样:
void CMyOptsDlg::OnBnClickedRadio1(){ DoEnabling(); }
void CMyOptsDlg::OnBnClickedRadio2(){ DoEnabling(); }
void CMyOptsDlg::OnBnClickedRadio3(){ DoEnabling(); }
//--------------------- Utilities for disabling a range of dialog items (labels and controls)
void EnableDlgItm( CDialog* pDlg, int nId, BOOL fEnable/*=TRUE*/ )
{
    CWnd* pwnd= pDlg->GetDlgItem( nId );
    if (pwnd ) {
        pwnd->EnableWindow( fEnable );
    }
}

void EnableDlgItmRange( CDialog* pDlg, int nIdFirst/*=-1*/, int nIdLast/*=-1*/, BOOL fEnable/*=TRUE*/ )
{
    CWnd* pwnd;
    if ( nIdFirst == -1 ) { // IDC_STATIC
        pwnd= pDlg->GetWindow( GW_CHILD );   // first Child
        nIdFirst= pwnd->GetDlgCtrlID();
    }
    pwnd= pDlg->GetDlgItem( nIdFirst );
    while ( pwnd ) {
        pwnd->EnableWindow( fEnable );
        pwnd= pwnd->GetWindow( GW_HWNDNEXT );
        if ( pwnd ) pwnd->EnableWindow( fEnable );
        if ((nIdLast != -1) && (pwnd && pwnd->GetDlgCtrlID() == nIdLast)) {
            break;
        }
    }
}
//--------------------------- Using this in the dialog
void CMyOptsDlg::DoEnabling()
{
    UpdateData(TRUE);  //--- find out what's been selected
    //----------------------------- disable some items when "Custom" is not selected
    BOOL fEnab= (m_eRdoGrpFrab == FrabCustom);
    EnableDlgItmRange( this, IDC_LblCustomStart, IDC_LblCustomEnd, fEnab );
}
4) In your OnInitDialog function make a call to the DoEnabling() function.
4)在您的OnInitDialog函数中,调用DoEnabling()函数。
Summary:
摘要:
The MFC coders at Microsoft implemented support for automatically handling a group of radio buttons. This Article has described how to use that support quickly and easily. Knowing how the MFC Wizard works will make these U/I design and implementation tasks easier. And when you know the system, you can use more advanced techniques to make your forms more professional.
Microsoft的MFC编码器实现了对自动处理一组单选按钮的支持。 本文介绍了如何快速,轻松地使用该支持。 了解MFC向导的工作方式将使这些U / I设计和实现任务更加容易。 而且,当您了解系统后,就可以使用更高级的技术来使表格更专业。
=-=-=-=-=-=-=-=-=-=-=-=-=-
=-=-=-=-=-=-=-=-=-=-=-=-=- =-=-=-=-=- =-=-=-=-=- =-=-=-=-=- =-=-=-=-=- =-=-=-=-=- =-=-=-=
If you liked this article and want to see more from this author, please click the Yes button near the:
如果您喜欢这篇文章,并希望从该作者那里获得更多信息,请单击旁边的是按钮:
Was this article helpful?
本文是否有帮助?
label that is just below and to the right of this text. Thanks!
此文字下方和右侧的标签。
=-=-=-=-=-=-=-=-=-=-=-=-=-
=-=-=-=-=-=-=-=-=-=-=-=-=- =-=-=-=-=- =-=-=-=-=- =-=-=-=-=- =-=-=-=-=- =-=-=-=-=- =-=-=-=
翻译自: https://www.experts-exchange.com/articles/1518/Radio-Buttons-in-MFC-Dialogs.html


 917
917

 被折叠的 条评论
为什么被折叠?
被折叠的 条评论
为什么被折叠?
 到【灌水乐园】发言


