


I've been creating more PNGs lately on the blog. However, the default PNGs created by most tools are fat fat fat. PNGOUT to the rescue.
我最近在博客上创建了更多的PNG。 但是,大多数工具创建的默认PNG是胖胖。 PNGOUT进行救援。
So, now I use PNGOUT to compress all PNGs before they are uploaded to the blog now. It's wonderful. It looks like Rick "Paint.NET Guy" Brewster is also enamored with PNGOUT and is considering integrating support directly into PAINT.NET although there might be legal issues. I'd be happy with a simple "call PNGOUT when you're done" option. Poof, we've avoided any legal trouble.
因此,现在我使用PNGOUT压缩所有PNG,然后立即将它们上传到博客。 太好了。 看起来Rick “ Paint.NET Guy” Brewster也被PNGOUT迷住了,尽管可能存在法律问题,但正在考虑将支持直接集成到PAINT.NET中。 我对简单的“完成后致电PNGOUT”选项感到满意。 of,我们避免了任何法律麻烦。
I know there's lots of Windows Apps that front PNGOUT and other PNG apps, but I like my things integrated and automatic.
我知道有很多Windows应用程序都支持PNGOUT和其他PNG应用程序,但是我喜欢集成和自动的东西。
Thoughts:
想法:
- I wonder if someone could write a Windows Live Writer Plugin to run PNG out on files created by WLW before they are posted? 我想知道是否有人可以编写Windows Live Writer插件来在WLW创建的文件发布之前将PNG用尽?
Since I'm using Kenny Kerr's Window Clippings to create the PNGs, it'd be more expedient to ask him to add the "Call PNGOUT when you're done"-feature to his tool.
由于我使用的是Kenny Kerr的Window Clippings来创建PNG,因此要求他将“完成后调用PNGOUT”功能添加到他的工具中会更加方便。
- I think I'll just integrate PNGOUT with the shell, it'll be faster... 我想我将PNGOUT与shell集成在一起,它将更快。
Create PNGOUT.reg file that looks like this:
创建如下所示的PNGOUT.reg文件:
Windows Registry Editor Version 5.00
[HKEY_CLASSES_ROOT\pngfile\shell\PNGOUT]
[HKEY_CLASSES_ROOT\pngfile\shell\PNGOUT\command]
@="\"C:\\Utils\\pngout.exe\" \"%1\""
Make sure you change your path to PNGOUT to match reality. Now you have this available in Explorer:
确保将路径更改为PNGOUT以符合实际情况。 现在,您可以在资源管理器中使用此功能:

优化我博客上的所有现有PNG (Optimizing all existing PNGs on my blog)
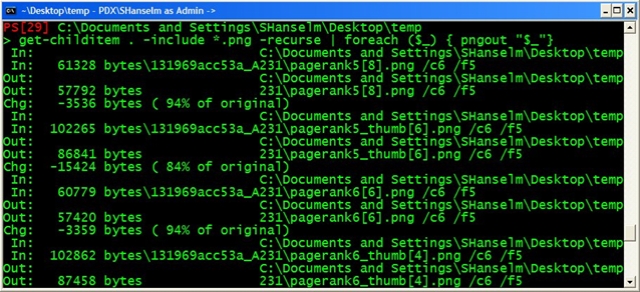
Ah, but I also need to tidy up the EXISTING PNGs from my site. First I'll download all the PNGs to my local drive, then fire up PowerShell and run this command that will recurse everywhere in the current directory and below and run PNGOUT on all the PNGs, replacing them in place:
嗯,但是我还需要整理网站中的现有PNG。 首先,我将所有PNG下载到我的本地驱动器,然后启动PowerShell并运行此命令,该命令将在当前目录和下方的任意位置进行递归,并在所有PNG上运行PNGOUT,并替换它们:
get-childitem . -include *.png -recurse | foreach ($_) { pngout "$_"}
Uploaded, and now I've taken my total PNG size (of all PNGs in all posts on the blog) from 40,004,166 bytes to 23,004,247 bytes a savings of about 42%. That'll add up in bandwidth costs.
上传后,现在我将我的PNG总大小(博客上所有帖子中所有PNG的大小)从40,004,166字节增加到23,004,247字节,节省了约42%。 这将增加带宽成本。
You can also optimize the autogenerated PNG files within Windows Live Writer by running that same PowerShell command on the files in
您还可以通过在Windows Live Writer中的文件上运行同一PowerShell命令来优化自动生成的PNG文件。
%APPDATA%\Windows Live Writer\PostSupportingFilesWriter\PostSupportingFiles
It's a shame that most default libraries for PNG make such large PNGs, considering that this is the "picture format design for the web." Thanks PNGOUT!
遗憾的是,考虑到这是“用于Web的图片格式设计”,大多数用于PNG的默认库制作如此大的PNG。 谢谢PNGOUT!
翻译自: https://www.hanselman.com/blog/adding-pngout-to-the-explorer-right-click-context-menu


 789
789

 被折叠的 条评论
为什么被折叠?
被折叠的 条评论
为什么被折叠?
 到【灌水乐园】发言


