


wordpress本地开发
If you’re building a site based on a content management system, it makes sense to install the CMS on your personal development platform first, crafting the design and data behind the scenes until is it ready to be pushed to a live production server. That way experiments and mistakes can be made locally, rather than in front of a live audience.
如果您要基于内容管理系统构建站点,则首先将CMS安装在您的个人开发平台上是有道理的,然后在幕后精心制作设计和数据,直到准备好将其推送到实时生产服务器为止。 这样,就可以在本地进行实验和错误,而不是在现场观众面前进行。
After a decade of continuous development most CMSes have streamlined installation to a point-and-click procedure, but there are a few steps that often confuse first-timers. In this article I’ll take you through the process of installing a modern version of Wordpress (3.8, as of this writing) on your local machine, while sharing some best practices and precautions.
经过十年的不断发展,大多数CMS已将安装简化为点击过程,但是有一些步骤常常使初学者感到困惑。 在本文中,我将指导您完成在本地计算机上安装现代版本的Wordpress(在撰写本文时为3.8)的过程,同时分享一些最佳实践和预防措施。
制备 (Preparation)
There are a few things you need in place before we begin. The most important component is a local server environment that features PHP and MySQL. I’m using MAMP for my server, although there are many other options. If you don’t yet have a web development server, go read up on installing one for Mac OS X or Windows before returning here.
在我们开始之前,您需要准备一些东西。 最重要的组件是具有PHP和MySQL的本地服务器环境。 我有MAMP用于我的服务器,尽管还有许多其他选择。 如果您还没有Web开发服务器,请先阅读为Mac OS X或Windows安装的Web开发服务器,然后再返回此处。
Make sure that your local server is up and running. Be certain that you understand the following:
确保本地服务器已启动并正在运行。 确保您了解以下内容:
- where the Apache Document Root is, and how to set it Apache Document Root在哪里,以及如何设置
- the username and password for the MySQL server MySQL服务器的用户名和密码
- how to make a new database in MySQL 如何在MySQL中建立新数据库
步骤1 (Step One)
Download a copy of Wordpress from Wordpress.org. Uncompress the downloaded archive file and rename the result. At this point, you have two choices:
从Wordpress.org下载Wordpress的副本 。 解压缩下载的存档文件并重命名结果。 此时,您有两种选择:
If you want to use WordPress for your entire site, rename the wordpress folder to reflect the name of your site (webdevguru, for example).
如果要在整个站点上使用WordPress,请重命名wordpress文件夹以反映站点名称( 例如 , webdevguru )。
If you only want to use WordPress to manage a portion of your site, rename the wordpress folder to blog, articles, or something else appropriate, and place it inside another folder that represents your entire site (webdevguru).
如果你只是想使用WordPress来管理你的网站的一部分 ,重命名文件夹的WordPress 博客来, 文章或别的合适的,并把它表示你的整个网站(webdevguru)另一个文件夹内 。
第二步 (Step Two)
Move the folder representing your site to a logical location: I use Sites in my home folder.
将代表您的网站的文件夹移动到逻辑位置:我在主文件夹中使用“ 网站” 。
第三步 (Step Three)
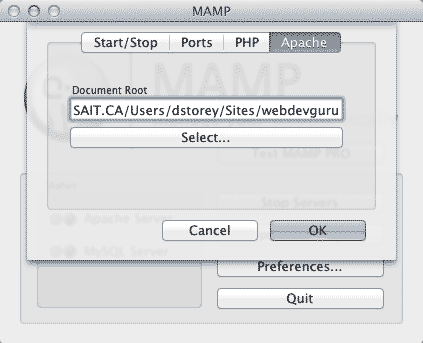
Go to your server preferences and set the Document Root to the location of your site folder. (The server may restart after you’ve reset the document root).
转到服务器首选项,然后将“文档根目录”设置为站点文件夹的位置。 (重置文档根目录后,服务器可能会重新启动)。
第四步 (Step Four)
Go to the default server URL in a browser on the same machine. In MAMP, that’s http://localhost:8888/ You’ll be shown a prompt: go ahead click on Create A Configuration File.
在同一台计算机上的浏览器中转到默认服务器URL。 在MAMP中,这是http:// localhost:8888 /,系统将显示提示:继续,单击Create A Configuration File 。
第五步 (Step Five)
Next, we need to create a database for Wordpress to use. There are many possible methods for doing so: perhaps the easiest way is from your MySQL administration page. (In MAMP, that’s found at http://localhost:8888/MAMP/, and clicking on the phpMyAdmin button at the top of the page.)
接下来,我们需要创建一个数据库供Wordpress使用。 这样做有许多种可能的方法:也许最简单的方法是从MySQL管理页面进行。 (在MAMP中,位于http:// localhost:8888 / MAMP / ,然后单击页面顶部的phpMyAdmin按钮。)
第五步 (Step Five)
Click on the Databases tab at the top of the page to create a new database. You can name the new database almost anything you wish: I’ll call mine devedge. It’s a good practice not to name your WordPress database anything too obvious, to avoid direct attacks.
单击页面顶部的“ 数据库”选项卡以创建一个新数据库。 您几乎可以随意为新数据库命名:我将其称为mine devedge 。 最好不要为您的WordPress数据库命名太明显,以免遭受直接攻击。
| Database name | devedge |
|---|---|
| User Name | root |
| Password | root |
| Database host | localhost |
| 数据库名称 | 承诺 |
|---|---|
| 用户名 | 根 |
| 密码 | 根 |
| 数据库主机 | 本地主机 |
第六步 (Step Six)
Switch back to the browser tab that contains the Wordpress configuration process and click on the Let’s Go button. At this point we’ll fill out the information required for connecting Wordpress to our database. If you’re using MAMP, it would look like this
切换回包含Wordpress配置过程的浏览器选项卡,然后单击“开始吧”按钮。 此时,我们将填写将Wordpress连接到我们的数据库所需的信息。 如果您使用的是MAMP,它将看起来像这样
Change the table prefix to something other than wp_ as a basic precaution, and click the Run The Install button.
作为基本预防措施,将表前缀更改为wp_以外的其他内容,然后单击“ 运行安装”按钮。
第七步 (Step Seven)
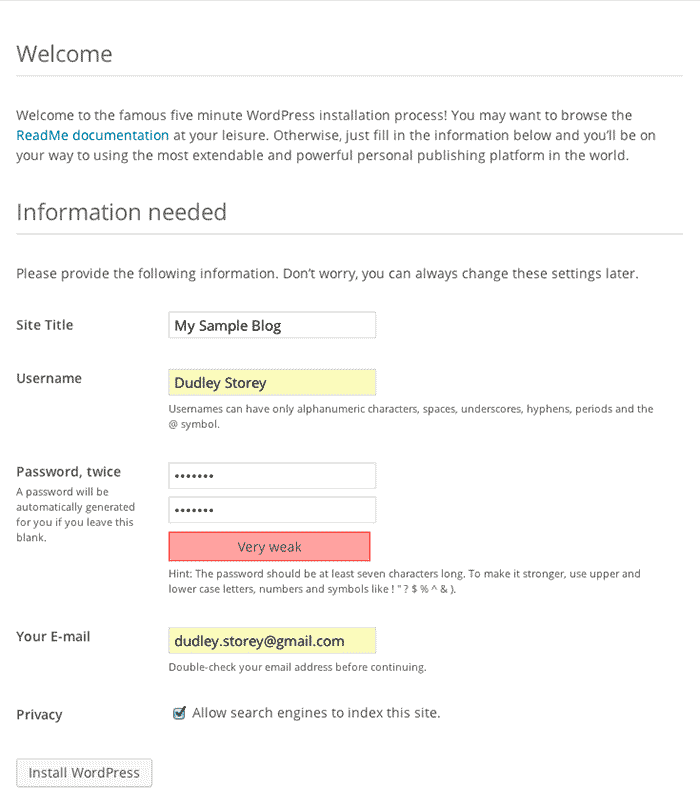
Enter the Site Title, a username, your administration password, and your eMail. Pick a unique username: do not use admin or administrator, as those are easy targets for brute force attacks. The WordPress installation provides an indication of password strength. Because this is the “master account”, it should have a very secure password: if the account is compromised, it can have huge effects on the entire site.
输入网站标题,用户名,您的管理密码和您的电子邮件。 选择一个唯一的用户名: 不使用管理员或管理员 ,因为这些都是蛮力攻击容易攻击的目标。 WordPress安装提供了密码强度的指示。 因为这是“主帐户”,所以它应该具有非常安全的密码:如果该帐户被盗用,则可能对整个站点产生巨大的影响。
At this stage, you’re all done with the installation. Click on the confirmation buttons, and log into your WordPress installation with the username and password you provided.
在此阶段,安装已全部完成。 单击确认按钮,然后使用提供的用户名和密码登录WordPress安装。
优化您的WordPress安装 (Optimizing Your WordPress Install)
I would suggest that you add several plugins to make your work in WordPress easier:
我建议您添加几个插件以使您在WordPress中的工作更轻松:
-
TinyMCE Advanced
TinyMCE高级
- Provides advanced editing capabilities in WordPress
- 在WordPress中提供高级编辑功能 Broken Link Checker 链接检查器损坏
- Does exactly what it says: alerts you to changed or broken links in your site.
- 确实如其所说:提醒您网站中链接的更改或断开。 WP Smush.it WP Smush.it
- Optimises images as they are added to posts or pages.
- 在将图像添加到帖子或页面时对其进行优化。 WP Migrate DB Pro WP Migrate DB Pro
- Allows the easy synchronisation of a local WordPress database with a remote server.
- 允许轻松地将本地WordPress数据库与远程服务器同步。
You’ll need to click on the Install Now option for each plugin , then Activate Plugin. (WP Migrate DB Pro will have to be purchased seperately).
您需要为每个插件单击“ 立即安装”选项,然后单击“ 激活插件” 。 (WP Migrate DB Pro必须单独购买)。
结论 (Conclusion)
Once you have your own copy of WordPress running, you can experiment with making your own CMS-driven site, variations of which I’ll be showing in future articles.
一旦运行了自己的WordPress副本,您就可以尝试创建自己的CMS驱动的网站,我将在以后的文章中介绍其变体。
翻译自: https://thenewcode.com/801/Installing-WordPress-For-Local-Development
wordpress本地开发


 740
740

 被折叠的 条评论
为什么被折叠?
被折叠的 条评论
为什么被折叠?
 到【灌水乐园】发言


