


免责声明 (Disclaimer)
The service we are creating here is used for removing files older than a specific date from a list of folders specified in a stand-alone configuration file. This application has been tested to the extent that I know that it works in my own environment. I don’t give any guarantees that it will work flawless in yours. Before using this in a production environment, I strongly suggest that you perform some additional testing.
我们在此处创建的服务用于从独立配置文件中指定的文件夹列表中删除早于特定日期的文件。 该应用程序已经过测试,据我所知它可以在自己的环境中运行。 我不保证它将在您的产品中完美无缺。 在生产环境中使用此功能之前,强烈建议您执行一些其他测试。
介绍 (Introduction)
In this article, I will go through how you can create a simple Windows Service using the Worker Service template in Visual Studio.
在本文中,我将介绍如何在Visual Studio中使用Worker Service模板创建简单的Windows Service。
Before Worker Services in .NET Core 3.0 was introduced, you would probably create your Windows services using the .NET Windows Service template. I always thought that the experience of using that template never was very intuitive. The first issue you might encounter is that you can’t run the service within your Visual Studio environment without implementing some code hacks. Also, the template didn’t give you much guidance for what is actually needed to make the service run as expected. Fortunately, with .NET 3.0 and Worker Services, all of this has become much easier.
在引入.NET Core 3.0中的Worker Services之前,您可能会使用.NET Windows Service模板创建Windows服务。 我一直认为使用该模板的经验从来都不是很直观的。 您可能会遇到的第一个问题是,如果不实施某些代码黑客,就无法在Visual Studio环境中运行该服务。 此外,该模板并没有为您提供使服务按预期运行所需的实际指导。 幸运的是,有了.NET 3.0和Worker Services,所有这些都变得更加容易。
解决方案 (The Solution)
To following this article, you need to have Visual Studio 2019 and .NET Core 3.0 installed on your environment.
要阅读本文,您需要在您的环境中安装Visual Studio 2019和.NET Core 3.0。
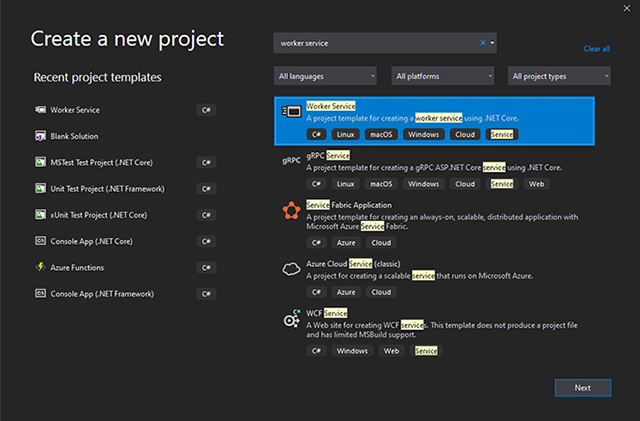
First, you need to create a new project and choose the Worker Process template as outlined in the image below:
首先,您需要创建一个新项目,然后选择下图所概述的Worker Process模板:
添加配置设置 (Adding Configuration Settings)
In the appsettings.json file, we will need to add a few configurations. One configuration for the threshold stating the max allowed age for the file before we delete it. Let’s call this setting NumberOfDaysBeforeDelete. I set the value for this to 90 days. Besides this, we need the file path to the stand-alone configuration file containing the list of folders to monitor. I call this setting ConfigurationFilePath and point that to a location in my c:\temp folder. The last setting is needed for configuring the interval for which this service will be executing our custom code. I call this setting RunIntervallInHours and I set the value to 12 hours. This means that this service will check the content of each folder in the configuration file twice a day and remove all files with a last written date of more than 90 days. These three configuration settings are grouped into a node in the appsettings.json file which I call “App.Configurations”, see here below:
在appsettings.json文件中,我们将需要添加一些配置。 阈值的一种配置,用于说明在删除文件之前文件的最大允许使用期限。 我们将此设置称为NumberOfDaysBeforeDelete 。 我将此值设置为90天。 除此之外,我们需要包含要监视的文件夹列表的独立配置文件的文件路径。 我将此设置称为ConfigurationFilePath并将其指向我的c:\ temp文件夹中的某个位置。 需要最后一个设置来配置此服务将执行我们的自定义代码的时间间隔。 我将此设置称为RunIntervallInHours ,并将其设置为12小时。 这意味着该服务每天两次检查配置文件中每个文件夹的内容,并删除最后写入日期超过90天的所有文件。 这三个配置设置被分组为appsettings.json文件中的一个节点,我称之为“ App.Configurations ”,请参见以下内容:
{
  "Logging": {
    "LogLevel": {
      "Default": "Information",
      "Microsoft": "Warning",
      "Microsoft.Hosting.Lifetime": "Information"
    }
  },
  "App.Configurations": {
    "ConfigurationFilePath": "C:\\Temp\\CleanUpFolders\\CleanUpConfigurations.config",
    "NumberOfDaysBeforeDelete": "10",
    "RunIntervallInHours": "12"
  }
}
Please note that you have both an “appsetttings.json” file as well as an “appsettings.development.json” file in your project. Which appsettings.json file is used during runtime depends on your environmental settings. When running this service from Visual Studio, it will default to use the development settings as configured in the file Properties/launchSettings.json.
请注意,您的项目中同时有一个“ appsetttings.json ”文件和一个“ appsettings.development.json ”文件。 在运行时使用哪个appsettings.json文件取决于您的环境设置。 从Visual Studio运行此服务时,默认情况下将使用文件Properties / launchSettings.json中配置的开发设置。
添加带有文件夹列表的配置文件 (Add Configuration Files With List of Folders)
I create a file named CleanUpConfigurations.config in c:\Temp\CleauUpFoders\ and put the following two lines in it:
我在c:\ Temp \ CleauUpFoders \中创建一个名为CleanUpConfigurations.config的文件,并将以下两行放入其中:
C:\Temp\CleanUpFolders\Folder1
C:\Temp\CleanUpFolders\Folder2
I also create the folders “Folder1” and “Folder2” in the same location.
我还在同一位置创建文件夹“ Folder1 ”和“ Folder2 ”。
我们的守则 (Our Code)
In the newly created solution, two files are initially of interest to us, program.cs used to start the application and worker.cs which will contain our custom code for this solution. In the program.cs file, you will find code for setting up the host environment. To facilitate running this application as a Windows service, you need to add the following NuGet package.
在新创建的解决方案中,我们最初需要关注两个文件:用于启动应用程序的program.cs和将包含我们针对该解决方案的自定义代码的worker.cs 。 在program.cs文件中,您将找到用于设置主机环境的代码。 为了便于将此应用程序作为Windows服务运行,您需要添加以下NuGet软件包。
Install-Package Microsoft.Extensions.Hosting.WindowsServices
With that package installed, you can add the row .UseWindowsService() after the Host.CreateDefaultBuilder(args), so that you end up with the following in your program.cs file.
安装该软件包后,可以在Host.CreateDefaultBuilder(args)之后添加.UseWindowsService()行,以便最终在program.cs文件中添加以下内容。
public class Program
    {
        public static void Main(string[] args)
        {
            CreateHostBuilder(args).Build().Run();
        }

        public static IHostBuilder CreateHostBuilder(string[] args) =>
            Host.CreateDefaultBuilder(args)
            .UseWindowsService()
                .ConfigureServices((hostContext, services) =>
                {
                    services.AddHostedService<worker>();
                });
    }
In the worker.cs file, we start by injecting an instance of IServiceScopeFactory to the constructor. This will be used to access the appsettings configuration file.
在worker.cs文件中,我们首先将IServiceScopeFactory实例注入构造函数。 这将用于访问appsettings配置文件。
public Worker(ILogger<worker> logger, IServiceScopeFactory serviceScopeFactory)
        {
            _logger = logger;
            _serviceScopeFactory = serviceScopeFactory;
        }
To make sure that configurations are read every time the service is started, I override the method StartAsync and retrieve my application configurations here:
为了确保每次启动服务时都读取配置,我重写了StartAsync方法,并在此处检索我的应用程序配置:
public override Task StartAsync(CancellationToken cancellationToken)
        {
            _configuration = _serviceScopeFactory.CreateScope().
                             ServiceProvider.GetRequiredService<iconfiguration>();
            _numberOfDaysBeforeDelete = int.Parse(_configuration
                                        ["App.Configurations:NumberOfDaysBeforeDelete"]);
            _runIntervallInHours = int.Parse(_configuration
                                            ["App.Configurations:RunIntervallInHours"]);
            _folderPaths = File.ReadAllLines(_configuration
            ["App.Configurations:ConfigurationFilePath"]).Select(x => x.Trim()).ToList();

            return base.StartAsync(cancellationToken);
        }
Note how I am reading all lines from the file stated in the ConfigurationFilePath setting and put them in the list _folderPaths.
请注意,我如何从ConfigurationFilePath设置中所述的文件中读取所有行,并将它们放在list _folderPaths 。
The following variables are declared in the Worker class:
在Worker类中声明了以下变量:
private IList<string> _folderPaths;
private int _numberOfDaysBeforeDelete;
private int _runIntervallInHours;
Our code for retrieving folders from our configuration file and remove all files older than 90 days will be placed in the method ExecuteAsync. ExecuteAsync takes a CancellationToken as a parameter. The CancellationToken is very important because it will be used to identify when the service is stopped. When this happens, the property IsCancellationRequested will be set to true. Hence, the first line of code in our ExecuteAsync is:
我们用于从配置文件中检索文件夹并删除所有90天以上的文件的代码将放置在ExecuteAsync方法中。 ExecuteAsync将CancellationToken作为参数。 CancellationToken非常重要,因为它将用于标识服务何时停止。 发生这种情况时,属性IsCancellationRequested将设置为true 。 因此,我们的ExecuteAsync的第一行代码是:
while (!stoppingToken.IsCancellationRequested)
I will do a second check for IsCancellationRequested in this method further down to make sure that I stop the execution as quickly as possible when receiving a cancellation request. The code for getting files older than x number of days and deleting them are written in two lines:
我将进一步检查此方法中的IsCancellationRequested ,以确保收到取消请求时尽快停止执行。 用于获取文件的天数大于x天数并删除它们的代码分为两行:
var files = Directory.GetFiles(path).Select(file => new FileInfo(file)).Where
(file => file.LastWriteTime < DateTime.Now.AddDays(-1* _numberOfDaysBeforeDelete)).ToList();

// Delete found files
files.ForEach(file => file.Delete());
Before closing the while loop, I put in a delay. Since our setting _runIntervallInHours is set to 12 hours, this code will put the service to rest for 12 hours before continuing the execution.
在关闭while循环之前,我延迟了一下。 由于我们的setting _runIntervallInHours设置为12小时,因此此代码将使服务停止12小时,然后再继续执行。
await Task.Delay(TimeSpan.FromHours(_runIntervallInHours), stoppingToken);
Notice the use of the cancellation token here which causes the waiting process to be cancelled when the windows service stops.
请注意,此处使用了取消令牌,这会导致Windows服务停止时等待进程被取消。
The complete code for the ExecuteAsync method will look like this:
ExecuteAsync方法的完整代码如下所示:
protected override async Task ExecuteAsync(CancellationToken stoppingToken)
        {
            while (!stoppingToken.IsCancellationRequested)
            {
                _logger.LogInformation("Worker running at: {time}", DateTimeOffset.Now);

                foreach (var path in _folderPaths)
                {
                    if (!stoppingToken.IsCancellationRequested)
                    {
                        // Get old files
                        var files = Directory.GetFiles(path).Select
                                    (file => new FileInfo(file)).Where
                                    (file => file.LastWriteTime < DateTime.Now.AddDays
                                             (-1* _numberOfDaysBeforeDelete)).ToList();

                        // Delete found files
                        files.ForEach(file => file.Delete());
                    }
                }

                await Task.Delay(TimeSpan.FromHours(_runIntervallInHours), stoppingToken);
            }
        }
That is all the code we need. You can simply press F5 and run the application directly from Visual Studio and see that it works.
那就是我们需要的所有代码。 您只需按F5键,然后直接从Visual Studio运行该应用程序,然后看它是否有效。
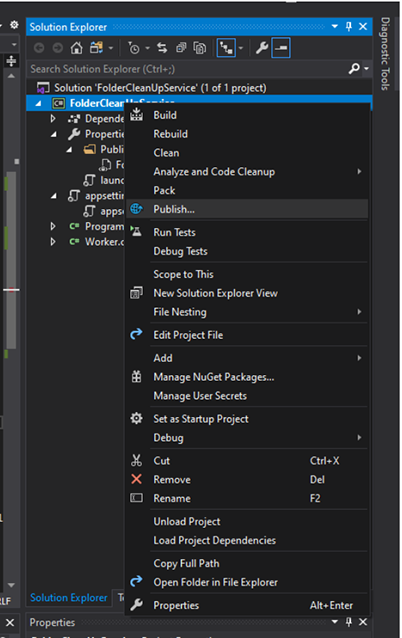
将应用程序转换为Windows服务 (Turning the Application Into a Windows Service)
Now go forward and publish the application.
现在,继续并发布该应用程序。
To a folder:
到文件夹:

Open up a PowerShell terminal as an administrator and run the following command:
以管理员身份打开PowerShell终端并运行以下命令:
sc.exe create FolderCleanUpService binpath= "C:\Apps\FolderCleanUpService.exe" start= auto
This will install the service on your Windows machine.
这将在您的Windows计算机上安装该服务。
You can put your service anywhere you want, I choose here to put it in the Apps folder on my c drive. I use the start=auto flag to make sure that the service is automatically started when Windows starts. To set a description on the service, you need to execute a second command:
您可以将服务放置在所需的任何位置,我在这里选择将其放置在C盘的Apps文件夹中。 我使用start=auto标志来确保Windows启动时自动启动该服务。 要设置服务描述,您需要执行第二条命令:
sc.exe description "FolderCleanUpService"
"This service monitors and deletes files older than 90 days"
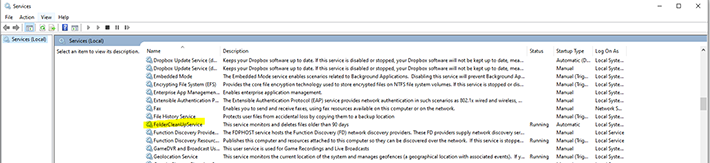
Press (Window + R) and run the command services.msc, then you should see a list of all your services and in that list, you should be able to see the FolderCleanUpService service. You need to manually start it the first time, but since the startup type is set to automatic, it will automatically start up itself after a reboot.
按(Window + R)并运行命令services.msc ,然后您应该看到所有服务的列表,并且在该列表中,您应该能够看到FolderCleanUpService服务。 您需要在第一次时手动启动它,但是由于启动类型设置为自动,因此它将在重新启动后自动启动。
You can remove the service using this command:
您可以使用以下命令删除服务:
sc.exe delete "FolderCleanUpService"
历史 (History)
3rd April, 2020: Initial version
3 RD 2020四月:初始版本
翻译自: https://www.codeproject.com/Articles/5263939/Build-a-Windows-Worker-Service-Using-NET-Core-3-1


 1254
1254


 被折叠的 条评论
为什么被折叠?
被折叠的 条评论
为什么被折叠?
 到【灌水乐园】发言


