本教程将对SMTP(用于发送邮件的Python模块)进行介绍。 它还将演示如何发送不同的电子邮件类型,例如简单文本电子邮件,带有附件的电子邮件以及带有HTML内容的电子邮件。
SMTP简介
简单邮件传输协议(SMTP)处理在邮件服务器之间发送和路由电子邮件。
在Python中, smtplib模块定义了一个SMTP客户端会话对象,该对象可用于通过SMTP或ESMTP侦听器守护程序将邮件发送到任何Internet计算机。
这是创建SMTP对象的方法。
import smtplib

server = smtplib.SMTP(host='host_address',port=your_port)
创建和发送简单的电子邮件
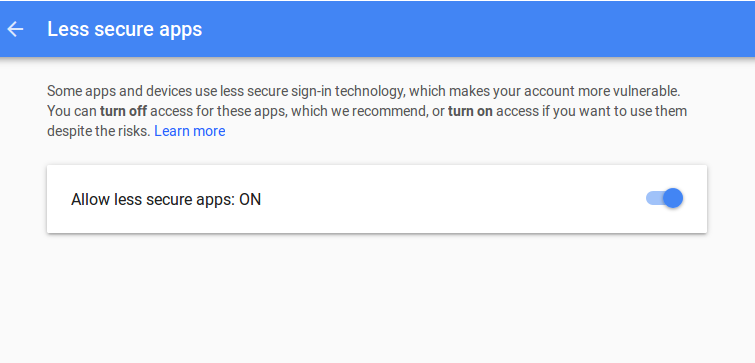
使用以下脚本,您可以通过Gmail SMTP服务器发送电子邮件。 但是,Google不允许通过smtplib登录,因为它已将这种类型的登录标记为“安全性较低”。 要解决此问题,请在登录Google帐户后转到https://www.google.com/settings/security/lesssecureapps ,然后选择“允许安全程度较低的应用程序”。 请参见下面的屏幕截图。

我们将按照以下步骤完成此过程:
- 创建一个SMTP对象以连接到服务器。
- 登录到您的帐户。
- 定义您的消息标题和登录凭据。
- 创建一个
MIMEMultipart消息对象,并将相关的标头附加到该对象,即From,To和Subject。 - 将消息附加到消息
MIMEMultipart对象。 - 最后,发送消息。
这个过程很简单,如下所示。
# import necessary packages

from email.mime.multipart import MIMEMultipart
from email.mime.text import MIMEText
import smtplib

# create message object instance
msg = MIMEMultipart()


message = "Thank you"

# setup the parameters of the message
password = "your_password"
msg['From'] = "your_address"
msg['To'] = "to_address"
msg['Subject'] = "Subscription"

# add in the message body
msg.attach(MIMEText(message, 'plain'))

#create server
server = smtplib.SMTP('smtp.gmail.com: 587')

server.starttls()

# Login Credentials for sending the mail
server.login(msg['From'], password)


# send the message via the server.
server.sendmail(msg['From'], msg['To'], msg.as_string())

server.quit()

print "successfully sent email to %s:" % (msg['To'])
请注意,“收件人”和“发件人”地址必须明确包含在消息头中。
创建和发送带有附件的电子邮件
在此示例中,我们将发送带有图像附件的电子邮件。 该过程类似于发送纯文本电子邮件。
- 创建一个SMTP对象以连接到服务器。
- 登录到您的帐户。
- 定义您的消息标题和登录凭据。
- 创建一个
MIMEMultipart消息对象,并将相关的标头附加到该对象,即From,To和Subject。 - 读取图像并将其附加到消息
MIMEMultipart对象。 - 最后,发送消息。
# send_attachment.py
# import necessary packages
from email.mime.multipart import MIMEMultipart
from email.MIMEImage import MIMEImage
from email.mime.text import MIMEText
import smtplib

# create message object instance
msg = MIMEMultipart()


# setup the parameters of the message
password = "your_password"
msg['From'] = "your_address"
msg['To'] = "to_address"
msg['Subject'] = "Photos"

# attach image to message body
msg.attach(MIMEImage(file("google.jpg").read()))


# create server
server = smtplib.SMTP('smtp.gmail.com: 587')

server.starttls()

# Login Credentials for sending the mail
server.login(msg['From'], password)


# send the message via the server.
server.sendmail(msg['From'], msg['To'], msg.as_string())

server.quit()

print "successfully sent email to %s:" % (msg['To']) 所述MIMEImage类是的子类MIMENonMultipart其被用来创建图像类型的MIME消息对象。 其他可用的类别包括
MIMEMessage和MIMEAudio 。
创建和发送HTML电子邮件
我们要做的第一件事是创建一个HTML电子邮件模板。
创建一个HTML模板
这是模板HTML代码,它包含两个表格列,每个表格列均包含图像和预览内容。 如果您希望使用现成的专业解决方案,请获取我们最好的电子邮件模板 。 我们提供了许多响应式选项,并具有易于自定义的功能。
<html>
<head>

   <title>Tutsplus Email Newsletter</title>
   <style type="text/css">
    a {color: #d80a3e;}
  body, #header h1, #header h2, p {margin: 0; padding: 0;}
  #main {border: 1px solid #cfcece;}
  img {display: block;}
  #top-message p, #bottom p {color: #3f4042; font-size: 12px; font-family: Arial, Helvetica, sans-serif; }
  #header h1 {color: #ffffff !important; font-family: "Lucida Grande", sans-serif; font-size: 24px; margin-bottom: 0!important; padding-bottom: 0; }
  #header p {color: #ffffff !important; font-family: "Lucida Grande", "Lucida Sans", "Lucida Sans Unicode", sans-serif; font-size: 12px;  }
  h5 {margin: 0 0 0.8em 0;}
    h5 {font-size: 18px; color: #444444 !important; font-family: Arial, Helvetica, sans-serif; }
  p {font-size: 12px; color: #444444 !important; font-family: "Lucida Grande", "Lucida Sans", "Lucida Sans Unicode", sans-serif; line-height: 1.5;}
   </style>
</head>
<body>
<table width="100%" cellpadding="0" cellspacing="0" bgcolor="e4e4e4"><tr><td>
<table id="top-message" cellpadding="20" cellspacing="0" width="600" align="center">
    <tr>
      <td align="center">
        <p><a href="#">View in Browser</a></p>
      </td>
    </tr>
  </table>

<table id="main" width="600" align="center" cellpadding="0" cellspacing="15" bgcolor="ffffff">
    <tr>
      <td>
        <table id="header" cellpadding="10" cellspacing="0" align="center" bgcolor="8fb3e9">
          <tr>
            <td width="570" align="center"  bgcolor="#d80a3e"><h1>Evanto Limited</h1></td>
          </tr>
          <tr>
            <td width="570" align="right" bgcolor="#d80a3e"><p>November 2017</p></td>
          </tr>
        </table>
      </td>
    </tr>

    <tr>
      <td>
        <table id="content-3" cellpadding="0" cellspacing="0" align="center">
          <tr>
              <td width="250" valign="top" bgcolor="d0d0d0" style="padding:5px;">
              <img src="https://thumbsplus.tutsplus.com/uploads/users/30/posts/29520/preview_image/pre.png" width="250" height="150"  />
            </td>
              <td width="15"></td>
            <td width="250" valign="top" bgcolor="d0d0d0" style="padding:5px;">
                <img src="https://cms-assets.tutsplus.com/uploads/users/30/posts/29642/preview_image/vue-2.png" width ="250" height="150" />
            </td>
          </tr>
        </table>
      </td>
    </tr>
    <tr>
      <td>
        <table id="content-4" cellpadding="0" cellspacing="0" align="center">
          <tr>
            <td width="200" valign="top">
              <h5>How to Get Up and Running With Vue</h5>
              <p>In the introductory post for this series we spoke a little about how web designers can benefit by using Vue. In this tutorial we’ll learn how to get Vue up..</p>
            </td>
            <td width="15"></td>
            <td width="200" valign="top">
              <h5>Introducing Haiku: Design and Create Motion</h5>
              <p>With motion on the rise amongst web developers so too are the tools that help to streamline its creation. Haiku is a stand-alone..</p>
            </td>
          </tr>
        </table>
      </td>
    </tr>
  </table>
  <table id="bottom" cellpadding="20" cellspacing="0" width="600" align="center">
    <tr>
      <td align="center">
        <p>Design better experiences for web & mobile</p>
        <p><a href="#">Unsubscribe</a> | <a href="#">Tweet</a> | <a href="#">View in Browser</a></p>
      </td>
    </tr>
  </table><!-- top message -->
</td></tr></table><!-- wrapper -->

</body>
</html>
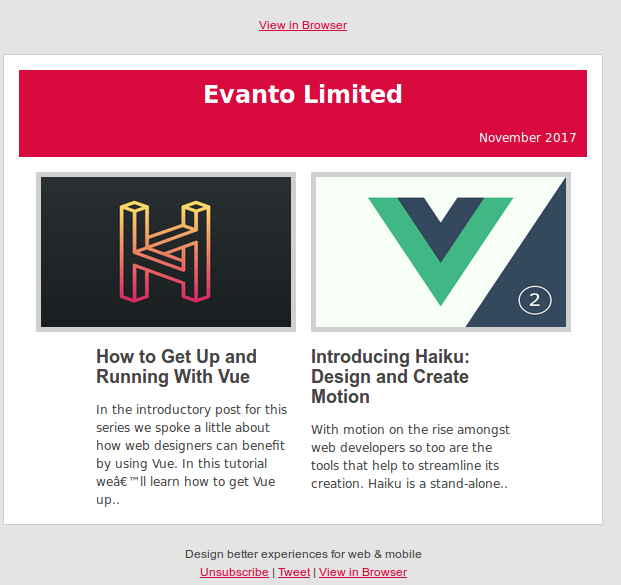
完成后,模板最终将如下所示:

以下是用于发送包含HTML内容的电子邮件的脚本。 模板的内容将是我们的电子邮件。
import smtplib
import email.message
server = smtplib.SMTP('smtp.gmail.com:587')

email_content = """
<html>

<head>
<meta http-equiv="Content-Type" content="text/html; charset=utf-8">

   <title>Tutsplus Email Newsletter</title>
   <style type="text/css">
    a {color: #d80a3e;}
  body, #header h1, #header h2, p {margin: 0; padding: 0;}
  #main {border: 1px solid #cfcece;}
  img {display: block;}
  #top-message p, #bottom p {color: #3f4042; font-size: 12px; font-family: Arial, Helvetica, sans-serif; }
  #header h1 {color: #ffffff !important; font-family: "Lucida Grande", sans-serif; font-size: 24px; margin-bottom: 0!important; padding-bottom: 0; }
  #header p {color: #ffffff !important; font-family: "Lucida Grande", "Lucida Sans", "Lucida Sans Unicode", sans-serif; font-size: 12px;  }
  h5 {margin: 0 0 0.8em 0;}
    h5 {font-size: 18px; color: #444444 !important; font-family: Arial, Helvetica, sans-serif; }
  p {font-size: 12px; color: #444444 !important; font-family: "Lucida Grande", "Lucida Sans", "Lucida Sans Unicode", sans-serif; line-height: 1.5;}
   </style>
</head>

<body>


<table width="100%" cellpadding="0" cellspacing="0" bgcolor="e4e4e4"><tr><td>
<table id="top-message" cellpadding="20" cellspacing="0" width="600" align="center">
    <tr>
      <td align="center">
        <p><a href="#">View in Browser</a></p>
      </td>
    </tr>
  </table>

<table id="main" width="600" align="center" cellpadding="0" cellspacing="15" bgcolor="ffffff">
    <tr>
      <td>
        <table id="header" cellpadding="10" cellspacing="0" align="center" bgcolor="8fb3e9">
          <tr>
            <td width="570" align="center"  bgcolor="#d80a3e"><h1>Evanto Limited</h1></td>
          </tr>
          <tr>
            <td width="570" align="right" bgcolor="#d80a3e"><p>November 2017</p></td>
          </tr>
        </table>
      </td>
    </tr>

    <tr>
      <td>
        <table id="content-3" cellpadding="0" cellspacing="0" align="center">
          <tr>
              <td width="250" valign="top" bgcolor="d0d0d0" style="padding:5px;">
              <img src="https://thumbsplus.tutsplus.com/uploads/users/30/posts/29520/preview_image/pre.png" width="250" height="150"  />
            </td>
              <td width="15"></td>
            <td width="250" valign="top" bgcolor="d0d0d0" style="padding:5px;">
                <img src="https://cms-assets.tutsplus.com/uploads/users/30/posts/29642/preview_image/vue-2.png" width ="250" height="150" />
            </td>
          </tr>
        </table>
      </td>
    </tr>
    <tr>
      <td>
        <table id="content-4" cellpadding="0" cellspacing="0" align="center">
          <tr>
            <td width="200" valign="top">
              <h5>How to Get Up and Running With Vue</h5>
              <p>In the introductory post for this series we spoke a little about how web designers can benefit by using Vue. In this tutorial we will learn how to get Vue up..</p>
            </td>
            <td width="15"></td>
            <td width="200" valign="top">
              <h5>Introducing Haiku: Design and Create Motion</h5>
              <p>With motion on the rise amongst web developers so too are the tools that help to streamline its creation. Haiku is a stand-alone..</p>
            </td>
          </tr>
        </table>
      </td>
    </tr>


  </table>
  <table id="bottom" cellpadding="20" cellspacing="0" width="600" align="center">
    <tr>
      <td align="center">
        <p>Design better experiences for web & mobile</p>
        <p><a href="#">Unsubscribe</a> | <a href="#">Tweet</a> | <a href="#">View in Browser</a></p>
      </td>
    </tr>
  </table><!-- top message -->
</td></tr></table><!-- wrapper -->

</body>
</html>


"""

msg = email.message.Message()
msg['Subject'] = 'Tutsplus Newsletter'


msg['From'] = 'youraddress'
msg['To'] = 'to_address'
password = "yourpassword"
msg.add_header('Content-Type', 'text/html')
msg.set_payload(email_content)

s = smtplib.SMTP('smtp.gmail.com: 587')
s.starttls()

# Login Credentials for sending the mail
s.login(msg['From'], password)

s.sendmail(msg['From'], [msg['To']], msg.as_string())
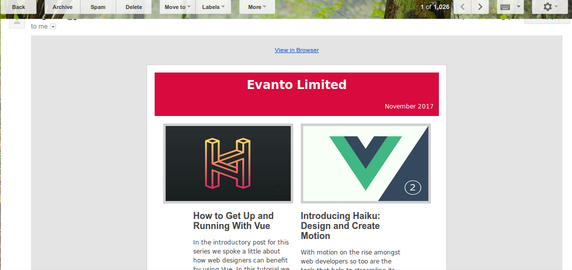
执行您的代码,如果没有错误发生,则电子邮件成功。 现在转到您的收件箱,您应该会看到格式正确HTML内容电子邮件。

结论
本教程介绍了为您的应用程序发送电子邮件所需的大部分内容。 有几种API可用于发送电子邮件,因此您不必从头开始,例如SendGrid ,但了解基础知识也很重要。 有关更多信息,请访问Python docs 。
此外,请不要犹豫,看看我们在Envato Market上可以出售和研究的东西 ,请提出任何问题,并使用下面的feed提供您的宝贵反馈。
翻译自: https://code.tutsplus.com/tutorials/sending-emails-in-python-with-smtp--cms-29975


 本教程详细介绍了如何使用Python的SMTP模块发送不同类型的电子邮件,包括简单文本、带有附件和HTML内容的邮件。通过示例代码,展示了创建SMTP对象、登录、设置消息头部和附件的步骤,帮助开发者掌握Python发送邮件的基础知识。


 1541
1541

 被折叠的 条评论
为什么被折叠?


