


find 命令示例
Network scanning is one of the steps of penetration testing. There are different and popular tools to scan network line masscan, nmap etc. Arp-scan is a tool specifically designed to scan network with layer 2 or mac or Ethernet arp packets.
网络扫描是渗透测试的步骤之一。 有多种不同的流行工具可以扫描网络线路masscan,nmap等。Arp-scan是专门设计用来扫描具有第2层或mac或以太网arp数据包的网络的工具。
安装 (Install)
We can install arp-scan tool with the following command.
我们可以使用以下命令安装arp-scan工具。
$ sudo apt install arp-scan -y

帮帮我(Help)
We can print help information with the -h option.
我们可以使用-h选项打印帮助信息。
$ arp-scan -h

句法(Syntax)
Usage: arp-scan [options] [hosts...]
扫描本地网络 (Scan Local Network)
Most basic usage of arp-scan is scanning local network with a single options named --localnet or-l . This will scan whole local network with arp packets. While using arp-scan we need root privileges.
arp-scan的最基本用法是使用名为--localnet或-l的单个选项扫描本地网络。 这将使用arp数据包扫描整个本地网络。 在使用arp-scan时,我们需要root特权。
$ arp-scan --localnet

指定网络接口(Specify Network Interface)
Enterprise environments requires more than one network interface for backup, load balancing etc. In this situations we need to specify network interface. We will use -i option. In the example we will use network interface named ens3 .
企业环境需要一个以上的网络接口来进行备份,负载平衡等。在这种情况下,我们需要指定网络接口。 我们将使用-i选项。 在示例中,我们将使用名为ens3网络接口。
$ arp-scan --interface=ens3 --localnet

设置源Mac地址(Set Source Mac Address)
During the scan process our exisiting mac address will be used. This may create some clue about the scan. We can change the source mac address during scan. This will make all sent packets have different mac address than our hardware mac address. We will use --destaddr or -T option.
在扫描过程中,将使用现有的mac地址。 这可能会产生一些有关扫描的线索。 我们可以在扫描过程中更改源mac地址。 这将使所有发送的数据包具有与我们的硬件mac地址不同的mac地址。 我们将使用--destaddr或-T选项。
$ arp-scan -T aa:bb:cc:dd:ee:ff
设置目标Mac地址 (Set Destination Mac Address)
Another useful option is setting destination mac address with --srcaddr or -S option.
另一个有用的选项是使用--srcaddr或-S选项设置目标MAC地址。
$ arp-scan -S aa:bb:cc:dd:ee:ff
指定VLAN (Specify Vlan)
In real world networks single interface can host multiple networks. This is generally done using some multiplexing protocol named Virtual Local Area Network or simply VLAN. If the interface is trunk which means interface hosts multiple VLANS we may need to specify VLAN id. We will use --vlan or -Q option to specify VLAN id. In the example we will only scan VLAN 10 .
在现实世界的网络中,单个接口可以托管多个网络。 通常使用某些称为虚拟局域网或VLAN的多路复用协议来完成此操作。 如果接口是中继线,则意味着接口承载多个VLAN,我们可能需要指定VLAN ID。 我们将使用--vlan或-Q选项指定VLAN ID。 在示例中,我们将仅扫描VLAN 10 。
$ arp-scan -i ens3 -Q 10
将收到的数据包写入Pcap (Write Received Packets To Pcap)
If the responses return by the scanned hosts are important for us we can save them in pcap format. Pcap format is supported by tools like tcpdump, wireshark etc. We will us -pcapsavefile or -W options to specify pcap file.
如果扫描的主机返回的响应对我们很重要,我们可以将它们保存为pcap格式。 pcap格式受tcpdump,wireshark等工具支持。我们将使用-pcapsavefile或-W选项来指定pcap文件。
$ sudo arp-scan --localnet -W scan.pcap
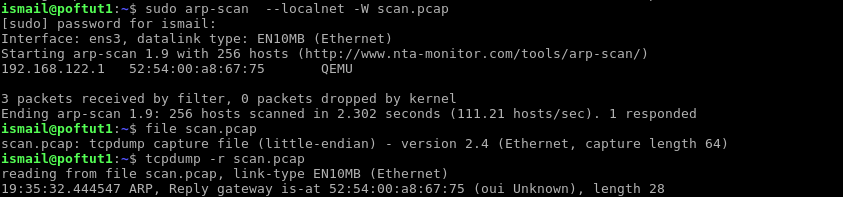
We can read pcap file with tcpdump like below.
我们可以使用tcpdump读取pcap文件,如下所示。
$ tcpdump -r scan.pcap
To get more information about tcpdump read following tutorial.
要获取有关tcpdump的更多信息,请阅读以下教程。
http://www.poftut.com/tcpdump-tutorial-with-examples/
http://www.poftut.com/tcpdump-tutorial-with-examples/
翻译自: https://www.poftut.com/arp-scan-command-tutorial-examples/
find 命令示例


 3357
3357


 被折叠的 条评论
为什么被折叠?
被折叠的 条评论
为什么被折叠?
 到【灌水乐园】发言


