


总览
- 我们将建立一个Eureka服务器(用于注册多个服务/微服务的服务注册表)。
- 我们将设置多个Eureka客户端(注册到Eureka Server的REST服务)。
- 我们将通过Eureka进行客户端负载平衡和服务发现。
这是视频教程。 请表达爱意,并订阅我的频道订阅 。
设置Eureka服务器
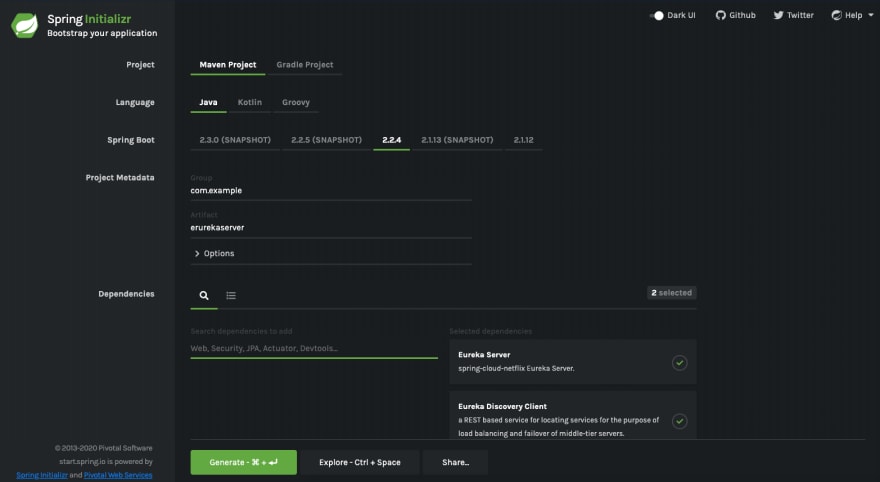
设置eureka服务器所需的依赖项是“ spring-cloud-starter-netflix-eureka-client”以及spring-boot-starter-parent。 您可以通过转到https://start.spring.io/生成代码,并提供组ID,工件ID并提供所需的依赖关系,如下所示,然后单击generate将生成示例代码,其中添加了依赖关系您的pom.xml

对应的pom.xml应该如下所示
<?xml version="1.0" encoding="UTF-8"?>
<project xmlns= "http://maven.apache.org/POM/4.0.0" xmlns:xsi= "http://www.w3.org/2001/XMLSchema-instance"
    xsi:schemaLocation= "http://maven.apache.org/POM/4.0.0 https://maven.apache.org/xsd/maven-4.0.0.xsd" >
    <modelVersion> 4.0.0 </modelVersion>
    <parent>
        <groupId> org.springframework.boot </groupId>
        <artifactId> spring-boot-starter-parent </artifactId>
        <version> 2.2.3.RELEASE </version>
        <relativePath/> <!-- lookup parent from repository -->
    </parent>
    <groupId> com.example </groupId>
    <artifactId> eurekaserver </artifactId>
    <version> 0.0.1-SNAPSHOT </version>
    <name> eurekaserver </name>
    <description> Demo project for Spring Boot </description>

    <properties>
        <java.version> 1.8 </java.version>
        <spring-cloud.version> Hoxton.SR1 </spring-cloud.version>
    </properties>

    <dependencies>
        <dependency>
            <groupId> org.springframework.cloud </groupId>
            <artifactId> spring-cloud-starter-netflix-eureka-server </artifactId>
        </dependency>

        <dependency>
            <groupId> org.springframework.boot </groupId>
            <artifactId> spring-boot-starter-test </artifactId>
            <scope> test </scope>
            <exclusions>
                <exclusion>
                    <groupId> org.junit.vintage </groupId>
                    <artifactId> junit-vintage-engine </artifactId>
                </exclusion>
            </exclusions>
        </dependency>
    </dependencies>

    <dependencyManagement>
        <dependencies>
            <dependency>
                <groupId> org.springframework.cloud </groupId>
                <artifactId> spring-cloud-dependencies </artifactId>
                <version> ${spring-cloud.version} </version>
                <type> pom </type>
                <scope> import </scope>
            </dependency>
        </dependencies>
    </dependencyManagement>

    <build>
        <plugins>
            <plugin>
                <groupId> org.springframework.boot </groupId>
                <artifactId> spring-boot-maven-plugin </artifactId>
            </plugin>
        </plugins>
    </build>

</project>
一旦有了项目,打开带有注解@SpringbootApplication的主Springboot类,并添加注解@EnableEurekaServer ,该类应如下所示。
package com . example . eurekaserver ;

import org . springframework . boot . SpringApplication ;
import org . springframework . boot . autoconfigure . SpringBootApplication ;
import org . springframework . cloud . netflix . eureka . server . EnableEurekaServer ;

@ SpringBootApplication
@ EnableEurekaServer
public class EurekaserverApplication {

    public static void main ( String [] args ) {
        SpringApplication . run ( EurekaserverApplication . class , args );
    }

}
设置服务器的最后一步是添加application.yml文件,当使用@EnableEurekaServer批注启动应用程序时,该文件将具有eureka相关属性,如果找不到,它将查找bootstrap.yml文件,如果找到,它将查找application.yml文件。 yml文件的属性应如下所示。
server:
  port: 9090

eureka:
  client:
    register-with-eureka: false
    fetch-registry: false
    serviceUrl:
defaultZone: http://localhost:9090/eureka/ 上面的yaml属性文件定义了eureka应该在其中运行的eureka defaultZone serviceUrl 。 register-with-eureka属性设置为false,因为我们不想向自己注册Eureka Server。
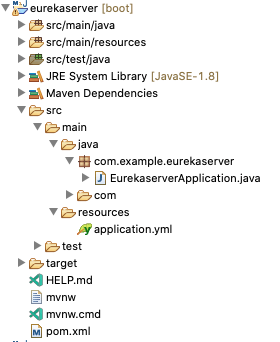
一旦一切就绪,项目结构应如下图所示
继续并启动spring boot应用程序,无论您在application.yml文件中提到的哪个端口上,eureka服务器都应该处于启动状态,在这种情况下,eureka服务器将位于localhost:9090处 ,如下所示。

奥拉,我们已经建立了尤里卡服务器。
现在,我们将像上面一样从spring初始化程序创建两个客户端,分别名为client1和client2,并添加一个依赖项Eureka Discovery Client,如下所示
创建完两个项目后,我们将继续在根SprintBootApplication类上添加@EnableDiscoveryClient注释,如下所示,分别针对客户端Client1和Client2
package com . example . client2 ;

import org . springframework . boot . SpringApplication ;
import org . springframework . boot . autoconfigure . SpringBootApplication ;
import org . springframework . cloud . client . discovery . EnableDiscoveryClient ;

@ SpringBootApplication
@ EnableDiscoveryClient
public class Client2Application {

    public static void main ( String [] args ) {
        SpringApplication . run ( Client2Application . class , args );
    }

}
同样,我们需要按如下所示更新application.yml文件,以提供所需的eureka配置详细信息。
spring:
  application:
    name: 'client1'
server:
  port: 8081

eureka:
  instance:
    hostname: ${vcap.application.uris[0]:localhost}
    prefer-ip-address: true
    lease-renewal-interval-in-seconds: 10
    lease-expiration-duration-in-seconds: 20
  client:
    service-url:
      defaultZone: http://localhost:9090/eureka
在上面的代码中,我们提供了eureka服务器所在的spring应用程序名称和eureka客户端服务URL,因此,一旦启动客户端,它将查看服务URL并尝试自行注册。 属性* 租约续订间隔时间(秒):10&租约到期期限(秒):20 *让Eureka Server何时检查客户端的运行状况。 完成这些更改后,请继续并启动两个客户端。
现在,如果您返回到Eureka Server,您将能够看到两个客户端,其名称分别为CLIENT1和CLIENT2 ,如下所示。

现在设置已完成,两个客户端可以使用服务发现与每个客户端进行对话。
这是视频教程。 请表达爱意,并订阅我的频道订阅 。
翻译自: https://dev.to/nagarajendra/netflix-eureka-server-and-client-setup-with-spring-boot-3j9n


 4469
4469


 被折叠的 条评论
为什么被折叠?
被折叠的 条评论
为什么被折叠?
 到【灌水乐园】发言


