


 这篇博客详细介绍了Keras的安装与配置过程,包括Keras的基本介绍、特点、安装步骤、后端配置以及其在深度学习中的应用。重点讨论了如何在不同操作系统上安装Keras,使用虚拟环境,并在Python中配置后端。此外,还涵盖了Keras的预训练模型,如ResNet、VGG16、MobileNetV2和Inception系列,以及如何使用这些模型进行实时预测。
keras安装与配置指南
Keras-快速指南 (Keras - Quick Guide)
Keras-简介 (Keras - Introduction )
Deep learning is one of the major subfield of machine learning framework. Machine learning is the study of design of algorithms, inspired from the model of human brain. Deep learning is becoming more popular in data science fields like robotics, artificial intelligence(AI), audio & video recognition and image recognition. Artificial neural network is the core of deep learning methodologies. Deep learning is supported by various libraries such as Theano, TensorFlow, Caffe, Mxnet etc., Keras is one of the most powerful and easy to use python library, which is built on top of popular deep learning libraries like TensorFlow, Theano, etc., for creating deep learning models.
深度学习是机器学习框架的主要子领域之一。 机器学习是受人脑模型启发而进行的算法设计研究。 深度学习在机器人,人工智能(AI),音频和视频识别以及图像识别等数据科学领域正变得越来越流行。 人工神经网络是深度学习方法的核心。 深度学习受到Theano,TensorFlow,Caffe,Mxnet等各种库的支持,Keras是功能最强大且易于使用的python库之一,它基于流行的深度学习库如TensorFlow,Theano等构建。 ,用于创建深度学习模型。
Keras概述 (Overview of Keras)
Keras runs on top of open source machine libraries like TensorFlow, Theano or Cognitive Toolkit (CNTK). Theano is a python library used for fast numerical computation tasks. TensorFlow is the most famous symbolic math library used for creating neural networks and deep learning models. TensorFlow is very flexible and the primary benefit is distributed computing. CNTK is deep learning framework developed by Microsoft. It uses libraries such as Python, C#, C++ or standalone machine learning toolkits. Theano and TensorFlow are very powerful libraries but difficult to understand for creating neural networks.
Keras在TensorFlow,Theano或Cognitive Toolkit(CNTK)等开源机器库之上运行。 Theano是用于快速数值计算任务的python库。 TensorFlow是用于创建神经网络和深度学习模型的最著名的符号数学库。 TensorFlow非常灵活,主要优势是分布式计算。 CNTK是Microsoft开发的深度学习框架。 它使用Python,C#,C ++或独立的机器学习工具包之类的库。 Theano和TensorFlow是非常强大的库,但是对于创建神经网络却很难理解。
Keras is based on minimal structure that provides a clean and easy way to create deep learning models based on TensorFlow or Theano. Keras is designed to quickly define deep learning models. Well, Keras is an optimal choice for deep learning applications.
Keras基于最小的结构,它提供了一种干净,简便的方法来创建基于TensorFlow或Theano的深度学习模型。 Keras旨在快速定义深度学习模型。 好吧,Keras是深度学习应用程序的最佳选择。
特征 (Features)
Keras leverages various optimization techniques to make high level neural network API easier and more performant. It supports the following features −
Keras利用各种优化技术来简化高级神经网络API,并提高其性能。 它支持以下功能-
Consistent, simple and extensible API.
一致,简单和可扩展的API。
Minimal structure - easy to achieve the result without any frills.
最小的结构-容易获得结果,没有任何多余的装饰。
It supports multiple platforms and backends.
它支持多个平台和后端。
It is user friendly framework which runs on both CPU and GPU.
它是用户友好的框架,可在CPU和GPU上运行。
Highly scalability of computation.
计算的高度可扩展性。
好处 (Benefits)
Keras is highly powerful and dynamic framework and comes up with the following advantages −
Keras是一个功能强大且动态的框架,具有以下优点-
Larger community support.
更大的社区支持。
Easy to test.
易于测试。
Keras neural networks are written in Python which makes things simpler.
Keras神经网络是用Python编写的,这使事情变得更简单。
Keras supports both convolution and recurrent networks.
Keras支持卷积和循环网络。
Deep learning models are discrete components, so that, you can combine into many ways.
深度学习模型是离散的组件,因此,您可以将其组合成多种方式。
Keras-安装 (Keras - Installation)
This chapter explains about how to install Keras on your machine. Before moving to installation, let us go through the basic requirements of Keras.
本章介绍了如何在计算机上安装Keras。 在进行安装之前,让我们先了解Keras的基本要求。
先决条件 (Prerequisites)
You must satisfy the following requirements −
您必须满足以下要求-
- Any kind of OS (Windows, Linux or Mac) 任何种类的操作系统(Windows,Linux或Mac)
- Python version 3.5 or higher. Python 3.5或更高版本。
Python (Python)
Keras is python based neural network library so python must be installed on your machine. If python is properly installed on your machine, then open your terminal and type python, you could see the response similar as specified below,
Keras是基于python的神经网络库,因此必须在您的计算机上安装python。 如果您的计算机上正确安装了python,请打开您的终端并输入python,您会看到如下所示的响应,
Python 3.6.5 (v3.6.5:f59c0932b4, Mar 28 2018, 17:00:18)
[MSC v.1900 64 bit (AMD64)] on win32
Type "help", "copyright", "credits" or "license" for more information.
>>>
As of now the latest version is ‘3.7.2’. If Python is not installed, then visit the official python link - www.python.org and download the latest version based on your OS and install it immediately on your system.
截至目前,最新版本为“ 3.7.2”。 如果未安装Python,请访问官方python链接-www.python.org并根据您的操作系统下载最新版本,然后立即将其安装在系统上。
Keras安装步骤 (Keras Installation Steps)
Keras installation is quite easy. Follow below steps to properly install Keras on your system.
Keras的安装非常简单。 请按照以下步骤在系统上正确安装Keras。
步骤1:创建虚拟环境 (Step 1: Create virtual environment)
Virtualenv is used to manage Python packages for different projects. This will be helpful to avoid breaking the packages installed in the other environments. So, it is always recommended to use a virtual environment while developing Python applications.
Virtualenv用于管理不同项目的Python软件包。 这将有助于避免破坏在其他环境中安装的软件包。 因此,始终建议在开发Python应用程序时使用虚拟环境。
Linux/Mac OS
Linux / Mac OS
Linux or mac OS users, go to your project root directory and type the below command to create virtual environment,
Linux或Mac OS用户,请转到您的项目根目录,然后键入以下命令以创建虚拟环境,
python3 -m venv kerasenv
After executing the above command, “kerasenv” directory is created with bin,lib and include folders in your installation location.
执行上述命令后,将使用bin,lib创建“ kerasenv”目录,并在您的安装位置包含文件夹 。
Windows
视窗
Windows user can use the below command,
Windows用户可以使用以下命令,
py -m venv keras
步骤2:激活环境 (Step 2: Activate the environment)
This step will configure python and pip executables in your shell path.
此步骤将在您的Shell路径中配置python和pip可执行文件。
Linux/Mac OS
Linux / Mac OS
Now we have created a virtual environment named “kerasvenv”. Move to the folder and type the below command,
现在,我们创建了一个名为“ kerasvenv”的虚拟环境。 移至该文件夹并输入以下命令,
$ cd kerasvenv kerasvenv $ source bin/activate
Windows
视窗
Windows users move inside the “kerasenv” folder and type the below command,
Windows用户进入“ kerasenv”文件夹,然后输入以下命令,
.\env\Scripts\activate
步骤3:Python库 (Step 3: Python libraries)
Keras depends on the following python libraries.
Keras依赖于以下python库。
- Numpy 脾气暴躁的
- Pandas 大熊猫
- Scikit-learn Scikit学习
- Matplotlib Matplotlib
- Scipy 西皮
- Seaborn Seaborn
Hopefully, you have installed all the above libraries on your system. If these libraries are not installed, then use the below command to install one by one.
希望您已在系统上安装了上述所有库。 如果未安装这些库,请使用以下命令逐一安装。
numpy
麻木
pip install numpy
you could see the following response,
您会看到以下回复,
Collecting numpy
   Downloading
https://files.pythonhosted.org/packages/cf/a4/d5387a74204542a60ad1baa84cd2d3353c330e59be8cf2d47c0b11d3cde8/
   numpy-3.1.1-cp36-cp36m-macosx_10_6_intel.
macosx_10_9_intel.macosx_10_9_x86_64.
   macosx_10_10_intel.macosx_10_10_x86_64.whl (14.4MB)
      |████████████████████████████████| 14.4MB 2.8MB/s
pandas
大熊猫
pip install pandas
We could see the following response,
我们可以看到以下回应,
Collecting pandas
   Downloading
https://files.pythonhosted.org/packages/cf/a4/d5387a74204542a60ad1baa84cd2d3353c330e59be8cf2d47c0b11d3cde8/
pandas-3.1.1-cp36-cp36m-macosx_10_6_intel.
macosx_10_9_intel.macosx_10_9_x86_64.
   macosx_10_10_intel.macosx_10_10_x86_64.whl (14.4MB)
      |████████████████████████████████| 14.4MB 2.8MB/s
matplotlib
matplotlib
pip install matplotlib
We could see the following response,
我们可以看到以下回应,
Collecting matplotlib
   Downloading
https://files.pythonhosted.org/packages/cf/a4/d5387a74204542a60ad1baa84cd2d3353c330e59be8cf2d47c0b11d3cde8/
matplotlib-3.1.1-cp36-cp36m-macosx_10_6_intel.
macosx_10_9_intel.macosx_10_9_x86_64.
   macosx_10_10_intel.macosx_10_10_x86_64.whl (14.4MB)
      |████████████████████████████████| 14.4MB 2.8MB/s
scipy
科学的
pip install scipy
We could see the following response,
我们可以看到以下回应,
Collecting scipy
   Downloading
https://files.pythonhosted.org/packages/cf/a4/d5387a74204542a60ad1baa84cd2d3353c330e59be8cf2d47c0b11d3cde8
/scipy-3.1.1-cp36-cp36m-macosx_10_6_intel.
macosx_10_9_intel.macosx_10_9_x86_64.
   macosx_10_10_intel.macosx_10_10_x86_64.whl (14.4MB)
      |████████████████████████████████| 14.4MB 2.8MB/s
scikit-learn
scikit学习
It is an open source machine learning library. It is used for classification, regression and clustering algorithms. Before moving to the installation, it requires the following −
这是一个开放源代码的机器学习库。 它用于分类,回归和聚类算法。 进行安装之前,需要满足以下条件:
- Python version 3.5 or higher Python 3.5或更高版本
- NumPy version 1.11.0 or higher NumPy 1.11.0或更高版本
- SciPy version 0.17.0 or higher SciPy版本0.17.0或更高
- joblib 0.11 or higher. joblib 0.11或更高。
Now, we install scikit-learn using the below command −
现在,我们使用以下命令安装scikit-learn-
pip install -U scikit-learn
Seaborn
Seaborn
Seaborn is an amazing library that allows you to easily visualize your data. Use the below command to install −
Seaborn是一个了不起的库,可让您轻松地可视化数据。 使用以下命令安装-
pip pip install seaborninstall -U scikit-learn
You could see the message similar as specified below −
您可能会看到类似以下内容的消息-
Collecting seaborn
   Downloading
https://files.pythonhosted.org/packages/a8/76/220ba4420459d9c4c9c9587c6ce607bf56c25b3d3d2de62056efe482dadc
/seaborn-0.9.0-py3-none-any.whl (208kB) 100%
   |████████████████████████████████| 215kB 4.0MB/s
Requirement already satisfied: numpy> = 1.9.3 in
./lib/python3.7/site-packages (from seaborn) (1.17.0)
Collecting pandas> = 0.15.2 (from seaborn)
   Downloading
https://files.pythonhosted.org/packages/39/b7/441375a152f3f9929ff8bc2915218ff1a063a59d7137ae0546db616749f9/
pandas-0.25.0-cp37-cp37m-macosx_10_9_x86_64.
macosx_10_10_x86_64.whl (10.1MB) 100%
   |████████████████████████████████| 10.1MB 1.8MB/s
Requirement already satisfied: scipy>=0.14.0 in
./lib/python3.7/site-packages (from seaborn) (1.3.0)
Collecting matplotlib> = 1.4.3 (from seaborn)
   Downloading
https://files.pythonhosted.org/packages/c3/8b/af9e0984f
5c0df06d3fab0bf396eb09cbf05f8452de4e9502b182f59c33b/
matplotlib-3.1.1-cp37-cp37m-macosx_10_6_intel.
macosx_10_9_intel.macosx_10_9_x86_64
.macosx_10_10_intel.macosx_10_10_x86_64.whl (14.4MB) 100%
   |████████████████████████████████| 14.4MB 1.4MB/s
......................................
......................................
Successfully installed cycler-0.10.0 kiwisolver-1.1.0
matplotlib-3.1.1 pandas-0.25.0 pyparsing-2.4.2
python-dateutil-2.8.0 pytz-2019.2 seaborn-0.9.0
使用Python安装Keras (Keras Installation Using Python)
As of now, we have completed basic requirements for the installtion of Kera. Now, install the Keras using same procedure as specified below −
到目前为止,我们已经完成了安装Kera的基本要求。 现在,使用下面指定的相同步骤安装Keras-
pip install keras
退出虚拟环境 (Quit virtual environment)
After finishing all your changes in your project, then simply run the below command to quit the environment −
完成项目中的所有更改后,只需运行以下命令即可退出环境-
deactivate
Python云 (Anaconda Cloud)
We believe that you have installed anaconda cloud on your machine. If anaconda is not installed, then visit the official link, www.anaconda.com/distribution and choose download based on your OS.
我们相信您已在计算机上安装了anaconda云。 如果未安装anaconda,请访问官方链接www.anaconda.com/distribution ,然后根据您的操作系统选择下载。
创建一个新的conda环境 (Create a new conda environment)
Launch anaconda prompt, this will open base Anaconda environment. Let us create a new conda environment. This process is similar to virtualenv. Type the below command in your conda terminal −
启动anaconda提示,这将打开基本的Anaconda环境。 让我们创建一个新的conda环境。 此过程类似于virtualenv。 在conda终端中输入以下命令-
conda create --name PythonCPU
If you want, you can create and install modules using GPU also. In this tutorial, we follow CPU instructions.
如果需要,您还可以使用GPU创建和安装模块。 在本教程中,我们遵循CPU指令。
激活conda环境 (Activate conda environment)
To activate the environment, use the below command −
要激活环境,请使用以下命令-
activate PythonCPU
安装间谍 (Install spyder)
Spyder is an IDE for executing python applications. Let us install this IDE in our conda environment using the below command −
Spyder是用于执行python应用程序的IDE。 让我们使用以下命令在conda环境中安装此IDE-
conda install spyder
安装python库 (Install python libraries)
We have already known the python libraries numpy, pandas, etc., needed for keras. You can install all the modules by using the below syntax −
我们已经知道keras需要的python库numpy,pandas等。 您可以使用以下语法安装所有模块-
Syntax
句法
conda install -c anaconda <module-name>
For example, you want to install pandas −
例如,您要安装熊猫-
conda install -c anaconda pandas
Like the same method, try it yourself to install the remaining modules.
与相同的方法一样,请自己尝试安装其余模块。
安装Keras (Install Keras)
Now, everything looks good so you can start keras installation using the below command −
现在,一切看起来都不错,因此您可以使用以下命令开始安装keras-
conda install -c anaconda keras
发射间谍 (Launch spyder)
Finally, launch spyder in your conda terminal using the below command −
最后,使用以下命令在conda终端中启动spyder-
spyder
To ensure everything was installed correctly, import all the modules, it will add everything and if anything went wrong, you will get module not found error message.
为确保所有组件均已正确安装,请导入所有模块,它将添加所有组件,如果出现任何错误,您将收到未找到模块的错误消息。
Keras-后端配置 (Keras - Backend Configuration)
This chapter explains Keras backend implementations TensorFlow and Theano in detail. Let us go through each implementation one by one.
本章详细说明Keras后端实现TensorFlow和Theano。 让我们逐一介绍每个实现。
TensorFlow (TensorFlow)
TensorFlow is an open source machine learning library used for numerical computational tasks developed by Google. Keras is a high level API built on top of TensorFlow or Theano. We know already how to install TensorFlow using pip.
TensorFlow是一个开源的机器学习库,用于Google开发的数值计算任务。 Keras是建立在TensorFlow或Theano之上的高级API。 我们已经知道如何使用pip安装TensorFlow。
If it is not installed, you can install using the below command −
如果尚未安装,则可以使用以下命令进行安装-
pip install TensorFlow
Once we execute keras, we could see the configuration file is located at your home directory inside and go to .keras/keras.json.
执行keras后,我们可以看到配置文件位于您的主目录中,并转到.keras / keras.json。
keras.json (keras.json)
{
   "image_data_format": "channels_last",
   "epsilon": 1e-07, "floatx": "float32", "backend": "tensorflow"
}
Here,
这里,
image_data_format represent the data format.
image_data_format表示数据格式。
epsilon represents numeric constant. It is used to avoid DivideByZero error.
epsilon表示数值常数。 用于避免DivideByZero错误。
floatx represent the default data type float32. You can also change it to float16 or float64 using set_floatx() method.
float x表示默认数据类型float32 。 您也可以使用set_floatx()方法将其更改为float16或float64 。
image_data_format represent the data format.
image_data_format表示数据格式。
Suppose, if the file is not created then move to the location and create using the below steps −
假设,如果未创建文件,则移动到该位置并使用以下步骤创建-
> cd home
> mkdir .keras
> vi keras.json
Remember, you should specify .keras as its folder name and add the above configuration inside keras.json file. We can perform some pre-defined operations to know backend functions.
请记住,您应该指定.keras作为其文件夹名称,并将上述配置添加到keras.json文件中。 我们可以执行一些预定义的操作来了解后端功能。
茶野 (Theano)
Theano is an open source deep learning library that allows you to evaluate multi-dimensional arrays effectively. We can easily install using the below command −
Theano是一个开源深度学习库,可让您有效地评估多维数组。 我们可以使用以下命令轻松安装-
pip install theano
By default, keras uses TensorFlow backend. If you want to change backend configuration from TensorFlow to Theano, just change the backend = theano in keras.json file. It is described below −
默认情况下,keras使用TensorFlow后端。 如果要将后端配置从TensorFlow更改为Theano,只需在keras.json文件中更改backend = theano。 它在下面描述-
keras.json (keras.json)
{
   "image_data_format": "channels_last",
   "epsilon": 1e-07,
   "floatx": "float32",
   "backend": "theano"
}
Now save your file, restart your terminal and start keras, your backend will be changed.
现在保存文件,重新启动终端并启动keras,您的后端将被更改。
>>> import keras as k
using theano backend.
Keras-深度学习概述 (Keras - Overview of Deep learning)
Deep learning is an evolving subfield of machine learning. Deep learning involves analyzing the input in layer by layer manner, where each layer progressively extracts higher level information about the input.
深度学习是机器学习的一个不断发展的子领域。 深度学习涉及逐层分析输入,其中每一层逐步提取有关输入的更高级别的信息。
Let us take a simple scenario of analyzing an image. Let us assume that your input image is divided up into a rectangular grid of pixels. Now, the first layer abstracts the pixels. The second layer understands the edges in the image. The Next layer constructs nodes from the edges. Then, the next would find branches from the nodes. Finally, the output layer will detect the full object. Here, the feature extraction process goes from the output of one layer into the input of the next subsequent layer.
让我们以分析图像的简单场景为例。 让我们假设您的输入图像被分成像素的矩形网格。 现在,第一层提取像素。 第二层了解图像中的边缘。 下一步层从边缘构造节点。 然后,下一个将从节点中找到分支。 最后,输出层将检测到整个对象。 在这里,特征提取过程从一层的输出转到下一个下一层的输入。
By using this approach, we can process huge amount of features, which makes deep learning a very powerful tool. Deep learning algorithms are also useful for the analysis of unstructured data. Let us go through the basics of deep learning in this chapter.
通过使用这种方法,我们可以处理大量功能,这使深度学习成为非常强大的工具。 深度学习算法对于非结构化数据的分析也很有用。 让我们在本章中学习深度学习的基础知识。
人工神经网络 (Artificial Neural Networks)
The most popular and primary approach of deep learning is using “Artificial neural network” (ANN). They are inspired from the model of human brain, which is the most complex organ of our body. The human brain is made up of more than 90 billion tiny cells called “Neurons”. Neurons are inter-connected through nerve fiber called “axons” and “Dendrites”. The main role of axon is to transmit information from one neuron to another to which it is connected.
深度学习最流行和最主要的方法是使用“人工神经网络”(ANN)。 它们的灵感来自人类大脑的模型,这是人体最复杂的器官。 人脑由超过900亿个称为“神经元”的微小细胞组成。 神经元通过称为“轴突”和“树突”的神经纤维相互连接。 轴突的主要作用是将信息从一个神经元传递到与其连接的另一神经元。
Similarly, the main role of dendrites is to receive the information being transmitted by the axons of another neuron to which it is connected. Each neuron processes a small information and then passes the result to another neuron and this process continues. This is the basic method used by our human brain to process huge about of information like speech, visual, etc., and extract useful information from it.
同样,树突的主要作用是接收与之相连的另一个神经元的轴突传递的信息。 每个神经元处理少量信息,然后将结果传递给另一个神经元,此过程继续进行。 这是人脑处理大量信息(如语音,视觉等)并从中提取有用信息的基本方法。
Based on this model, the first Artificial Neural Network (ANN) was invented by psychologist Frank Rosenblatt, in the year of 1958. ANNs are made up of multiple nodes which is similar to neurons. Nodes are tightly interconnected and organized into different hidden layers. The input layer receives the input data and the data goes through one or more hidden layers sequentially and finally the output layer predict something useful about the input data. For example, the input may be an image and the output may be the thing identified in the image, say a “Cat”.
基于此模型,心理学家Frank Rosenblatt于1958年发明了第一个人工神经网络。人工神经网络由类似于神经元的多个节点组成。 节点紧密互连,并组织成不同的隐藏层。 输入层接收输入数据,数据依次经过一个或多个隐藏层,最后输出层预测有关输入数据的有用信息。 例如,输入可以是图像,而输出可以是图像中标识的东西,例如“猫”。
A single neuron (called as perceptron in ANN) can be represented as below −
单个神经元(在ANN中称为感知器)可以表示如下-
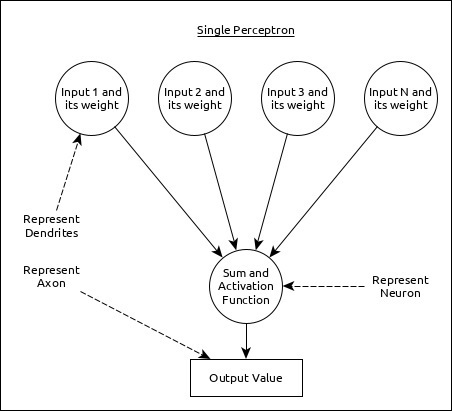
Here,
这里,
Multiple input along with weight represents dendrites.
多个输入以及重量代表树突。
Sum of input along with activation function represents neurons. Sum actually means computed value of all inputs and activation function represent a function, which modify the Sum value into 0, 1 or 0 to 1.
输入和激活功能的总和代表神经元。 Sum实际上表示所有输入的计算值,激活函数表示一个函数,它将Sum值修改为0、1或0到1。
Actual output represent axon and the output will be received by neuron in next layer.
实际输出代表轴突,输出将被下一层的神经元接收。
Let us understand different types of artificial neural networks in this section.
让我们在本节中了解不同类型的人工神经网络。
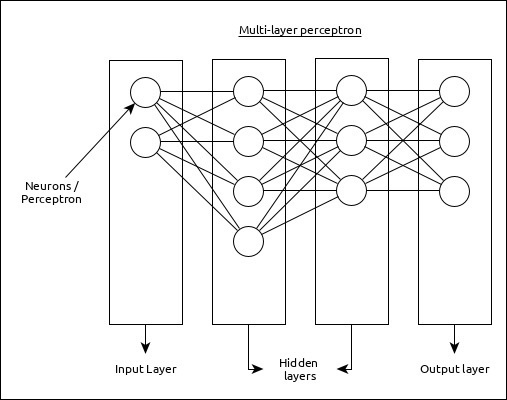
多层感知器 (Multi-Layer Perceptron)
Multi-Layer perceptron is the simplest form of ANN. It consists of a single input layer, one or more hidden layer and finally an output layer. A layer consists of a collection of perceptron. Input layer is basically one or more features of the input data. Every hidden layer consists of one or more neurons and process certain aspect of the feature and send the processed information into the next hidden layer. The output layer process receives the data from last hidden layer and finally output the result.
多层感知器是ANN的最简单形式。 它由一个输入层,一个或多个隐藏层以及最后一个输出层组成。 一层由感知器集合组成。 输入层基本上是输入数据的一个或多个特征。 每个隐藏层由一个或多个神经元组成,并处理特征的某些方面,并将处理后的信息发送到下一个隐藏层。 输出层进程从最后一个隐藏层接收数据,最后输出结果。
卷积神经网络(CNN) (Convolutional Neural Network (CNN))
Convolutional neural network is one of the most popular ANN. It is widely used in the fields of image and video recognition. It is based on the concept of convolution, a mathematical concept. It is almost similar to multi-layer perceptron except it contains series of convolution layer and pooling layer before the fully connected hidden neuron layer. It has three important layers −
卷积神经网络是最流行的人工神经网络之一。 它广泛应用于图像和视频识别领域。 它基于数学概念卷积的概念。 它几乎与多层感知器相似,不同之处在于它在完全连接的隐藏神经元层之前包含一系列卷积层和池化层。 它具有三个重要的层-
Convolution layer − It is the primary building block and perform computational tasks based on convolution function.
卷积层 -它是主要的构建块,并基于卷积函数执行计算任务。
Pooling layer − It is arranged next to convolution layer and is used to reduce the size of inputs by removing unnecessary information so computation can be performed faster.
池层 -它位于卷积层旁边,用于通过删除不必要的信息来减小输入的大小,从而可以更快地执行计算。
Fully connected layer − It is arranged to next to series of convolution and pooling layer and classify input into various categories.
完全连接的层 -安排在一系列卷积和池化层的旁边,并将输入分类为各种类别。
A simple CNN can be represented as below −
一个简单的CNN可以表示如下-
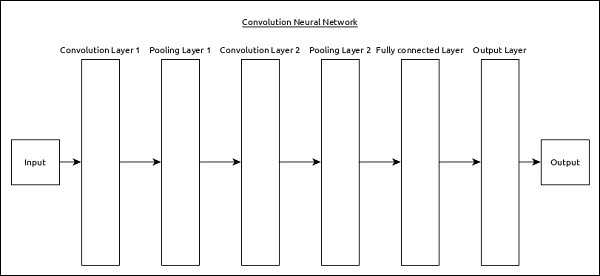
Here,
这里,
2 series of Convolution and pooling layer is used and it receives and process the input (e.g. image).
使用2系列卷积和池化层,它接收并处理输入(例如图像)。
A single fully connected layer is used and it is used to output the data (e.g. classification of image)
使用单个完全连接的层,并用于输出数据(例如,图像分类)
递归神经网络(RNN) (Recurrent Neural Network (RNN))
Recurrent Neural Networks (RNN) are useful to address the flaw in other ANN models. Well, Most of the ANN doesn’t remember the steps from previous situations and learned to make decisions based on context in training. Meanwhile, RNN stores the past information and all its decisions are taken from what it has learnt from the past.
递归神经网络(RNN)对于解决其他ANN模型中的缺陷很有用。 好吧,大多数ANN都不记得以前的情况,而是学会根据训练中的情境做出决策。 同时,RNN存储了过去的信息,其所有决策都是从过去的经验中学到的。
This approach is mainly useful in image classification. Sometimes, we may need to look into the future to fix the past. In this case bidirectional RNN is helpful to learn from the past and predict the future. For example, we have handwritten samples in multiple inputs. Suppose, we have confusion in one input then we need to check again other inputs to recognize the correct context which takes the decision from the past.
该方法主要用于图像分类。 有时,我们可能需要展望未来以修正过去。 在这种情况下,双向RNN有助于从过去学习和预测未来。 例如,我们有多个输入的手写样本。 假设我们在一个输入中有混淆,然后我们需要再次检查其他输入以识别做出过去决定的正确上下文。
人工神经网络的工作流程 (Workflow of ANN)
Let us first understand the different phases of deep learning and then, learn how Keras helps in the process of deep learning.
首先让我们了解深度学习的不同阶段,然后了解Keras在深度学习过程中如何提供帮助。
收集所需数据 (Collect required data)
Deep learning requires lot of input data to successfully learn and predict the result. So, first collect as much data as possible.
深度学习需要大量输入数据才能成功学习和预测结果。 因此,首先要收集尽可能多的数据。
分析数据 (Analyze data)
Analyze the data and acquire a good understanding of the data. The better understanding of the data is required to select the correct ANN algorithm.
分析数据并获得对数据的良好理解。 选择正确的ANN算法需要对数据有更好的了解。
选择一种算法(模型) (Choose an algorithm (model))
Choose an algorithm, which will best fit for the type of learning process (e.g image classification, text processing, etc.,) and the available input data. Algorithm is represented by Model in Keras. Algorithm includes one or more layers. Each layers in ANN can be represented by Keras Layer in Keras.
选择一种最适合学习过程类型(例如图像分类,文本处理等)和可用输入数据的算法。 算法由Keras中的模型表示。 算法包括一层或多层。 ANN中的每个层都可以用Keras中的Keras层表示。
Prepare data − Process, filter and select only the required information from the data.
准备数据 -处理,过滤和仅从数据中选择所需的信息。
Split data − Split the data into training and test data set. Test data will be used to evaluate the prediction of the algorithm / Model (once the machine learn) and to cross check the efficiency of the learning process.
拆分数据 -将数据拆分为训练和测试数据集。 测试数据将用于评估算法/模型的预测(一旦机器学习),并交叉检查学习过程的效率。
Compile the model − Compile the algorithm / model, so that, it can be used further to learn by training and finally do to prediction. This step requires us to choose loss function and Optimizer. loss function and Optimizer are used in learning phase to find the error (deviation from actual output) and do optimization so that the error will be minimized.
编译模型 -编译算法/模型,以便可以通过训练进一步学习,最后进行预测。 这一步需要我们选择损失函数和优化器。 损失函数和优化器用于学习阶段,以查找错误(与实际输出的偏差)并进行优化,以使错误最小化。
Fit the model − The actual learning process will be done in this phase using the training data set.
拟合模型 -实际的学习过程将在此阶段使用训练数据集完成。
Predict result for unknown value − Predict the output for the unknown input data (other than existing training and test data)
预测未知值的结果 -预测未知输入数据的输出(现有培训和测试数据除外)
Evaluate model − Evaluate the model by predicting the output for test data and cross-comparing the prediction with actual result of the test data.
评估模型 -通过预测测试数据的输出并将预测与测试数据的实际结果进行交叉比较来评估模型 。
Freeze, Modify or choose new algorithm − Check whether the evaluation of the model is successful. If yes, save the algorithm for future prediction purpose. If not, then modify or choose new algorithm / model and finally, again train, predict and evaluate the model. Repeat the process until the best algorithm (model) is found.
冻结,修改或选择新算法 -检查模型评估是否成功。 如果是,则保存算法以供将来预测之用。 如果不是,则修改或选择新的算法/模型,最后再次训练,预测和评估模型。 重复该过程,直到找到最佳算法(模型)为止。
The above steps can be represented using below flow chart −
可以使用以下流程图表示以上步骤-

Keras-深度学习 (Keras - Deep learning)
Keras provides a complete framework to create any type of neural networks. Keras is innovative as well as very easy to learn. It supports simple neural network to very large and complex neural network model. Let us understand the architecture of Keras framework and how Keras helps in deep learning in this chapter.
Keras提供了一个完整的框架来创建任何类型的神经网络。 Keras具有创新性并且非常易于学习。 它支持简单的神经网络到非常大和复杂的神经网络模型。 在本章中,让我们了解Keras框架的体系结构以及Keras如何帮助深度学习。
凯拉斯的体系结构 (Architecture of Keras)
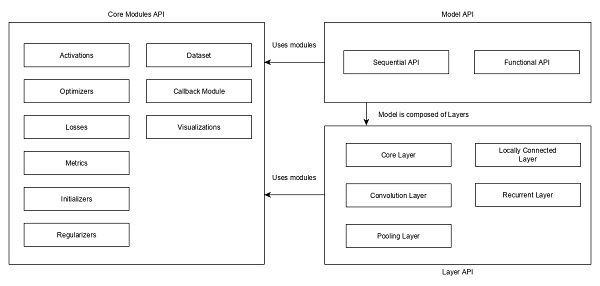
Keras API can be divided into three main categories −
Keras API可以分为三个主要类别-
- Model 模型
- Layer 层
- Core Modules 核心模块
In Keras, every ANN is represented by Keras Models. In turn, every Keras Model is composition of Keras Layers and represents ANN layers like input, hidden layer, output layers, convolution layer, pooling layer, etc., Keras model and layer access Keras modules for activation function, loss function, regularization function, etc., Using Keras model, Keras Layer, and Keras modules, any ANN algorithm (CNN, RNN, etc.,) can be represented in a simple and efficient manner.
在Keras中,每个人工神经网络都由Keras模型表示。 反过来,每个Keras模型都是Keras层的组成 ,代表了ANN层,例如输入层,隐藏层,输出层,卷积层,池化层等。Keras模型和层访问Keras模块,用于激活函数,损失函数,正则化函数,等等,使用Keras模型,Keras Layer和Keras模块,可以以简单有效的方式表示任何ANN算法(CNN,RNN等)。
The following diagram depicts the relationship between model, layer and core modules −
下图描述了模型,层和核心模块之间的关系-
Let us see the overview of Keras models, Keras layers and Keras modules.
让我们看一下Keras模型,Keras图层和Keras模块的概述。
模型 (Model)
Keras Models are of two types as mentioned below −
Keras模型有以下两种类型-
Sequential Model − Sequential model is basically a linear composition of Keras Layers. Sequential model is easy, minimal as well as has the ability to represent nearly all available neural networks.
顺序模型 -顺序模型基本上是Keras层的线性组成。 顺序模型简单,最小,并且能够表示几乎所有可用的神经网络。
A simple sequential model is as follows −
一个简单的顺序模型如下-
from keras.models import Sequential
from keras.layers import Dense, Activation

model = Sequential()
model.add(Dense(512, activation = 'relu', input_shape = (784,)))
Where,
哪里,
Line 1 imports Sequential model from Keras models
1号线从Keras模型导入顺序模型
Line 2 imports Dense layer and Activation module
第2行导入了密集层和激活模块
Line 4 create a new sequential model using Sequential API
第4行使用Sequential API创建新的顺序模型
Line 5 adds a dense layer (Dense API) with relu activation (using Activation module) function.
第5行添加了带有relu激活(使用Activation模块)功能的密集层(Dense API)。
Sequential model exposes Model class to create customized models as well. We can use sub-classing concept to create our own complex model.
顺序模型公开了Model类,以创建自定义模型。 我们可以使用子分类概念来创建我们自己的复杂模型。
Functional API − Functional API is basically used to create comp
 最低0.47元/天 解锁文章


 4万+
4万+


 被折叠的 条评论
为什么被折叠?
被折叠的 条评论
为什么被折叠?
 到【灌水乐园】发言


