


一、最终效果

新增主应用在线地址
可以在线切换进入wocwin-vue2(常规vue2+webpack后台管理系统模板)、wocwin-admin(常规vue3+vite+Ts后台管理系统模板)
二、微前端(qiankun)介绍及为什么选择用微前端,可以看官网
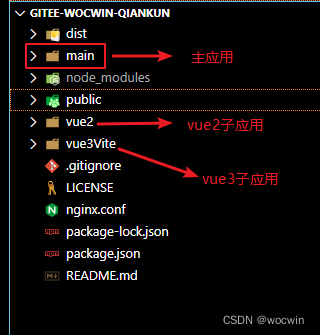
三、目录结构如下
四、具体配置
一、主应用配置
1、主应用技术栈
Vue-cli4搭建项目+Vue2+Element-Ui+qiankun;Vue2+Element-Ui+qiankun
2、搭建好主项目(即:常规的vue2后台管理系统模板)
3、在主项目目录src下新建一个micro-app.js文件(main/src/micro-app.js)
整合所有子应用,为了方便管理(后续可以在系统管理中开个微前端配置页面——调用接口来获取)
const microApps = [
  {
    name: 'portal-fe',
    // entry: process.env.VUE_APP_SUB_VUE2,
    entry: '//localhost:9100/wocwin-qiankun/app-vue2/',
    activeRule: '/wocwin-qiankun/app-vue2'
  },
  {
    name: 'vue3-vite-fe',
    // entry: process.env.VUE_APP_SUB_VUE3,
    entry: '//localhost:3300/app-vue3vite/',
    activeRule: '/app-vue3vite'
  }
]
const apps = microApps.map(item => {
  return {
    ...item,
    container: '#app', // 子应用挂载的div
    props: {
      routerBase: item.activeRule // 下发基础路由
    }
  }
})
export default apps
4、在main.js中注册子应用(main/src/main.js)
import { registerMicroApps, start } from 'qiankun'
// 获取所有子应用
import microApps from './micro-app'

// 给子应用配置加上loader方法
const apps = microApps.map(item => {
  // console.log('app', item)
  return {
    ...item
  }
})
registerMicroApps(apps, {
  beforeLoad: (app) => {
    console.log('before load', app)
    switch (app.name) {
      case 'portal-fe':
        document.title = 'vue2常规模板'
        break
      case 'vue3-vite-fe':
        document.title = 'vue3+vite模板'
        break
    }
  },
  beforeMount: [(app) => {
    console.log('before mount', app.name)
  }]
})
start({
  prefetch: false // 取消预加载
})
5、具体跳转子应用需要用到window.history.pushState()
注意:调用这个方法前提:路由是 history 模式
window.history.pushState(state, title, url)
// 1、state:一个与添加的记录相关联的状态对象,主要用于popstate事件。该事件触发时,该对象会传入回调函数。也就是说,浏览器会将这个对象序列化以后保留在本地,重新载入这个页面的时候,可以拿到这个对象。如果不需要这个对象,此处可以填null。
///2、title:新页面的标题。但是,现在所有浏览器都忽视这个参数,所以这里可以填空字符串。
// 3、url:新的网址,必须与当前页面处在同一个域。浏览器的地址栏将显示这个网址。
二、vue2子应用配置
1、vue2子应用技术栈跟主项目一样
2、具体需要修改以下几个部分(跟主应用的micro-app.js一致)
1、子应用的package.json ,name要与microApps 的name一样
2、如下修改src/main.js文件
let instance = null
export function render(props = {}) {
console.log('执行子应用渲染')
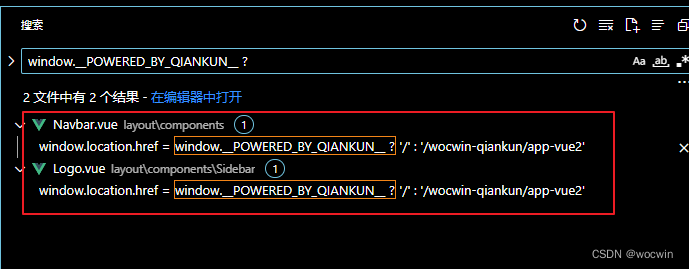
if (window.__POWERED_BY_QIANKUN__) {
// eslint-disable-next-line no-undef
__webpack_public_path__ = window.__INJECTED_PUBLIC_PATH_BY_QIANKUN__
}
const { container } = props
instance = new Vue({
router,
store,
render: (h) => h(App)
}).$mount(container ? container.querySelector('#app') : '#app')
console.log('开始加载相关内容')
}
// TODO:非qiankun环境下单独运行
// @ts-ignore
if (!window.__POWERED_BY_QIANKUN__) {
console.log('并不是qiankun渲染')
render()
}
/**
* bootstrap 只会在微应用初始化的时候调用一次,下次微应用重新进入时会直接调用 mount 钩子,不会再重复触发 bootstrap。
* 通常我们可以在这里做一些全局变量的初始化,比如不会在 unmount 阶段被销毁的应用级别的缓存等。
*/
export async function bootstrap() {
console.log('react app bootstraped')
}
/**
* 应用每次进入都会调用 mount 方法,通常我们在这里触发应用的渲染方法
*/
export async function mount(props) {
console.log('应用每次进入都会调用 mount 方法,通常我们在这里触发应用的渲染方法', props)
props.onGlobalStateChange((state) => {
console.log('子应用接收的参数', state)
if (state.menuId) {
store.commit('SET_MENU_ID', state.menuId)
}
}, true)
render(props)
}
/**
* 应用每次 切出/卸载 会调用的方法,通常在这里我们会卸载微应用的应用实例
*/
export async function unmount(props) {
if (instance) {
instance.$destroy()
instance = null
}
await store.dispatch('tagsView/delAllViews')
console.log('应用每次 切出/卸载 会调用的方法,通常在这里我们会卸载微应用的应用实例', props)
}
/**
* 可选生命周期钩子,仅使用 loadMicroApp 方式加载微应用时生效
*/
export async function update(props) {
console.log('update props', props)
}
3、vue.config.js文件新增以下代码
const packageName = require('./package.json').name
module.exports = {
 publicPath: '/wocwin-qiankun/app-vue2', // 这个要与主应用的micro-app.js中activeRule一致
// 解决本地启动主子切换报跨域问题
devServer: {
    headers: {
      'Access-Control-Allow-Origin': '*'
    }
  },
  configureWebpack: {
   // 把子应用打包成 umd 库格式
    output: {
      library: `${packageName}`,
      libraryTarget: 'umd', // 把微应用打包成 umd 库格式
      jsonpFunction: `webpackJsonp_${packageName}`,
      filename: `[name].[hash].js`,
      chunkFilename: `[name].[hash].js`
    }
  }
}
4、如下修改src/router/index.js文件
import Vue from 'vue'
import Router from 'vue-router'

Vue.use(Router)

/* Layout */
import Layout from '@/layout'
import login from '@/views/login.vue'
import redirect from '@/views/redirect.vue'

// 公共路由
export const constantRoutes = window.__POWERED_BY_QIANKUN__
  ? [
    {
      path: '/login',
      name: 'login',
      component: login,
      hidden: true,
      meta: {
        rootPage: true,
        noCache: true
      }
    },
    {
      path: '/redirect',
      name: 'redirect',
      component: Layout,
      hidden: true,
      children: [
        {
          path: ':path(.*)',
          name: 'redirectPage',
          component: redirect,
          meta: {
            noCache: true
          }
        }
      ]
    },
    {
      path: '/',
      component: Layout,
      redirect: '/base',
      // hidden: true,
      children: [
        {
          path: 'base',
          component: () => import('../views/demo/TTable/base.vue'),
          name: 'base',
          meta: { title: 'vue2常规模板', icon: 'monitor' }
        }
      ]
    }
  ]
  : [
    {
      path: '/redirect',
      component: Layout,
      hidden: true,
      children: [{
        path: '/redirect/:path(.*)',
        component: () =>
          import('@/views/redirect')
      }]
    },
    {
      path: '/login',
      component: () =>
        import('@/views/login'),
      hidden: true
    },
    {
      path: '/404',
      component: () =>
        import('@/views/error/404'),
      hidden: true
    },
    {
      path: '/401',
      component: () =>
        import('@/views/error/401'),
      hidden: true
    },
    {
      path: '/',
      component: Layout,
      redirect: '/base',
      children: [
        {
          path: 'base',
          component: () => import('../views/demo/TTable/base.vue'),
          name: 'base',
          meta: { title: 'vue2常规模板', icon: 'monitor' }
        }
      ]
    }
  ]
const router = new Router({
  base: '/wocwin-qiankun/app-vue2/',
  routes: constantRoutes,
  mode: 'history'
})
export default router
5、如下修改部分登出文件(判断是回主应用登录还是子应用登录页面)
二、vue3+vite3子应用配置
1、创建Vue3+Vite项目
可以参考我之前发布的vite快速搭建vue3项目文章来创建;也可以直接使用我开源Vue3.2+Ts+Vite3+Pinia+Element-Plus模板wocwin-admin
以下我以 wocwin-admin 项目为例
具体步骤可以参考这篇文章
2、抽离贴出重点代码
1、vue3Vite/src/main.ts文件修改
/**
 * 配置qiankun
 */
import { renderWithQiankun, qiankunWindow } from 'vite-plugin-qiankun/dist/helper'
let instance: any = null
function render(props: any = {}) {
  const { container } = props
  instance = createApp(App)
  instance.use(router)
  instance.use(pinia)
  // 注册全局api方法
  instance.config.globalProperties.$api = api
  // 注册所有图标
  for (const [key, component] of Object.entries(ElementPlusIconsVue)) {
    instance.component(key, component)
  }
  // 注册ElementPlus
  instance.use(ElementPlus, {
    locale // 语言设置
    // size: Cookies.get('size') || 'medium' // 尺寸设置
  })
  instance.use(TuiPlus)
  // 全局组件祖册
  instance.component(
    'SvgIcon',
    // 如果这个组件选项是通过 `export default` 导出的,那么就会优先使用 `.default`,否则回退到使用模块的根
    SvgIcon.default || SvgIcon
  )
  instance?.mount(container ? container.querySelector('#app') : '#app')
  console.log('开始加载相关内容')
}
renderWithQiankun({
  mount(props: any) {
    render(props)
  },
  bootstrap() {
    console.log('%c', 'color:green;', ' ChildOne bootstrap')
  },
  update() {
    console.log('%c', 'color:green;', ' ChildOne update')
  },
  unmount(props: any) {
    console.log('unmount', props)
    instance.unmount()
    instance._container.innerHTML = ''
    instance = null
  }
})

if (!qiankunWindow.__POWERED_BY_QIANKUN__) {
  console.log('并不是qiankun渲染')
  render()
}
2、vue3Vite/package.json文件修改
name要与主应用的microApps 的name一样
3、vue3Vite/vite.config.ts文件修改
// 配置qiankun
import qiankun from 'vite-plugin-qiankun'
const packName = require('./package').name
export default defineConfig({
	base: '/app-vue3vite/', // 这个要与主应用的micro-app.js中activeRule一致
	plugins: [
     ...
    // 配置qiankun
    qiankun(`${packName}`, {
      useDevMode: true
    })
  ],
 server: {
    headers: {
      'Access-Control-Allow-Origin': '*'
    }
  },
})
4、vue3Vite/src/router/index.ts文件修改
import { createWebHistory } from 'vue-router'
const router = createRouter({
  history: createWebHistory('/app-vue3vite/'), // 这个要与主应用的micro-app.js中activeRule一致
  routes: constantRoutes,
})
export default router
三、若想实现主子应用之间通信可以参考这一篇博客
四、本地部署到服务器需要配置NG(可以参考下面代码)
这种配置的好处:所有子应用都是挂载在主应用中,子应用无需在新开一个端口,若服务器部署成功,单独子应用项目地址:主应用地址+子应用的publicPath
################################################
#### 门户 PC前端主-子项目NGINX统一代理规则 ####
################################################

# nginx配置
server {
    listen       8100;
    server_name  localhost;
    gzip on;
    gzip_buffers 32 4K;
    gzip_comp_level 6;
    gzip_min_length 100;
    gzip_types application/javascript text/css text/xml;
    gzip_disable "MISE [1-6]\.";
    gzip_vary on;

    # pc端主应用
    location / {
        add_header Access-Control-Allow-Origin *;
        add_header Cache-Control no-cache;
        # root 根目录,默认nginx镜像的html文件夹,可以指定其他
        root   /data/build/nodejs/wocwin-qiankun-main/dist-wocwin-qiankun-main;
        index  index.html index.htm;
        # 如果vue-router使用的是history模式,需要设置这个
        try_files $uri $uri/ /index.html;
		if ($request_filename ~* ^.*?\.(doc|pdf|docx)$) {
            add_header Content-Disposition "attachment";
			add_header Content-Type application/octet-stream;
		}
    }

    #### vue2常规模板
    location /app-vue2 {
        add_header Access-Control-Allow-Origin *;
        add_header Cache-Control no-cache;
        alias /data/build/nodejs/portal-fe-dev/dist-portal-fe/;
        index  index.html index.htm;
        try_files $uri $uri/ /app-vue2/index.html;
		if ($request_filename ~* ^.*?\.(doc|pdf|docx)$) {
            add_header Content-Disposition "attachment";
			add_header Content-Type application/octet-stream;
		}
    }

    ## vue3模板
    location /app-vue3vite {
        add_header Access-Control-Allow-Origin *;
        add_header Cache-Control no-cache;
        # root 根目录,默认nginx镜像的html文件夹,可以指定其他
        alias /data/build/nodejs/vue3-vite-fe-dev/dist-vue3-vite-fe/;
        index  index.html /index.htm;
        # 如果vue-router使用的是history模式,需要设置这个
        try_files $uri $uri/ /app-vue3vite/index.html;
        if ($request_filename ~* ^.*?\.(doc|pdf|docx)$) {
            add_header Content-Disposition "attachment";
            add_header Content-Type application/octet-stream;
        }
    }
    #######################

    # 转发后端接口
    location ^~ /sso/ {
        proxy_pass http://*********/sso/;     # 统一登录
    }
    location ^~ /user/ {
        proxy_pass http://*********/user/;   # 统一用户
    }
    # 单个子应用业务后台接口地址
		location ^~ /mes/ {
				proxy_pass http://******/mes/;
			}

    ###############################
    ### WS转发配置
    ###############################
    # 单个子应用websocket地址
    location ^~ /***/ws/ {
        proxy_pass http://****/ws/;
        proxy_http_version 1.1;
        proxy_set_header Upgrade $http_upgrade;
        proxy_set_header Connection "Upgrade";
        proxy_set_header X-Real-IP $remote_addr;
    }

    #error_page  404              /404.html;

    # redirect server error pages to the static page /50x.html
    #
    error_page   500 502 503 504  /50x.html;
    location = /50x.html {
        root   /usr/local/nginx/html;
    }
}
五、源码地址
相关文章
vue3+ts基于Element-plus再次封装基础组件文档


 1020
1020


 被折叠的 条评论
为什么被折叠?
被折叠的 条评论
为什么被折叠?
 到【灌水乐园】发言


