


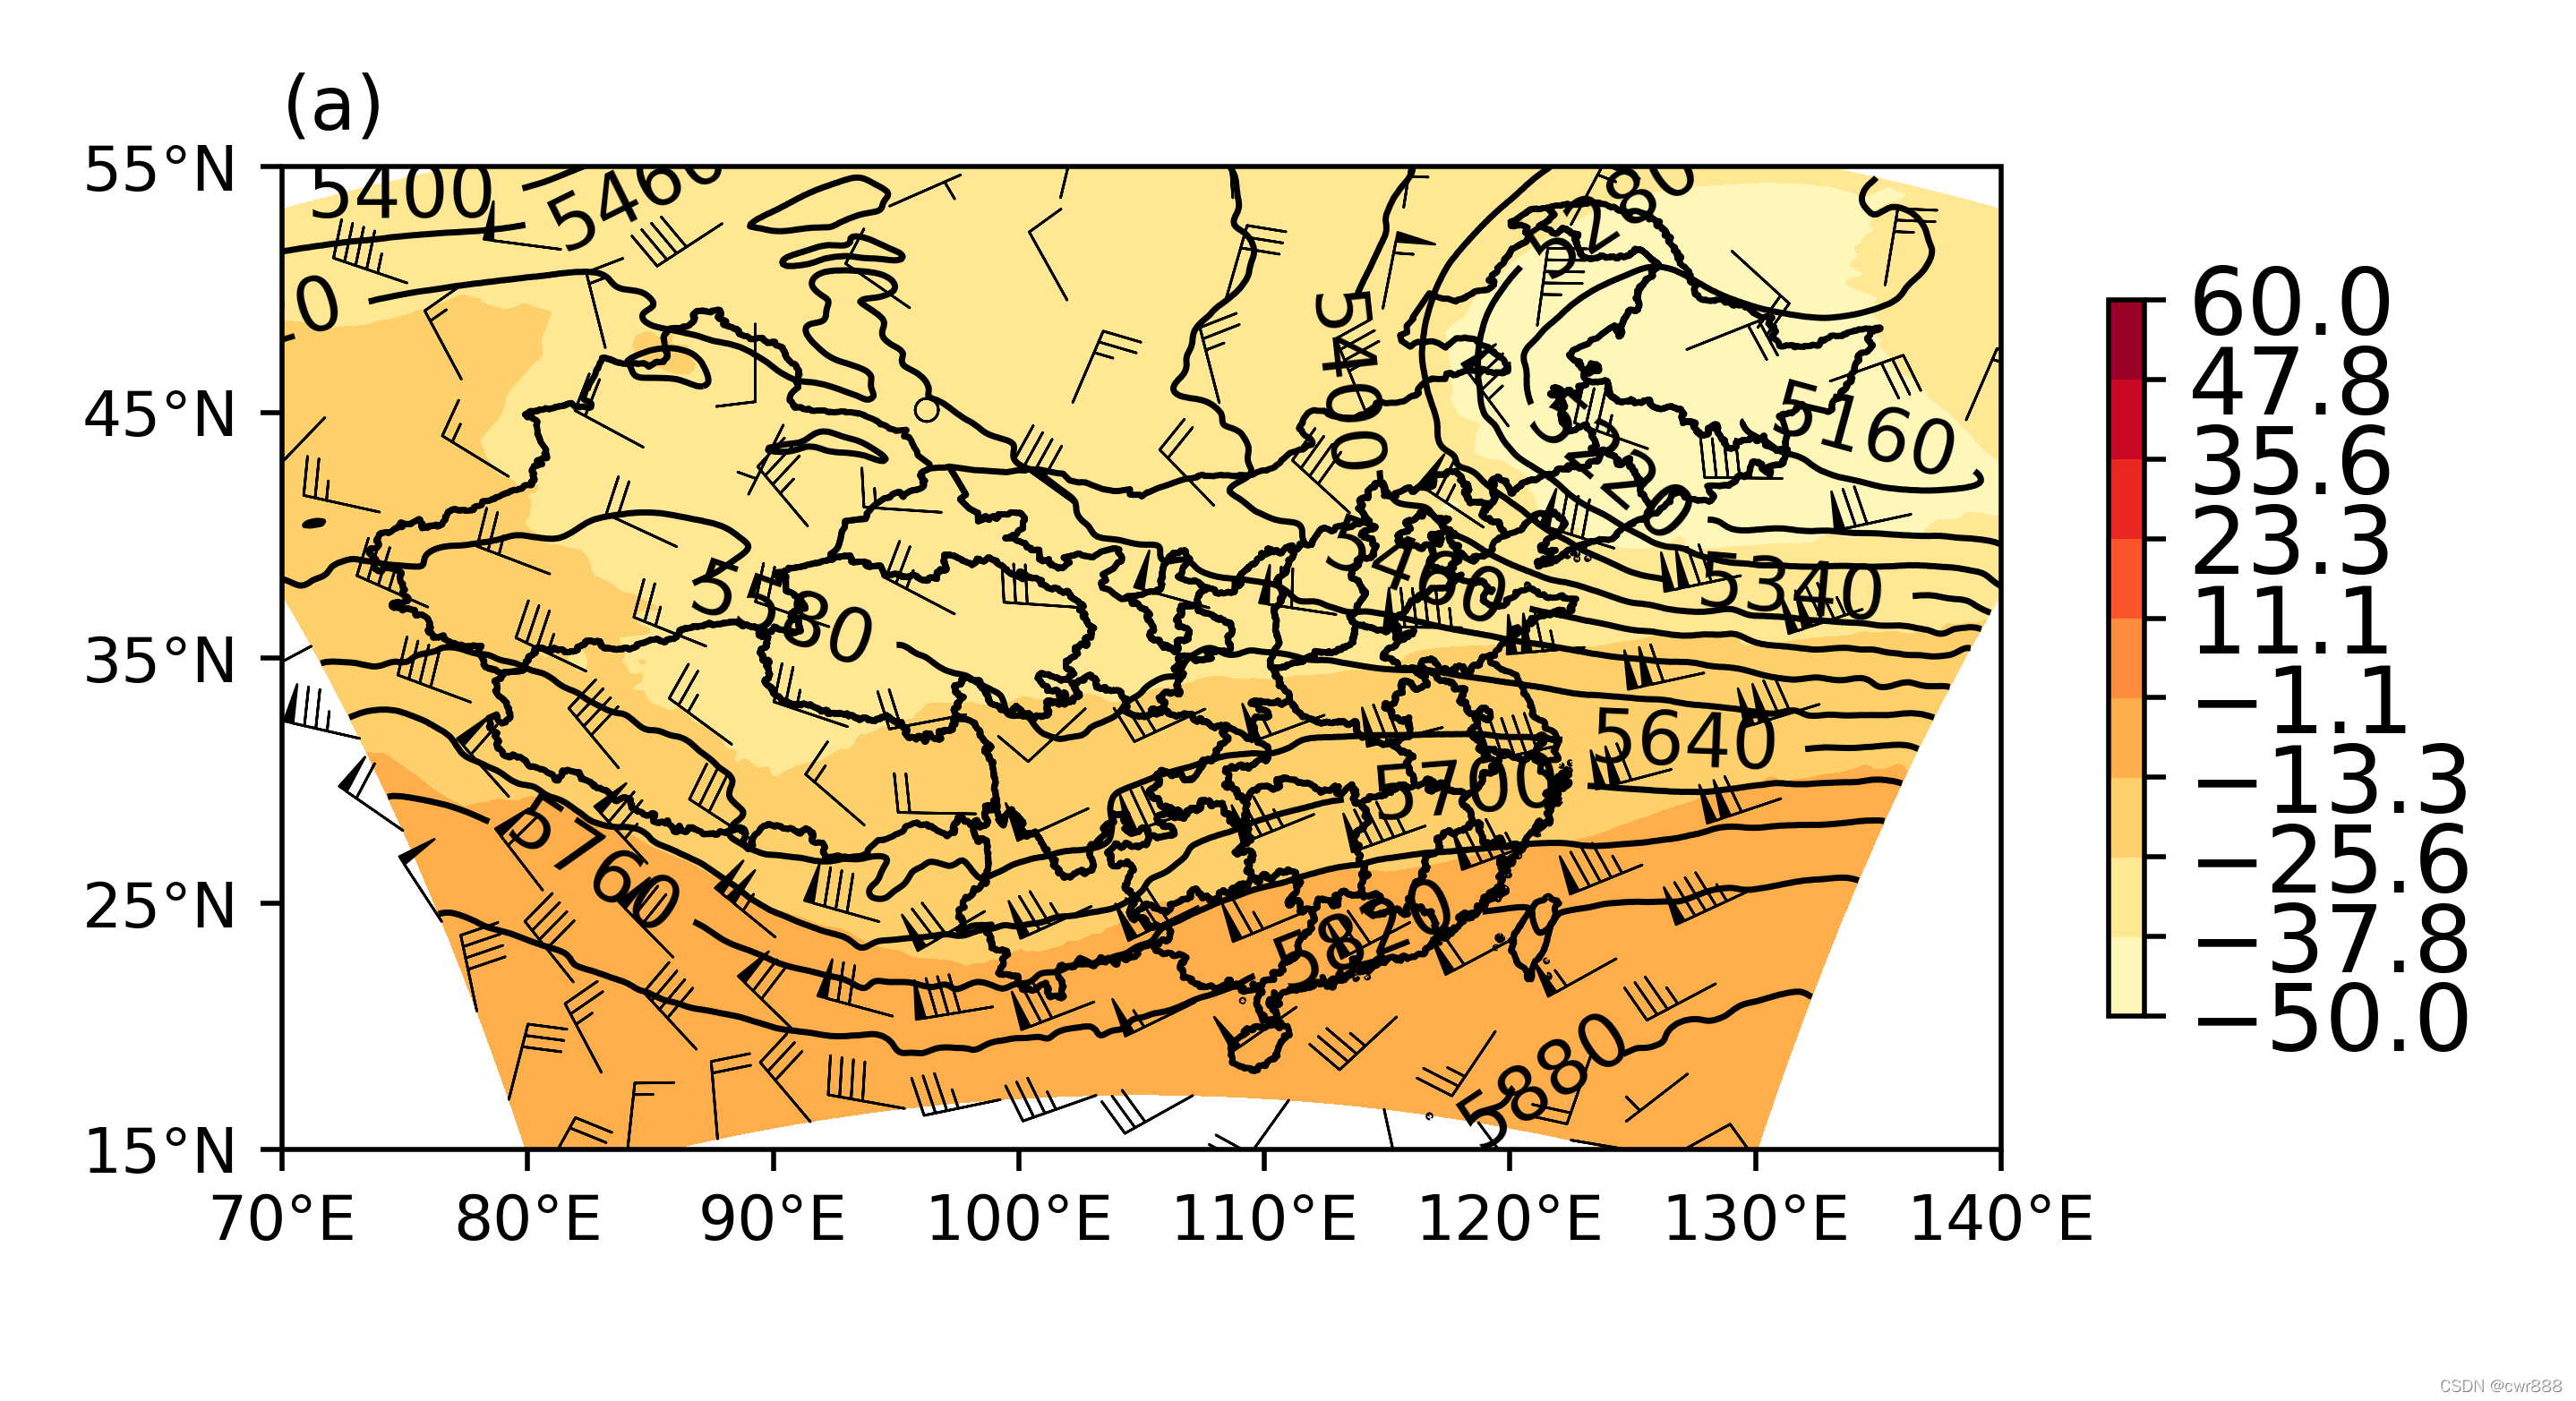
python读取nc文件数据生成专业气象图如色斑图、等值线、风向标,如下图所示:
代码如下:
# -*- coding: utf-8 -*-
"""
Created on Tue Apr 12 10:58:15 2022
@author: junco
"""
import numpy as np
import matplotlib.pyplot as plt
import matplotlib as mpl
import scipy.ndimage as ndimage
import xarray as xr
import cartopy.crs as ccrs
import cartopy.io.shapereader as shpreader
import cartopy.feature as cfeature
from itertools import chain
from cartopy.mpl.ticker import LongitudeFormatter, LatitudeFormatter
#打开文件
path='data.nc'

ds = xr.open_dataset(path)
ds['PRES_GDS3_SFC'] = ds['PRES'] / 100
lat = ds['NLAT'] #维度
lon = ds['ELON']#经度
hght = ds['HGT'].sel(lv_ISBL2=500)#高度
#avor = ds['ABS_V'].sel(lv_ISBL2=500)#涡度
avor = ds['TMP'].sel(lv_ISBL2=500)-273.15#温度
#print(avor)

#ds = xr.open_dataset(path)
#数据处理
## 500hpa 数据
#hgt_500 = ds['HGT']
#temp_500 = ds['TMP']
#u_500 = ds['U_GRD']
#v_500= ds['V_GRD']

#lons=ds['NLAT'][0,:]
#lats=ds['ELON'][:,0]
#hgt_500=hgt_500[0]*0.1 ## 单位换算为dagpm
#temp_500 = temp_500[0]-273.15
#u_500 = u_500[0]
#v_500 = v_500[0]
#hgt_500=hgt_500.sel(lv_ISBL2=500)*0.1 ## 单位换算为dagpm
#temp_500 = temp_500.sel(lv_ISBL2=500)-273.15
#u_500 = u_500.sel(lv_ISBL2=500)
#v_500 = v_500.sel(lv_ISBL2=500)
#网格化 ,生成网格点坐标矩阵
#lons, lats = np.meshgrid(lons, lats)
#绘图
#一页4图
#设置投影方式,地图边界
proj = ccrs.PlateCarree()    #定义投影转换,后面都会用到,不必重复输入‘ccrs.PlateCarree()’
#proj=ccrs.LambertConformal(central_longitude=120.0,central_latitude=45,standard_parallels=[40])
#leftlon, rightlon, lowerlat, upperlat = (113,120,36,43)#113,120,36,43  70,140,15,55
leftlon, rightlon, lowerlat, upperlat = (70,140,15,55)#113,120,36,43  70,140,15,55
img_extent = [leftlon, rightlon, lowerlat, upperlat]

#建立画布
fig=plt.figure(figsize=(12,8))

#添加第一子图
ax1 = fig.add_axes([0.1, 0.55, 0.4, 0.4],projection = proj)
#contour_map(ax1,img_extent,10)

# Smooth and re-plot the vorticity field
avor_levels = np.linspace(-50, 60, 10)
avor_smooth = ndimage.gaussian_filter(avor, sigma=1.5, order=0)
#print(avor_smooth)
avor_contour = ax1.contourf(lon, lat, avor_smooth, levels = avor_levels, zorder=2, cmap=plt.cm.YlOrRd, transform = ccrs.PlateCarree())
# Smooth and re-plot the height field
hght_levels = np.arange(4320,6000,60)
hght_smooth = ndimage.gaussian_filter(hght, sigma=3, order=0)
hght_contour = ax1.contour(lon, lat, hght_smooth, levels=hght_levels, linewidths=1, colors='k',
                          zorder=2,transform = ccrs.PlateCarree())
# Plot contour labels for the heights, leaving a break in the contours for the text (inline=True)
plt.clabel(hght_contour,  hght_levels, inline=True, fmt='%1i', fontsize=12)

# Get the wind components
urel = ds['U_GRD_GDS3_ISBL'].sel(lv_ISBL2=500)#*1.944 #U风
#urel = ds['U_GRD_GDS3_ISBL'][0, 0:, :].values*1.944 #U风
print(urel)
vrel = ds['V_GRD_GDS3_ISBL'].sel(lv_ISBL2=500)#*1.944 #v风
#vrel = ds['V_GRD_GDS3_ISBL'][0, 0:, :].values*1.944 #v风
#print(vrel)
# Plot the barbs
#ax1.barbs(lon, lat, urel, vrel, regrid_shape=, zorder=2, transform=ccrs.PlateCarree())
#ax1.barbs(lon, lat, urel, vrel, zorder=2, transform=ccrs.PlateCarree())
#风场
ax1.barbs(lon[::50,::50],lat[::50,::50],urel[::50,::50],vrel[::50,::50],
         linewidth=0.4,flagcolor='k',linestyle='-',length=5,
         pivot='tip',barb_increments=dict(half=2,full=4,flag=20),
        sizes=dict(spacing=0.15,height=0.5,width=0.12), zorder=2,transform=ccrs.PlateCarree())


#Create a colorbar and shrink it down a bit.
cb = plt.colorbar(avor_contour, shrink=0.5)
cb.ax.tick_params(labelsize=15)

##定义地理坐标标签格式
xstep, ystep = 10, 10
#xstep, ystep = 1, 1
###set_extent需要配置相应的crs,否则出来的地图范围不准确
ax1.set_extent(img_extent,crs=proj)
#### 标注坐标轴
ax1.set_xticks(np.arange(leftlon, rightlon+xstep,xstep), crs=proj)
ax1.set_yticks(np.arange(lowerlat, upperlat+ystep,ystep), crs=proj)
# zero_direction_label用来设置经度的0度加不加E和W
lon_formatter = LongitudeFormatter(zero_direction_label=False)
lat_formatter = LatitudeFormatter()
ax1.xaxis.set_major_formatter(lon_formatter)
ax1.yaxis.set_major_formatter(lat_formatter)
ax1.set_title('(a)',loc='left')

#地图设置
#湖
#ax1.add_feature(cfeature.LAKES, alpha=0.5)
#国界
#ax1.add_feature(cfeature.BORDERS, linestyle='-',lw=0.25)
##海岸线,50m精度
#ax1.add_feature(cfeature.COASTLINE.with_scale('50m'))

file='D:\\Province.dbf'
#本地shp文件
china = shpreader.Reader(file).geometries()
#绘制中国国界省界九等等
ax1.add_geometries(china, proj,facecolor='none', edgecolor='black',zorder = 2)
china = shpreader.Reader(file).geometries()
#存储
plt.savefig('D:/123.png',format='png',dpi=500)


 5007
5007


 被折叠的 条评论
为什么被折叠?
被折叠的 条评论
为什么被折叠?
 到【灌水乐园】发言


