android 自定义 view 之ViewGroup(四)

22 篇文章 0 订阅

还是先上效果图:


在学习新内容之前,我们先来弄清楚两个问题: 

1 . 什么是ViewGroup?
ViewGroup是一种容器。它包含零个或以上的View及子View。 

这里写图片描述(图片来自网上)


2 . ViewGroup有什么作用?

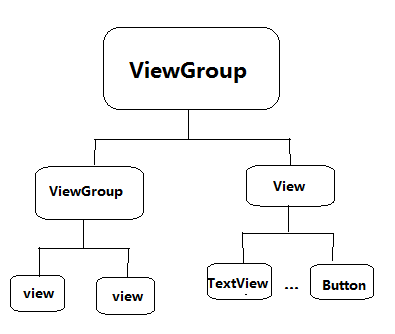
ViewGroup内部可以用来存放多个View控件,并且根据自身的测量模式,来测量View子控件,并且决定View子控件的位置。这在下面会逐步讲解它是怎么测量及决定子控件大小和位置的。

继承ViewGroup,并重写它们的构造方法

/**
 * 作者:chengxiangtong on 2016/11/10 14:00
 * 邮箱:528440900@qq.com
 */

public class CustomerViewGroup extends ViewGroup {

    int paddingleft = 0;
    int paddingtop = 0;
    int paddingright = 0;
    int paddingbottom = 0;


    public CustomerViewGroup(Context context) {
        this(context, null);
    }

    public CustomerViewGroup(Context context, AttributeSet attrs) {
        this(context, attrs, 0);
    }

    public CustomerViewGroup(Context context, AttributeSet attrs, int defStyleAttr) {
        super(context, attrs, defStyleAttr);
    }

//ViewGroup它是一个容器,它是用来存放和管理子控件的,并且子控件的测量方式是根据它的测量模式来进行的,
// 所以我们必须重写它的onMeasure(),在该方法中进行对子View的大小进行测量
@Override protected void onMeasure(int widthMeasureSpec, int heightMeasureSpec) { super.onMeasure(widthMeasureSpec, heightMeasureSpec); paddingleft = getPaddingLeft(); paddingtop = getPaddingTop(); paddingright = getPaddingRight(); paddingbottom = getPaddingBottom(); int childcount = getChildCount(); for (int i = 0; i < childcount; i++) { View view = getChildAt(i); measureChild(view, widthMeasureSpec, heightMeasureSpec); } int widthMode = MeasureSpec.getMode(widthMeasureSpec); int widthSize = MeasureSpec.getSize(widthMeasureSpec); int heightMode = MeasureSpec.getMode(heightMeasureSpec); int heightSize = MeasureSpec.getSize(heightMeasureSpec); int mHeight = 0; int mWidth = 0; int mMaxWidth = 0; if (widthMode == MeasureSpec.AT_MOST && heightMode == MeasureSpec.AT_MOST) { for (int i = 0; i < childcount; i++) { View view = getChildAt(i); mWidth += view.getMeasuredWidth(); mHeight += view.getMeasuredHeight(); } setMeasuredDimension(mWidth + paddingleft + paddingright, mHeight + paddingtop + paddingbottom); } else if (widthMode == MeasureSpec.AT_MOST) { for (int i = 0; i < childcount; i++) { View view = getChildAt(i); mMaxWidth = Math.max(mMaxWidth, view.getMeasuredWidth());// mHeight += view.getMeasuredHeight(); } setMeasuredDimension(mMaxWidth+ paddingleft + paddingright, heightSize+ paddingtop + paddingbottom); } else if (heightMode == MeasureSpec.AT_MOST) { for (int i = 0; i < childcount; i++) { View view = getChildAt(i);// mWidth += view.getMeasuredWidth(); mHeight += view.getMeasuredHeight(); } setMeasuredDimension(widthSize+ paddingleft + paddingright, mHeight+ paddingtop + paddingbottom); } } @Override protected void onLayout(boolean b, int i, int i1, int i2, int i3) { int childcount = getChildCount(); int preheight = paddingtop; for (int k = 0; k < childcount; k++) { View view = getChildAt(k); int cheight = view.getMeasuredHeight(); if (view.getVisibility() != View.GONE || view.getVisibility() != View.INVISIBLE) { view.layout(i + paddingleft, preheight, i2 + paddingright, preheight += cheight); } } }}

我们重写了onMeasure(),在方法里面,我们首先先获取ViewGroup中的子View的个数,然后遍历它所有的子Vie

w,得到每一个子View,调用measureChild()放来,来对子View进行测量。刚才提到子View的测量是根据ViewGroup

所提供的测量模式来进行来,所以在measureChild()方法中,把ViewGroup的widthMeasureSpec 和 heightMeasureS

pec和子View一起传进去了,我们可以跟进去看看是不是和我们所说的一样。

measureChild()方法源码:


    protected void measureChild(View child, int parentWidthMeasureSpec,
            int parentHeightMeasureSpec) {
        final LayoutParams lp = child.getLayoutParams();

        final int childWidthMeasureSpec = getChildMeasureSpec(parentWidthMeasureSpec,
                mPaddingLeft + mPaddingRight, lp.width);
        final int childHeightMeasureSpec = getChildMeasureSpec(parentHeightMeasureSpec,
                mPaddingTop + mPaddingBottom, lp.height);

        child.measure(childWidthMeasureSpec, childHeightMeasureSpec);
    }

measureChild()源码方法里面很好理解,它首先得到子View的LayoutParams,然后根据ViewGroup传递进来的宽高属

性值和自身的LayoutParams 的宽高属性值及自身padding属性值分别调用getChildMeasureSpec()方法获取到子View

的测量。由该方法我们也知道ViewGroup中在测量子View的大小时,测量结果分别是由父节点的测量模式和子View本

身的LayoutParams及padding所决定的。

下面我们再来看看getChildMeasureSpec()方法的源码,看看它是怎么获取测量结果的。

getChildMeasureSpec()方法源码:

    public static int getChildMeasureSpec(int spec, int padding, int childDimension) {
        int specMode = MeasureSpec.getMode(spec);
        int specSize = MeasureSpec.getSize(spec);

        int size = Math.max(0, specSize - padding);

        int resultSize = 0;
        int resultMode = 0;

        switch (specMode) {
        // Parent has imposed an exact size on us
        case MeasureSpec.EXACTLY:
            if (childDimension >= 0) {
                resultSize = childDimension;
                resultMode = MeasureSpec.EXACTLY;
            } else if (childDimension == LayoutParams.MATCH_PARENT) {
                // Child wants to be our size. So be it.
                resultSize = size;
                resultMode = MeasureSpec.EXACTLY;
            } else if (childDimension == LayoutParams.WRAP_CONTENT) {
                // Child wants to determine its own size. It can't be
                // bigger than us.
                resultSize = size;
                resultMode = MeasureSpec.AT_MOST;
            }
            break;

        // Parent has imposed a maximum size on us
        case MeasureSpec.AT_MOST:
            if (childDimension >= 0) {
                // Child wants a specific size... so be it
                resultSize = childDimension;
                resultMode = MeasureSpec.EXACTLY;
            } else if (childDimension == LayoutParams.MATCH_PARENT) {
                // Child wants to be our size, but our size is not fixed.
                // Constrain child to not be bigger than us.
                resultSize = size;
                resultMode = MeasureSpec.AT_MOST;
            } else if (childDimension == LayoutParams.WRAP_CONTENT) {
                // Child wants to determine its own size. It can't be
                // bigger than us.
                resultSize = size;
                resultMode = MeasureSpec.AT_MOST;
            }
            break;

        // Parent asked to see how big we want to be
        case MeasureSpec.UNSPECIFIED:
            if (childDimension >= 0) {
                // Child wants a specific size... let him have it
                resultSize = childDimension;
                resultMode = MeasureSpec.EXACTLY;
            } else if (childDimension == LayoutParams.MATCH_PARENT) {
                // Child wants to be our size... find out how big it should
                // be
                resultSize = View.sUseZeroUnspecifiedMeasureSpec ? 0 : size;
                resultMode = MeasureSpec.UNSPECIFIED;
            } else if (childDimension == LayoutParams.WRAP_CONTENT) {
                // Child wants to determine its own size.... find out how
                // big it should be
                resultSize = View.sUseZeroUnspecifiedMeasureSpec ? 0 : size;
                resultMode = MeasureSpec.UNSPECIFIED;
            }
            break;
        }
        return MeasureSpec.makeMeasureSpec(resultSize, resultMode);
    }
 
 
  • 1
  • 2
  • 3
  • 4
  • 5
  • 6
  • 7
  • 8
  • 9
  • 10
  • 11
  • 12
  • 13
  • 14
  • 15
  • 16
  • 17
  • 18
  • 19
  • 20
  • 21
  • 22
  • 23
  • 24
  • 25
  • 26
  • 27
  • 28
  • 29
  • 30
  • 31
  • 32
  • 33
  • 34
  • 35
  • 36
  • 37
  • 38
  • 39
  • 40
  • 41
  • 42
  • 43
  • 44
  • 45
  • 46
  • 47
  • 48
  • 49
  • 50
  • 51
  • 52
  • 53
  • 54
  • 55
  • 56
  • 57
  • 58
  • 59
  • 60
  • 61
  • 62
  • 63
  • 64
  • 65
  • 66
  • 67

该方法:首先是获取父节点(这里是ViewGroup)的测量模式和测量的大小,并根据测量的大小值与子Vie

w自身的padding属性值相比较取最大值得到一个size的值。 

然后根据父节点的测量模式分别再来判定子View的LayoutParams属性值,根据LayoutParams的属性值从而获取到子

View测量的大小和模式,知道了ziView的测量模式和大小就能决定子View的大小了。


我们再来分析一下ViewGroup是怎样给子View定位的,首先我们也是必须先重写onLayout()方法,代码如下:

@Override
    protected void onLayout(boolean changed, int l, int t, int r, int b) {
         int childcount = getChildCount();


        int preheight = paddingtop;


        for (int k = 0; k < childcount; k++) {
            View view = getChildAt(k);
            int cheight = view.getMeasuredHeight();
            if (view.getVisibility() != View.GONE || view.getVisibility() != View.INVISIBLE) {
                view.layout(i + paddingleft, preheight, i2 + paddingright, preheight += cheight);
            }
        }
    }

很好理解,给子View定位,首先必须知道有多少个子View才行,所以我们先得到子View的数量,然后遍历获取每个子

View。其实在定位子View的layout()方法中,系统并没有

给出具体的定位方法,而是给了我们最大的限度来自己定义,下面来看下layout源码:

public void layout(int l, int t, int r, int b) {
        if ((mPrivateFlags3 & PFLAG3_MEASURE_NEEDED_BEFORE_LAYOUT) != 0) {
            onMeasure(mOldWidthMeasureSpec, mOldHeightMeasureSpec);
            mPrivateFlags3 &= ~PFLAG3_MEASURE_NEEDED_BEFORE_LAYOUT;
        }

        int oldL = mLeft;
        int oldT = mTop;
        int oldB = mBottom;
        int oldR = mRight;

        boolean changed = isLayoutModeOptical(mParent) ?
                setOpticalFrame(l, t, r, b) : setFrame(l, t, r, b);

        if (changed || (mPrivateFlags & PFLAG_LAYOUT_REQUIRED) == PFLAG_LAYOUT_REQUIRED) {
            onLayout(changed, l, t, r, b);
            mPrivateFlags &= ~PFLAG_LAYOUT_REQUIRED;

            ListenerInfo li = mListenerInfo;
            if (li != null && li.mOnLayoutChangeListeners != null) {
                ArrayList<OnLayoutChangeListener> listenersCopy =
                        (ArrayList<OnLayoutChangeListener>)li.mOnLayoutChangeListeners.clone();
                int numListeners = listenersCopy.size();
                for (int i = 0; i < numListeners; ++i) {
                    listenersCopy.get(i).onLayoutChange(this, l, t, r, b, oldL, oldT, oldR, oldB);
                }
            }
        }

        mPrivateFlags &= ~PFLAG_FORCE_LAYOUT;
        mPrivateFlags3 |= PFLAG3_IS_LAID_OUT;
    }
 
 
  • 1
  • 2
  • 3
  • 4
  • 5
  • 6
  • 7
  • 8
  • 9
  • 10
  • 11
  • 12
  • 13
  • 14
  • 15
  • 16
  • 17
  • 18
  • 19
  • 20
  • 21
  • 22
  • 23
  • 24
  • 25
  • 26
  • 27
  • 28
  • 29
  • 30
  • 31
  • 32

在上面一段代码中,最关键个就是setFrame(l, t, r, b);这个方法,它主要是来定位子View的四个顶点左右坐标的,然后

关键的定位方法是在onLayout(changed, l, t, r, b);这个方法中,跟进去看看

    protected void onLayout(boolean changed, int left, int top, int right, int bottom) {
    }
 
 
  • 1
  • 2

系统给了我们最大的自由,让我们自己根据需求去定义了。 

而我这里是根据子View的高度让它们竖直顺序的排列下来。

    int childcount = getChildCount();
    int preheight = paddingtop;
    for (int k = 0; k < childcount; k++) {
            View view = getChildAt(k);
            int cheight = view.getMeasuredHeight();
            if (view.getVisibility() != View.GONE || view.getVisibility() != View.INVISIBLE) {
                view.layout(i + paddingleft, preheight, i2 + paddingright, preheight += cheight);
            }
        }


定义一个记录上一个View的高度的变量,每次遍历以后都让它加上当前的View高度,由此就可以竖直依次地排列了每

个子View,从而实现了子View的定义。


接下来我们看看布局:

<?xml version="1.0" encoding="utf-8"?>
<test.com.test.CustomerViewGroup xmlns:android="http://schemas.android.com/apk/res/android"
              xmlns:app="http://schemas.android.com/apk/res-auto"
                                 android:background="#999999"
              android:layout_width="match_parent"
              android:layout_height="wrap_content"
              android:orientation="vertical">


    <test.com.test.CompositeViews
        android:id="@+id/CompositeViews"
        android:layout_width="match_parent"
        android:layout_height="wrap_content"
        android:paddingBottom="@dimen/activity_horizontal_margin"
        app:centerTextBackground="@android:color/holo_blue_bright"
        app:leftTextBackground="@android:color/holo_purple"
        app:rightTextBackground="@android:color/holo_purple"/>


    <test.com.test.CustomerRunLine
        android:layout_width="match_parent"
        android:layout_height="10dp"
        app:c_color="#ef5621"
        android:paddingBottom="50dp"
        app:c_h="80dp"
        app:c_w="4dp"
        />


    <test.com.test.AudioView
        android:layout_width="match_parent"
        android:layout_height="wrap_content"/>


</test.com.test.CustomerViewGroup>


最好这是我们的activity啦

public class MainActivity extends AppCompatActivity implements CompositeViews.tabBarListener {

    private CompositeViews mCompositeViews;

    @Override
    protected void onCreate(Bundle savedInstanceState) {
        super.onCreate(savedInstanceState);
        setContentView(R.layout.layout);
        mCompositeViews = (CompositeViews) findViewById(R.id.CompositeViews);
        mCompositeViews.settabBarOnclcikLisenter(this);

    }

    @Override
    public void mTextViewleftListener() {
        Toast.makeText(this,"mTextViewleftListener",Toast.LENGTH_LONG).show();
    }

    @Override
    public void mTextViewrightListener() {
        Toast.makeText(this,"mTextViewrightListener",Toast.LENGTH_LONG).show();

    }
}

好的这篇也说完了,赶紧试试吧,文中有联系方式微笑,多多交流


github 地址:https://github.com/xiangtongcheng/customerView


  • 1
    点赞
  • 0
    收藏
    觉得还不错? 一键收藏
  • 0
    评论

“相关推荐”对你有帮助么?

  • 非常没帮助
  • 没帮助
  • 一般
  • 有帮助
  • 非常有帮助
提交
评论
添加红包

请填写红包祝福语或标题

红包个数最小为10个

红包金额最低5元

当前余额3.43前往充值 >
需支付:10.00
成就一亿技术人!
领取后你会自动成为博主和红包主的粉丝 规则
hope_wisdom
发出的红包
实付
使用余额支付
点击重新获取
扫码支付
钱包余额 0

抵扣说明:

1.余额是钱包充值的虚拟货币,按照1:1的比例进行支付金额的抵扣。
2.余额无法直接购买下载,可以购买VIP、付费专栏及课程。

余额充值