


1. 启动一个springboot项目
-
创建maven工程
-
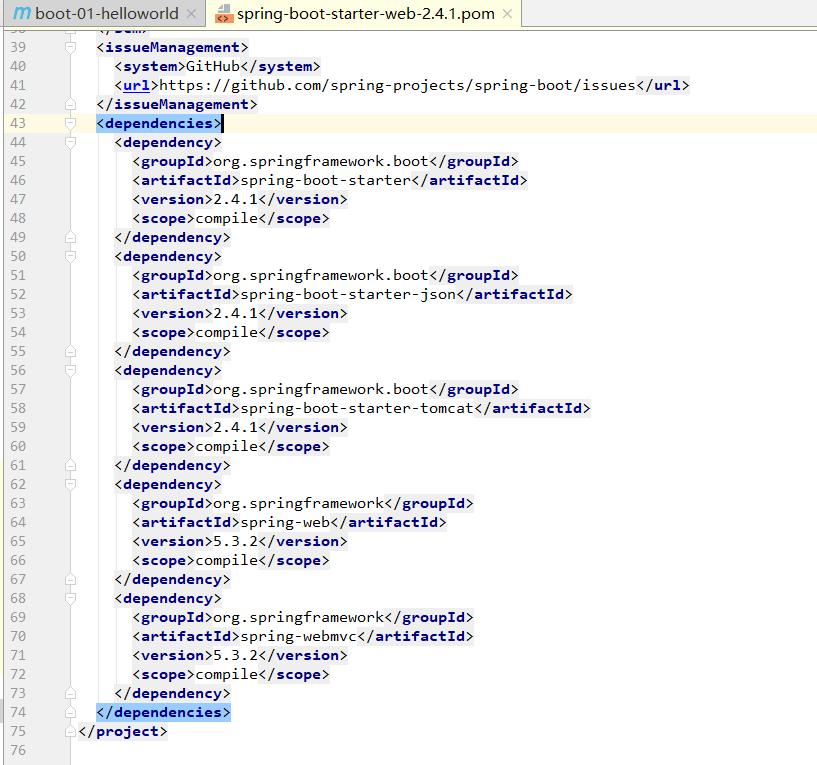
在pom中引入依赖
<dependency> <groupId>org.springframework.boot</groupId> <artifactId>spring-boot-starter-web</artifactId> </dependency> -
创建主程序
/** * 主程序类 * @SpringBootApplication:这是一个SpringBoot应用 */ @SpringBootApplication public class MainApplication { public static void main(String[] args) { SpringApplication.run(MainApplication.class,args); } } -
编写业务Controller
@RestController public class HelloController { @RequestMapping("/hello") public String handle01(){ return "Hello, Spring Boot 2!"; } } -
配置application.properties
server.port=8888 -
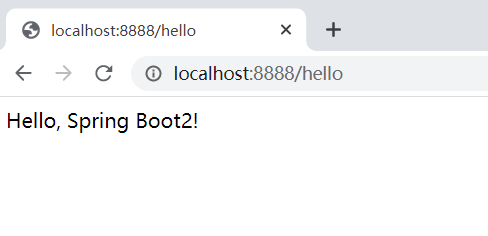
测试运行main方法
-
也可以把项目打成jar包,直接在目标服务器执行
 <build>
        <plugins>
            <plugin>
                <groupId>org.springframework.boot</groupId>
                <artifactId>spring-boot-maven-plugin</artifactId>
            </plugin>
        </plugins>
</build>
maven工具栏的clean和package
-
结果
2. 自动配置原理
2.1 Springboot特点
-
依赖管理
- 父项目做依赖管理
spring-boot-starter-parent的父项目spring-boot-dependencies
几乎声明了所有开发中常用的依赖的版本号,自动版本仲裁机制
-
开发导入starter场景启动器
1、见到很多 spring-boot-starter-* : *就某种场景 2、只要引入starter,这个场景的所有常规需要的依赖我们都自动引入 3、SpringBoot所有支持的场景 https://docs.spring.io/spring-boot/docs/current/reference/html/using-spring-boot.html#using-boot-starter 4、见到的 *-spring-boot-starter: 第三方为我们提供的简化开发的场景启动器。 5、所有场景启动器最底层的依赖 <dependency> <groupId>org.springframework.boot</groupId> <artifactId>spring-boot-starter</artifactId> <version>2.3.4.RELEASE</version> <scope>compile</scope> </dependency> -
无需关注版本号,自动版本仲裁
1、引入依赖默认都可以不写版本 2、引入非版本仲裁的jar,要写版本号。 -
可以修改默认版本号
1、查看spring-boot-dependencies里面规定当前依赖的版本 用的 key。
2、在当前项目里面重写配置
    <properties>
        <mysql.version>5.1.43</mysql.version>
    </properties>
-
自动配置
-
自动配好Tomcat,SpringMVC…
-
-
自动配好Web常见功能,如:字符编码问题
-
默认的包结构
-
主程序所在包及其下面的所有子包里面的组件都会被默认扫描进来
-
无需以前的包扫描配置
-
想要改变扫描路径,
-
@SpringBootApplication(scanBasePackages=“com.atguigu”)
-
或者@ComponentScan 指定扫描路径
-
-
-
各种配置拥有默认值
-
默认配置(写在.properties里的)最终都是映射到某个类上,如:MultipartProperties
-
配置文件的值最终会绑定每个类上,这个类会在容器中创建对象
-
-
按需加载所有自动配置项
-
引入的starter
-
引入了哪些场景这个场景的自动配置才会开启
-
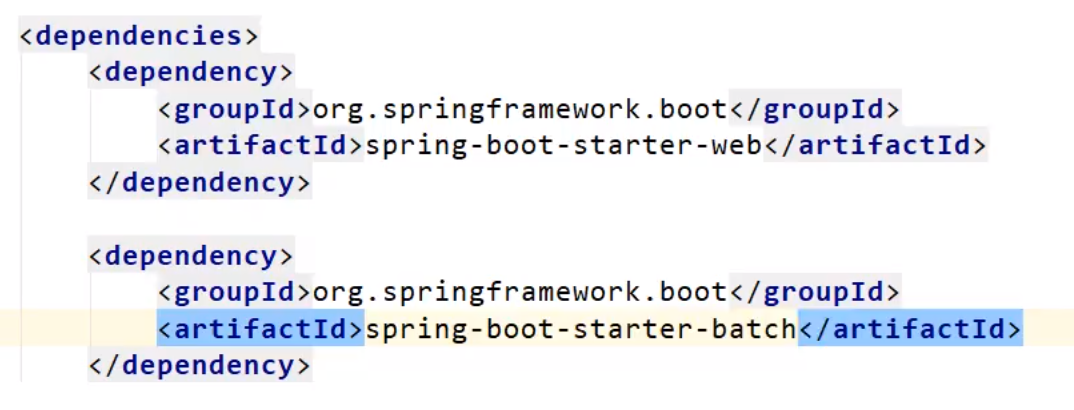
SpringBoot所有的自动配置功能都在 spring-boot-autoconfigure 包里面,如果没有引入特定的starter,里面的相关配置文件会发红
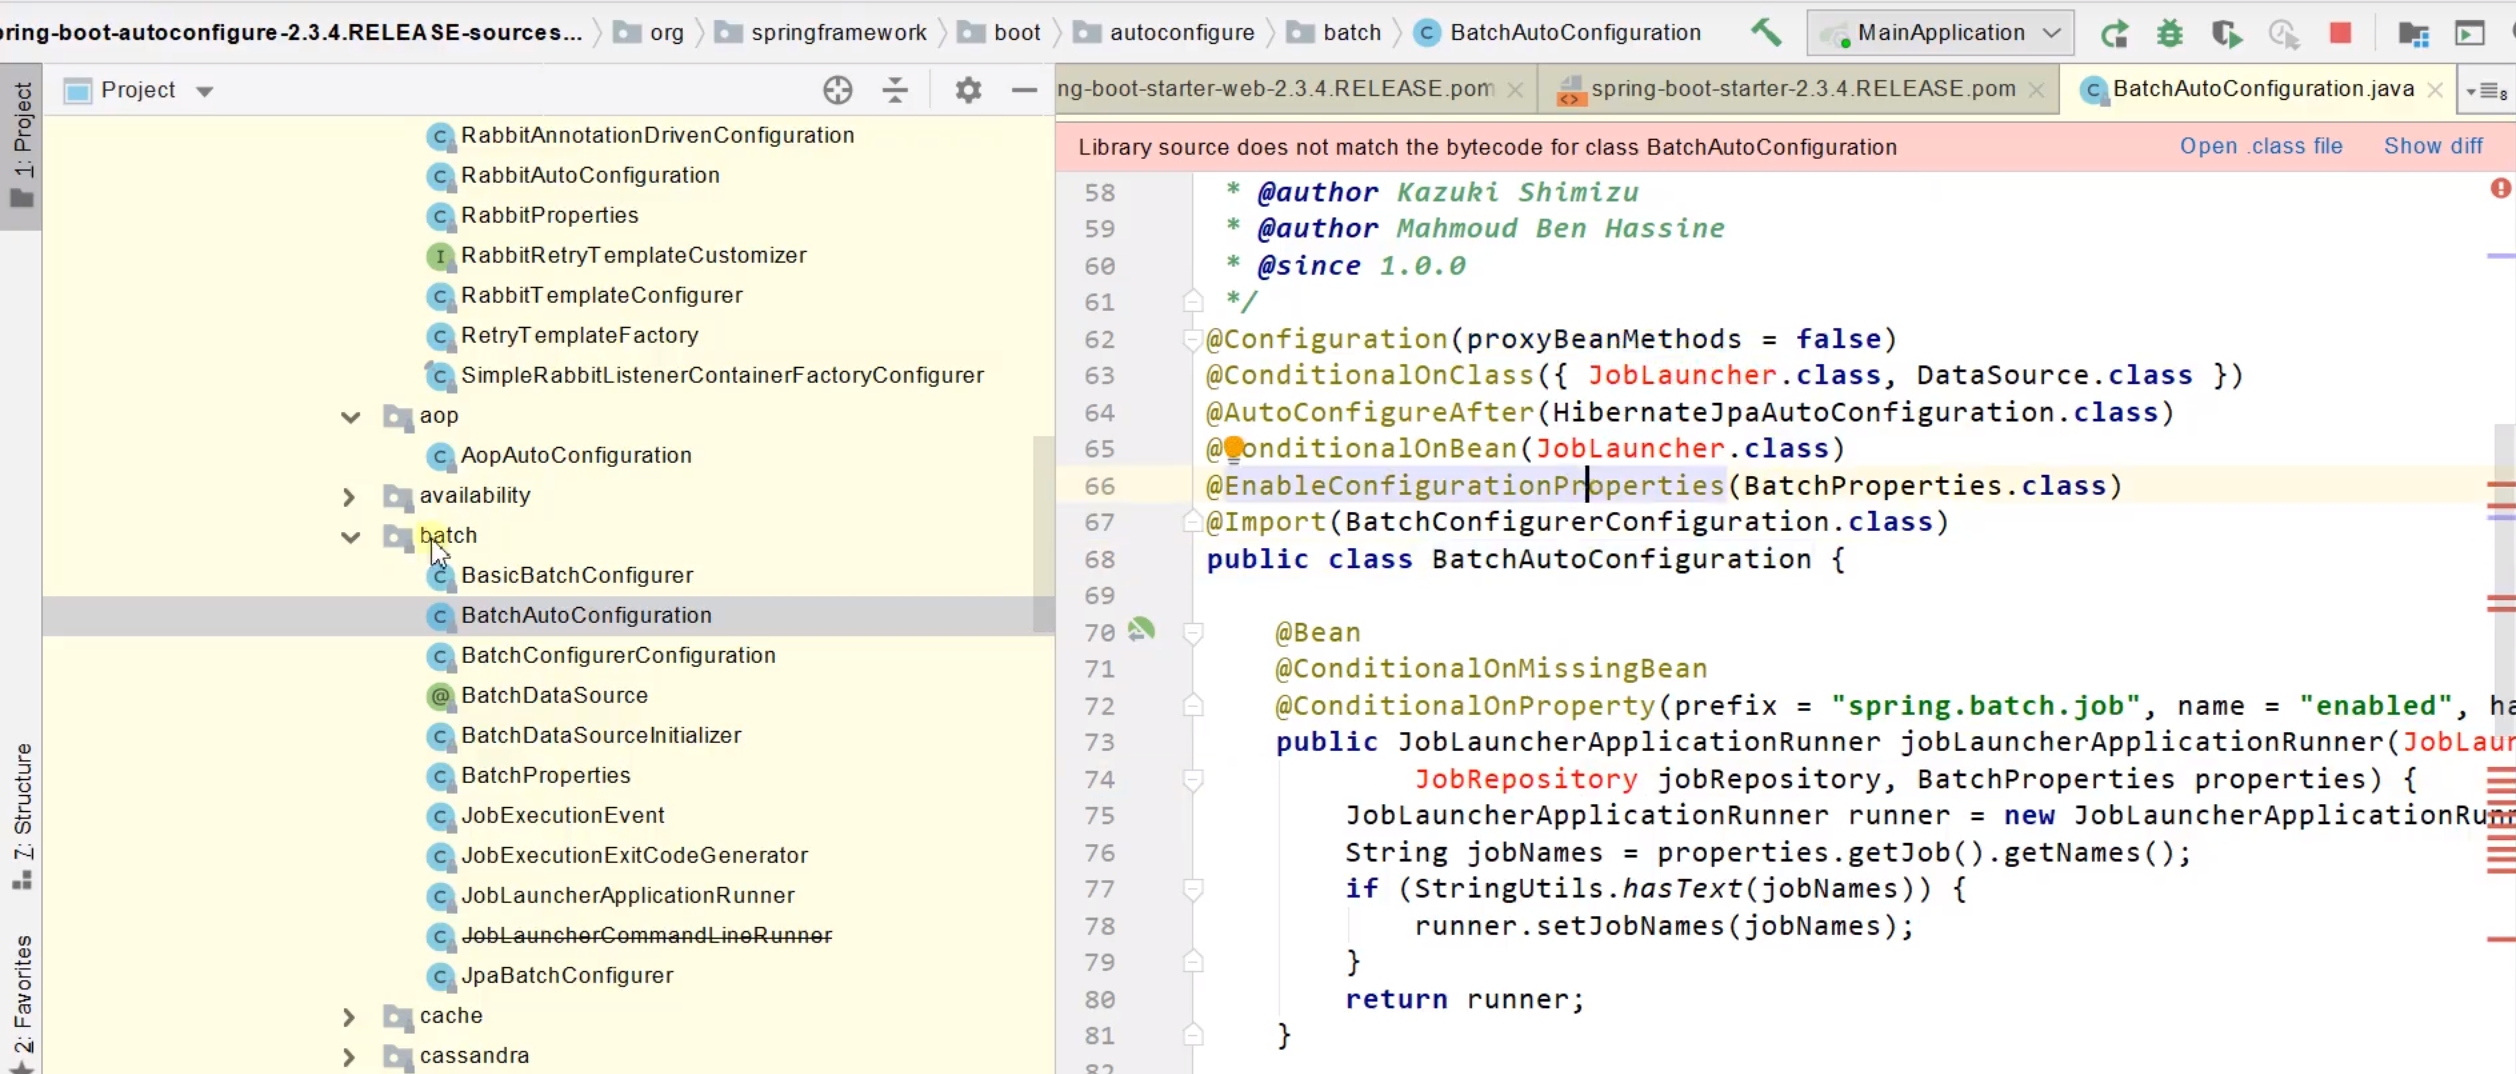
引入batch后就不发红,代表生效了
-
2.2 容器功能
-
如何给容器中添加组件,比如Pet类和User类
-
在spring中,写beans.xml
-
@Configuration
可以使用一个配置类代替beans.xml,加上@Configuration注解
/**
 * 1.配置类里面使用@Bean标注在方法上给容器注册组件,默认也是单实例的
 * 2.这个配置类本身也是一个组件
 * 3.proxyBeanMethods:代理bean的方法
 *      Full(proxyBeanMethods = true) 每次外接调用都会检查容器中有没有,比如下面这种依赖的情况需要用到
 *      Lite(proxyBeanMethods = false) 速度更快,如果不依赖组件推荐这个
 *      组件依赖
 */
@Configuration(proxyBeanMethods = false) //告诉SpringBoot这是一个配置类 == 配置文件
public class MyConfig {

    /**
     * 外部无论对配置类中的这个组件注册方法调用多少次获取的都是之前注册容器中的单实例对象
     * @return
     */
    @Bean //给容器添加组件,方法名作为组件的id,返回类型就是组件类型。返回的值就是组件在容器中的实例
    public User user01(){
        User zhangsan = new User("zhangsan", 18);
        //User组件依赖了Pet组件
        zhangsan.setPet(tomcatPet());
        return zhangsan;
    }

    @Bean("tom") //不想让组件名就是方法名,可以在这个注解里面指定名字
    public Pet tomcatPet(){
        return new Pet("tomcat");
    }
}
改成true后,调用的才是同一个
-
除了Configuration,以前还使用@Component,@Controller,@Service,@Repository给容器中添加组件
@Import注解也可以导入组件@Import({User.class, DBHelper.class})给容器中自动创建出这两个类型的组件、默认组件的名字就是全类名
//5.获取组件
System.out.println("========================");
String[] type = run.getBeanNamesForType(User.class);
for (String s : type) {
    System.out.println(s);
}

DBHelper b = run.getBean(DBHelper.class);
System.out.println(b);
其中user01是前面已经加入容器中的
-
@Conditional
条件装配:满足Conditional指定的条件,则进行组件注入,有很多派生的子注解,可以放在类和方法上
以@ConditionalOnBean为例
	@ConditionalOnBean(name = "tom")
    @Bean //给容器添加组件,方法名作为组件的id,返回类型就是组件类型。返回的值就是组件在容器中的实例
    public User user01(){
        User zhangsan = new User("zhangsan", 18);
        //User组件依赖了Pet组件
        zhangsan.setPet(tomcatPet());
        return zhangsan;
    }

//    @Bean("tom") //不想让组件名就是方法名,可以在这个注解里面指定名字
    public Pet tomcatPet(){
        return new Pet("tomcat");
    }
由于里面没有tom组件,那么user01组件也不会注入,如果有tom组件,它的代码也要放在前面才行。如果该注解放在类上就是一荣俱荣一损俱损。
-
@ImportResource
以前很多都是用的bean.xml方式,如何让老办法也能生效呢
@ImportResoure("classpath:beans.xml") //导入Spring的配置文件
-
-
如何让application.properties和javabean绑定
如果用java原生代码做很麻烦
public class getProperties {
     public static void main(String[] args) throws FileNotFoundException, IOException {
         Properties pps = new Properties();
         pps.load(new FileInputStream("a.properties"));
         Enumeration enum1 = pps.propertyNames();//得到配置文件的名字
         while(enum1.hasMoreElements()) {
             String strKey = (String) enum1.nextElement();
             String strValue = pps.getProperty(strKey);
             System.out.println(strKey + "=" + strValue);
             //封装到JavaBean。
         }
     }
 }
使用@ConfigurationProperties注解
//application.properties文件中

mycar.brand=BYD
mycar.price=100000
//为什么要加@Component注解?因为只有在容器中的组件,才会拥有SpringBoot提供的强大功能 @Component @ConfigurationProperties(prefix = "mycar") public class Car { private String brand; private Integer price; ... }除了@Component注解,还有一种方式,在配置类上面加注解代替之,可以防止想要注册的类是默认不可修改的类
@EnableConfigurationProperties(Car.class)
//1.开启Car配置绑定功能
//2.把Car这个组件自动注册到容器中
public class MyConfig {
...
以上有可能都是boot底层经常用到的注解,暂时放一下
-
实践
-
引入场景依赖
-
- https://docs.spring.io/spring-boot/docs/current/reference/html/using-spring-boot.html#using-boot-starter
-
查看自动配置了哪些(选做)
-
- 自己分析,引入场景对应的自动配置一般都生效了
- 配置文件中debug=true开启自动配置报告。Negative(不生效)\Positive(生效)
-
是否需要修改
-
- 参照文档修改配置项
-
-
- https://docs.spring.io/spring-boot/docs/current/reference/html/appendix-application-properties.html#common-application-properties
- 比如修改banner图,配置 spring.banner.image.location=classpath:banner.jpg
- 自己分析。xxxxProperties绑定了配置文件的哪些。
- https://docs.spring.io/spring-boot/docs/current/reference/html/appendix-application-properties.html#common-application-properties
-
-
- 自定义加入或者替换组件
-
-
- @Bean、@Component。。。
-
-
- 自定义器 XXXXXCustomizer;
- …
-
2.3 开发小技巧
-
Lombok
包含在spring-boot-dependencies-2.4.1.pom里面。可以简化javaBean的编写,不用写构造函数,gettersetter和toString方法,都用注解代替
还有一个@Slf4j注解用于controller层的日志输出
-
dev-tools
<dependency>
    <groupId>org.springframework.boot</groupId>
    <artifactId>spring-boot-devtools</artifactId>
    <optional>true</optional>
</dependency>
再按Ctrl+F9可以实现Restart,热重启
-
Spring Initailizr(项目初始化向导)
-
选择我们需要的开发场景
-
自动依赖引入
-
自动创建项目结构
-
自动编好主配置类
-
3. yml配置文件
-
语法
- 字面量:单个的、不可再分的值。date、boolean、string、number、null
k: v- 对象:键值对的集合。map、hash、set、object
行内写法: k: {k1:v1,k2:v2,k3:v3} #或 k: k1: v1 k2: v2 k3: v3- 数组:一组按次序排列的值。array、list、queue
行内写法:  k: [v1,v2,v3]
#或者
k:
 - v1
 - v2
 - v3
注意:
key: value;kv之间有空格
大小写敏感
使用缩进表示层级关系
缩进不允许使用tab,只允许空格
缩进的空格数不重要,只要相同层级的元素左对齐即可
'#'表示注释
字符串无需加引号,如果要加,’'与""表示字符串内容 会被 转义/不转义
-
练习
给定Person类
@Component
@ConfigurationProperties(prefix = "person")
@Data
@ToString
public class Person {
    private String userName;
    private Boolean boss;
    private Date birth;
    private Integer age;
    private Pet pet;
    private String[] interests;
    private List<String> animal;
    private Map<String, Object> score;
    private Set<Double> salarys;
    private Map<String, List<Pet>> allPets;
}
对应绑定的yml文件内容
person: userName: zhangsan boss: false birth: 2019/12/12 20:12:33 age: 18 pet: name: tomcat weight: 23.4 interests: [篮球,游泳] animal: - jerry - mario score: english: first: 30 second: 40 third: 50 math: [131,140,148] chinese: {first: 128,second: 136} salarys: [3999,4999.98,5999.99] allPets: sick: - {name: tom} - {name: jerry,weight: 47} health: [{name: mario,weight: 47}] -
yml配置提示
在官方文档里找到Metadata Format,里面有pom配置代码
<dependency>
   <groupId>org.springframework.boot</groupId>
   <artifactId>spring-boot-configuration-processor</artifactId>
   <optional>true</optional>
</dependency>
再在里面写不用打包到war包的代码,貌似2.4以后默认不用写了,都不会打包
4. Web开发
4.1 简单功能分析
-
静态资源访问
-
静态资源目录
只要静态资源放在类路径下: called
/static(or/publicor/resourcesor/META-INF/resources访问 : 当前项目根路径/ + 静态资源名
原理: 静态映射/**。
请求进来,先去找Controller看能不能处理。不能处理的所有请求又都交给静态资源处理器。静态资源也找不到则响应404页面
改变默认的静态资源路径
spring: resources: # 把静态资源放在haha文件夹下 static-locations: [classpath:/haha/] -
静态资源访问前缀
默认无前缀不方便后期拦截器的使用,比如要拦截没有登录的/**的请求,前面加/res的可以放行
spring:
  mvc:
  	# 浏览器地址前面要加上res才能访问静态资源
    static-path-pattern: /res/**
当前项目 + static-path-pattern + 静态资源名 = 静态资源文件夹下找
-
webjar
自动映射 /webjars/**
https://www.webjars.org/
<dependency> <groupId>org.webjars</groupId> <artifactId>jquery</artifactId> <version>3.5.1</version> </dependency>访问地址:http://localhost:8080/webjars/jquery/3.5.1/jquery.js 后面地址要按照依赖里面的包路径
-
-
欢迎页
-
静态资源路径下 index.html
-
- 可以配置静态资源路径
- 但是不可以配置静态资源的访问前缀。否则导致 index.html不能被默认访问
- controller能处理/index
-
-
自定义Favicon(页面图标)
controller能处理/index
4.2 请求参数处理
-
Rest映射及原理分析
-
使用
-
@xxxMapping;
-
Rest风格支持(使用HTTP请求方式动词来表示对资源的操作)
-
- 以前:**/getUser 获取用户 /deleteUser 删除用户 /editUser 修改用户 /saveUser 保存用户
- 现在: /user *GET-*获取用户 *DELETE-*删除用户 *PUT-*修改用户 *POST-*保存用户
- 核心Filter;HiddenHttpMethodFilter
-
-
-
用法: 表单method=post,隐藏域 _method=put
-
SpringBoot中手动开启
spring:
  mvc:
    hiddenmethod:
      filter:
        enabled: true   #开启页面表单的Rest功能
-
-
-
- 扩展:如何把_method 这个名字换成我们自己喜欢的。
    @RequestMapping(value = "/user",method = RequestMethod.GET)
    public String getUser(){
        return "GET-张三";
    }

    @RequestMapping(value = "/user",method = RequestMethod.POST)
    public String saveUser(){
        return "POST-张三";
    }


    @RequestMapping(value = "/user",method = RequestMethod.PUT)
    public String putUser(){
        return "PUT-张三";
    }

    @RequestMapping(value = "/user",method = RequestMethod.DELETE)
    public String deleteUser(){
        return "DELETE-张三";
    }


	//源码
    @Bean
    @ConditionalOnMissingBean(HiddenHttpMethodFilter.class)
    @ConditionalOnProperty(prefix = "spring.mvc.hiddenmethod.filter", name = "enabled", matchIfMissing = false) //要手动开成true
    public OrderedHiddenHttpMethodFilter hiddenHttpMethodFilter() {
        return new OrderedHiddenHttpMethodFilter();
    }


//自定义filter
    @Bean
    public HiddenHttpMethodFilter hiddenHttpMethodFilter(){
        HiddenHttpMethodFilter methodFilter = new HiddenHttpMethodFilter();
        methodFilter.setMethodParam("_m");
        return methodFilter;
    }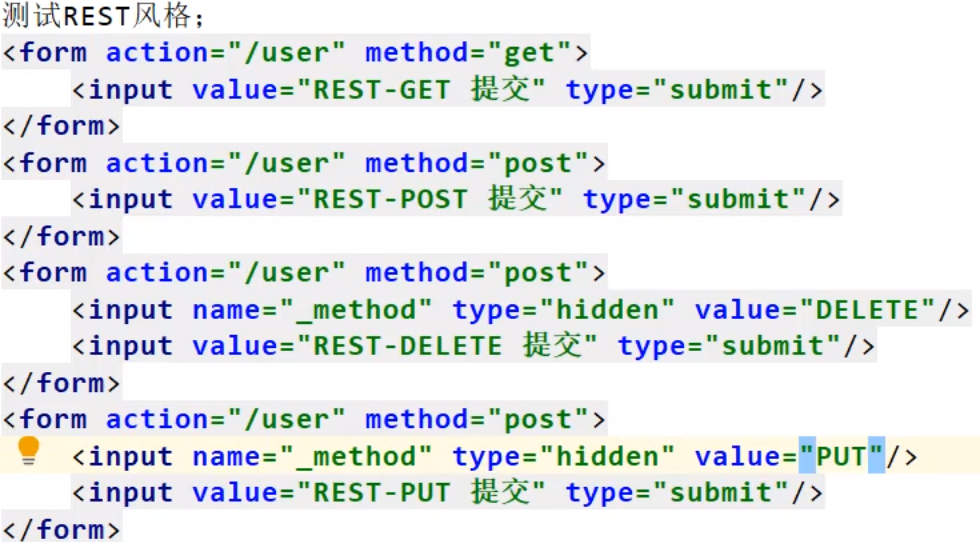
-
-
-
普通参数与基本注解
-
注解
@RestController
public class HelloController {

    @GetMapping("/car/{id}/owner/{username}")
    public Map<String,Object> getCar(@PathVariable("id") Integer id,
                                     @PathVariable("username") String name,
                                     @PathVariable Map<String,String> pv,
                                     @RequestHeader("User-Agent") String userAgent,
                                     @RequestHeader Map<String,String> header,
                                     @RequestParam("age") Integer age,
                                     @RequestParam("inters") List<String> inters,
                                     @RequestParam Map<String,String> params,
                                     @CookieValue("Idea-ce2cbf95") String co,
                                     @CookieValue("Idea-ce2cbf95") Cookie cookie){
        Map<String,Object> map = new HashMap<>();

        map.put("id",id);
        map.put("name",name);
        map.put("pv",pv);
//        map.put("userAgent",userAgent);
//        map.put("header",header); 这两个太多了
        map.put("age",age);
        map.put("inters",inters);
        map.put("params",params);
        map.put("Idea-ce2cbf95",co);
        System.out.println(cookie.getName()+":"+cookie.getValue());
        return map;
    }

    @PostMapping("/save")
    public Map postMethods(@RequestBody String content){ //这个必须是Post才有body
        Map<String,Object> map = new HashMap<>();
        map.put("content",content);

        return map;
    }

}
<a href="car/3/owner/lisi?age=18&inters=basketball&inters=game">car/{id}/owner/{username}</a>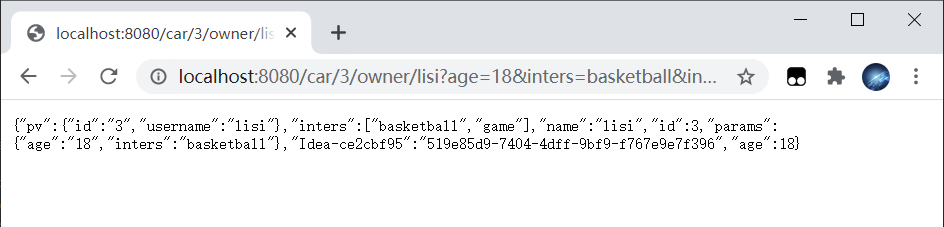
<form action="/save" method="post">
    测试@RequestBody获取数据 <br/>
    用户名:<input name="userName"/> <br>
    邮箱:<input name="email"/>
    <input type="submit" value="提交"/>
</form>
再演示@RequestAttribute
@Controller
public class RequestController {

    @GetMapping("/goto")
    public String goToPage(HttpServletRequest request){
        request.setAttribute("msg","成功了");
        request.setAttribute("code",200);

        return "forward:/success";
    }

    @ResponseBody
    @GetMapping("/success")
    //两种方法接收
    public Map success(@RequestAttribute("msg") String msg,
                       HttpServletRequest request){

        Object msg1 = request.getAttribute("msg");

        Map<String,Object> map = new HashMap<>();
        map.put("reqMethod_msg",msg1);
        map.put("annotation_msg",msg);
        return map;
    }

}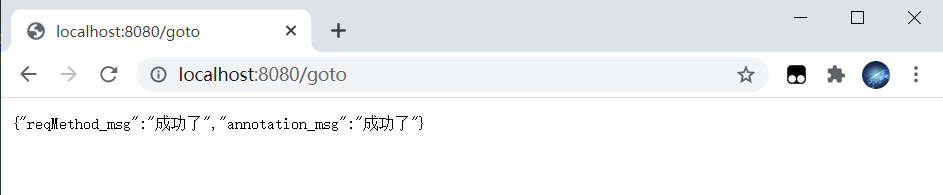
还有一个矩阵变量注解,先放一放
-
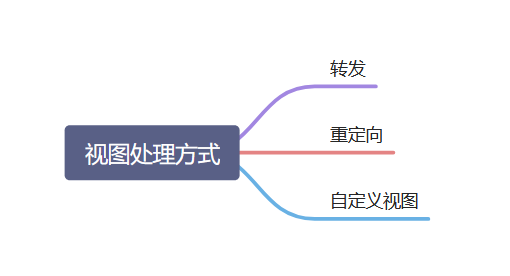
4.2 视图解析与模板引擎
- 视图解析:SpringBoot默认不支持 JSP,需要引入第三方模板引擎技术实现页面渲染。
-
模板引擎 Thymeleaf
-
语法
-
使用
-
引入Starter
<dependency> <groupId>org.springframework.boot</groupId> <artifactId>spring-boot-starter-thymeleaf</artifactId> </dependency> -
自动配置好了thymeleaf
-
页面开发
@Controller
public class ViewTestController {

    @GetMapping("/atguigu")
    public String atguigu(Model model){
        model.addAttribute("msg","你好  atguigu");
        model.addAttribute("link","www.baidu.com");

        return "success";
    }
}
自动跳转到->>
<!DOCTYPE html>
<html lang="en" xmlns:th="http://www.thymeleaf.org">
<head>
    <meta charset="UTF-8">
    <title>Title</title>
</head>
<body>
//会后端传来的值会覆盖掉“哈哈”
<h1 th:text="${msg}">哈哈</h1>

<a href="www.guigu.com" th:href="${link}">去百度</a>
<!--下面这个@是直接把link当作链接的,不会转意-->
<a href="www.guigu.com" th:href="@{link}">去百度2</a>
</body>
</html>
配置了的话,模板引擎会自动加上项目的访问路径
server:
  servlet:
    context-path: /world
-
-
-
构建后台管理系统
-
项目创建,
这里可以直接使用脚手架,勾选thymeleaf,web-starter,devtools,lombok
-
静态资源处理
把css,js,fonts,images等所有静态文件放到static文件夹
-
编写登录跳转到主页面代码
@Controller public class IndexController { /** * 去登录页 * @return */ @GetMapping(value={"/","/login"}) public String loginPage(){ return "login"; } @PostMapping("/login") //User已经写好了bean类,包含userName和password public String main(User user, HttpSession session, Model model){ if(StringUtils.hasLength(user.getUserName())&&"123456".equals(user.getPassword())){ //把登录成功的用户保存起来 session.setAttribute("loginUser",user); //登录成功重定向到main.html; 重定向防止表单重复提交 return "redirect:/main.html"; }else { model.addAttribute("msg","账号或者密码错误"); //回到登录页面 return "login"; } } /** * 去main页面 * @param session * @param model * @return */ @GetMapping("/main.html") //这里不会跳到主页面,因为模板引擎跳转页面必须return才可以 public String mainPage(HttpSession session, Model model){ //判断是否登录, 可以用拦截器,过滤器,下面只是简单处理一下 Object loginUser = session.getAttribute("loginUser"); if(loginUser != null){ //跳转到主页面 return "main"; }else { model.addAttribute("msg","请登录"); return "login"; } } } -
login.html登录部分代码
<!--表单提交post请求-->
<form class="form-signin" action="http://view.jqueryfuns.com/2014/4/10/7_df25ceea231ba5f44f0fc060c943cdae/index.html" method="post" th:action="@{/login}">
    <div class="form-signin-heading text-center">
        <h1 class="sign-title">登录</h1>
        <img src="images/login-logo.png" alt=""/>
    </div>
    <div class="login-wrap">
    	<!--登录输入上面提示底层代码使用model.addAttribute写入的msg提示信息-->
        <label style="color: red" th:text="${msg}"></label>
        <input type="text" name="userName" class="form-control" placeholder="用户名" autofocus>
        <input type="password" name="password" class="form-control" placeholder="密码">

        <button class="btn btn-lg btn-login btn-block" type="submit">
            <i class="fa fa-check"></i>
        </button>
main.html替换显示登录用户代码
[[${session.loginUser.userName}]]-
知识点:
-
前端表单传过来的两个参数userName, password会自动绑定到User这个POJO上。其实这都是Spring @RequestMapping这个注解的功劳,它会自动扫描形参的POJO,并创建对象,如果前端传进来的参数与POJO成员变量名相同,会通过POJO的setter方法传给该对象。
-
session和model
session 里放的数据可以在其他页面使用
model的数据,只能在接下来的页面使用,其他页面就不能使用
存入session后,取出数据使用get()方法,像是对象,而model使用点,有点类似json字符串?
-
session和request
request对象的生命周期是针对一个客户端(说确切点就是一个浏览器应用程序)的一次请求,当请求完毕之后,request里边的内容也将被释放。
session可以跨越很多页面。而session的生命周期也是针对一个客户端,但是却是在别人设置的会话周期内(一般是20-30分钟),session里边的内容将一直存在,即便关闭了这个客户端浏览器 session也不一定会马上释放掉的。
详细见:https://blog.csdn.net/lilinsqq/article/details/78909619
-
-
-
模板抽取
即把各个html的公共部分抽取出来放在一个公共的html页面中,并且各个部分标注自己的属性以便其他页面引用,公共的部分比如导航栏,标题栏,引入的js、css文件等
- 被引对象标签加上:
- th:framgent=“标签名称”
- id=“标签名称”
- 引用对象标签加上:(与上面一一对应)
- th:insert=“公共页名称 :: 标签名称”
- th:insert=“公共页名称 :: #标签名称”
注意点:
-
th:href= / 动态加上项目名,以后项目部署的时候,如果想要改变项目名,不需要修改原代码
如:
<link href="css/style.css" rel="stylesheet"> //修改为-->><link href="css/style.css" th:href="@{/css/style.css}" rel="stylesheet"> -
如上图所示,引入的时候,无论如何都会多一个标签,给重复掉最好,如果公共页面属性写在head标签里面重复不了,那就加div,因为错误的div比错误的link更好
- 被引对象标签加上:
-
数据渲染
-
通过model加入静态用户数据
@GetMapping("/dynamic_table") public String dynamic_table(Model model){ //表格内容的遍历 List<User> users = Arrays.asList(new User("zhangsan", "123456"), new User("lisi", "123444"), new User("haha", "aaaaa"), new User("hehe ", "aaddd")); model.addAttribute("users",users); return "table/dynamic_table"; } -
thymeleaf遍历
<table class="display table table-bordered" id="hidden-table-info">
<thead>
<tr>
    <th>#</th>
    <th>用户名</th>
    <th>密码</th>
</tr>
</thead>
<tbody>
<tr class="gradeX" th:each="user,stats:${users}"> //逗号后加入状态可以实现id计数
    <td th:text="${stats.count}">Trident</td>
    <td th:text="${user.userName}">Internet</td>
    <td>[[${user.password}]]</td>
</tr>
</tbody>
</table>
-
-
4.3 拦截器
-
编写一个拦截器类,拦截所有未登录的页面访问登录后才能展示的页面
** * 登录检查 * 1.配置好拦截器要拦截哪些请求 * 2.把这些配置放在容器中 */ @Slf4j public class LoginInterceptor implements HandlerInterceptor { /** * 目标方法执行前 * @param request * @param response * @param handler * @return * @throws Exception */ @Override public boolean preHandle(HttpServletRequest request, HttpServletResponse response, Object handler) throws Exception { String requestURI = request.getRequestURI(); log.info("拦截的请求路径是{}",requestURI); //登录检查逻辑 Object loginUser = request.getSession().getAttribute("loginUser"); if (loginUser != null){ System.out.println("有用户,放行"); return true; } //拦截住,返回登录页面并添加提示信息,信息存在request域中 request.setAttribute("msg","请先登录"); request.getRequestDispatcher("/").forward(request,response); return false; } /** * 目标方法执行完成以后 */ @Override public void postHandle(HttpServletRequest request, HttpServletResponse response, Object handler, ModelAndView modelAndView) throws Exception { } /** * 页面渲染以后 */ @Override public void afterCompletion(HttpServletRequest request, HttpServletResponse response, Object handler, Exception ex) throws Exception { } } -
编写一个拦截器的管理类
/** * 1.编写一个拦截器实现HandlerInterceptor接口 * 2.拦截器注册到容器中(实现WebMvcConfigurer的addInterceptors) * 3.指定拦截规则【如果是拦截所有,静态资源也会被拦截】 */ @Configuration public class AdminWebConfig implements WebMvcConfigurer { @Override public void addInterceptors(InterceptorRegistry registry) { registry.addInterceptor(new LoginInterceptor()) .addPathPatterns("/**") //所有请求都被拦截包括静态资源 .excludePathPatterns("/","/login","/css/**","/fonts/**","/images/**","/js/**"); //放行的资源,不会经过拦截器 } } -
可以把之前写在登录页面的拦截代码删除了
- 登录页面会拦截,检查以登录后会放行,设置好的静态资源不会经过拦截器
- 如果想要在登录页面上面添加一个label显示登录出现的各种问题(账号密码错误/未登录),需要掌握request域和session域作用范围,以及重定向和转发的使用场景
4.4 文件上传
-
修改页面表单
<form role="form" th:action="@{/upload}" method="post" enctype="multipart/form-data"> <div class="form-group"> <label for="exampleInputEmail1">邮箱</label> <input type="email" name="email" class="form-control" id="exampleInputEmail1" placeholder="Enter email"> </div> <div class="form-group"> <label for="exampleInputPassword1">名字</label> <input type="text" name="username" class="form-control" id="exampleInputPassword1" placeholder="Password"> </div> <div class="form-group"> <label for="exampleInputFile">头像</label> <input type="file" name="headerImg" id="exampleInputFile"> </div> <div class="form-group"> <label for="exampleInputFile">生活照</label> <input type="file" name="photos" multiple> </div> <div class="checkbox"> <label> <input type="checkbox"> Check me out </label> </div> <button type="submit" class="btn btn-primary">提交</button> </form> -
上传处理代码
@Slf4j @Controller public class FormTestController { @GetMapping("/form_layouts") public String form_layouts(){ return "form/form_layouts"; } /** * 自动封装上传过来的文件 * @param email * @param username * @param headerImg * @param photos * @return * @throws IOException */ @PostMapping("/upload") public String upload(@RequestParam("email") String email, @RequestParam("username") String username, @RequestParam("headerImg") MultipartFile headerImg, @RequestParam("photos") MultipartFile[] photos) throws IOException { log.info("上传的信息:email={},username={},headerImg={},photos={}",email,username,headerImg.getSize(),photos.length); //开始上传 if(!headerImg.isEmpty()){ //实际上可以保存到文件服务器,OSS服务器 String originalFilename = headerImg.getOriginalFilename(); headerImg.transferTo(new File("D:\\tmp\\"+originalFilename)); } if(photos.length>0){ for (MultipartFile photo : photos) { if(!photo.isEmpty()){ String originalFilename = photo.getOriginalFilename(); photo.transferTo(new File("D:\\tmp\\"+originalFilename)); } } } return "main"; } } -
一些问题
如果不配置的话,默认上传是有大小限制的,要增大一些
spring.servlet.multipart.max-file-size=10MB
spring.servlet.multipart.max-request-size=100MB
4.5 异常处理
-
默认规则
-
默认情况下,Spring Boot提供
/error处理所有错误的映射 -
对于机器客户端,它将生成JSON响应,其中包含错误,HTTP状态和异常消息的详细信息。对于浏览器客户端,响应一个“ whitelabel”错误视图,以HTML格式呈现相同的数据,比如访问不存在的页面
-
还要添加jsessionid,里面保存了登录信息
-
要对其进行自定义,添加View解析为error
error/下的404,5xx页面会被自动解析
-
让自定义的页面也可以显示错误信息
<section>
    <div class="container ">

        <section class="error-wrapper text-center">
            <h1><img alt="" src="images/500-error.png"></h1>
            <h2>OOOPS!!!</h2>
            <h3 th:text="${error}">Something went wrong.</h3>
            <p class="nrml-txt" th:text="${message}">Why not try refreshing you page? Or you can <a href="#">contact our support</a> if the problem persists.</p>
            <a class="back-btn" th:href="@{main.html}"> Back To Home</a>
        </section>

    </div>
</section>
4.6 Web原生组件注入
-
使用Servlet API
-
在启动类上加入注解@ServletComponentScan(basePackages = “com.atguigu.admin”) :指定原生Servlet组件都放在那里
-
在编写的三大组件类上分别加上
@WebServlet(urlPatterns = “/my”):效果:直接响应,没有经过Spring的拦截器?
@WebFilter(urlPatterns={"/css/*","/images/*"})
@WebListener
-
-
使用RegistrationBean
ServletRegistrationBean`, `FilterRegistrationBean`, and `ServletListenerRegistrationBean@Configuration public class MyRegistConfig { @Bean public ServletRegistrationBean myServlet(){ MyServlet myServlet = new MyServlet(); return new ServletRegistrationBean(myServlet,"/my","/my02"); } @Bean public FilterRegistrationBean myFilter(){ MyFilter myFilter = new MyFilter(); // return new FilterRegistrationBean(myFilter,myServlet()); FilterRegistrationBean filterRegistrationBean = new FilterRegistrationBean(myFilter); filterRegistrationBean.setUrlPatterns(Arrays.asList("/my","/css/*")); return filterRegistrationBean; } @Bean public ServletListenerRegistrationBean myListener(){ MySwervletContextListener mySwervletContextListener = new MySwervletContextListener(); return new ServletListenerRegistrationBean(mySwervletContextListener); } }- 注意:configuration注解属性使用默认的 proxyBeanMethods=true 保证原来的组件始终是单实例的
5. 数据访问
5.1数据源的自动配置
-
导入JDBC的场景
<dependency> <groupId>org.springframework.boot</groupId> <artifactId>spring-boot-starter-data-jdbc</artifactId> </dependency> -
导入数据库驱动
数据库版本与驱动版本对应
默认版本:<mysql.version>8.0.22</mysql.version> <dependency> <groupId>mysql</groupId> <artifactId>mysql-connector-java</artifactId> <!-- <version>5.1.49</version>--> </dependency> 想要修改版本 1、直接依赖引入具体版本(maven的就近依赖原则) 2、重新声明版本(maven的属性的就近优先原则) <properties> <java.version>1.8</java.version> <mysql.version>5.1.49</mysql.version> </properties> -
分析自动配置
-
DataSourceAutoConfiguration : 数据源的自动配置
-
- 修改数据源相关的配置:spring.datasource
- 数据库连接池的配置,是自己容器中没有DataSource才自动配置的
- 底层配置好的连接池是:HikariDataSource
@Configuration(proxyBeanMethods = false) @Conditional(PooledDataSourceCondition.class) @ConditionalOnMissingBean({ DataSource.class, XADataSource.class }) @Import({ DataSourceConfiguration.Hikari.class, DataSourceConfiguration.Tomcat.class, DataSourceConfiguration.Dbcp2.class, DataSourceConfiguration.OracleUcp.class, DataSourceConfiguration.Generic.class, DataSourceJmxConfiguration.class }) protected static class PooledDataSourceConfiguration-
DataSourceTransactionManagerAutoConfiguration: 事务管理器的自动配置
-
JdbcTemplateAutoConfiguration: JdbcTemplate的自动配置,可以来对数据库进行crud
-
- 可以修改这个配置项@ConfigurationProperties(prefix = “spring.jdbc”) 来修改JdbcTemplate
- @Bean@Primary JdbcTemplate;容器中有这个组件
-
JndiDataSourceAutoConfiguration: jndi的自动配置
-
XADataSourceAutoConfiguration: 分布式事务相关的
-
-
修改配置项
spring: datasource: url: jdbc:mysql://localhost:3306/day23 username: root password: root driver-class-name: com.mysql.jdbc.Driver -
测试
@Slf4j
@SpringBootTest
class Boot05WebAdminApplicationTests {

   @Autowired
   JdbcTemplate jdbcTemplate;

   @Test
   void contextLoads() {

      Long aLong = jdbcTemplate.queryForObject("select count(*) from province", Long.class);

      log.info("记录总数:{}",aLong);

   }

}
5.2 使用Druid数据源
-
自定义方式
-
导入Druid的依赖
<dependency> <groupId>com.alibaba</groupId> <artifactId>druid</artifactId> <version>1.1.17</version> </dependency> -
写配置类代替bean.xml
@Configuration public class MyDataSourceConfig { //可以绑定application里面的数据,不用set方法 @ConfigurationProperties("spring.datasource") // 默认的自动配置是判断容器中没有才会配@ConditionalOnMissingBean(DataSource.class) @Bean public DataSource dataSource(){ DruidDataSource druidDataSource = new DruidDataSource(); // druidDataSource.setUrl(); // druidDataSource.setUsername(); // druidDataSource.setPassword(); return druidDataSource; } } -
通过测试类测试现在的数据源,更换成功
@Autowired DataSource dataSource; @Test void contextLoads() { log.info("数据源类型:{}",dataSource.getClass()); } -
根据Druid官方文档配置druid的各种监控功能

官方文档提供的是在web.xml里面配置servlet和filter,我们使用的是springboot,所以可以用到前面的使用Web原生组件注入的方式得到servlet和filter,然后根据文档属性配置这两个组件的类。
		//下面两个放在DataSource方法中,也可以在配置文件中写
        //加入监控功能
        druidDataSource.setFilters("stat,wall");
        druidDataSource.setMaxActive(10);

/**
     * 配置 druid的监控页功能
     * @return
     */
//    @Bean
    public ServletRegistrationBean statViewServlet(){
        StatViewServlet statViewServlet = new StatViewServlet();
        ServletRegistrationBean<StatViewServlet> registrationBean = new ServletRegistrationBean<>(statViewServlet, "/druid/*");

        registrationBean.addInitParameter("loginUsername","admin");
        registrationBean.addInitParameter("loginPassword","123456");


        return registrationBean;
    }

    /**
     * WebStatFilter 用于采集web-jdbc关联监控的数据。
     */
//    @Bean
    public FilterRegistrationBean webStatFilter(){
        WebStatFilter webStatFilter = new WebStatFilter();

        FilterRegistrationBean<WebStatFilter> filterRegistrationBean = new FilterRegistrationBean<>(webStatFilter);
        filterRegistrationBean.setUrlPatterns(Arrays.asList("/*"));
        filterRegistrationBean.addInitParameter("exclusions","*.js,*.gif,*.jpg,*.png,*.css,*.ico,/druid/*");

        return filterRegistrationBean;
    }
-
-
使用官方starter方式
-
引入druid-starter
<dependency> <groupId>com.alibaba</groupId> <artifactId>druid-spring-boot-starter</artifactId> <version>1.1.17</version> </dependency> -
分析自动配置
导入的包
package com.alibaba.druid.spring.boot.autoconfigure;

/**
 * @author lihengming [89921218@qq.com]
 */
@Configuration
@ConditionalOnClass(DruidDataSource.class)
@AutoConfigureBefore(DataSourceAutoConfiguration.class)
@EnableConfigurationProperties({DruidStatProperties.class, DataSourceProperties.class})
@Import({DruidSpringAopConfiguration.class,
    DruidStatViewServletConfiguration.class,
    DruidWebStatFilterConfiguration.class,
    DruidFilterConfiguration.class})
public class DruidDataSourceAutoConfigure
扩展配置项 spring.datasource.druid
DruidSpringAopConfiguration.class, 监控SpringBean的;配置项:spring.datasource.druid.aop-patterns
DruidStatViewServletConfiguration.class, 监控页的配置:spring.datasource.druid.stat-view-servlet;默认开启
DruidWebStatFilterConfiguration.class, web监控配置;spring.datasource.druid.web-stat-filter;默认开启
DruidFilterConfiguration.class}) 所有Druid自己filter的配置
-
示例配置
spring: datasource: url: jdbc:mysql://localhost:3306/day23 username: root password: root driver-class-name: com.mysql.jdbc.Driver druid: aop-patterns: com.atguigu.admin.* #监控SpringBean filters: stat,wall # 底层开启功能,stat(sql监控),wall(防火墙) stat-view-servlet: # 配置监控页功能 enabled: true login-username: admin login-password: admin resetEnable: false web-stat-filter: # 监控web enabled: true urlPattern: /* exclusions: '*.js,*.gif,*.jpg,*.png,*.css,*.ico,/druid/*' filter: stat: # 对上面filters里面的stat的详细配置 slow-sql-millis: 1000 logSlowSql: true enabled: true wall: enabled: true config: drop-table-allow: false -
分析
在如何根据官方的类配置在配置文档里面写配置信息
- 在如何根据官方的类配置在配置文档里面写配置信息
- 在引入类里找@ConditionalOnProperty(prefix="")、@ConfigurationProperties()等注解,里面是配置文件填写的属性,属性下面的键值找属性类下面的类中值
-
5.3 整合MyBatis
-
配置版
-
找到MyBatis的starter
<dependency> <groupId>org.mybatis.spring.boot</groupId> <artifactId>mybatis-spring-boot-starter</artifactId> <version>2.1.4</version> </dependency> -
源码分析(后看)
全局配置文件
SqlSessionFactory: 自动配置好了
SqlSession:自动配置了 SqlSessionTemplate 组合了SqlSession
@Import(AutoConfiguredMapperScannerRegistrar.class);
Mapper: 只要我们写的操作MyBatis的接口标注了 @Mapper 就会被自动扫描进来
@EnableConfigurationProperties(MybatisProperties.class) : MyBatis配置项绑定类。
@AutoConfigureAfter({ DataSourceAutoConfiguration.class, MybatisLanguageDriverAutoConfiguration.class })
public class MybatisAutoConfiguration{}

@ConfigurationProperties(prefix = "mybatis")
public class MybatisProperties
可以修改配置文件中 mybatis 开始的所有;
-
配置mybatis规则,在yml文件中写
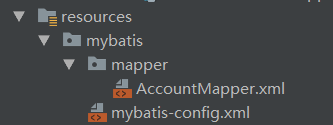
mybatis:
  config-location: classpath:mybatis/mybatis-config.xml  #全局配置文件位置
  mapper-locations: classpath:mybatis/mapper/*.xml  #sql映射文件位置
根据源码可知,配置 private Configuration configuration;
mybatis.configuration下面的所有,就是相当于改mybatis全局配置文件中的值
不必在全局配置文件中开启大驼峰,在yml中也可
mybatis: # config-location: classpath:mybatis/mybatis-config.xml mapper-locations: classpath:mybatis/mapper/*.xml configuration: map-underscore-to-camel-case: true 可以不写全局配置文件,所有全局配置文件的配置都放在configuration配置项中即可 -
以根据id查询账户为例,编写业务代码
-
编写mapper接口。标准@Mapper注解
@Mapper public interface AccountMapper { public Account getAcct(Long id); } -
编写sql映射文件并绑定mapper接口
@Service
public class AccountService {

    @Autowired
    AccountMapper accountMapper;

    public Account getAcctById(Long id){
        return accountMapper.getAcct(id);
    }
}
<?xml version="1.0" encoding="UTF-8" ?> <!DOCTYPE mapper PUBLIC "-//mybatis.org//DTD Mapper 3.0//EN" "http://mybatis.org/dtd/mybatis-3-mapper.dtd"> <mapper namespace="com.atguigu.admin.mapper.AccountMapper"> <select id="getAcct" resultType="com.atguigu.admin.bean.Account"> select * from account_tb1 where id = #{id} </select> </mapper> -
controller
@Autowired
AccountService accountService;

@ResponseBody
@GetMapping("/acct")
public Account getById(@RequestParam("id") Long id){
    return accountService.getAcctById(id);
}
-
-
-
注解版
只要在Mapper类的方法上加数据库注解就行了,其他方法的调用一样
@Mapper public interface CityMapper { @Select("select * from city where id=#{id}") public City getById(Long id); public void insert(City city); } -
混合版(以查询注解,添加配置为例)
-
CityMapper
public void insert(City city); -
添加CityMapper.xml文件
# id名与mapper类中的方法一致,其他的方法名随意 <mapper namespace="com.atguigu.admin.mapper.CityMapper"> //后面两个参数是为了把id也当作返回值封装进去 <insert id="insert" useGeneratedKeys="true" keyProperty="id"> insert into city(`name`, `state`,`country`) values(#{name},#{state},#{country}) </insert> </mapper> -
Controller
@ResponseBody @PostMapping("/city") public City saveCity(City city){ cityService.saveCity(city); //save方法自己完善 return city; } -
使用postman测试
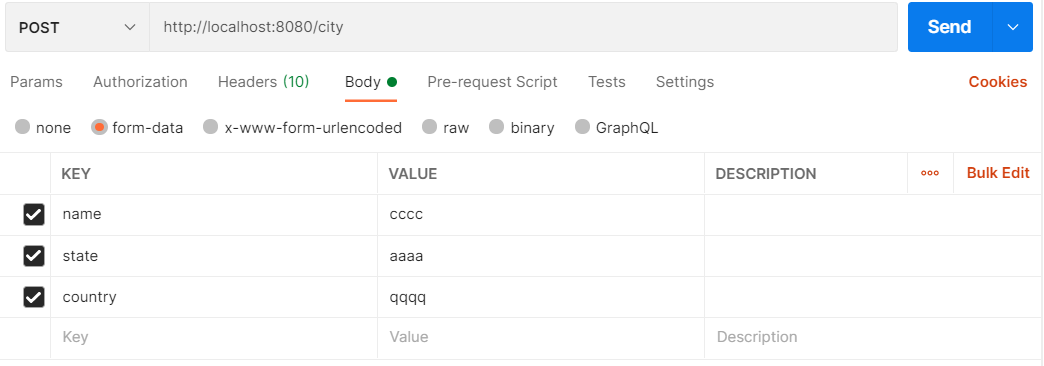
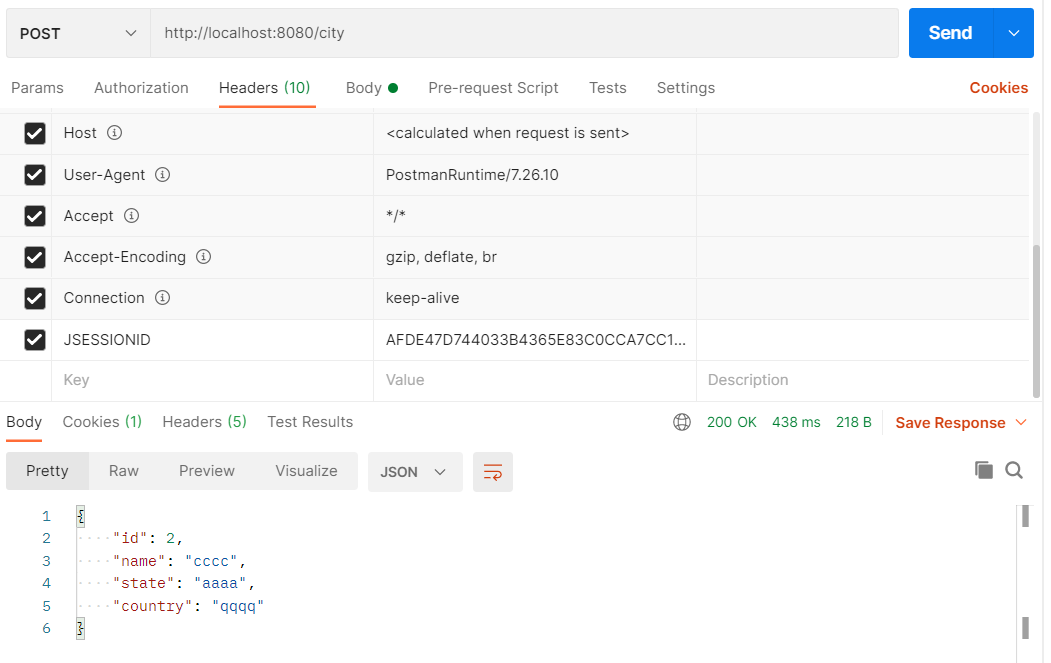
- 如果不想放入JSESSIONID,可以让拦截器放行/city
-
insert也可以用注解方法
@Insert("insert into city(`name`, `state`,`country`) values(#{name},#{state},#{country})")
@Options(useGeneratedKeys = true,keyProperty = "id")
public void insert(City city);
-
-
最佳实战
-
引入mybatis-starter
-
配置application.yaml中,指定mapper-location位置即可
-
编写Mapper接口并标注@Mapper注解
-
简单方法直接注解方式
-
复杂方法编写mapper.xml进行绑定映射
-
@MapperScan(“com.atguigu.admin.mapper”) 简化,其他的接口就可以不用标注@Mapper注解
-
5.4 整合MyBatisPlus
-
建议安装MyBatisX插件
-
导入坐标
<dependency>
   <groupId>com.baomidou</groupId>
   <artifactId>mybatis-plus-boot-starter</artifactId>
   <version>3.4.1</version>
</dependency>
自动配置
- MybatisPlusAutoConfiguration 配置类,MybatisPlusProperties 配置项绑定。mybatis-plus:xxx 就是对****mybatis-plus的定制
- SqlSessionFactory 自动配置好。底层是容器中默认的数据源
- **mapperLocations 自动配置好的。有默认值。*classpath*:/mapper/*/*.xml;任意包的类路径下的所有mapper文件夹下任意路径下的所有xml都是sql映射文件。 建议以后sql映射文件,放在 mapper下
- 容器中也自动配置好了 SqlSessionTemplate
- @Mapper 标注的接口也会被自动扫描;建议直接 @MapperScan(“com.atguigu.admin.mapper”) 批量扫描就行
-
以测试查询user数据为例
-
添加数据库

-
类文件
@AllArgsConstructor @NoArgsConstructor @Data @TableName("user_tb1") //如果表名不是这个,就得写上规定的 public class User { @TableField(exist = false) //表示忽略注解下面的属性 private String userName; @TableField(exist = false) private String password; private Long id; private String name; private Integer age; private String email; } -
mapper
public interface UserMapper extends BaseMapper<User> { //里面包含各种方法,如果过于复杂还是可以用xml } -
测试
@Test
void testUserMapper(){
   User user = userMapper.selectById(1L);
   log.info("用户信息:{}",user);
}
-
5.5 crud
- 把数据库中的数据查询出来放在页面的表格中
-
根据MyBatisPlus,已经可以在mapper省略很多方法,service里一样的也可以
public interface UserService extends IService<User> { } -
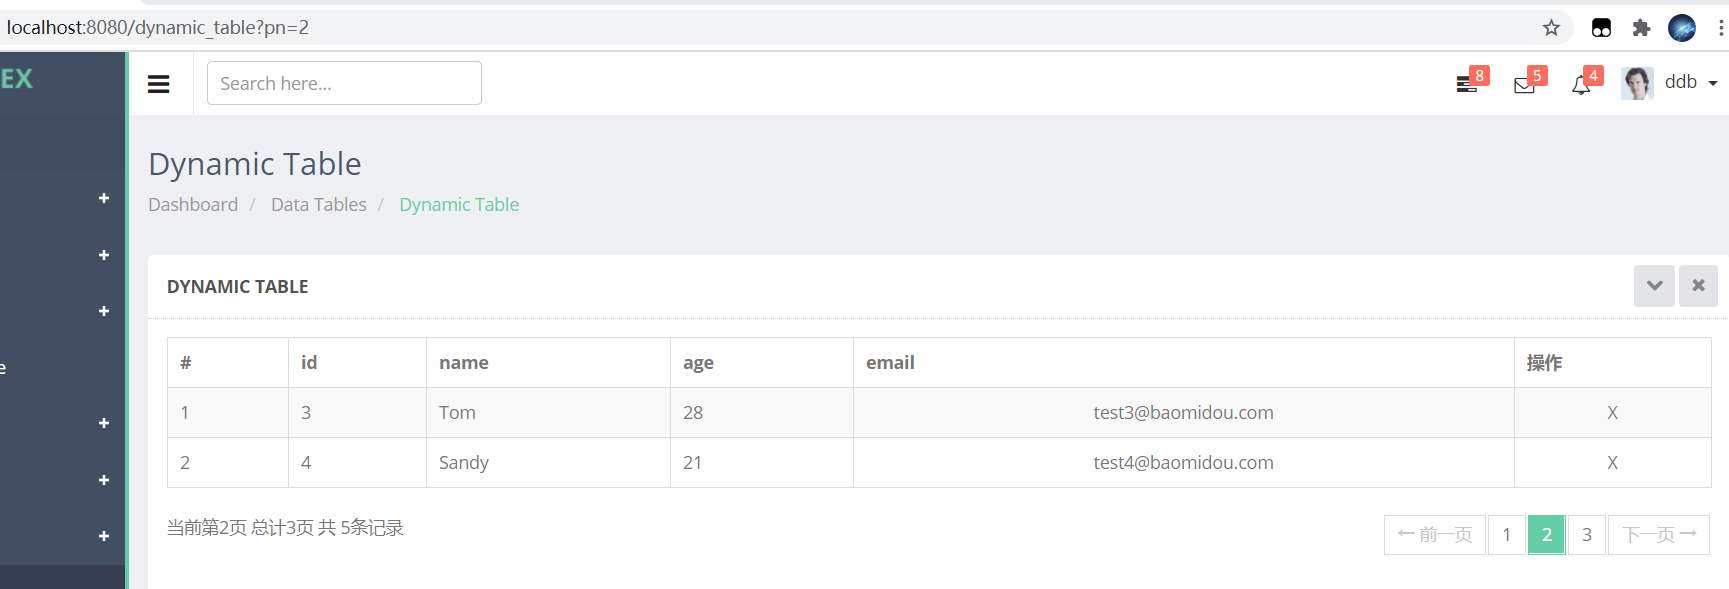
把数据查出来放在域中,供前端调用
@GetMapping("/dynamic_table") public String dynamic_table(@RequestParam(value = "pn",defaultValue = "1")Integer pn, Model model){ //表格内容的遍历 List<User> list = userService.list(); // model.addAttribute("users",list);下面的就包括了users的信息,不做分页的话就写这个就行了 Page<User> userPage = new Page<>(pn, 2); Page<User> page = userService.page(userPage, null); long current = page.getCurrent(); long pages = page.getPages(); long total = page.getTotal(); List<User> records = page.getRecords(); model.addAttribute("page",page); return "table/dynamic_table"; } -
修改前端代码接收展示需要的数据
-
留下一个th循环从数据库中查询数据
<table class="display table table-bordered table-striped" id="dynamic-table"> <thead> <tr> <th>#</th> <th>id</th> <th>name</th> <th>age</th> <th>email</th> <th>操作</th> </tr> </thead> <tbody role="alert" aria-live="polite" aria-relevant="all"> <tr class="gradeX" th:each="user,stat:${page.records}"> <td th:text="${stat.count}">Trident</td> <td th:text="${user.id}">Trident</td> <td class=" " th:text="${user.name}">Internet Explorer 4.0 </td> <td class=" " th:text="${user.age}">Win 95+</td> <td class="center hidden-phone">[[${user.email}]]</td> <td class="center hidden-phone">X</td> </tr> </tbody> <tfoot></tfoot> </table> -
分页数据展示
要先整合分页插件(mybatis官方文档中有代码)
在table下面添加分页代码
<div class="span6">
    <div class="dataTables_paginate paging_bootstrap pagination">
        <ul>
            <li class="prev disabled"><a href="#">← 前一页</a></li>
            <!--让当前页面进度高亮,并且显示所有页数-->
            <li th:class="${num == page.current?'active':''}" th:each="num:${#numbers.sequence(1,page.pages)}">
                <!--使得可以通过按分页条更改地址后的页面参数pn达到分页效果-->
                <a th:href="@{dynamic_table(pn=${num})}">[[${num}]]</a>
            </li>
            <li class="next disabled"><a href="#">下一页 → </a></li>
        </ul>
    </div>
</div>
-
- 删除用户
-
在操作下面添加删除按钮的样式
<td>
    <a th:href="@{/user/delete/{id}(id=${user.id},pn=${page.current})}" class="btn btn-danger btn-sm" type="button">删除</a>
</td>
括号里面是传的参数给后端
-
controller里面处理删除请求
@GetMapping("/user/delete/{id}")
public String deleteUser(@PathVariable("id") Long id,
                         @RequestParam(value = "pn",defaultValue = "1") Integer pn,
                         RedirectAttributes ra){

    userService.removeById(id);
    //删除一项之后保证当前页面不变
    ra.addAttribute("pn",pn);
    //重定向到当前页面
    return "redirect:/dynamic_table";
}
关于@PathVariable和@RequestParam注解的区别:
一个id是从前端传过来,一个从地址栏传过来,写法不同
5.6 redis
-
导入坐标
<dependency> <groupId>org.springframework.boot</groupId> <artifactId>spring-boot-starter-data-redis</artifactId> </dependency> -
导入包中的自动配置分析
RedisAutoConfiguration 自动配置类。RedisProperties 属性类 --> spring.redis.xxx是对redis的配置
连接工厂是准备好的。LettuceConnectionConfiguration、JedisConnectionConfiguration
自动注入了RedisTemplate<Object, Object> : xxxTemplate;
自动注入了StringRedisTemplate;k:v都是String
key:value
底层只要我们使用 **StringRedisTemplate、**RedisTemplate就可以操作redis
-
redis环境搭建
- 阿里云的
1、阿里云按量付费redis。经典网络
2、申请redis的公网连接地址
3、修改白名单 允许0.0.0.0/0 访问
- 在本地虚拟机中搭建
1、虚拟机中下载好redis
2、防火墙中开启6376端口允许外接访问
-
springboot连接redis
-
导入坐标(不写jedis默认是Lettuce)
<dependency> <groupId>org.springframework.boot</groupId> <artifactId>spring-boot-starter-data-redis</artifactId> </dependency> <!-- 导入jedis--> <dependency> <groupId>redis.clients</groupId> <artifactId>jedis</artifactId> </dependency> -
yml中配置redis相关信息
spring: redis: host: 192.168.11.128 port: 6379 password: 123456 client-type: jedis //也可以用Lettuce jedis: pool: max-active: 10 -
测试连接成功
@Autowired
StringRedisTemplate redisTemplate;

@Test
void testRedis(){
   ValueOperations<String, String> operations = redisTemplate.opsForValue();
   operations.set("hello","world");  //键值对
   String hello = operations.get("hello");
   System.out.println(hello);
}
-
-
统计相应页面访问次数显示在主页
-
编写拦截器
@Component //注册到容器中 public class RedisUrlCountInterceptor implements HandlerInterceptor { //redisTemplate是使用redis的工具 @Autowired StringRedisTemplate redisTemplate; @Override public boolean preHandle(HttpServletRequest request, HttpServletResponse response, Object handler) { String uri = request.getRequestURI(); ValueOperations<String, String> opsForValue = redisTemplate.opsForValue(); //让页面的uri为键,访问次数为值存入redis中 opsForValue.increment(uri); return true; } } -
把拦截器注册到容器中
@Configuration public class AdminWebConfig implements WebMvcConfigurer { @Autowired RedisUrlCountInterceptor redisUrlCountInterceptor; @Override public void addInterceptors(InterceptorRegistry registry) { //第一个是前面写的 registry.addInterceptor(new LoginInterceptor()) .addPathPatterns("/**") //所有请求都被拦截包括静态资源 .excludePathPatterns("/","/login","/css/**","/fonts/**","/images/**","/js/**"); //放行的资源,不会经过拦截器 //为什么不能new?因为容器中的组件不能new,从容器中拿就行了 registry.addInterceptor(redisUrlCountInterceptor) .addPathPatterns("/**") .excludePathPatterns("/","/login","/css/**","/fonts/**","/images/**","/js/**"); } }-
关于拦截器的选择:
Filter、Interceptor 几乎拥有相同的功能
- Filter是Servlet定义的原生组件。脱离Spring应用也能使用
- Interceptor是Spring定义的接口,可以使用Spring 的自动装配等功能
-
-
把访问次数展示在首页
@GetMapping("/main.html")
public String mainPage(HttpSession session, Model model){

    ValueOperations<String, String> opsForValue = redisTemplate.opsForValue();
    String s = opsForValue.get("/main.html");
    String s1 = opsForValue.get("/sql");
    model.addAttribute("mainCount",s);
    model.addAttribute("sqlCount",s1);
    return "main";
}
再在thymeleaf里面通过${}接收就行
-
6. 单元测试
-
JUnit5的变化
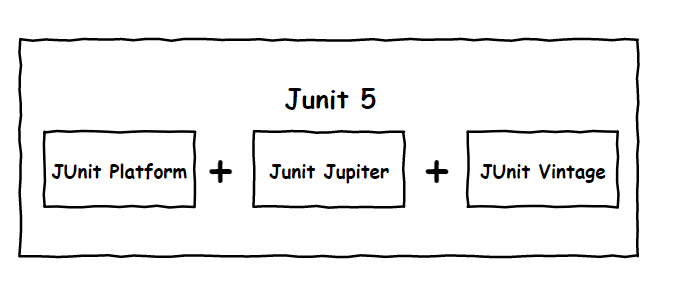
注意:SpringBoot 2.4 以上版本移除了默认对 Vintage 的依赖。如果需要兼容junit4需要自行引入(不能使用junit4的功能 @Test)
如果需要继续兼容junit4需要自行引入vintage
导入坐标
<dependency>
  <groupId>org.springframework.boot</groupId>
  <artifactId>spring-boot-starter-test</artifactId>
  <scope>test</scope>
</dependency>
使用方法
@SpringBootTest
class Boot05WebAdminApplicationTests {


    @Test
    void contextLoads() {

    }
}
SpringBoot整合Junit以后
- 编写测试方法:@Test标注(注意需要使用junit5版本的注解)
- Junit类具有Spring的功能,@Autowired、比如 @Transactional 标注测试方法,测试完成后自动回滚
-
JUnit5常用注解
https://junit.org/junit5/docs/current/user-guide/#writing-tests-annotations
- **@Test 😗*表示方法是测试方法。但是与JUnit4的@Test不同,他的职责非常单一不能声明任何属性,拓展的测试将会由Jupiter提供额外测试
- **@ParameterizedTest 😗*表示方法是参数化测试,下方会有详细介绍
- **@RepeatedTest 😗*表示方法可重复执行,下方会有详细介绍
- **@DisplayName 😗*为测试类或者测试方法设置展示名称
- **@BeforeEach 😗*表示在每个单元测试之前执行
- **@AfterEach 😗*表示在每个单元测试之后执行
- **@BeforeAll 😗*表示在所有单元测试之前执行
- **@AfterAll 😗*表示在所有单元测试之后执行
- **@Tag 😗*表示单元测试类别,类似于JUnit4中的@Categories
- **@Disabled 😗*表示测试类或测试方法不执行,类似于JUnit4中的@Ignore
- **@Timeout 😗*表示测试方法运行如果超过了指定时间将会返回错误
- **@ExtendWith 😗*为测试类或测试方法提供扩展类引用
-
断言
断言(assertions)是测试方法中的核心部分,用来对测试需要满足的条件进行验证。这些断言方法都是 org.junit.jupiter.api.Assertions 的静态方法。JUnit 5 内置的断言可以分成如下几个类别:
检查业务逻辑返回的数据是否合理。
所有的测试运行结束以后,会有一个详细的测试报告;
-
前置条件
JUnit 5 中的前置条件(assumptions【假设】)类似于断言,不同之处在于不满足的断言会使得测试方法失败,而不满足的前置条件只会使得测试方法的执行终止。前置条件可以看成是测试方法执行的前提,当该前提不满足时,就没有继续执行的必要。就跟@Ignore注解实现效果一样
-
嵌套测试
Unit 5 可以通过 Java 中的内部类和@Nested 注解实现嵌套测试,从而可以更好的把相关的测试方法组织在一起。在内部类中可以使用@BeforeEach 和@AfterEach 注解,而且嵌套的层次没有限制。
-
参数化测试
指标监控和高级特性先放一放


 2228
2228


 被折叠的 条评论
为什么被折叠?
被折叠的 条评论
为什么被折叠?
 到【灌水乐园】发言


