


一、问题描述
制作一个抓取检测界面,在网页前端上传图片后,使用jQuery和AJAX将图片传到后端处理,再将处理后的图片返回到界面指定的位置。
初始界面如下:

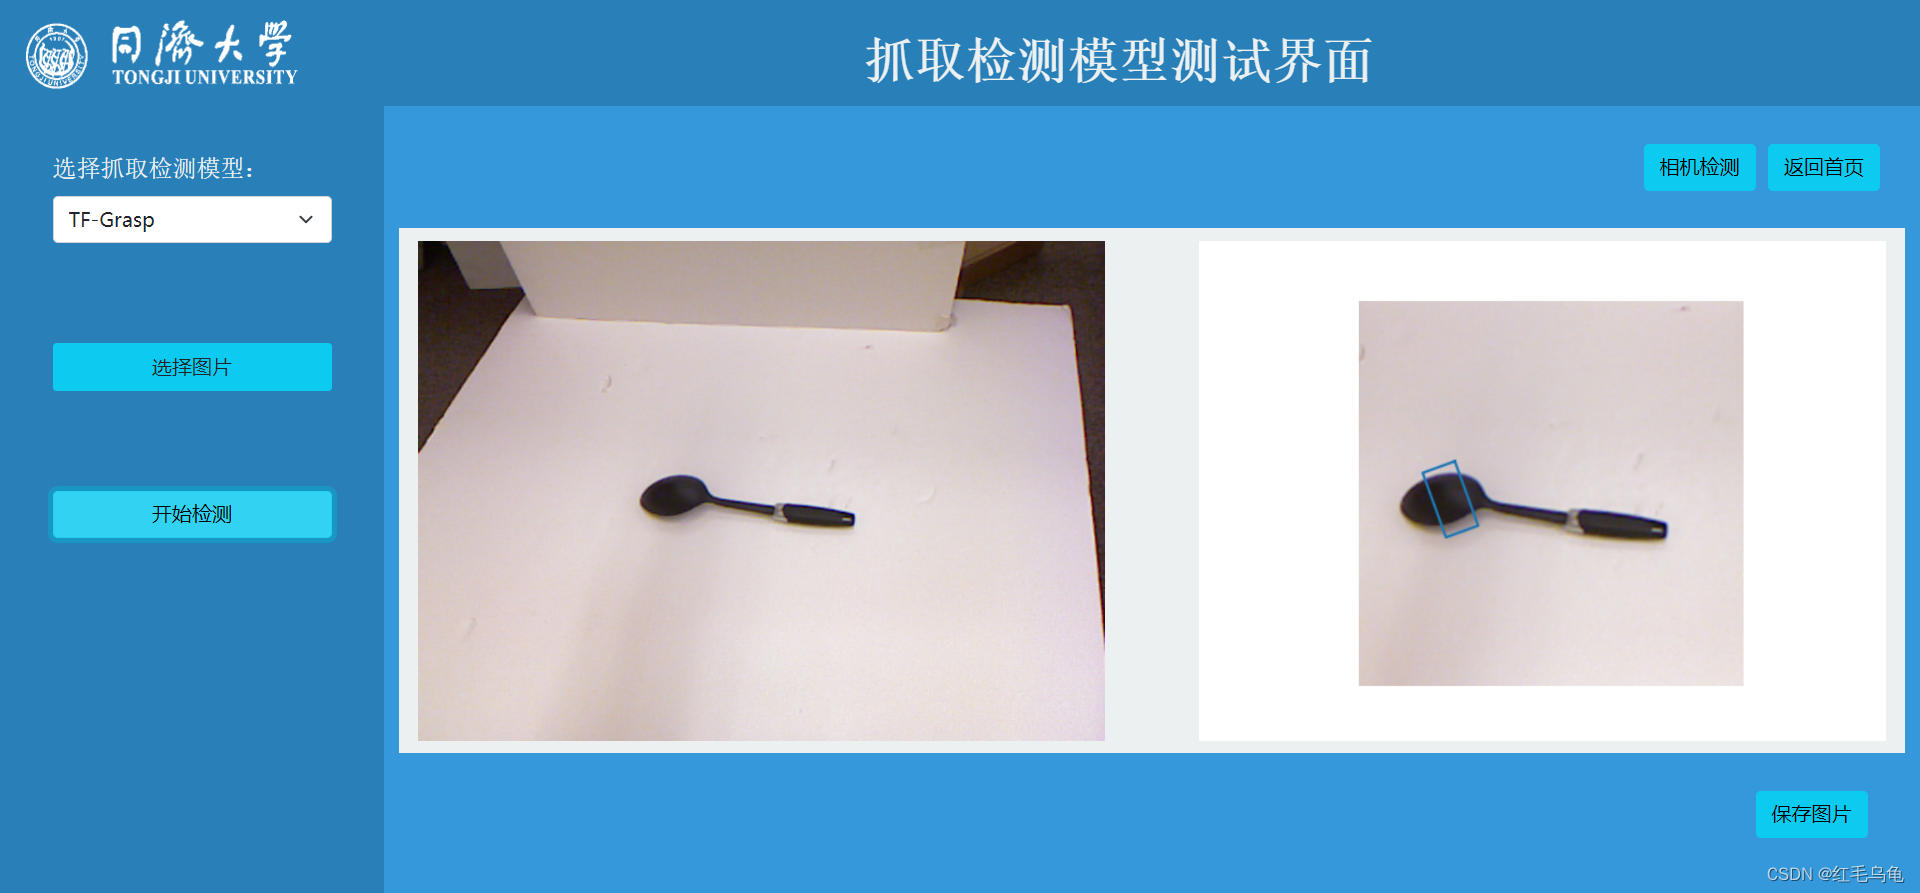
点击 选择图片 按钮上传图片后,图片展示在左边区域;点击 开始检测 按钮,将上传的图片传入后端处理后展示在右边区域。完成后界面如下(算法效果还不是太好):
二、代码实现
2.1 图片上传
本文利用<input>和<label>标签以及jQuery实现图片上传,并展示在界面的 等待上传 区域。
HTML部分
<div class="d-grid" style="margin: 80px 30px">
    <input type="file" name="load_img01" id="load_img01" class="image_load"/>
    <label for="load_img01">选择图片</label>
</div>

<img src="../static/image/loading01.png" alt="等待上传" height="400" width="550" id="img_loaded01"/>
图片上传需要<input type="file"/>标签,之后对其进行美化。
CSS部分:
.image_load {
    width: 0.1px;
    height: 0.1px;
    opacity: 0;
    overflow: hidden;
    position: absolute;
    z-index: -1;
}

.image_load + label {
    height: 38px;
    text-align: center;
    line-height: 38px;
    background-color: #0dcaf0;
    border-color: #0dcaf0;
    display: inline-block;
    border-radius: 3px;
}

.image_load + label:hover {
    background-color: #31d2f2;
    border-color: #25cff2;
    cursor: pointer;
}
JS部分:
// Load image and preview
$(function (){
    "use strict";
    $("#load_img01").change(function(){
        console.log(this.files[0]);
        let objUrl = getObjectURL(this.files[0]) ; // 获取文件信息
        console.log("objUrl = "+objUrl);
        if (objUrl) {
            $("#img_loaded01").attr("src", objUrl);
        }
    });
});


function getObjectURL(file) {
    "use strict";
    let url = null;
    if(Window.createObjectURL !== undefined) {
        url = window.createObjectURL(file) ;
    }else if (window.URL !== undefined) { // mozilla(firefox)
        url = window.URL.createObjectURL(file) ;
    }else if (window.webkitURL !== undefined) { // webkit or chrome
        url = window.webkitURL.createObjectURL(file) ;
    }
    return url ;
}
2.2 图片处理
将上传的图片传到后端进行处理,再将处理后的图片返回到界面指定的位置。这里主要是后端将处理完成后的图片编码成base64的形式发送到前端,再由前端进行解码。
HTML部分:
<button type="button" class="btn btn-info btn-block" onclick="detect()">开始检测</button>

 <img src="../static/image/loading02.png" alt="等待检测" height="400" width="550" id="img_detected"/>
JS部分:
function detect() {
    "use strict";
    let fileObj = $("#load_img01")[0].files[0];
    console.log(fileObj);
    let form = new FormData();
    let img_src;
    form.append("file", fileObj);
    $.ajax({
        type: 'POST',
        url: "imageDetect",
        data: form,
        async: false,
        processData: false,
        contentType: false,
        success: function (res){
            alert("检测完成!");
            console.log(res);
            img_src = "data:image/png;base64,"+res;
            console.log(img_src);
            $("#img_detected").attr("src",img_src);
        },
        error: function (){
            alert("检测失败!");
            console.log("后台处理错误");
        }
    });

}
后端部分:
@app.route("/imageDetect", methods=["POST"])
@torch.no_grad()
def imgDetect():
    image = request.files["file"]
    img_bytes = image.read()
    img_stream = get_detection(image_bytes=img_bytes)
    return img_stream
import io
import base64
from PIL import Image
import matplotlib.pyplot as plt
from torchvision import transforms


# Pre-process image
def transform_image(image_bytes):
    my_transforms = transforms.Compose([transforms.Resize(500),
                                        transforms.CenterCrop(300)])
    image = Image.open(io.BytesIO(image_bytes))

    if image.mode != "RGB":
        raise ValueError("input file does not RGB image...")

    return my_transforms(image)


# Detection
def get_detection(image_bytes):
    image = transform_image(image_bytes)

    fig = plt.figure()
    fig.set_size_inches(550 / 100, 400 / 100)
    ax = fig.add_subplot(1, 1, 1)
    ax.imshow(image)
    ax.axis('off')

    canvas = fig.canvas
    buffer = io.BytesIO()
    canvas.print_png(buffer)
    data = buffer.getvalue()
    buffer.write(data)

    img_stream = base64.b64encode(buffer.getvalue()).decode()

    return img_stream
2.3 代码汇总
文件夹结构:
- static
- css
- detection_image.css
- js
- self
- load_file.js
- jquery-3.6.1.js
- plugins
- Bootstrap
- templates
- detection_image.html
- app.py
- detect.py
- requirements.txt
app.py
from flask import Flask, render_template, request
from detect import get_detection

app = Flask(__name__)


@app.route('/')
def main():  # put application's code here
    return render_template('detection_image.html')


@app.route("/imageDetect", methods=["POST"])
def imgDetect():
    image = request.files["file"]
    img_bytes = image.read()
    img_stream = get_detection(image_bytes=img_bytes)
    return img_stream


if __name__ == '__main__':
    app.run()
detect.py
import io
import base64
from PIL import Image
import matplotlib.pyplot as plt
from torchvision import transforms


# Pre-process image
def transform_image(image_bytes):
    my_transforms = transforms.Compose([transforms.Resize(500),
                                        transforms.CenterCrop(300)])
    image = Image.open(io.BytesIO(image_bytes))

    if image.mode != "RGB":
        raise ValueError("input file does not RGB image...")

    return my_transforms(image)


# Detection
def get_detection(image_bytes):
    image = transform_image(image_bytes)

    fig = plt.figure()
    fig.set_size_inches(550 / 100, 400 / 100)
    ax = fig.add_subplot(1, 1, 1)
    ax.imshow(image)
    ax.axis('off')

    canvas = fig.canvas
    buffer = io.BytesIO()
    canvas.print_png(buffer)
    data = buffer.getvalue()
    buffer.write(data)

    img_stream = base64.b64encode(buffer.getvalue()).decode()

    return img_stream
detection_image.html
<!DOCTYPE html>
<html lang="en">
<head>
    <meta charset="UTF-8">
    <title>机械臂视觉抓取检测界面</title>

    <!-- Loading Bootstrap css -->
    <link rel="stylesheet" type="text/css" href="../static/plugins/Bootstrap/css/bootstrap.min.css">

    <!-- Loading user-defined css -->
    <link rel="stylesheet" type="text/css" href="../static/css/detection_image.css">

    <!-- Loading js -->
    <script src="../static/js/jquery-3.6.1.js"></script>
    <script src="../static/plugins/Bootstrap/js/bootstrap.bundle.min.js"></script>

</head>
<body>

<header>
    <img src="../static/image/TJ.png" alt="TJ" style="float: left; margin: 15px 15px" height="60.4" width="224.4">
    <h1>抓取检测模型测试界面</h1>
</header>

<div class="main">
    <div class="manipulation container">
        <div class="model_select">
            <form action="">
                <label for="sell" class="form-label" id="font_piggy">选择抓取检测模型:</label>
                <select class="form-select" id="sell" name="sellList">
                    <option value="1">TF-Grasp</option>
                    <option value="2">GG-CNN</option>
                </select>
            </form>
        </div>

        <div class="d-grid" style="margin: 80px 30px">
            <input type="file" name="load_img01" id="load_img01" class="image_load"/>
            <label for="load_img01">选择图片</label>
        </div>

        <div class="d-grid" style="margin: 80px 30px">
            <button type="button" class="btn btn-info btn-block" onclick="detect()">开始检测</button>
        </div>
    </div>

    <div class="display container">
        <div class="return">
            <div style="float: right">
                <a href="/" class="btn btn-info" role="button">返回首页</a>
            </div>

            <div style="float: right; margin-right: 10px">
                <a href="/cameraDetection" class="btn btn-info" role="button">相机检测</a>
            </div>
        </div>

        <div class="pictures_exhibit">
            <div class="picture_l">
                <img src="../static/image/loading01.png" alt="等待上传" height="400" width="550" id="img_loaded01"/>
            </div>
            <div class="picture_r">
                <img src="../static/image/loading02.png" alt="等待检测" height="400" width="550" id="img_detected"/>
            </div>
        </div>

        <div class="generation">
            <button type="button" class="btn btn-info btn-block" style="float: right">保存图片</button>
        </div>
    </div>
</div>

<!-- Loading js -->
<script src="../static/js/self/load_file.js"></script>

</body>
</html>
detection_image.css
/* layout */
* {
    margin: 0;
    padding: 0;
}

header {
    position: absolute;
    width: 100%;
    height: 12%;
    text-align: center;
    background-color: #2980b9;
}

.main {
    position: absolute;
    width: 100%;
    height: 88%;
    background: #3498db;
    bottom: 0;
}

.main:after {
    content: "";
    display: block;
    clear: both;
}

.main .manipulation {
    height: 100%;
    width: 20%;
    float: left;
    background: #2980b9;
}

.main .display {
    height: 100%;
    width: 80%;
    float: left;
    background: #3498db;
}

#font_piggy {
    color: #ecf0f1;
    font-family: "宋体", serif;
    font-size: larger;
}


/* header */
header h1 {
    color: #ecf0f1;
    font-weight: bold;
    font-family: "宋体", serif;
    line-height: 100px;
}


/* manipulation */
.manipulation .model_select {
    margin: 35px 30px;
}

.manipulation .image_load {
    width: 0.1px;
    height: 0.1px;
    opacity: 0;
    overflow: hidden;
    position: absolute;
    z-index: -1;
}

.manipulation .image_load + label {
    height: 38px;
    text-align: center;
    line-height: 38px;
    background-color: #0dcaf0;
    border-color: #0dcaf0;
    display: inline-block;
    border-radius: 3px;
}

.manipulation .image_load + label:hover {
    background-color: #31d2f2;
    border-color: #25cff2;
    cursor: pointer;
}


/* display */
.display .return {
    margin: 30px 20px;
}

.display .return:after {
    content: "";
    display: table;
    clear: both;
}

.display .pictures_exhibit {
    padding: 10px 15px;
    height: 420px;
    width: 100%;
    background: #ecf0f1;
}

.display .pictures_exhibit:after {
    content: "";
    display: table;
    clear: both;
}

.display .pictures_exhibit .picture_l {
    float: left;
    height: 100%;
    width: 550px;
    background: #bdc3c7;
}

.display .pictures_exhibit .picture_r {
    float: right;
    height: 100%;
    width: 550px;
    background: #bdc3c7;
}

.display .generation {
    margin: 30px 30px;
}

.display .generation:after {
    content: "";
    display: table;
    clear: both;
}
load_file.js
// Load image and preview
$(function (){
    "use strict";
    $("#load_img01").change(function(){
        console.log(this.files[0]);
        let objUrl = getObjectURL(this.files[0]) ; // 获取文件信息
        console.log("objUrl = "+objUrl);
        if (objUrl) {
            $("#img_loaded01").attr("src", objUrl);
        }
    });
});


function getObjectURL(file) {
    "use strict";
    let url = null;
    if(Window.createObjectURL !== undefined) {
        url = window.createObjectURL(file) ;
    }else if (window.URL !== undefined) { // mozilla(firefox)
        url = window.URL.createObjectURL(file) ;
    }else if (window.webkitURL !== undefined) { // webkit or chrome
        url = window.webkitURL.createObjectURL(file) ;
    }
    return url ;
}


// Detect image
function detect() {
    "use strict";
    let fileObj = $("#load_img01")[0].files[0];
    console.log(fileObj);
    let form = new FormData();
    let img_src;
    form.append("file", fileObj);
    $.ajax({
        type: 'POST',
        url: "imageDetect",
        data: form,
        async: false,
        processData: false,
        contentType: false,
        success: function (res){
            alert("检测完成!");
            console.log(res);
            img_src = "data:image/png;base64,"+res;
            console.log(img_src);
            $("#img_detected").attr("src",img_src);
        },
        error: function (){
            alert("检测失败!");
            console.log("后台处理错误");
        }
    });

}
requirements.txt
Flask==2.2.2
matplotlib==3.6.2
Pillow==9.4.0
torchvision==0.14.0
项目文件链接:
链接:https://pan.baidu.com/s/1_KZv22XidLrmt5GLm5u3GA?pwd=0000
提取码:0000
三、参考资料
1. python的flask框架实现将python绘制的图像显示到web页面
https://www.cnblogs.com/qingnvsue/p/12988209.html
2. 获取图片上传路径方法
https://www.cnblogs.com/AaronNotes/p/6526479.html
3. 上传按钮<input type="file"/>智能多效美化
https://www.jianshu.com/p/07c27e576b26
4. 使用pytorch配合flask搭建简易web服务


 被折叠的 条评论
为什么被折叠?
被折叠的 条评论
为什么被折叠?
 到【灌水乐园】发言


