


安装环境
阿里云服务器
centos6.5 X64
参考教程
Pip安装
Pip 是一个 Python 的软件包安装与管理工具.
在安装 TensorFlow 过程中要涉及安装或升级的包详见 列表
首先安装 pip (或 Python3 的 pip3 ):
$ sudo yum install python-pip python-dev
注释:
apt是debian(ubuntu)的包管理器
Centos用yum来管理软件
注:tensorflow0.8只支持python2.7以上和python3,两者选一个安装即可
安装python3.4
系统预装的是python2.6.6
参考教程中只能用2.7和3.4
需要升级到3.4
安装相关包
# yum install zlib-devel bzip2-devel openssl-devel ncurses-devel sqlite-devel readline-devel tk-devel gcc make
下载 Python 3.4 源码包
# wget http://mirrors.sohu.com/python/3.4.1/Python-3.4.1.tar.xz
安装 Python 3.4
# tar xf Python-3.4.1.tar -C /usr/local/src/
# cd /usr/local/src/Python-3.4.1/
# ./configure --prefix=/usr/local/python34
# make
# make install
添加 python3.4 相关命令到环境变量
添加 python3.4 到环境变量,编辑 ~/.bash_profile,将:
PATH=
PATH:
HOME/bin
改为:
PATH=
PATH:
HOME/bin:/usr/local/python34/bin
使 python3.4 环境变量生效:
# . ~/.bash_profile
更新版本
此时已完成新版本的安装,但由于老版本还在系统中,所以需要将原来/usr/bin/python链接改为新的连接:
a.先修改老的连接,执行:mv /usr/bin/python /usr/bin/python_bak。
b.再建立新连接: ln -s /usr/local/python34/bin/python3.4 /usr/bin/python
查看版本
#python
安装tensorflow
# Ubuntu/Linux 64-bit, CPU only, Python 3.4:
# pip3 install --upgrade https://storage.googleapis.com/tensorflow/linux/cpu/tensorflow-0.8.0-cp34-cp34m-linux_x86_64.whl

# Ubuntu/Linux 64-bit, GPU enabled, Python 3.4. Requires CUDA toolkit 7.5 and CuDNN v4.
# For other versions, see "Install from sources" below.
# pip3 install --upgrade https://storage.googleapis.com/tensorflow/linux/gpu/tensorflow-0.8.0-cp34-cp34m-linux_x86_64.whl
测试
运行 TensorFlow
打开一个 python 终端:
# python

>>> import tensorflow as tf
>>> hello = tf.constant('Hello, TensorFlow!')
>>> sess = tf.Session()
>>> print (sess.run(hello))
Hello, TensorFlow!
>>> a = tf.constant(10)
>>> b = tf.constant(32)
>>> print (sess.run(a+b))
42
>>>
需要说明的是,在centos系统下,无法直接换行,我们可以用touch命令新建.py文件,然后用python命令执行此文件
#python opt/hello.py
python2.7环境
安装python2.7
yum中最新的也是Python 2.6.6,只能下载Python 2.7.9的源代码自己编译安装。
操作步骤如下:
安装devtoolset
yum groupinstall "Development tools"
安装编译Python需要的包包
yum install zlib-devel
yum install bzip2-devel
yum install openssl-devel
yum install ncurses-devel
yum install sqlite-devel
下载并解压Python 2.7.9的源代码
cd /opt
wget --no-check-certificate https://www.python.org/ftp/python/2.7.9/Python-2.7.9.tar.xz
tar xf Python-2.7.9.tar.xz
cd Python-2.7.9
编译与安装Python 2.7.9
./configure --prefix=/usr/local
make && make altinstall
将python命令指向Python 2.7.9
ln -s /usr/local/bin/python2.7 /usr/local/bin/python
检查Python版本
安装python2.7的pip
wget --no-check-certificate https://pypi.python.org/packages/source/s/setuptools/setuptools-1.4.2.tar.gz
tar -vxf setuptools-1.4.2.tar.gz
cd setuptools-1.4.2
python2.7 setup.py install
easy_install-2.7 pip
安装tensorflow
# Ubuntu/Linux 64-bit, CPU only, Python 2.7:
$ sudo pip install --upgrade https://storage.googleapis.com/tensorflow/linux/cpu/tensorflow-0.8.0-cp27-none-linux_x86_64.whl

# Ubuntu/Linux 64-bit, GPU enabled, Python 2.7. Requires CUDA toolkit 7.5 and CuDNN v4.
# For other versions, see "Install from sources" below.
$ sudo pip install --upgrade https://storage.googleapis.com/tensorflow/linux/gpu/tensorflow-0.8.0-cp27-none-linux_x86_64.whl
测试
# python

>>> import tensorflow as tf
>>> hello = tf.constant('Hello, TensorFlow!')
>>> sess = tf.Session()
>>> print sess.run(hello)
Hello, TensorFlow!
>>> a = tf.constant(10)
>>> b = tf.constant(32)
>>> print sess.run(a+b)
42
>>>
注释:python2.7和python3.X的语法结构不同
训练你的第一个 TensorFlow 神经网络模型
我的python3.4中tensorflow目录
/usr/local/python34/lib/python3.4/site-packages/tensorflow
python2.7.9目录
/usr/local/lib/python2.7/site-packages/tensorflow
从源代码树的根路径执行:
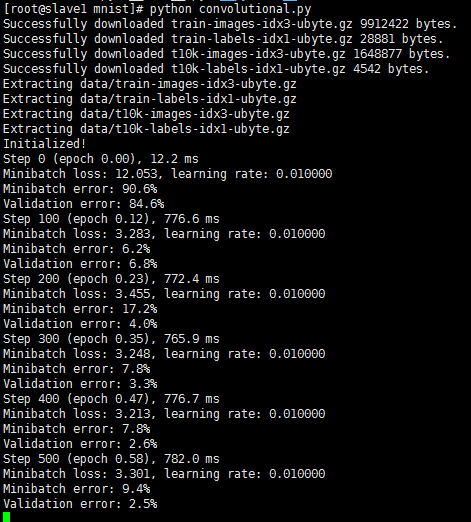
# cd tensorflow/models/image/mnist
# python convolutional.py
Succesfully downloaded train-images-idx3-ubyte.gz 9912422 bytes.
Succesfully downloaded train-labels-idx1-ubyte.gz 28881 bytes.
Succesfully downloaded t10k-images-idx3-ubyte.gz 1648877 bytes.
Succesfully downloaded t10k-labels-idx1-ubyte.gz 4542 bytes.
Extracting data/train-images-idx3-ubyte.gz
Extracting data/train-labels-idx1-ubyte.gz
Extracting data/t10k-images-idx3-ubyte.gz
Extracting data/t10k-labels-idx1-ubyte.gz
Initialized!
Epoch 0.00
Minibatch loss: 12.054, learning rate: 0.010000
Minibatch error: 90.6%
Validation error: 84.6%
Epoch 0.12
Minibatch loss: 3.285, learning rate: 0.010000
Minibatch error: 6.2%
Validation error: 7.0%
...
...
我的运行界面
常见问题
测试出错
>>> import tensorflow as tf
Traceback (most recent call last):
  File "<stdin>", line 1, in <module>
  File "/usr/local/python27/lib/python2.7/site-packages/tensorflow/__init__.py", line 23, in <module>
from tensorflow.python import *
  File "/usr/local/python27/lib/python2.7/site-packages/tensorflow/python/__init__.py", line 45, in <module>
from tensorflow.python import pywrap_tensorflow
  File "/usr/local/python27/lib/python2.7/site-packages/tensorflow/python/pywrap_tensorflow.py", line 28, in <module>
_pywrap_tensorflow = swig_import_helper()
  File "/usr/local/python27/lib/python2.7/site-packages/tensorflow/python/pywrap_tensorflow.py", line 24, in swig_import_helper
_mod = imp.load_module('_pywrap_tensorflow', fp, pathname, description)
ImportError: /lib64/libc.so.6: version `GLIBC_2.15' not found (required by /usr/local/python27/lib/python2.7/site-packages/tensorflow/python/_pywrap_tensorflow.so)
解决方案参考http://blog.csdn.net/levy_cui/article/details/51251095
直接升级到2.17
wget http://ftp.gnu.org/pub/gnu/glibc/glibc-2.17.tar.xz
xz -d glibc-2.17.tar.xz
tar -xvf glibc-2.17.tar
cd glibc-2.17
mkdir build
cd build
../configure --prefix=/usr --disable-profile --enable-add-ons --with-headers=/usr/include --with-binutils=/usr/bin
make && make install
需要等大概10分钟。
输入strings /lib64/libc.so.6|grep GLIBC发现已经更新
GLIBC_2.2.5
GLIBC_2.2.6
GLIBC_2.3
GLIBC_2.3.2
GLIBC_2.3.3
GLIBC_2.3.4
GLIBC_2.4
GLIBC_2.5
GLIBC_2.6
GLIBC_2.7
GLIBC_2.8
GLIBC_2.9
GLIBC_2.10
GLIBC_2.11
GLIBC_2.12
GLIBC_2.13
GLIBC_2.14
GLIBC_2.15
GLIBC_2.16
GLIBC_2.17
GLIBC_PRIVATE
再次运行,还是报错
>>> import tensorflow as tf
Traceback (most recent call last):
  File "<stdin>", line 1, in <module>
  File "/usr/local/python27/lib/python2.7/site-packages/tensorflow/__init__.py", line 23, in <module>
from tensorflow.python import *
  File "/usr/local/python27/lib/python2.7/site-packages/tensorflow/python/__init__.py", line 45, in <module>
from tensorflow.python import pywrap_tensorflow
  File "/usr/local/python27/lib/python2.7/site-packages/tensorflow/python/pywrap_tensorflow.py", line 28, in <module>
_pywrap_tensorflow = swig_import_helper()
  File "/usr/local/python27/lib/python2.7/site-packages/tensorflow/python/pywrap_tensorflow.py", line 24, in swig_import_helper
_mod = imp.load_module('_pywrap_tensorflow', fp, pathname, description)
ImportError: /usr/lib64/libstdc++.so.6: version `GLIBCXX_3.4.14' not found (required by /usr/local/python27/lib/python2.7/site-packages/tensorflow/python/_pywrap_tensorflow.so)
再次直接升级到3.4.20
从网上下载libstdc++.so.6.0.20
http://ftp.de.debian.org/debian/pool/main/g/gcc-4.8/
或者
http://download.csdn.net/detail/pomelover/7524227
放到/usr/lib64/下
#chmod +x libstdc++.so.6.0.20
#rm libstdc++.so.6
#ln -s libstdc++.so.6.0.20 libstdc++.so.6
#strings /usr/lib64/libstdc++.so.6 | grep GLIBCXX
# strings /usr/lib64/libstdc++.so.6 | grep GLIBCXX
GLIBCXX_3.4
GLIBCXX_3.4.1
GLIBCXX_3.4.2
GLIBCXX_3.4.3
GLIBCXX_3.4.4
GLIBCXX_3.4.5
GLIBCXX_3.4.6
GLIBCXX_3.4.7
GLIBCXX_3.4.8
GLIBCXX_3.4.9
GLIBCXX_3.4.10
GLIBCXX_3.4.11
GLIBCXX_3.4.12
GLIBCXX_3.4.13
GLIBCXX_3.4.14
GLIBCXX_3.4.15
GLIBCXX_3.4.16
GLIBCXX_3.4.17
GLIBCXX_3.4.18
GLIBCXX_3.4.19
GLIBCXX_3.4.20
GLIBCXX_FORCE_NEW
GLIBCXX_DEBUG_MESSAGE_LENGTH
终于成功了
GPU 相关问题
如果在尝试运行一个 TensorFlow 程序时出现以下错误:
ImportError: libcudart.so.7.0: cannot open shared object file: No such file or directory
请确认你正确安装了 GPU 支持, 参见 相关章节.
在 Linux 上如果出现错误:
...
 "__add__", "__radd__",
 ^
SyntaxError: invalid syntax
解决方案: 确认正在使用的 Python 版本为 Python 2.7.
参考教程:
安装教程:
https://github.com/jikexueyuanwiki/tensorflow-zh/blob/master/SOURCE/get_started/os_setup.md
错误解决方案:
http://blog.csdn.net/levy_cui/article/details/51251095


 1028
1028

 被折叠的 条评论
为什么被折叠?
被折叠的 条评论
为什么被折叠?
 到【灌水乐园】发言


