


AWS设备自定义身份认证需要通过lambda服务实现,具体来说,首先需要创建一个lambda函数,在函数中实现具体的认证逻辑,然后Iot在调用授权方时,将触发lambda函数,返回认证结果。
1.输入参数说明
授权方在调用lambda函数时,将传递相关的参数信息,具体内容如下所示:
{
    "token" :"aToken",
    "signatureVerified": Boolean, // Indicates whether the device gateway has validated the signature.
    "protocols": ["tls", "http", "mqtt"], // Indicates which protocols to expect for the request.
    "protocolData": {
        "tls" : {
            "serverName": "serverName" // The server name indication (SNI) host_name string.
        },
        "http": {
            "headers": {
                "#{name}": "#{value}"
            },
            "queryString": "?#{name}=#{value}"
        },
        "mqtt": {
            "username": "myUserName",
            "password": "myPassword", // A base64-encoded string.
            "clientId": "myClientId" // Included in the event only when the device sends the value.
        }
    },
    "connectionMetadata": {
        "id": UUID // The connection ID. You can use this for logging.
    },
}
2.创建lambda函数
操作地址:函数 – Lambda (amazonaws.cn)
编写函数逻辑:
如果检测到用户密码为test,则认证通过,并附加允许策略,其他情况,则附加拒绝策略。
console.log('Loading function');

exports.handler = function(event, context, callback) {
    var uname = event.protocolData.mqtt.username;
    var pwd = event.protocolData.mqtt.password;
    var buff = Buffer.from(pwd, 'base64');
    var passwd = buff.toString('ascii');
    console.log(passwd);
    switch (passwd) {
        case 'test':
            callback(null, generateAuthResponse(passwd, 'Allow'));
        default:
            callback(null, generateAuthResponse(passwd, 'Deny'));
    }
};

// Helper function to generate the authorization response.
var generateAuthResponse = function(token, effect) {
    console.log(effect);
    var authResponse = {};
    authResponse.isAuthenticated = true;
    authResponse.principalId = 'TEST123';

    var policyDocument = {};
    policyDocument.Version = '2012-10-17';
    policyDocument.Statement = [];
    var publishStatement = {};
    var connectStatement = {};
    connectStatement.Action = ["iot:Connect"];
    connectStatement.Effect = effect;
    connectStatement.Resource = ["arn:aws:iot:cn-northwest-1:xxxxxx:client/*"];
    publishStatement.Action = ["iot:Publish"];
    publishStatement.Effect = effect;
    publishStatement.Resource = ["arn:aws:iot:cn-northwest-1:xxxxxx:topic/test/battery"];
    policyDocument.Statement[0] = connectStatement;
    policyDocument.Statement[1] = publishStatement;
    authResponse.policyDocuments = [policyDocument];
    authResponse.disconnectAfterInSeconds = 3600;
    authResponse.refreshAfterInSeconds = 300;

    return authResponse;
}
3.创建授权方
通过aws cli命令行工具创建授权方,或者在Iot Core控制台直接创建授权方,
aws iot create-authorizer --authorizer-name TestAuthorizer --authorizer-function-arn arn:aws-cn:lambda:cn-northwest-1:xxxxxx:function:AceAuthorizor --status ACTIVE --signing-disabled
4.授权方添加权限
通过aws cli命令行的方式给授权方添加调用lambda的权限,
aws lambda add-permission --function-name TestAuthorizer --principal iot.amazonaws.com --source-arn arn:aws-cn:iot:cn-northwest-1:xxxxxx:authorizer/TestAuthorizer --statement-id Id-124 --action "lambda:InvokeFunction"
5.测试授权方
通过aws cli测试授权方调用lambda是否成功
aws iot test-invoke-authorizer --authorizer-name TestAuthorizer --mqtt-context "username=xxxxx,password=dGVzdA==,clientId=demo1"
密码正确,则返回授权的策略内容,如下图所示

6.总结
这里要注意aws cli 的配置,我这里最开始用IAM Role方式配置命令行,

刚开始一直报权限问题,后来直接换成用户凭证的方式配置,
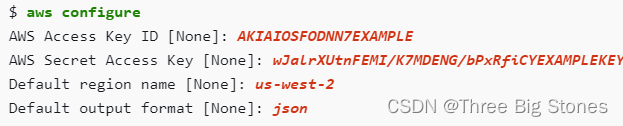
报错“An error occurred (AccessDenied) when calling the AssumeRole operation: User: arn:aws-cn:iam::xxxxxx:user/test is not authorized to perform: sts:AssumeRole on resource: arn:aws-cn:iam::xxxxxx:role/JITP”,后来在目录“C:\Users\用户\.aws”下config文件去掉role_arn,问题才解决。
另外,要注意给授权放添加调用lambda的权限,否则测试一直报错"An error occurred (InvalidResponseException) when calling the TestInvokeAuthorizer operation: AccessDeniedException encountered when invoking lambda; requestId: 53bc3fb4-80d2-4f89-ac98-4d529444ee48"


 1261
1261

 被折叠的 条评论
为什么被折叠?
被折叠的 条评论
为什么被折叠?
 到【灌水乐园】发言


