


在许多文章中,我们广泛讨论了ListView及其处理方法:创建自定义适配器或处理用户交互。
在本文中,我将介绍过去未涉及的与ListView相关的另一个方面:具有多行布局的ListView。 到现在为止,我们已经看到行具有相同的布局,无论如何,都有可能具有不同的布局。
我们希望拥有如下所示的图片:
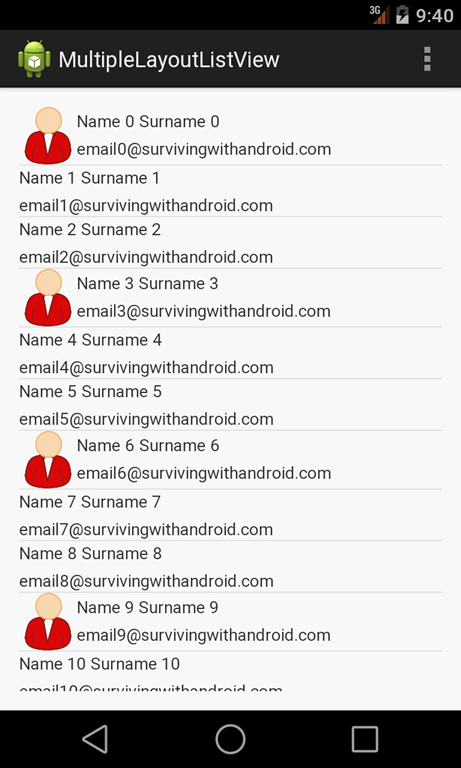
在此应用中,我们显示一个联系人列表,该列表具有两种不同的布局,一种使用图像,另一种不使用图像。 即使该示例非常简单,也足以了解如何使用几种ListView方法来获得此结果。
如何有多重布局
通常,当我们要自定义ListView数据时,我们使用自定义适配器 。 我们知道Android提供了一些现成的基本适配器(即ArrayAdapter , SimpleAdapter等)。 我们已经知道,所有这些适配器都有一个共同的父类,即BaseAdapter 。
当我们要自定义ListView如何显示数据时,可以使用Android提供的适配器类之一或实现我们的自定义适配器,在这种情况下,我们将创建一个扩展BaseAdapter的自定义适配器。
如果我们要具有多个行布局, BaseAdapter有两个非常有用的方法:
- public int getItemViewType(int position)
- 公共诠释getViewTypeCount()
方法getViewTypeCount “返回将由getView(int,View,ViewGroup)创建的View的类型数 ”。
换句话说,此方法返回ListView中有多少种不同的布局。 getItemViewType返回当前行的视图类型,如果您查看方法签名,则将位置作为参数。 我们应该注意的一件事是,此方法必须返回介于0和getViewTypeCount()– 1之间的整数值。
因此,如果要具有多个行布局,则必须重写这些方法并返回正确的值。
多行布局实施
首先,我们必须创建一个自定义适配器,我们将其称为ContactAdapter :
public class ContactAdapter extends BaseAdapter {
...
}
并具有两种不同的布局,我们将覆盖:
@Override
public int getViewTypeCount() {
    return 2;
}
然后我们必须实现逻辑以根据位置值选择要分配给行的布局类型:
@Override
public int getItemViewType(int position) {
    return (contactList.get(position).getContactType() == ContactType.CONTACT_WITH_IMAGE) ? 0 : 1;
} 在此方法中,我们使用getContactType知道要使用的布局,如您所见,我们返回0或1。
现在我们必须实现两种不同的布局:它们非常相似:
<RelativeLayout xmlns:android="http://schemas.android.com/apk/res/android"
    android:layout_width="match_parent" android:layout_height="wrap_content">

    <ImageView
        android:layout_width="48dp"
        android:layout_height="48dp"
        android:id="@+id/img"/>

    <TextView
        android:layout_width="wrap_content"
        android:layout_height="wrap_content"
        android:id="@+id/name"
        android:layout_toRightOf="@id/img"
        android:layout_marginTop="2dp"/>

    <TextView
        android:layout_width="wrap_content"
        android:layout_height="wrap_content"
        android:id="@+id/surname"
        android:layout_toRightOf="@id/name"
        android:layout_marginLeft="4dp"/>

    <TextView
        android:layout_width="wrap_content"
        android:layout_height="wrap_content"
        android:id="@+id/email"
        android:layout_below="@id/name"
        android:layout_alignStart="@id/name"
        android:layout_marginTop="4dp"/>
</RelativeLayout>
另一个没有图片的是:
<RelativeLayout xmlns:android="http://schemas.android.com/apk/res/android"
    android:layout_width="match_parent" android:layout_height="wrap_content">

    <TextView
        android:layout_width="wrap_content"
        android:layout_height="wrap_content"
        android:id="@+id/name"/>

    <TextView
        android:layout_width="wrap_content"
        android:layout_height="wrap_content"
        android:id="@+id/surname"
        android:layout_toRightOf="@id/name"
        android:layout_marginLeft="4dp"/>

    <TextView
        android:layout_width="wrap_content"
        android:layout_height="wrap_content"
        android:id="@+id/email"
        android:layout_below="@id/name"
        android:layout_alignStart="@id/name"
        android:layout_marginTop="4dp"/>
</RelativeLayout> 现在,我们只需在自定义适配器中重写getView方法即可:
@Override
public View getView(int position, View convertView, ViewGroup parent) {
    View v = convertView;
    int type = getItemViewType(position);
    if (v == null) {
        // Inflate the layout according to the view type
        LayoutInflater inflater = (LayoutInflater) ctx.getSystemService(Context.LAYOUT_INFLATER_SERVICE);
        if (type == 0) {
            // Inflate the layout with image
            v = inflater.inflate(R.layout.image_contact_layout, parent, false);
        }
        else {
            v = inflater.inflate(R.layout.simple_contact_layout, parent, false);
        }
    }
    //
    Contact c = contactList.get(position);

    TextView surname = (TextView) v.findViewById(R.id.surname);
    TextView name = (TextView) v.findViewById(R.id.name);
    TextView email = (TextView) v.findViewById(R.id.email);

    if (type == 0) {
        ImageView img = (ImageView) v.findViewById(R.id.img);
        img.setImageResource(c.imageId);
    }

    surname.setText(c.surname);
    name.setText(c.name);
    email.setText(c.email);

    return v;
}
完成应用程序
现在我们有了我们的自定义适配器,它很容易使用并将其绑定到ListView。 在保存ListView的主要活动中:
@Override
protected void onCreate(Bundle savedInstanceState) {
    super.onCreate(savedInstanceState);
    setContentView(R.layout.activity_my);
    ContactAdapter ca = new ContactAdapter(createContact(20), this);
    ListView lv = (ListView) findViewById(R.id.contact_list);
    lv.setAdapter(ca);
}- 源代码即将发布。
翻译自: https://www.javacodegeeks.com/2014/08/android-listview-with-multiple-row-layout.html


 8万+
8万+

 被折叠的 条评论
为什么被折叠?
被折叠的 条评论
为什么被折叠?
 到【灌水乐园】发言


