


 本文档是一个关于如何在Android平台上创建接近警报的教程。通过利用GPS设备和LocationManager类,应用程序可以在用户接近预设的兴趣点时发送通知。内容包括设置LocationListener,使用SharedPreferences保存坐标,以及创建BroadcastReceiver来处理进入或退出警报区域的事件。
智能手机正在占领移动世界,这是事实。 由于通常在这些电话中嵌入GPS设备,因此利用所提供的地理定位功能的应用程序已经有了明显的增长。 这些应用程序的一种是基于位置的服务 ,其中该服务利用有关移动用户在全球位置的知识。 使用地理编码 (从地理数据(例如街道地址)中找到关联的地理坐标)和反向地理编码 (基于给定坐标提供信息)的应用程序也很常见。 这类应用程序的另一个方面是创建邻近警报。 顾名思义,这些警报是在用户实际位于特定兴趣点(POI)附近时生成的。 在接下来的几年中,接近警报将成为一件“热门”事情,因为许多应用程序都将使用它们,其中最突出的例子是针对性广告。 在本教程中,我将向您展示如何利用Android内置的接近警报功能。
在开始之前,阅读有关基于位置的应用程序和/或地理编码的介绍性文章会有所帮助。 您可能想看一下我以前的一些教程,例如“基于Android的位置服务应用程序– GPS位置”和“使用Yahoo API进行Android反向地理编码– PlaceFinder” 。 需要注意的另一件事是,本教程的灵感来自一个非常酷的教程,名为“使用Android平台开发移动应用程序的接近警报” 。 这是一个由四部分组成的教程,有时会有些复杂,可能会使初学者感到恐惧。 因此,我决定提供一个更简短,更直接的教程。
我们将构建一个简单的应用程序,该应用程序存储用户感兴趣的点的坐标,然后在用户靠近该点时提供通知。 当用户位于该点时,可以根据需要检索坐标。
我们首先创建一个新的Eclipse项目,在本例中为“ AndroidProximityAlertProject”。 我们还为应用程序创建了一个名为“ ProxAlertActivity”的主活动。 该应用程序的主页如下所示:

这是主UI布局的声明文件,名为“ main.xml”:
<?xml version="1.0" encoding="utf-8"?>

<LinearLayout xmlns:android="http://schemas.android.com/apk/res/android"
    android:orientation="vertical"
    android:layout_width="fill_parent"
    android:layout_height="fill_parent"
>

    <EditText
        android:id="@+id/point_latitude"
        android:layout_width="fill_parent"
        android:layout_height="wrap_content"
        android:layout_marginLeft="25dip"
        android:layout_marginRight="25dip"
    />

    <EditText
        android:id="@+id/point_longitude"
        android:layout_width="fill_parent"
        android:layout_height="wrap_content"
        android:layout_marginLeft="25dip"
        android:layout_marginRight="25dip"
    />

    <Button
        android:id="@+id/find_coordinates_button"
        android:text="Find Coordinates"
        android:layout_width="wrap_content"
        android:layout_height="wrap_content"
    />

    <Button
        android:id="@+id/save_point_button"
        android:text="Save Point"
        android:layout_width="wrap_content"
        android:layout_height="wrap_content"
    />

</LinearLayout>
现在让我们开始学习有趣的东西。 首先,我们需要对LocationManager类的引用,该类提供对系统位置服务的访问。 这是通过调用活动的getSystemService方法来完成的。 然后,我们可以使用requestLocationUpdates方法来在用户位置更改时请求通知。 在开发接近警报时,这并不是严格要求的,但是我将在这里使用它来计算兴趣点和当前用户位置之间的距离。 在任何给定时间,我们都可以调用getLastKnownLocation方法并检索特定提供商(在我们的情况下为GPS设备)的最新已知位置。 最后,我们将使用addProximityAlert方法,该方法可用于为由特定坐标(纬度,经度)和给定半径指定的位置设置接近警报。 如果我们希望在特定时间段内监视警报,我们还可以选择定义该警报的到期时间。 还可以提供PendingIntent ,当检测到进入警报区域或从警报区域退出时,将使用该PendingIntent生成要触发的Intent 。
所有这些都转换为以下代码:
package com.javacodegeeks.android.lbs;

import java.text.DecimalFormat;
import java.text.NumberFormat;

import android.app.Activity;
import android.app.PendingIntent;
import android.content.Context;
import android.content.Intent;
import android.content.IntentFilter;
import android.content.SharedPreferences;
import android.location.Location;
import android.location.LocationListener;
import android.location.LocationManager;
import android.os.Bundle;
import android.view.View;
import android.view.View.OnClickListener;
import android.widget.Button;
import android.widget.EditText;
import android.widget.Toast;

public class ProxAlertActivity extends Activity {

    private static final long MINIMUM_DISTANCECHANGE_FOR_UPDATE = 1; // in Meters
    private static final long MINIMUM_TIME_BETWEEN_UPDATE = 1000; // in Milliseconds

    private static final long POINT_RADIUS = 1000; // in Meters
    private static final long PROX_ALERT_EXPIRATION = -1;

    private static final String POINT_LATITUDE_KEY = "POINT_LATITUDE_KEY";
    private static final String POINT_LONGITUDE_KEY = "POINT_LONGITUDE_KEY";

    private static final String PROX_ALERT_INTENT =
         "com.javacodegeeks.android.lbs.ProximityAlert";

    private static final NumberFormat nf = new DecimalFormat("##.########");

    private LocationManager locationManager;

    private EditText latitudeEditText;
    private EditText longitudeEditText;
    private Button findCoordinatesButton;
    private Button savePointButton;

    @Override
    public void onCreate(Bundle savedInstanceState) {

        super.onCreate(savedInstanceState);
        setContentView(R.layout.main);

        locationManager = (LocationManager) getSystemService(Context.LOCATION_SERVICE);

        locationManager.requestLocationUpdates(
                        LocationManager.GPS_PROVIDER,
                        MINIMUM_TIME_BETWEEN_UPDATE,
                        MINIMUM_DISTANCECHANGE_FOR_UPDATE,
                        new MyLocationListener()
        );

        latitudeEditText = (EditText) findViewById(R.id.point_latitude);
        longitudeEditText = (EditText) findViewById(R.id.point_longitude);
        findCoordinatesButton = (Button) findViewById(R.id.find_coordinates_button);
        savePointButton = (Button) findViewById(R.id.save_point_button);

        findCoordinatesButton.setOnClickListener(new OnClickListener() {
            @Override
            public void onClick(View v) {
                populateCoordinatesFromLastKnownLocation();
            }
        });

        savePointButton.setOnClickListener(new OnClickListener() {
            @Override
            public void onClick(View v) {
                saveProximityAlertPoint();
            }
        });

    }

    private void saveProximityAlertPoint() {
        Location location =
            locationManager.getLastKnownLocation(LocationManager.GPS_PROVIDER);
        if (location==null) {
            Toast.makeText(this, "No last known location. Aborting...",
                Toast.LENGTH_LONG).show();
            return;
        }
        saveCoordinatesInPreferences((float)location.getLatitude(),
               (float)location.getLongitude());
        addProximityAlert(location.getLatitude(), location.getLongitude());
    }

    private void addProximityAlert(double latitude, double longitude) {

        Intent intent = new Intent(PROX_ALERT_INTENT);
        PendingIntent proximityIntent = PendingIntent.getBroadcast(this, 0, intent, 0);

        locationManager.addProximityAlert(
            latitude, // the latitude of the central point of the alert region
            longitude, // the longitude of the central point of the alert region
            POINT_RADIUS, // the radius of the central point of the alert region, in meters
            PROX_ALERT_EXPIRATION, // time for this proximity alert, in milliseconds, or -1 to indicate no expiration
            proximityIntent // will be used to generate an Intent to fire when entry to or exit from the alert region is detected
       );

       IntentFilter filter = new IntentFilter(PROX_ALERT_INTENT);
       registerReceiver(new ProximityIntentReceiver(), filter);

    }

    private void populateCoordinatesFromLastKnownLocation() {
        Location location =
            locationManager.getLastKnownLocation(LocationManager.GPS_PROVIDER);
        if (location!=null) {
            latitudeEditText.setText(nf.format(location.getLatitude()));
            longitudeEditText.setText(nf.format(location.getLongitude()));
        }
    }

    private void saveCoordinatesInPreferences(float latitude, float longitude) {
        SharedPreferences prefs =
           this.getSharedPreferences(getClass().getSimpleName(),
                           Context.MODE_PRIVATE);
        SharedPreferences.Editor prefsEditor = prefs.edit();
        prefsEditor.putFloat(POINT_LATITUDE_KEY, latitude);
        prefsEditor.putFloat(POINT_LONGITUDE_KEY, longitude);
        prefsEditor.commit();
    }

    private Location retrievelocationFromPreferences() {
        SharedPreferences prefs =
           this.getSharedPreferences(getClass().getSimpleName(),
                           Context.MODE_PRIVATE);
        Location location = new Location("POINT_LOCATION");
        location.setLatitude(prefs.getFloat(POINT_LATITUDE_KEY, 0));
        location.setLongitude(prefs.getFloat(POINT_LONGITUDE_KEY, 0));
        return location;
    }

    public class MyLocationListener implements LocationListener {
        public void onLocationChanged(Location location) {
            Location pointLocation = retrievelocationFromPreferences();
            float distance = location.distanceTo(pointLocation);
            Toast.makeText(ProxAlertActivity.this,
                    "Distance from Point:"+distance, Toast.LENGTH_LONG).show();
        }
        public void onStatusChanged(String s, int i, Bundle b) {
        }
        public void onProviderDisabled(String s) {
        }
        public void onProviderEnabled(String s) {
        }
    }

}在onCreate方法中,我们使用自定义类将位置管理器连接起来,该类实现了LocationListener接口,并允许通过onLocationChanged方法获取位置更改通知。 我们将在以后看到如何处理更新。 我们还找到了各种UI小部件,并将OnClickListener附加到按钮上。
当用户希望找到其当前坐标时,将调用“ populateCoordinatesFromLastKnownLocation”方法。 在其中,我们使用getLastKnownLocation方法并检索Location对象。 然后,用检索到的位置信息填充EditText 。
类似地,当用户想要保存点并为其提供警报(“ saveProximityAlertPoint”)时,首先会获取位置信息。 然后,我们使用SharedPreferences类,更具体地说是SharedPreferences.Editor将纬度和经度信息保存为首选项数据。 最后,我们使用getBroadcast静态方法创建PendingIntent 。 对于封装的Intent ,我们创建一个IntentFilter并使用registerReceiver方法将自定义的BroadcastReceiver与特定的Intent过滤器相关联。 注意,可以使用清单文件以声明的方式来实现此绑定。
现在,让我们检查一下我们如何处理用户的位置更改。 在“ MyLocationListener”类的已实现方法中,我们从SharedPreferences类中提取存储的位置信息(“ retrievelocationFromPreferences”)。 然后,我们使用distanceTo方法计算两个位置之间的距离,即当前位置和与兴趣点相对应的位置。 这样做是出于调试目的,以便我们知道是否实际上已进入该点周围的区域。
最后一步是处理进入兴趣点区域的事件。 这是在“ ProximityIntentReceiver”类内部完成的,该类扩展了BroadcastReceiver并在添加邻近警报时响应我们附加到位置管理器的自定义意图。 处理发生在onReceive方法内部,该方法在事件发生时被调用。 在其中,我们从关联的意图中检索KEY_PROXIMITY_ENTERING键的值,该值指示接近警报是进入(true)还是退出(false)。 代码如下:
package com.javacodegeeks.android.lbs;

import android.app.Notification;
import android.app.NotificationManager;
import android.app.PendingIntent;
import android.content.BroadcastReceiver;
import android.content.Context;
import android.content.Intent;
import android.graphics.Color;
import android.location.LocationManager;
import android.util.Log;

public class ProximityIntentReceiver extends BroadcastReceiver {

    private static final int NOTIFICATION_ID = 1000;

    @Override
    public void onReceive(Context context, Intent intent) {

        String key = LocationManager.KEY_PROXIMITY_ENTERING;

        Boolean entering = intent.getBooleanExtra(key, false);

        if (entering) {
            Log.d(getClass().getSimpleName(), "entering");
        }
        else {
            Log.d(getClass().getSimpleName(), "exiting");
        }

        NotificationManager notificationManager =
            (NotificationManager) context.getSystemService(Context.NOTIFICATION_SERVICE);

        PendingIntent pendingIntent = PendingIntent.getActivity(context, 0, null, 0);

        Notification notification = createNotification();
        notification.setLatestEventInfo(context,
            "Proximity Alert!", "You are near your point of interest.", pendingIntent);

        notificationManager.notify(NOTIFICATION_ID, notification);

    }

    private Notification createNotification() {
        Notification notification = new Notification();

        notification.icon = R.drawable.ic_menu_notifications;
        notification.when = System.currentTimeMillis();

        notification.flags |= Notification.FLAG_AUTO_CANCEL;
        notification.flags |= Notification.FLAG_SHOW_LIGHTS;

        notification.defaults |= Notification.DEFAULT_VIBRATE;
        notification.defaults |= Notification.DEFAULT_LIGHTS;

        notification.ledARGB = Color.WHITE;
        notification.ledOnMS = 1500;
        notification.ledOffMS = 1500;

        return notification;
    }

}
该代码非常简单。 确定是否有进入或退出的接近警报后,我们准备提供自定义通知。 为此,我们首先参考适当的服务,即NotificationManager 。 通过该服务,我们可以将警报发送给用户,这些通知将包裹在Notification对象中。 通知可以随意定制,包括振动 , 闪光灯等。我们还添加了一个特定图标,该图标将显示在状态栏中。 当我们只想添加基本标题和文本消息时,首选setLatestEventInfo 。 您可以在此处找到有关通知的更多信息。 此外,我们可以使用PendingIntent来定义一个活动,当用户通过单击该通知来确认该通知时,该活动将被调用。 但是,为了简单起见,在我的示例中我没有使用要启动的意图。
最后,让我们看看Android清单文件的外观:
<?xml version="1.0" encoding="utf-8"?>

<manifest xmlns:android="http://schemas.android.com/apk/res/android"
      package="com.javacodegeeks.android.lbs"
      android:versionCode="1"
      android:versionName="1.0">

    <application android:icon="@drawable/icon" android:label="@string/app_name">

        <activity android:name=".ProxAlertActivity"
                  android:label="@string/app_name">
            <intent-filter>
                <action android:name="android.intent.action.MAIN" />
                <category android:name="android.intent.category.LAUNCHER" />
            </intent-filter>
        </activity>

    </application>

    <uses-sdk android:minSdkVersion="3" />

    <uses-permission android:name="android.permission.ACCESS_FINE_LOCATION" />
    <uses-permission android:name="android.permission.ACCESS_MOCK_LOCATION" />
    <uses-permission android:name="android.permission.ACCESS_COARSE_LOCATION" />
    <uses-permission android:name="android.permission.VIBRATE" />

</manifest>
这里没什么特别的,只记得添加必要的权限,即
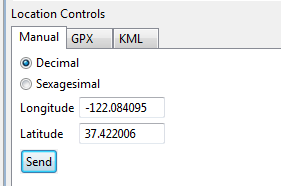
现在,我们准备测试我们的应用程序。 启动Eclipse配置。 然后,转到Eclipse的DDMS视图并查找“仿真控件”选项卡。 在那里,您将找到“位置控制”部分,该部分可以将模拟位置数据发送到仿真器。 在“手动”选项卡中,只需单击“发送”按钮,就已经设置了一些坐标。
之后,GPS提供商将具有可以根据要求提供的最后已知位置。 因此,点击“查找坐标”按钮,您将获得:
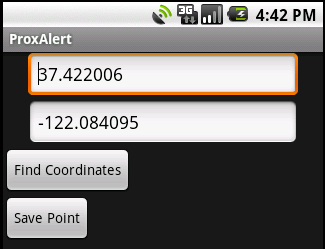
然后,点击“保存点”以将当前位置声明为兴趣点。 位置坐标将保存在首选项中,并且接近警报将添加到位置管理器中。
接下来,让我们模拟用户离开该位置的事实。 更改坐标值,例如,如下更改纬度:37.422006? 37.522006。 我们现在离兴趣点还很远。 现在假设我们正在接近它,因此将纬度更改为更接近的值,例如:37.522006? 37.423006。
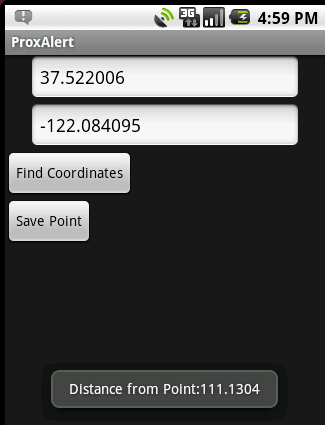
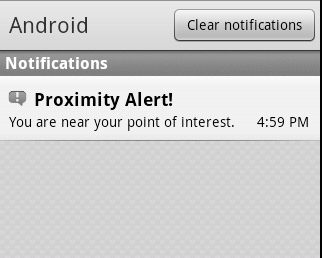
它位于该点的半径之内(已设置为1000米),因此触发了警报并通知了我们的接收器。 在那里,我们创建通知并通过通知管理器发送它。 通知显示在状态栏上,如下所示:
就是这样,这是有关如何在Android平台上实施接近警报的快速指南。 您可以在此处找到为满足本教程的需要而创建的Eclipse项目。
- Android基于位置的服务应用程序– GPS位置
- 带有Yahoo API的Android反向地理编码– PlaceFinder
- “ Android完整应用程序教程”系列
- 使用XML Pull增强Android XML解析
- Android文字转语音应用
- 使用VirtualBox在PC上安装Android OS
翻译自: https://www.javacodegeeks.com/2011/01/android-proximity-alerts-tutorial.html


 4650
4650

 被折叠的 条评论
为什么被折叠?
被折叠的 条评论
为什么被折叠?
 到【灌水乐园】发言


