


Couchbase Docker映像发布在hub.docker.com/_/couchbase上 。 启动此映像的最简单方法是:
docker run -d -p 8091:8091 couchbase/server8091是Couchbase Web控制台用于REST通信的网络端口。 完整的端口集记录在Couchbase网络配置中 。 可以使用单主机单容器配置来配置该映像,如hub.docker.com/_/couchbase所述 。
该博客将显示您可以使用Docker创建一个单节点Couchbase集群,并使用Data,Index和Query服务对其进行配置,加载示例存储区并进行查询。
启动Couchbase Docker容器
使用以下docker-compose.yml启动Couchbase Docker容器:
mycouchbase:
  name: mycouchbase
  image: couchbase/server
  volumes:
    - ~/couchbase:/opt/couchbase/var
  ports:
    - 8091:8091
    - 8092:8092
    - 8093:8093
- 11210:11210可以从github.com/arun-gupta/docker-images/tree/master/couchbase-server下载此Docker Compose文件。
容器可以通过以下方式启动:
docker-compose up -d
Creating couchbaseserver_mycouchbase_1
正在运行的容器的状态可以视为:
docker-compose ps
           Name                       Command                       State                        Ports
-----------------------------------------------------------------------------------------------------------------
couchbaseserver_mycouchbas   /entrypoint.sh couchbase-s   Up                           11207/tcp,
e_1                          ...                                                       0.0.0.0:11210->11210/tcp,
                                                                                       11211/tcp, 18091/tcp,
                                                                                       18092/tcp,
                                                                                       0.0.0.0:8091->8091/tcp,
                                                                                       0.0.0.0:8092->8092/tcp,
                                                                                       0.0.0.0:8093->8093/tcp
日志可以看成是:
docker-compose logs
Attaching to couchbaseserver_mycouchbase_1
mycouchbase_1 | Starting Couchbase Server -- Web UI available at http://<ip>:8091
配置Couchbase Docker容器
- 获取Docker主机的IP地址:
docker-machine ip default
192.168.99.100
在所有后续命令中使用此IP地址。
- 配置数据和索引服务的内存:
curl -v -X POST http://192.168.99.100:8091/pools/default -d memoryQuota=300 -d indexMemoryQuota=300 * Hostname was NOT found in DNS cache * Trying 192.168.99.100... * Connected to 192.168.99.100 (192.168.99.100) port 8091 (#0) > POST /pools/default HTTP/1.1 > User-Agent: curl/7.37.1 > Host: 192.168.99.100:8091 > Accept: */* > Content-Length: 36 > Content-Type: application/x-www-form-urlencoded > * upload completely sent off: 36 out of 36 bytes < HTTP/1.1 401 Unauthorized < WWW-Authenticate: Basic realm="Couchbase Server Admin / REST" * Server Couchbase Server is not blacklisted < Server: Couchbase Server < Pragma: no-cache < Date: Wed, 25 Nov 2015 22:48:16 GMT < Content-Length: 0 < Cache-Control: no-cache < * Connection #0 to host 192.168.99.100 left intact - 配置数据,查询和索引服务:
curl -v http://192.168.99.100:8091/node/controller/setupServices -d 'services=kv%2Cn1ql%2Cindex' * Hostname was NOT found in DNS cache * Trying 192.168.99.100... * Connected to 192.168.99.100 (192.168.99.100) port 8091 (#0) > POST /node/controller/setupServices HTTP/1.1 > User-Agent: curl/7.37.1 > Host: 192.168.99.100:8091 > Accept: */* > Content-Length: 26 > Content-Type: application/x-www-form-urlencoded > * upload completely sent off: 26 out of 26 bytes < HTTP/1.1 200 OK * Server Couchbase Server is not blacklisted < Server: Couchbase Server < Pragma: no-cache < Date: Wed, 25 Nov 2015 22:49:51 GMT < Content-Length: 0 < Cache-Control: no-cache < * Connection #0 to host 192.168.99.100 left intact - 设置群集的凭据:
curl -v -X POST http://192.168.99.100:8091/settings/web -d port=8091 -d username=Administrator -d password=password
* Hostname was NOT found in DNS cache
*   Trying 192.168.99.100...
* Connected to 192.168.99.100 (192.168.99.100) port 8091 (#0)
> POST /settings/web HTTP/1.1
> User-Agent: curl/7.37.1
> Host: 192.168.99.100:8091
> Accept: */*
> Content-Length: 50
> Content-Type: application/x-www-form-urlencoded
>
* upload completely sent off: 50 out of 50 bytes
< HTTP/1.1 200 OK
* Server Couchbase Server is not blacklisted
< Server: Couchbase Server
< Pragma: no-cache
< Date: Wed, 25 Nov 2015 22:50:43 GMT
< Content-Type: application/json
< Content-Length: 44
< Cache-Control: no-cache
<
* Connection #0 to host 192.168.99.100 left intact
{"newBaseUri":"http://192.168.99.100:8091/"}
安装Couchbase Travel Sample Bucket
curl -v -u Administrator:password -X POST http://192.168.99.100:8091/sampleBuckets/install -d '["travel-sample"]'
* Hostname was NOT found in DNS cache
*   Trying 192.168.99.100...
* Connected to 192.168.99.100 (192.168.99.100) port 8091 (#0)
* Server auth using Basic with user 'Administrator'
> POST /sampleBuckets/install HTTP/1.1
> Authorization: Basic QWRtaW5pc3RyYXRvcjpwYXNzd29yZA==
> User-Agent: curl/7.37.1
> Host: 192.168.99.100:8091
> Accept: */*
> Content-Length: 17
> Content-Type: application/x-www-form-urlencoded
>
* upload completely sent off: 17 out of 17 bytes
< HTTP/1.1 202 Accepted
* Server Couchbase Server is not blacklisted
< Server: Couchbase Server
< Pragma: no-cache
< Date: Wed, 25 Nov 2015 22:51:51 GMT
< Content-Type: application/json
< Content-Length: 2
< Cache-Control: no-cache
<
* Connection #0 to host 192.168.99.100 left intact
[]
使用CBQ查询Couchbase Docker容器
- 列出Couchbase服务器的容器ID:
docker ps
CONTAINER ID        IMAGE               COMMAND                  CREATED             STATUS              PORTS                                                                                               NAMES
e54a9849ba35        couchbase/server    "/entrypoint.sh couch"   3 minutes ago       Up 3 minutes        0.0.0.0:8091-8093->8091-8093/tcp, 11207/tcp, 11211/tcp, 18091-18092/tcp, 0.0.0.0:11210->11210/tcp   couchbaseserver_mycouchbase_1
此输出显示有关容器的完整信息。 或者,仅可以通过以下方式获取容器ID:
docker ps | grep couch | awk '{print $1}' e54a9849ba35 - 运行Couchbase查询工具:
docker exec -it e5 /opt/couchbase/bin/cbq Couchbase query shell connected to http://localhost:8093/ . Type Ctrl-D to exit. cbq> - 运行查询:
cbq> select * from `travel-sample` limit 1;
{
    "requestID": "9b354cc0-371c-4126-84a2-dea302312b79",
    "signature": {
        "*": "*"
    },
    "results": [
        {
            "travel-sample": {
                "callsign": "AIRFRANS",
                "country": "France",
                "iata": "AF",
                "icao": "AFR",
                "id": 137,
                "name": "Air France",
                "type": "airline"
            }
        }
    ],
    "status": "success",
    "metrics": {
        "elapsedTime": "48.080992ms",
        "executionTime": "47.950777ms",
        "resultCount": 1,
        "resultSize": 293
    }
}
您是否意识到,这是对JSON文档的SQL查询? 挺酷的。 在此交互式N1QL教程中了解更多信息。
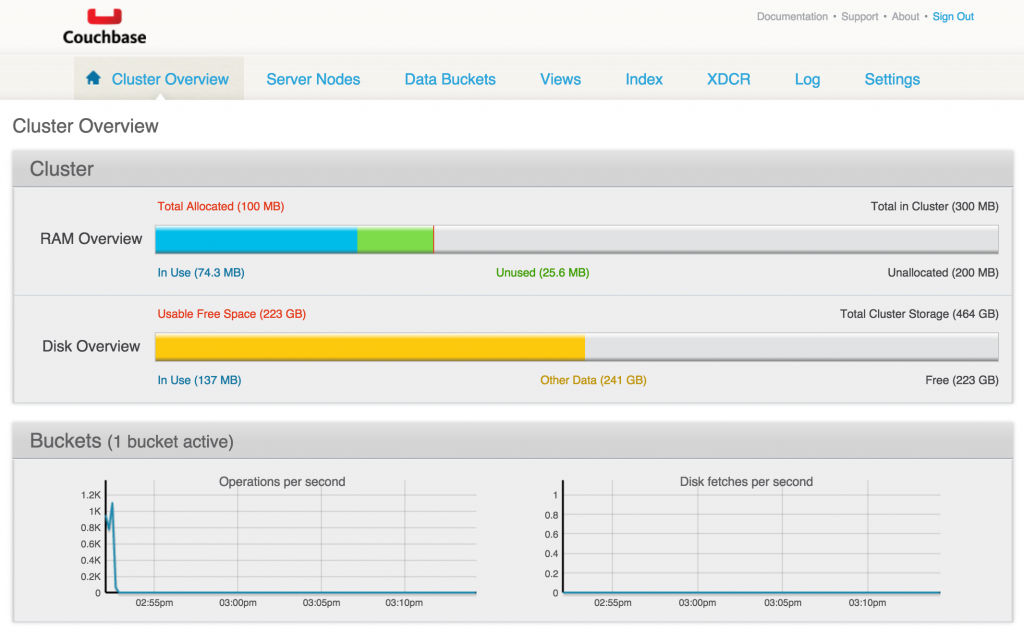
群集概述可以在192.168.99.100:8091处看到:
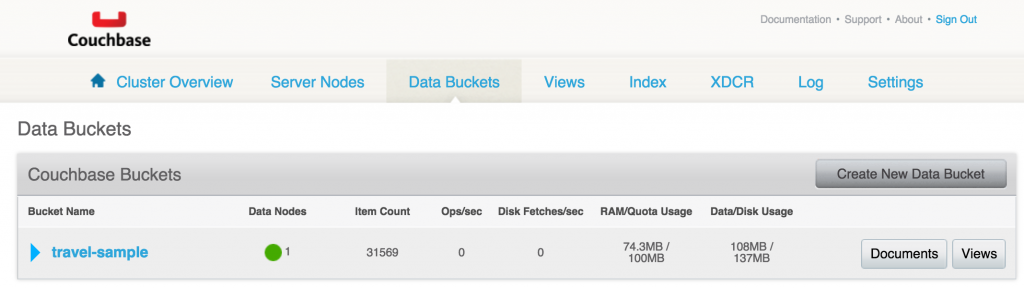
数据桶可以看作:
在forums.couchbase.com上问您的问题,了解有关Couchbase REST API的更多信息,或在Couchbase 4 Docs中阅读更多信息。
随后的博客将展示如何将所有这些步骤完全自动化。
请享用!
翻译自: https://www.javacodegeeks.com/2015/11/configure-couchbase-docker-container-using-rest-api.html


 2845
2845

 被折叠的 条评论
为什么被折叠?
被折叠的 条评论
为什么被折叠?
 到【灌水乐园】发言


