


当前文章是使用基于Javascript的Web服务器制作Web应用程序的概念证明。 这种技术堆栈通常称为MEAN堆栈。
为了使之成为可能,我们选择了以下技术
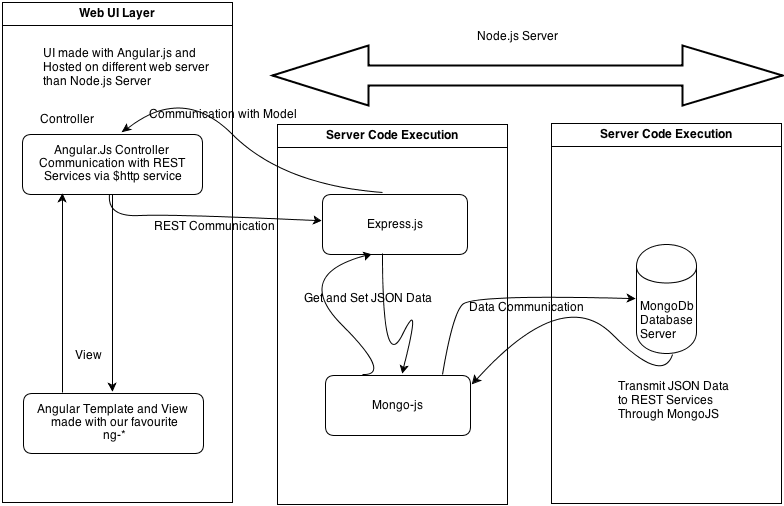
- Angular.js用于客户端开发–单页应用程序
- Angular.js和Node.js之间的跨域通信
- 用于服务器端开发的Node.js
- 使用express.js创建基于Rest的Web服务
- 数据库– MongoDb
- Node.js MongoDb模块扩展(mongojs)
我们已经使用基于Javascript的Web服务器创建了概念证明,其中我们专注于在客户端使用基于JavaScript的框架Node.js和angular.js处理NoSql(MongoDB)。 我们的初始代码可以在这里下载( https://github.com/piyasde/NodeMongoDBAngular )。
建筑一目了然
所以这是步骤:
安装
答:从此处(http://nodejs.org/download/)下载并安装Node.js。
B:要开发该应用程序,我们需要为Node.js安装mongojs模块
命令– npm install mongojs (应该连接到互联网)
C:我们需要为node.js安装express.js
命令– npm install express (应该连接到互联网)
配置代码:
现在,我们将尝试描述代码部分:
var application_root = __dirname,
    express = require("express"),
    path = require("path");
在这里,我们已经针对Node.js概念在javascript变量中初始化了express.js。
var app = express();在这里,我们已经在app变量中初始化了Express Web服务器。
var databaseUrl = "sampledb";
var collections = ["things"]
var db = require("mongojs").connect(databaseUrl, collections);
在这里,我们使用Node.js mongojs模块扩展库建立了与mongodb数据库的连接。
// Config

app.configure(function () {
  app.use(express.bodyParser());
  app.use(express.methodOverride());
  app.use(app.router);
  app.use(express.static(path.join(application_root, "public")));
  app.use(express.errorHandler({ dumpExceptions: true, showStack: true }));
});
在这里,我们进行了与express.js相关的配置
休息服务守则
app.get('/api', function (req, res) {
  res.send('Our Sample API is up...');
});
在这里,我们已经制作了第一个基于REST的Web服务,并测试了express.js是否启动。
我们的示例API将为– http://127.0.0.1:1212/api (获取方法)
app.get('/getangularusers', function (req, res) {
	res.header("Access-Control-Allow-Origin", "http://localhost");
	res.header("Access-Control-Allow-Methods", "GET, POST");
        // The above 2 lines are required for Cross Domain Communication(Allowing the methods that come as Cross           // Domain Request
	db.things.find('', function(err, users) { // Query in MongoDB via Mongo JS Module
	if( err || !users) console.log("No users found");
	  else
	{
		res.writeHead(200, {'Content-Type': 'application/json'}); // Sending data via json
		str='[';
		users.forEach( function(user) {
			str = str + '{ "name" : "' + user.username + '"},' +'\n';
		});
		str = str.trim();
		str = str.substring(0,str.length-1);
		str = str + ']';
		res.end( str);
                // Prepared the jSon Array here
	}
  });
});
在这里,我们创建了另一个REST API调用,以从用户集合中获取所有用户名,并且提供了mongojs查询。
我们的示例API将为– http://127.0.0.1:1212/getangularusers (获取方法)
app.post('/insertangularmongouser', function (req, res){
  console.log("POST: ");
  res.header("Access-Control-Allow-Origin", "http://localhost");
  res.header("Access-Control-Allow-Methods", "GET, POST");
  // The above 2 lines are required for Cross Domain Communication(Allowing the methods that come as
 // Cross Domain Request
  console.log(req.body);
  console.log(req.body.mydata);
  var jsonData = JSON.parse(req.body.mydata);

  db.things.save({email: jsonData.email, password: jsonData.password, username: jsonData.username},
       function(err, saved) { // Query in MongoDB via Mongo JS Module
           if( err || !saved ) res.end( "User not saved");
           else res.end( "User saved");
       });
});
在这里,我们发出了POST请求,以通过REST调用创建用户。
我们的示例API将为– http://127.0.0.1:1212/insertangularmongouser (发布方法)
// Launch server
app.listen(1212);我们已经使服务器侦听端口1212。现在从命令外壳运行节点appmongodbangular.js 。
Angular.js部分
以下是Angular Controller中的代码:
'use strict';

var myApp = angular.module('myApp', []); // Taking Angular Application in Javascript Variable

// Below is the code to allow cross domain request from web server through angular.js
myApp.config(['$httpProvider', function($httpProvider) {
        $httpProvider.defaults.useXDomain = true;
        delete $httpProvider.defaults.headers.common['X-Requested-With'];
    }
]);

/* Controllers */

function UserListCtrl($scope, $http, $templateCache) {

  var method = 'POST';
  var inserturl = 'http://localhost:1212/insertangularmongouser';// URL where the Node.js server is running
  $scope.codeStatus = "";
  $scope.save = function() {
    // Preparing the Json Data from the Angular Model to send in the Server.
    var formData = {
      'username' : this.username,
      'password' : this.password,
	  'email' : this.email
    };

	this.username = '';
	this.password = '';
	this.email = '';

	var jdata = 'mydata='+JSON.stringify(formData); // The data is to be string.

	$http({ // Accessing the Angular $http Service to send data via REST Communication to Node Server.
            method: method,
            url: inserturl,
            data:  jdata ,
            headers: {'Content-Type': 'application/x-www-form-urlencoded'},
            cache: $templateCache
        }).
        success(function(response) {
		console.log("success"); // Getting Success Response in Callback
                $scope.codeStatus = response.data;
		console.log($scope.codeStatus);

        }).
        error(function(response) {
		console.log("error"); // Getting Error Response in Callback
                $scope.codeStatus = response || "Request failed";
		console.log($scope.codeStatus);
        });
	$scope.list();// Calling the list function in Angular Controller to show all current data in HTML
        return false;
  };

  $scope.list = function() {
	  var url = 'http://localhost:1212/getangularusers';// URL where the Node.js server is running
	  $http.get(url).success(function(data) {
		$scope.users = data;
	  });
          // Accessing the Angular $http Service to get data via REST Communication from Node Server
  };

  $scope.list();
}
角度模板和HTML
<html lang="en" ng-app="myApp">
.....
我们在上面的代码中引用了Angular Application
<body ng-controller="UserListCtrl">
.....
我们在上面的代码中引用了Angular Controller
Search: <input ng-model="user">
<div class="span10">
    <!--Body content-->
    <ul class="users">
        <li ng-repeat="user in users | filter:user ">
            {{user.name}}
        </li>
    </ul>
</div>我们已使用ng-repeat标记从REST通信中获取用户数据模型,并以HTML格式显示
<form name="myform" id="myform1" ng-submit="save()">
    <fieldset>
        <legend>New User</legend>
            <div class="control-group">
                <center><input type="text" placeholder="User…" ng-model="username" size=50 required/></center>
                <center><input type="text" placeholder="Password…" ng-model="password" size=50 required/></center>
                <center><input type="text" placeholder="Email…" ng-model="email" size=50 required/></center>
            </div>
    </fieldset>
    <p>
         <div><center><button type="submit" >Save now...</button></center></div>
    </p>
</form>我们已使用ng-submit标记从REST通信发送用户数据模型,并将其发送到节点服务器以保存在MongoDB中。
- 读者可以在GitHub(https://github.com/piyasde/NodeMongoDBAngular)中下载完整的源代码。
 本文摘自“ 使用Javascript框架和NoSQL的动手Web应用程序 ”一书的摘录。
该技术正在将传统的结构化数据编程转换为非结构化数据编程,而服务器端的工作正在用JavaScript兴起。
因此,本书是其中一些工具的快速入门,以及如何将这些工具与……动手集成在一起。
我们可能会认为这本电子书是Web框架中某些新技术的共同起点,以应对新来者的未来。


 1082
1082

 被折叠的 条评论
为什么被折叠?
被折叠的 条评论
为什么被折叠?
 到【灌水乐园】发言


