


 本文详细解析了LLVM中的DenseMap数据结构,包括其内部实现原理、内存管理策略、关键方法如查找、插入和删除的操作流程。同时介绍了与DenseMap相关的C++11/17特性,如完美转发、定位new操作以及std::try_emplace的使用。
DenseMap
数据结构子篇
DenseMap是在llvm中用的非常广泛的数据结构,它本身的实现是一个基于Quadratic probing(二次探查)的散列表,键值对本身是std::pair<KeyT, ValueT>。DenseMap<>的构造函数和赋值运算符的定义如下,DenseMap<>有四个数据成员,Buckets、NumEntries、NumTombstones、NumBuckets,分别用于表示散列桶的首地址(一块连续的内存),存储的数据个数,Tombstone个数(二次探查法删除数据时需要设置deleted标识),桶的个数。
template <typename KeyT, typename ValueT,
          typename KeyInfoT = DenseMapInfo<KeyT>,
          typename BucketT = detail::DenseMapPair<KeyT, ValueT>>
class DenseMap : public DenseMapBase<DenseMap<KeyT, ValueT, KeyInfoT, BucketT>,
                                     KeyT, ValueT, KeyInfoT, BucketT> {
  // Lift some types from the dependent base class into this class for
  // simplicity of referring to them.
  using BaseT = DenseMapBase<DenseMap, KeyT, ValueT, KeyInfoT, BucketT>;

  BucketT *Buckets;
  unsigned NumEntries;
  unsigned NumTombstones;
  unsigned NumBuckets;
public:
  /// Create a DenseMap with an optional \p InitialReserve that guarantee that
  /// this number of elements can be inserted in the map without grow()
  explicit DenseMap(unsigned InitialReserve = 0) { init(InitialReserve); }

  DenseMap(const DenseMap &other) : BaseT() {
    init(0);
    copyFrom(other);
  }

  DenseMap(DenseMap &&other) : BaseT() {
    init(0);
    swap(other);
  }

  ~DenseMap() {
    this->destroyAll();
    operator delete(Buckets);
  }

  void swap() {
    this->incrementEpoch();
    RHS.incrementEpoch();
    std::swap(Buckets, RHS.Buckets);
    std::swap(NumEntries, RHS.NumEntries);
    std::swap(NumTombstones, RHS.NumTombstones);
    std::swap(NumBuckets, RHS.NumBuckets);
  }

  DenseMap& operator=(const DenseMap& other) {
    if (&other != this)
      copyFrom(other);
    return *this;
  }

  DenseMap& operator=(DenseMap &&other) {
    this->destroyAll();
    operator delete(Buckets);
    init(0);
    swap(other);
    return *this;
  }
};
DenseMap<>继承自DenseMapBase<>,DenseMapBase是2012年Chandler Carruth添加的,为了实现SmallDenseMap<>,将DenseMap的哈希逻辑抽象到了DenseMapBase中,而内存管理的逻辑留在了DenseMap和SmallDenseMap实现。
Factor DenseMap into a base class that implements the hashtable logic, and a derived class that provides the allocation and growth strategy.
This is the first (and biggest) step toward building a SmallDenseMap that actually behaves exactly the same as DenseMap, and supports all the same types and interface points with the same semantics. - commit message
内存管理
DenseMap的内存管理,主要是通过operator new分配内存,通过operator delete释放内存。
初始化
DenseMap的涉及到的方法有init()、getMinBucketToReserveForEntries()和allocateBuckets(),如下所示。
class DenseMapBase<> {
  /// Returns the number of buckets to allocate to ensure that the DenseMap can
  /// accommodate \p NumEntries without need to grow().
  unsigned getMinBucketToReserveForEntries(unsigned NumEntries) {
    // Ensure that "NumEntries * 4 < NumBuckets * 3"
    if (NumEntries == 0)
      return 0;
    // +1 is required because of the strict equality.
    // For example if NumEntries is 48, we need to return 401.
    return NextPowerOf2(NumBuckets * 4 / 3 + 1);
  }
};

template<>
class DenseMap : public DenseMapBase<> {

  explicit DenseMap(unsigned InitialReserve = 0) { init(InitialReserve); }

  void init(unsigned InitNumEntries) {
    auto InitBuckets = BaseT::getMinBucketToReserveForEntries(InitNumEntries);
    if (allocateBuckets(InitBuckets)) {
      this->BaseT::initEmpty();
    } else {
      NumEntries = 0;
      NumTombstones = 0;
    }
  }

  bool allocateBuckets(unsigned Num) {
    NumBuckets = Num;
    if (NumBuckets == 0) {
      Buckets = nullptr;
      return false;
    }

    Buckets = static_cast<BucketT*>(operator new(sizeof(BucketT) * NumBuckets));
    return true;
  }
};
DenseMap的初始化分为如下三步:
- 针对初始元素数,计算初始最小桶的数量
- 针对桶的个数,分配内存
- 初始化
计算最小桶数量的方法是getMinBucketToReserveForEntries(),由于DenseMap对桶的数量有两个标准:
- 桶的数量必须是2次幂
- 如果
DenseMap的load factor > 3/4或者空桶数量 < 1/8,则说明需要增加桶的数量
为了满足这两个标准,getMinBucketToReserveForEntries()首先将元素数量 * 4/3,然后计算大于元素数量 * 4/3的最小的2次幂,计算2次幂的方法为NextPowerOf2(),实现如下:
inline uint64_t NextPowerOf2(uint64_t A) {
  A |= (A >> 1);
  A |= (A >> 2);
  A |= (A >> 4);
  A |= (A >> 8);
  A |= (A >> 16);
  A |= (A >> 32);
  return A + 1;
}
为桶分配内存的方法是allocateBuckets(),该方法就是调用operator new()分配一块堆内存,用于存放数据。最后是信息的初始化,初始化空桶的方法是initEmpty(),该方法如下所示:
void initEmpty() {
  setNumEntries(0);
  setNumTombstones(0);

  assert((getNumBuckets() & (getNumBuckets() - 1) == 0) && "
          # initial buckets must be a power of two!");
  const KeyT EmptyKey = getEmptyKey();
  for (BucketT *B = getBuckets(), *E = getBucketsEnd(); B != E; ++B)
    ::new (&new->getFirst()) KeyT(EmptyKey);
}
上面有两点需要注意,一是验证桶的数量是不是2次幂,二是预设置的empty key是多少。关于empty key的计算,我们会在后面介绍DenseMapInfo的时候再进行介绍。
增长
DenseMap在初始化阶段,会进行初始桶数量的计算,桶的分配,以及empty key的初始化。当桶的数量不够时,标准是load factor > 3/4或者空桶数量 < 1/8,说明需要分配新的桶来存储数据。为DenseMap增加桶数量的方法是grow(),该方法定义如下:
void grow(unsigned AtLeast) {
  unsigned OldNumBuckets = NumBuckets;
  BucketT *OldBuckets = Buckets;

  allocateBuckets(std::max<unsigned>(64, static_cast<unsigned>(NextPowerOf2(AtLeast - 1))));

  if (!OldBuckets) {
    this->BaseT::initEmpty();
    return;
  }

  this->moveFromOldBuckets(OldBuckets, OldBuckets + OldNumBuckets);

  // Free the old table.
  operator delete(OldBuckets);
}
增长过程和std::vector很相似,分为计算新的桶数量并分配内存,拷贝数据,释放旧的桶。计算桶的数量同样使用的是NextPowerOf2()方法。
注:原始的grow()中计算桶数量是简单的乘以2,这个和现在std::vector<>做法很相似,见DenseMap.h。其实DenseMap<>最开始的实现就是通过std::vector实现的。
清理
清理操作是由shrink_and_clear()方法实现的,主要是将重新分配一块内存,然后进行初始化,然后将原有的内存释放,类似于容器中的clear()方法。
void shrink_and_clear() {
  unsigned OldNumEntries = NumEntries;
  this->destroyAll();

  // Reduce the number of buckets.
  unsigned NewNumBuckets = 0;
  if (OldNumEntries)
    NewNumBuckets = std::max(64, 1 << (Log2_32_Ceil(OldNumEntries) + 1));
  if (NewNumBuckets == NumBuckets) {
    this->BaseT::initEmpty();
    return;
  }

  operator delete(Buckets);
  init(NewNumBuckets);
}
empty key & tombstone key & 哈希值的计算
empty key、tombstone key以及哈希值的计算都是在DenseMapInfo<>模版类中实现的,llvm提供了针对常见类型的DenseMapInfo<>的特化版本,例如指针类型、整型等,对于empty key来说,基本上都是该类型所能表示的最大值,例如针对short而言,empty key为0x7FFF,tombstone key都是empty key - 1。
其中需要详细介绍的是哈希值的计算,DenseMap<>的哈希值的计算选择的是乘法运算,每个hash seed是37,所以问题就在于为什么选择37作为hash seed。
why 37
关于DenseMapInfo中哈希值的计算有两个问题,首先第一个问题,为什么哈希函数中普通都使用质数作为哈希种子?第二个问题为什么llvm当初选了37而不是其它的质数。
对于第一个问题,质数能够有效的避免哈希碰撞的发生,但是至今我没有找到一个让我满意的解释。对于第二个问题,llvm-dev有一个相关的问题 [[llvm-dev] Default hashing function for integers (DenseMapInfo.h)] 4,但该问题下并没有完善的回答,只是在测试过程中有比较好的性能表现,估计使用31也能达到差不多的效果。
但是里面有一句话"My guess is that the k >> 4 is here because pointers returned by malloc are 16 bytes aligned"比较有意思,我从前没有关注过这个问题,还是自己思考的不深入。stackoverflow上有相关的问题Do malloc and new return an int-aligned address?,如果定制的内存分配函数专门用于某类型的分配,那么并不需要遵循该要求。
查找 & 插入
DenseMap基于开放寻址法(open-addressing)实现,探查采用二次探查(quadratic probing),初始探查位置决定了整个序列,每一个关键字都有其相应的唯一固定的探查序列。
查找
DenseMap的查找由函数find()实现,DenseMap使用二次探查法,所以其查找过程就是标准的二次探查法。find()最终调用LookupBucketFor()来进行查找。LookupBucketFor()的过程如下:
- 设置探查计数
ProbeAmt为1,然后计算键值KEY,通过键值得到桶的ID - 如果
Buckets[ID]的键值为KEY,则找到该值,记录当前位置,返回true。否则跳转到3。 - 如果
Buckets[ID]的键值EmptyKey,没有找到该值,记录当前位置,返回。否则转3。 - 如果桶
Buckets[ID]为TombstoneKey,则通过ID = ID + ProbeAmt++。跳转到2继续执行。
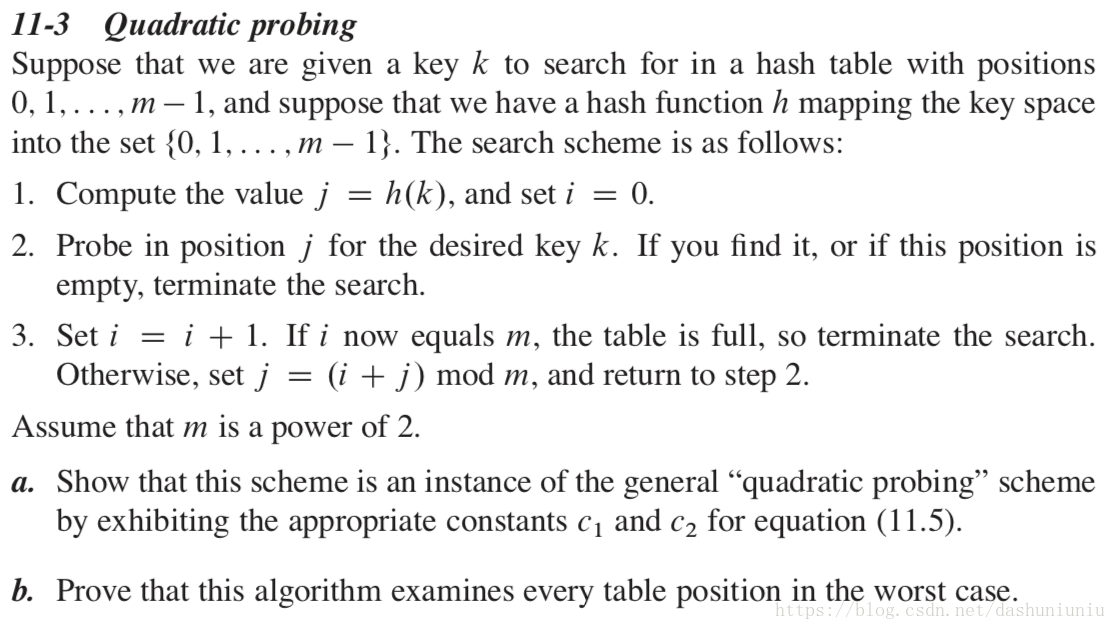
计算桶ID的方法是键值 & (桶数量 - 1),相当于一个取余操作。二次探查的关键在于ID = ID + ProbeAmt++,如果ProbeAmt没有自增运算,那么就是线性探查,存在自增运算就是二次探查,其实这个二次探查就是《算法导论-第三版》11-3的习题,如下图所示。二次探查的推导公式可以近似看作IDn = IDn-1 + i,可以看出这是一个二次的公式,通过迭代法可以计算出相应的m和n的值。
/// LookupBucketFor - Lookup the appropriate bucket for Val, returning it in
/// FoundBucket. If the bucket contains the key and a value, this returns
/// true, otherwise it returns a bucket with an empty market or tombstone and
/// returns false.
template<typename LookupKetT>
bool LookupBucketFor(const LookupKey &Val,
					const BucketT *&FoundBucket) const {
	const BucketT *BucketsPtr = getBuckets();
	const unsigned NumBuckets = getNumBuckets();

	if (NumBuckets == 0) {
		FoundBucket = nullptr;
		return false;
	}

	/// FoundTombstone - Keep track of whether we find a tombstone while probing.
	const BucketT *FoundTombstone = nullptr;
	const KeyT EmptyKey = getEmpty();
	const KeyT TombstoneKey = getTombstoneKey();
	assert(!KeyInfoT::isEqual(Val, EmptyKey) &&
			!KeyInfoT::isEqual(Val, TombstoneKey) &&
			"Empty/Tombstone value shouldn't be inserted into map!");

	unsigned BucketNo = getHashValue(Val) & (NumBuckets - 1);
	unsigned ProbeAmt = 1;
	while(true) {
		const BucketT *ThisBucket = BucketsPtr + BucketNo;
		// Found Val's buckets? If so, return it.
		if (LLVM_LIKELY(KeyInfoT::isEqual(Val, ThisBucket->getFirst()))) {
			FoundBucket = ThisBucket;
			return true;
		}

		// If we found an empty bucket, the key doesn't exist in the set.
		// Insert it and return the default value.
		if (LLVM_LIKELY(KeyInfoT::isEqual(ThisBucket->getFirst(), EmptyKey))) {
			// If we've already seen a tombstone while probing, fill it in instead
			// of the empty bucket we eventually probed to.
			FoundBucket = FoundTombstone ? FoundTombstone : ThisBucket;
			return false;
		}

		// If this a tombstone, remember it. If Val ends up not in the map, we
		// prefer to return it than something that would require more probing.
		if (KeyInfoT::isEqual(ThisBucket->getFirst(), TombstoneKey) &&
			!FoundTombstone)
			FoundTombstone = ThisBucket; // Remember the first tombstone found.

		// Otherwise, it's a hash collision or a tombstone, continue quadratic
		// probing.
		BucketNo += ProbeAmt++;
		BucketNo &= (NumBuckets - 1);
	}
}

iterator find(const_arg_type_t<KeyT> Val) {
	BucketT *TheBucket;
	if (LookupBucketFor(Val, TheBucket))
		return makeIterator(TheBucket, getBucketsEnd(), *this, true);
	return end();
}
关于上面代码中的LLVM_LIKELY我会在后面进行介绍。
插入
DenseMap最终也会调用LookupBucketFor()来寻找插入位置,只是有可能插入的时候,桶数量不足,导致需要扩充新的桶以至于重新分配内存,插入的入口为insert(),具体的插入过程中由try_emplace()完成,是in-place式的插入,代码如下(代码有点多)。try_emplace()模拟了c++17中的std::map::try_emplace,见[DenseMap] Add a C++17-style try_emplace method.。
[DenseMap] Add a C++17-style try_emplace method.
This provides an elegant pattern to solve the “construct if not in map already” problem we have many times in LLVM. Without try_emplace we either have to rely on a sentinel value (nullptr) or do two lookups.
注:加粗的语句,还没搞懂?
DenseMap::try_emplace提供了左值和右值的两个版本,但是逻辑相同,首先使用Key查询map中是否已经存在了相同的键值,如果存在则返回<Iterator,false>,如果不存在则调用InsertIntoBucket(),该函数执行真正的插入操作,如果有需求的话则重新分配内存。
// -------------------------左值版本-----------------------
// Inserts key, value pair into the map if the key isn't already in the map.
// If the key is already in the map, it returns false and doesn't update the
// value.
std::pair<iterator, bool> insert(const std::pair<KeyT, ValueT> &KV) {
	return try_emplace(KV.first, KV.second);
}

// Inserts key, value pair into the map if the key isn't already in the map.
// The value is constructed in-place if the key is not in the map, otherwise
// it is not moved.
template <typename ... Ts>
std::pair<iterator, bool> try_emplace(const KeyT &Key, Ts &&... Args) {
	BucketT *TheBucket;
	if (LookupBucketFor(Key, TheBucket))
		return std::make_pair(
					makeIterator(TheBucket, getBucketsEnd(), *this, true), false); // Already in map.

	// Otherwise, insert the new element.
	TheBucket = InsertIntoBucket(TheBucket, Key, std::forward<Ts>(Args)...);
	return std::make_pair(makeIterator(TheBucket, getBucketsEnd(), *this, true), true);
}
// -------------------------左值版本-----------------------

// -------------------------右值版本-----------------------

// Inserts key, value pair into the map if the key isn't already in the map.
// If the key is already in the map, it returns false and doesn't update the
// value.
std::pair<iterator, bool> insert(std::pair<KeyT, ValueT> &&KV) {
	return try_emplace(std::move(KV.first), std::move(KV.second));
}

// Inserts key, value pair into the map if the key isn't already in the map.
// The value is constructed in-place if the key is not in the map, otherwise
// it is not moved.
template <typename ... Ts>
std::pair<iterator, bool> try_emplace(const KeyT &Key, Ts &&... Args) {
	BucketT *TheBucket;
	if (LookupBucketFor(Key, TheBucket))
		return std::make_pair(
					makeIterator(TheBucket, getBucketsEnd(), *this, true), false); // Already in map.

	// Otherwise, insert the new element.
	TheBucket = InsertIntoBucket(TheBucket, std::move(Key), std::forward<Ts>(Args)...);
	return std::make_pair(makeIterator(TheBucket, getBucketsEnd(), *this, true), true);
}
// -------------------------右值版本-----------------------
InsertIntoBucket()的定义如下,该函数分为如下两步:
- 调用
InsertIntoBucketImpl(),根据装载因子(load factor),来判断是否需要增加桶的数量,然后返回插入位置 - 根据插入位置,使用
placement new在指定的内存位置上创建对象
template <typename KayArg, typename... ValueArgs>
BucketT *InsertIntoBucket(BucketT *TheBucket, KeyArg &&Key,
                          ValueArgs &&... Values) {
	TheBucket = InsertIntoBucketImpl(Key, Key, TheBucket);

	TheBucket->getFirst() = std::forward<KeyArg>(Key);
	::new (&TheBucket->getSecond()) ValueT(std::forward<ValueArgs>(Values)...);
	return TheBucket;
}

template<typename LookupKeyT>
BucketT *InsertIntoBucketImpl(const KeyT &Key, const LookupKeyT &Lookup,
							Bucket *TheBucket) {
	incrementEpoch();

	// If the load of the hash table is more than 3/4, or if fewer than 1/8 of
	// the buckets are empty(meaning that many are filled with tombstones),
	// grow the table.
	//
	// The later case is tricky. For example, if we had one empty bucket with
	// tons of tombstones, failing lookups (e.g. for insertion) would have to
	// probe almost the entire table until it found the empty bucket. If the
	// table completely filled with tombstones, no lookup would ever succeed,
	// causing infinite loops in lookup.
	unsigned NewNumEntries = getNumEntries() + 1;
	unsigned NumBuckets = getNumBuckets();
	if (LLVM_UNLIKELY(NewNumEntries * 4 >= NumBuckets * 3)) {
		this->grow(NumBuckets * 2);
		LookupBucketFor(Lookup, TheBucket);
		NumBuckets = getNumBuckets();
	} else if (LLVM_UNLIKELY(NumBuckets - (NewNumEntries + getNumTombstones()) <=
							NumBuckets / 8)) {
		this->grow(NumBuckets);
		LookupBucketFor(LookUp, TheBucket);
	}
	assert(TheBucket);

	// Only update the state after we've grown our bucket space appropriately
	// so that when growing buckets we have self-consistent entry count.
	incrementNumEntries();

	// If we are writing over a tombstone, remember this.
	const KeyT EmptyKey = getEmptyKey();
	if (!KeyInfoT::isEqual(TheBucket->getFirst(), EmptyKey))
		decrementNumTombstones();

	return TheBucket;
}
首先,我们先看一看InsertIntoBucketImpl()的实现,InsertIntoBucketImpl()逻辑如下:
- 首先判断
NumEntries / NumBuckets >= 3 /4,如果为true,则说明需要增加桶的数量,调用grow()增加桶的数量,重新计算插入位置,转3。如果为false,则跳转到2。 - 如果
NumEntries / NumBuckets < 3 / 4为true,但是EmptyEntries / NumBuckets <= 1 / 8,则说明DenseMap中的Tombstone数量太多,如果DenseMap中全部为Tombstone的话,有可能会造成死循环,此时并不会增加桶的数量,而是重新哈希。然后重新计算插入位置,跳转到3。 - 增加
NumEntries,如果插入位置为Tombstone,则相应地减少Tombstone的数量
注:关于第2步中的重新哈希,见Rehash but don’t grow when full of tombstones.,可见任何数据结构刚实现的时候,都是很呆的。
插入位置计算完毕后,最后根据插入位置进行in-place的插入,通过定位new实现。
删除
删除由DenseMap::erase()实现,是一个很典型的open addressing的删除过程,为了不影响查找的过程中的探查,将函数位置置tombstone标识,该函数的定义如下:
bool erase(const KeyT &Val) {
	BucketT *TheBucket;
	if (!LookupBucketFor(Val, TheBucket))
		return false; // not in map.

	TheBucket->getSecond().~ValueT();
	TheBucket->getFirst() = getTombstoneKey();
	decrementNumEntries();
	incrementNumTombstones();
	return true;
}

bool erase(const KeyT &Val) {
	BucketT *TheBucket = &*I;
	TheBucket->getSecond().~ValueT();
	TheBucket->getFirst() = getTombstoneKey();
	decrementNumEntries();
	incrementTombstones();
}
DenseMap的部分已经介绍完了,我借LLVM Data-structures overview中的内容,DenseMap大致可以分为如下几个部分:
- DenseMap is a quadratically probed HashMap.
- Keeps everything in a single memory allocation
- Iterators potentially invalidated after insertion
- Matches pretty closely std::map interface
- Supports all pointers and integer types as keys
- Additional Key types can be specified a custom DenseMapInfo<> class
struct KeyInfo {
static inline T getEmptyKey ( ) { . . . }
static inline T getTombstoneKey ( ) { . . . }
static unsigned getHashValue(const T &Val ) { . . . }
static bool is Equal(const T &LHS , const T &RHS) { . . . }
} ;
DenseMap< Key , Value , KeyInfo > M;
C++子篇
std::foward
std::forward用于实现完美转发,相关内容见range-based for loop的等价形式。
所谓完美转发(perfect forwarding),是指在函数模板中,完全依照模板的参数类型,将参数传递给函数模板中的另外一个函数。
。。。
实际上,C++11是通过引入一条所谓的"引用折叠"(reference collapsing)的新语言规则,并结合新的模板推导规则来完成完美转发。
注:需要注意的是universe reference的推导规则也就是auto &&等同于模板中的T&&的推导规则
::new
Even when operator new has been defined for a class type, the global operator can be used by using the form of this example:
T *TObject =::new TObject;
The scope-resolution operator (:? forces use of the global new operator.
NextPowerOf2
llvm::NextPowerof2(uint64_t A)用于计算比A大的最小的2^N,该函数的定义如下,该实现通过简单的移位和加法运算就实现了功能,很优美。
/// Returns the next power of two (in 64-bits) that is strictly greater than A.
/// Returns zero on overflow.
inline uint64_t NextPowerOf2(uint64_t A) {
	A |= (A >> 1);
	A |= (A >> 2);
	A |= (A >> 4);
	A |= (A >> 8);
	A |= (A >> 16);
	A |= (A >> 32);
	return A + 1;
}
ConstantLog2
llvm::ConstantLog2是通过模板元编程实现的一个简单的计算2^N中的N值的模板函数。模板元编程我并不了解,这里记录一下实现权当入了个门儿。
namespace detail {
	/// A tiny meta function to compute the log2 of a compile constant.
	template <size_t N>
	struct ConstantLog2
		: std::integral_constant<size_t, ConstantLog2<N / 2>::value + 1> {};
	template <> struct ConstantLog2<1> : std::integral_constant<size_t, 0> {};
}
std::integral_constant
tag dispatching
注:std::integral_constant和tag dispatching与模板元编程关系紧密,自己不了解这一块,怕误人子弟,暂且搁置
alignof
std::alignof是c++11引入的一个运算符,用于获取类型所需要的对齐长度。
alignof operator (since c++11)
Queries alignment requirements of a type.
另外需要注意的是
- The weakest alignment(the smallest alignment requirement) is the alignment of char, signed char, and unsigned char, which equals 1.
- The largest fundamental alignment of any type is the alignment of std::max_align_it
另外我们使用alignas来获得比std::max_align_it更stricter(larger)的内存对齐要求。
std::try_emplace
std::try_emplace是C++17中新添加的接口,是std::emplace的加强版。std::emplace是C++11加入的,主要是为了减少不必要的临时对象的创建,直接是in place的构建。std::emplace主要是通过下面两个C++11添加的特性完成的,见Perfect forwarding and universal references in C++。
- variadic templates
- perfect forwarding
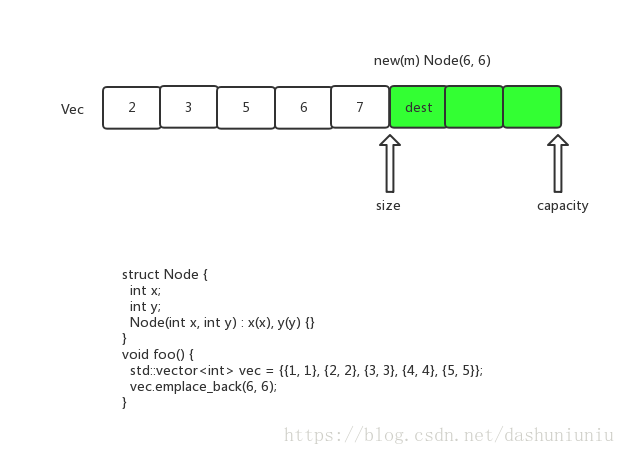
以std::vector::emplace为例,libc++中它的定义如下,剥去其中的各种宏定义,下面的代码可以分为两个部分:
- 判断是否达到
std::vector的capacity,达到capacity则转3,没有达到则转2 - 在指定位置上构造对象(本质上可以看作一个定位new)
- 重新分配内存,并在指定位置上构造对象
#if __cplusplus >= 201103L
  template<typename _Tp, typename _Alloc>
    template<typename... _Args>
#if __cplusplus > 201402L
      typename vector<_Tp, _Alloc>::reference
#else
      void
#endif
      vector<_Tp, _Alloc>::
      emplace_back(_Args&&... __args)
      {
	if (this->_M_impl._M_finish != this->_M_impl._M_end_of_storage)
	  {
	    _Alloc_traits::construct(this->_M_impl, this->_M_impl._M_finish,
				     std::forward<_Args>(__args)...);
	    ++this->_M_impl._M_finish;
	  }
	else
	  _M_realloc_insert(end(), std::forward<_Args>(__args)...);
#if __cplusplus > 201402L
	return back();
#endif
      }
#endif
首先介绍为什么使用variadic templates,为了避免临时对象的创建,首先需要跳过将对象作为参数传递这一过程,为了避免这一过程,就需要延迟对象的创建,唯一的办法就是将构造函数需要的参数传递进去,然后直接在指定的内存上进行创建。
You don’t pass an object of type T but arguments to a constructor of T. This way, object construction is delayed: the vector is extended to accomodate for the memory needed by the new object, and the constructor is called to initialized the object in the vector. Variadic template don’t have anything to do with copies, they only allow forwarding a variable number of arguments to the constructor. - vector’s emplace_back
然后介绍为什么使用perfect forwarding,上面提到既然直接传递构造函数的参数,但是参数的传递还是会产生不必要的拷贝,所以emplace()使用perfect forwarding,从而达到右值引用还是右值引用,左值引用还是左值引用。对于左值引用来说,减少了一次拷贝构造,而对于右值引用来说,减少了一次移动构造。关于完美转发相关的内容见Perfect forwarding and universal references in C++。
Arguments to the constructors themselves are not copied because they are passed as rvalues references and std::move is used to forward them to the constructor. Basically, move semantics avoid deep copies of objects.
现在我们已经知道std::emplace可以减少不必要的临时对象的创建,减少程序运行时的开销。例如下图所示,如果我们使用std::vector::emplace_back()就会直接在指定的内存位置上(也就是in-place)的形式构造对象,关于emplace_back()的具体实现可以参照libc++中的相关实现。
需要注意的是对于emplace来说,选择了使用参数列表来传递构造函数的参数,那么对于std::map::emplace来说如何区分key值和构造函数的参数呢?,方法就是使用std::forward_as_tuple。
既然有了std::emplace那么std::try_emplace存在的目的又是什么呢?std::try_emplace主要用于map的插入,应对的是map中已经存在相同键值的情况,为了解释这个问题,首先大致给出std::map实现的示意图。关于std::map的实现,标准并没有给出规定,libc++中的std::map是通过红黑树实现的,当然这是绝大多数std::map的实现方式。
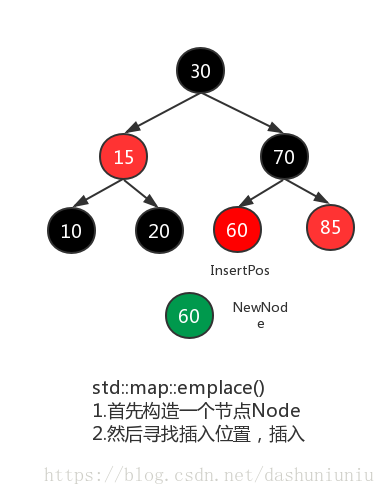
如上图所示,std::map::emplace是先构造一个结点,然后查找key值是否已经存在,如果不存在则进行插入,std::emplace这样的做法确实很呆!libc++中对应的std::map::emplace最核心的函数如下所示,我们可以清楚的看到,首先进行结点的创建,然后进行查询,最终根据查询的结果,来决定是否进行插入。需要注意的是std::map的值是以std::pair<>的形式的存在,创建对象的时候,创建的也是这样的std::pair<>。
template <class _Tp, class _Compare, class _Allocator>
template <class... _Args>
pair<typename __tree<_Tp, _Compare, _Allocator>::iterator, bool>
__tree<_Tp, _Compare, _Allocator>::__emplace_unique_impl(_Args&&... __args)
{
    __node_holder __h = __construct_node(_VSTD::forward<_Args>(__args)...);
    __parent_pointer __parent;
    __node_base_pointer& __child = __find_equal(__parent, __h->__value_);
    __node_pointer __r = static_cast<__node_pointer>(__child);
    bool __inserted = false;
    if (__child == nullptr)
    {
        __insert_node_at(__parent, __child, static_cast<__node_base_pointer>(__h.get()));
        __r = __h.release();
        __inserted = true;
    }
    return pair<iterator, bool>(iterator(__r), __inserted);
}
libc++中std::map::try_emplace的核心函数如下所示,从下面的代码中我们可以看到,首先进行的是查询操作,然后根据查询的结果,来决定是否进行创建对象,并进行插入。需要注意的是,该函数的参数是以< Key, Args >的形式存在的,而上面的__emplace_unique_impl()的参数是将key和Args看作了铁板一块,当然我不知道这是否是std::map::emplace不能先作查询,再进行插入的原因?
template <class _Key, class _Args>
pair<typename __tree<_Tp, _Compare, _Allocator>::iterator, bool>
__tree<_Tp, _Compare, _Allocator>::__emplace_unique_key_args(_Key const& __k, _Args& __args)
#endif
{
    __parent_pointer __parent;
    __node_base_pointer& __child = __find_equal(__parent, __k);
    __node_pointer __r = static_cast<__node_pointer>(__child);
    bool __inserted = false;
    if (__child == nullptr)
    {
#ifndef _LIBCPP_CXX03_LANG
        __node_holder __h = __construct_node(_VSTD::forward<_Args>(__args)...);
#else
        __node_holder __h = __construct_node(__args);
#endif
        __insert_node_at(__parent, __child, static_cast<__node_base_pointer>(__h.get()));
        __r = __h.release();
        __inserted = true;
    }
    return pair<iterator, bool>(iterator(__r), __inserted);
}
关于std::map::emplace和std::map::try_emplace的行为上的区别,C++标准中给出了完善的描述。
std::map::emplace
The element may be constructed even if there already is an element with the key in the container, in which case the newly constructed element will be destroyed immediately.
std::map::try_emplace
If a key equivalent to k already exists in the container, does nothing.
而更直观的表述,见Is there any reason to use std::map::emplace() instead of try_emplace() in C++1z?,
- try_emplace() does not move from rvalue arguments if the insertion does not happen. This is useful when manipulating maps whose values are move-only types, such as std::unique_ptr.
- try_emplace() treats the key and the arguments to the mapped_type separately, which makes it somewhat more intuitive than generic mutators that are expressed in terms of value_type (which is std::pair).
至此,我们已经知道了try_emplace是emplace的加强版,在插入数据时,针对键值已经存在的情况进行了特殊优化,节省了一步无谓的构造函数的调用,所有的其它区别都是由该区别延伸出来的。当然这只是最浅显的区别,该部分也只是蜻蜓点水似的介绍一下std::emplace和std::try_emplace,自己不是C++ expert,暂时无能力再深入一步。
其它子篇
__builtin_expect
__builtin_expect指令用于提供分支预测的相关信息,类似于提高CPU的指令预取的成功率?
__builtin_expect(long exp, long, c)instruction provides branch prediction information. The return value is the value ofexp.
LLVM_UNLIKELY
LLVM_UNLIKELY是通过__builtin_expect实现的,如下所示:
#define LLVM_UNLIKELY(EXPR) __builtin_expect(bool(EXPR), false)
另外Chandler Carruth有两篇关于llvm data structure的talk,分别是《CppCon 2014: Chandler Carruth “Efficiency with Algorithms, Performance with Data Structures”》和《CppCon 2016: Chandler Carruth “High Performance Code 201: Hybrid Data Structures"》
———-后续———–
llvm的数据结构及内存分配策略 - StringMap & DenseSet & SparseSet篇
llvm中的数据结构及内存分配策略 - FoldingNodeSet & SmallVector & StringRef & ArrayRef篇
llvm中的数据结构及内存分配策略 - clang static analyzer内存分配策略篇
llvm中的数据结构及内存分配策略 - BumpAllocator篇


 1350
1350

 被折叠的 条评论
为什么被折叠?
被折叠的 条评论
为什么被折叠?
 到【灌水乐园】发言


