


前言
本文在前人博客的基础上做了修改和整合,用以记录IDEA创建springBoot项目整合Mybatis以及mybatisGenerator工具的使用过程。
IDEA连接mysql,原文连接:参考博客1
springBoot项目整合Mybatis,原文链接:参考博客2
MybatisGenerator工具的使用,原文链接:参考博客3
一、创建springboot项目
1.创建springboot项目
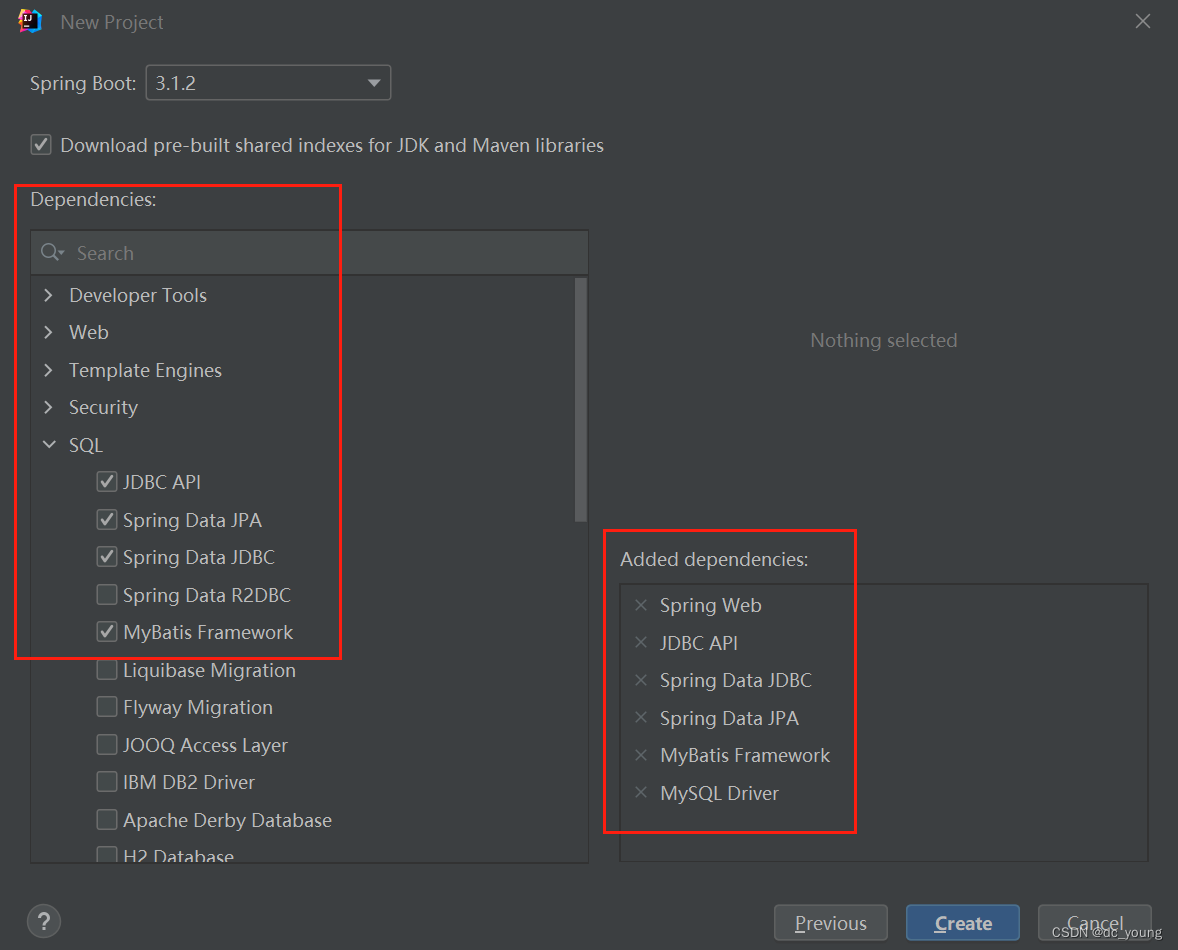
点击菜单栏 File _> new project ,进入如下页面,参照图片设置好后,点击next

2.添加依赖
二、连接数据库
3.配置数据库连接
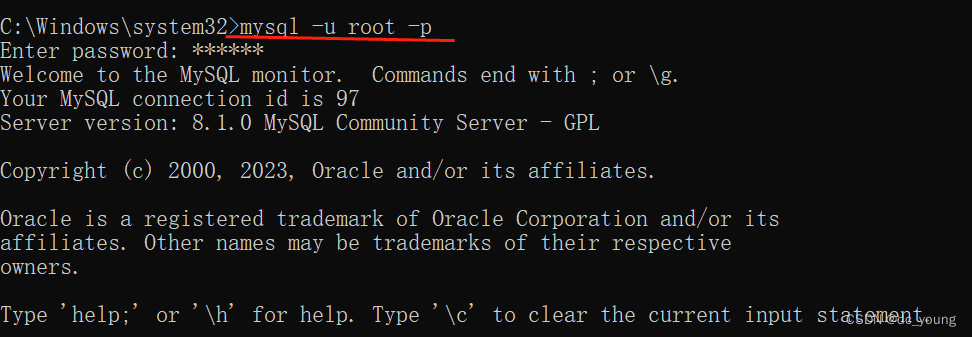
3.1cmd命令创建数据库:
进入cmd,输入如下命令:
mysql -u root -p
再输入密码登录mysql
创建数据库命令
create database databaseTest2;

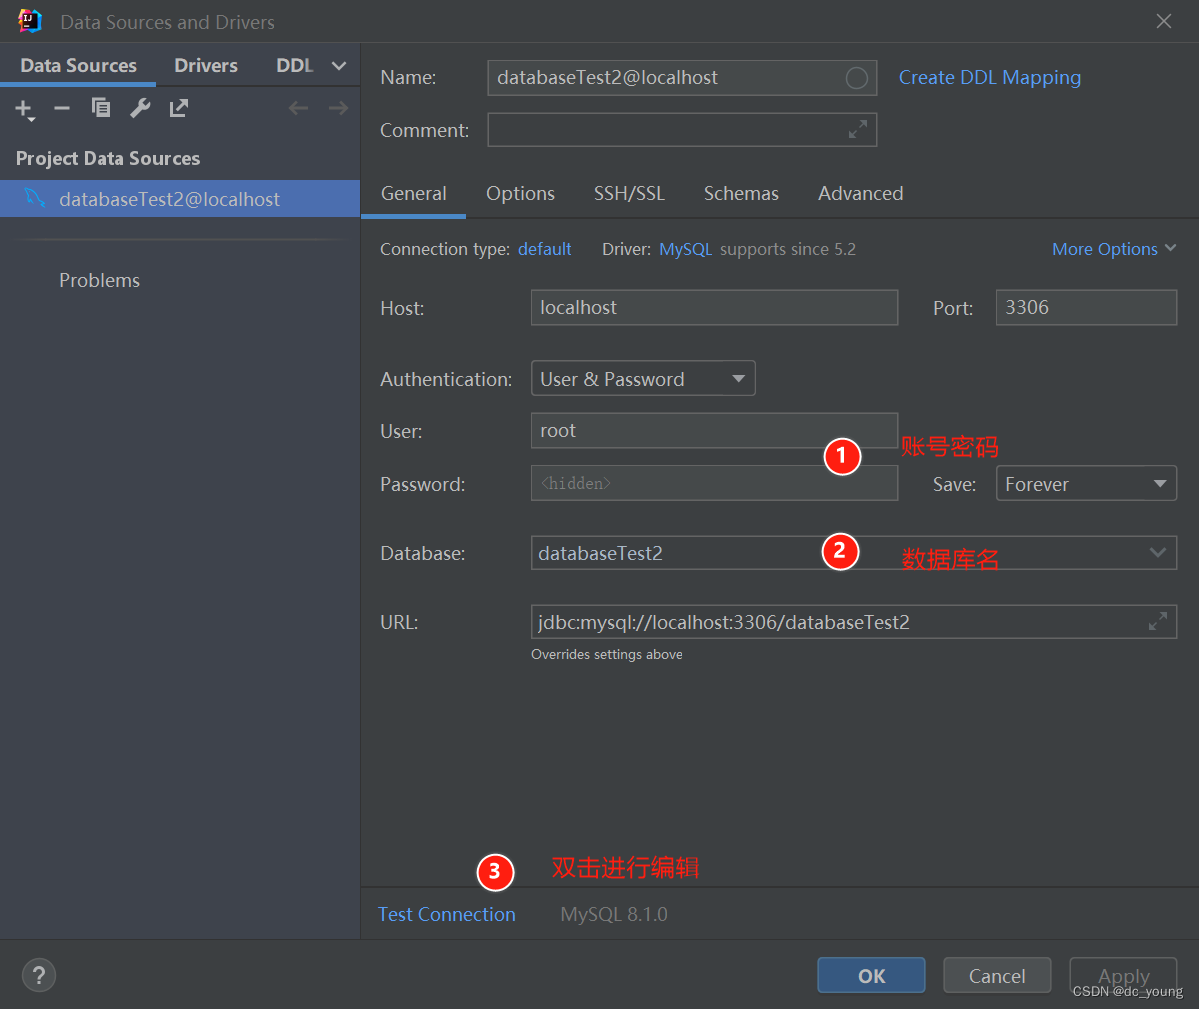
3.2 IDEA连接mysql
可参考:https://blog.csdn.net/dc_young/article/details/132141166
4.连接数据库,创建用户表
数据库连接成功后,右键点击数据库名,新建Query console窗口,创建用户表,用于后续测试mybatis是否配置成功
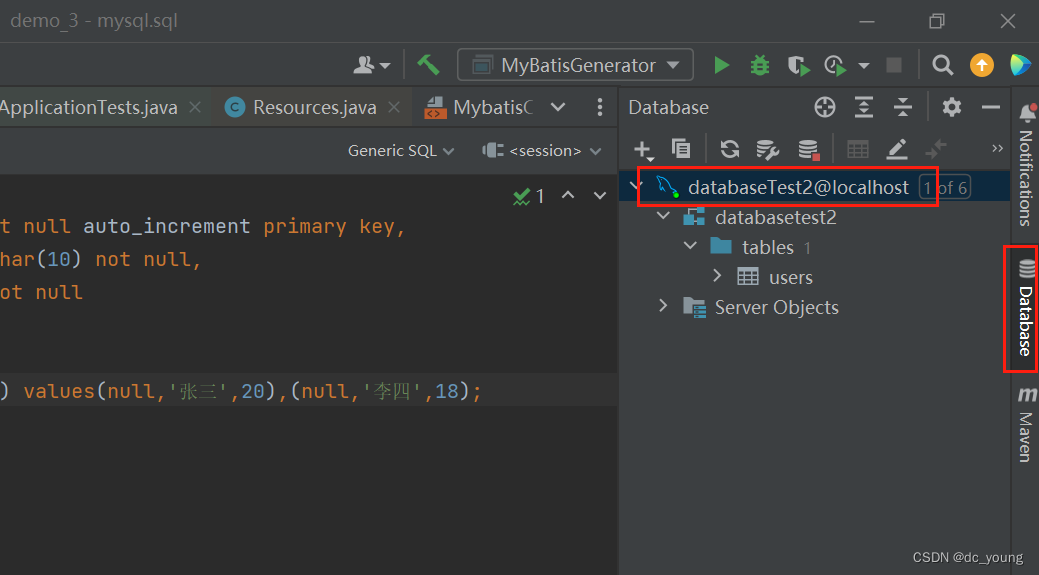
use databaseTest2;

#创建表
create table Users(
          uid int not null auto_increment primary key,
          uname varchar(10) not null,
          uage int not null
);
#插入数据
insert into Users(uid,uname,uage) values(null,'张三',20),(null,'李四',18);
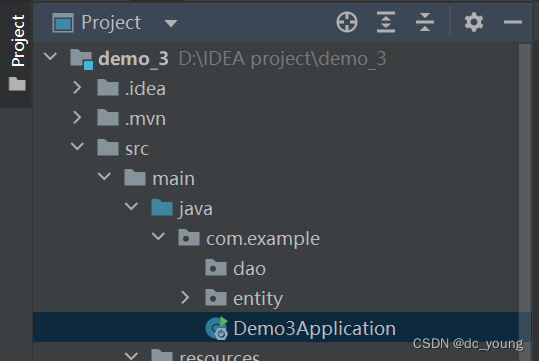
5.项目结构

注意:项目不是maven项目?
问题:新建Springboot主程序的入口没有启动按钮

原因:
上图的启动程序没有启动按钮,因为不是maven项目(可能是因为没有关闭省电模式),依赖未导入。正确的maven项目应该是下图这样的
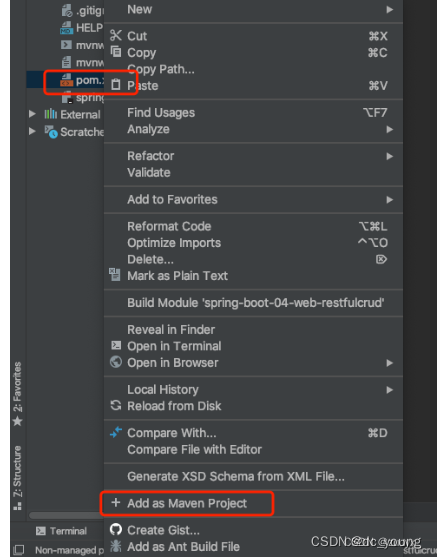
解决办法
变Maven项目
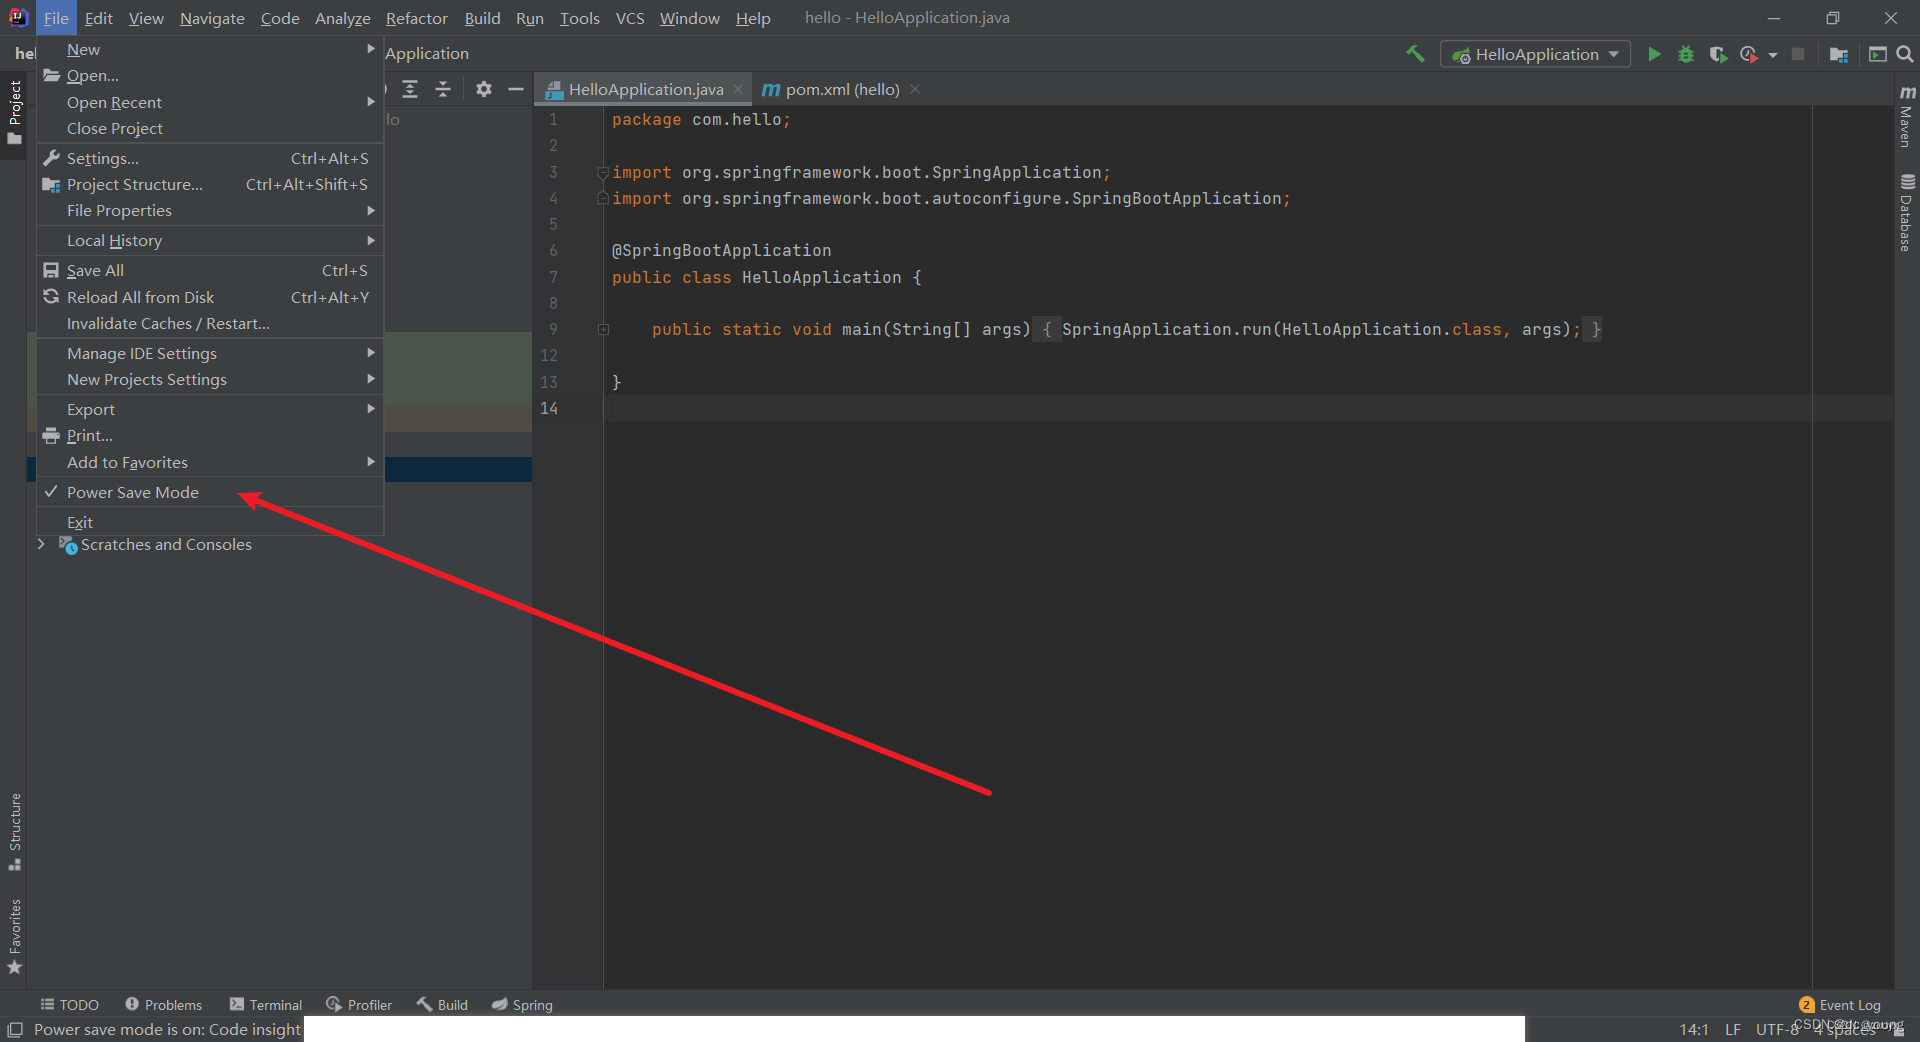
关闭省电模式
6.引入相关依赖
在dependencies上一行引入相关依赖

<dependency>
	<groupId>org.mybatis</groupId>
	<artifactId>mybatis</artifactId>
	<version>3.5.2</version>
</dependency>
<dependency>
	<groupId>mysql</groupId>
	<artifactId>mysql-connector-java</artifactId>
	<version>8.0.11</version>
</dependency>
<dependency>
	<groupId>junit</groupId>
	<artifactId>junit</artifactId>
	<version>4.12</version>
	<scope>compile</scope>
</dependency>
在build下一行引入相关资源路径
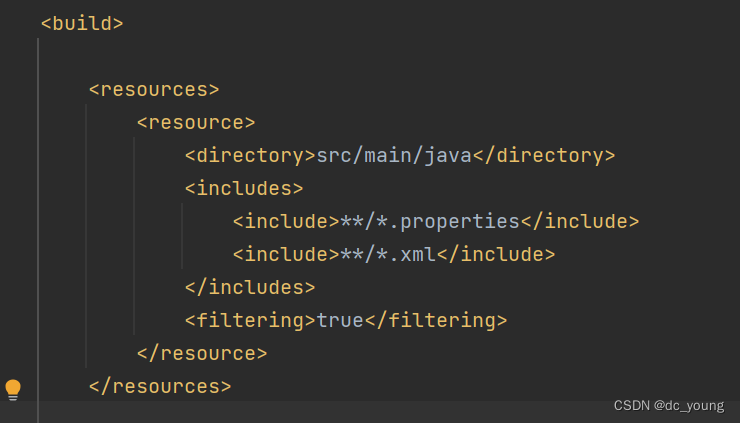
<resources>
	<resource>
		<directory>src/main/java</directory>
		<includes>
			<include>**/*.properties</include>
			<include>**/*.xml</include>
		</includes>
		<filtering>true</filtering>
	</resource>
</resources>
7.数据库配置文件
在java/resources下创建db.properties文件
mysql.driver=com.mysql.cj.jdbc.Driver
mysql.username=root
mysql.password=123456
mysql.url=jdbc:mysql://localhost:3306/databaseTest2?serverTimezone=UTC&characterEncoding=utf8&useUnicode=true&useSSL=false

三、配置Mybatis
8.mybatis配置文件
在java/resources下创建MybatisConfig.xml文件

<?xml version="1.0" encoding="UTF-8" ?>
<!DOCTYPE configuration
        PUBLIC "-//mybatis.org//DTD Config 3.0//EN"
        "http://mybatis.org/dtd/mybatis-3-config.dtd">
<configuration>
    <properties resource="db.properties"/>
    <environments default="development">
        <environment id="development">
            <transactionManager type="JDBC"/>
            <dataSource type="POOLED">
                <!--                JDBC 驱动-->
                <property name="driver" value="${mysql.driver}"/>
                <!--                url数据库的 JDBC URL地址。-->
                <property name="url" value="${mysql.url}"/>
                <property name="username" value="${mysql.username}"/>
                <property name="password" value="${mysql.password}"/>
            </dataSource>
        </environment>
    </environments>


</configuration>
9.创建空文件夹
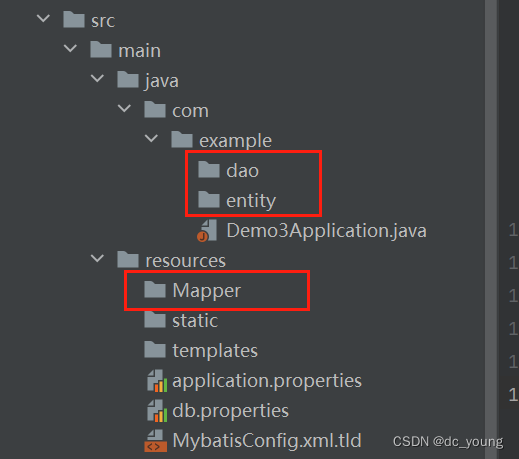
10.创建实体类
entity 包下的 User 类,用于封装 User 对象的属性
package com.example.entity;

public class User {
    private int uid;
    private String uname;
    private int uage;

    public int getUid() {
        return uid;
    }

    public void setUid(int uid) {
        this.uid = uid;
    }

    public String getUname() {
        return uname;
    }

    public void setUname(String uname) {
        this.uname = uname;
    }

    public int getUage() {
        return uage;
    }
    public void setUage(int uage) {
        this.uage = uage;
    }
}
11.创建映射文件
Mapper 文件夹下的 UserMapper.xml 文件(即映射文件)。
注意配置实体类路径:namespace参数和resultType参数
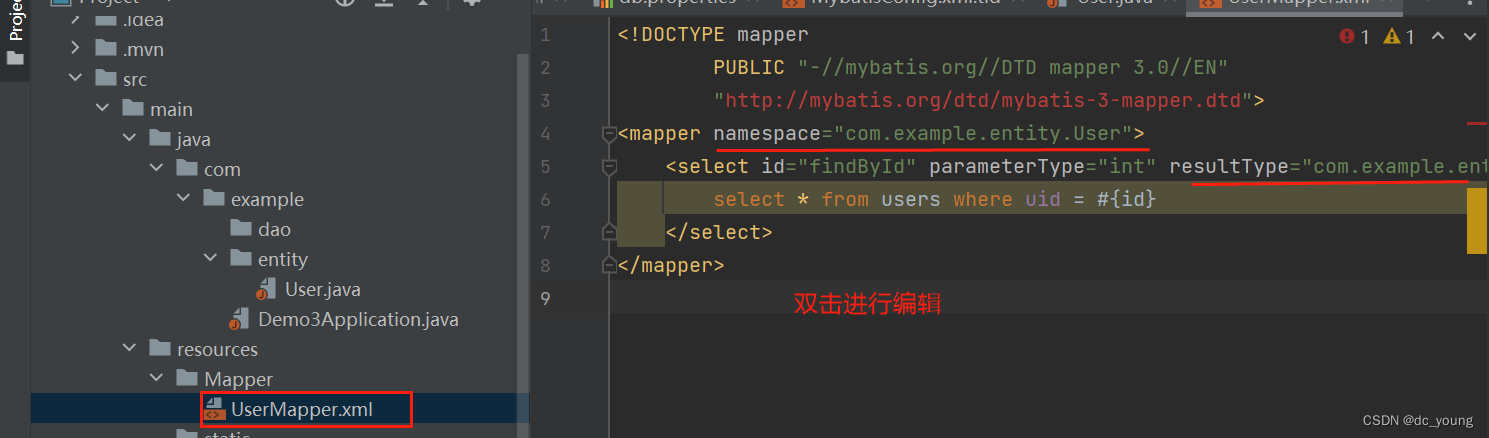
<!DOCTYPE mapper
     PUBLIC "-//mybatis.org//DTD mapper 3.0//EN"
     "http://mybatis.org/dtd/mybatis-3-mapper.dtd">
<mapper namespace="com.example.entity.User">
    <select id="findById" parameterType="int" resultType="com.example.entity.User">
        select * from users where uid = #{id}
    </select>
</mapper>
12.创建mapper映射模板文件
每次新建一个实体类就要创建一个映射文件,由于创建映射文件不会提供头部声明,复制粘贴起来也很麻烦,所以这里我们可以通过创建一个映射文件模板的方式,新建映射文件。(当然不影响本项目,你可以不创建,只不过为了方便)
具体步骤,File → Settings → Editor → File and Code Templates → 加号
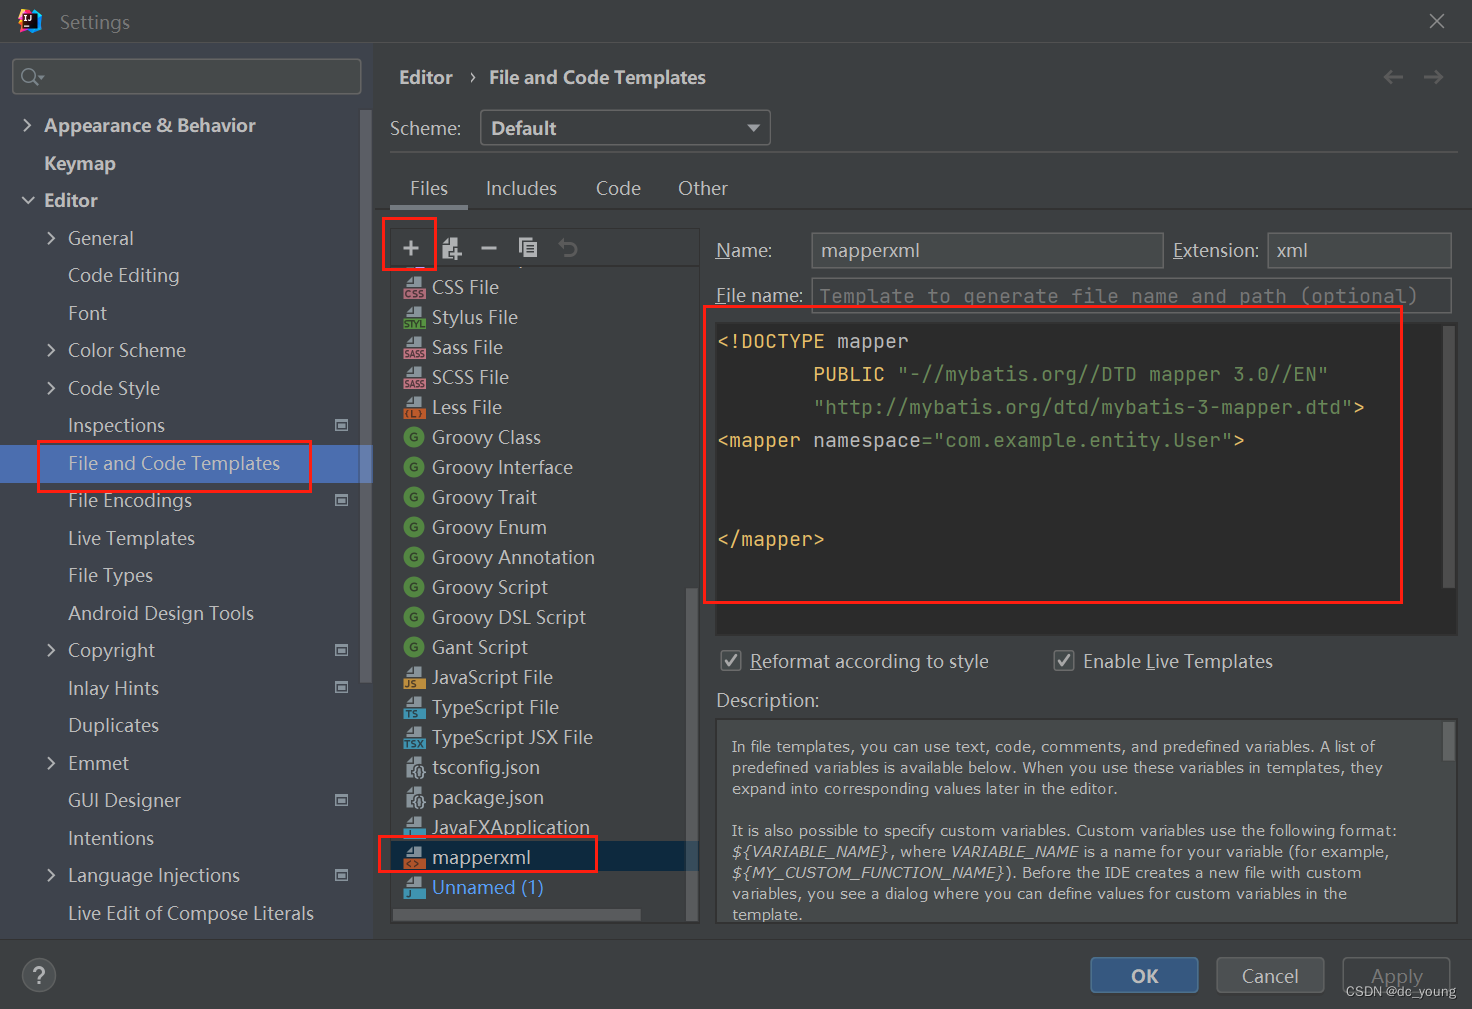
复制我的代码进去:
<!DOCTYPE mapper
        PUBLIC "-//mybatis.org//DTD mapper 3.0//EN"
        "http://mybatis.org/dtd/mybatis-3-mapper.dtd">
<mapper namespace="com.example.entity.User">


</mapper>
别忘了 Apply,下次需要可直接在选项卡中看到 mapperxml!
13.修改mybatis配置文件
将映射文件的路径添加到 mybatis配置文件中
(将UserMapper.xml 的路径添加到 MybatisConfig.xml 中)
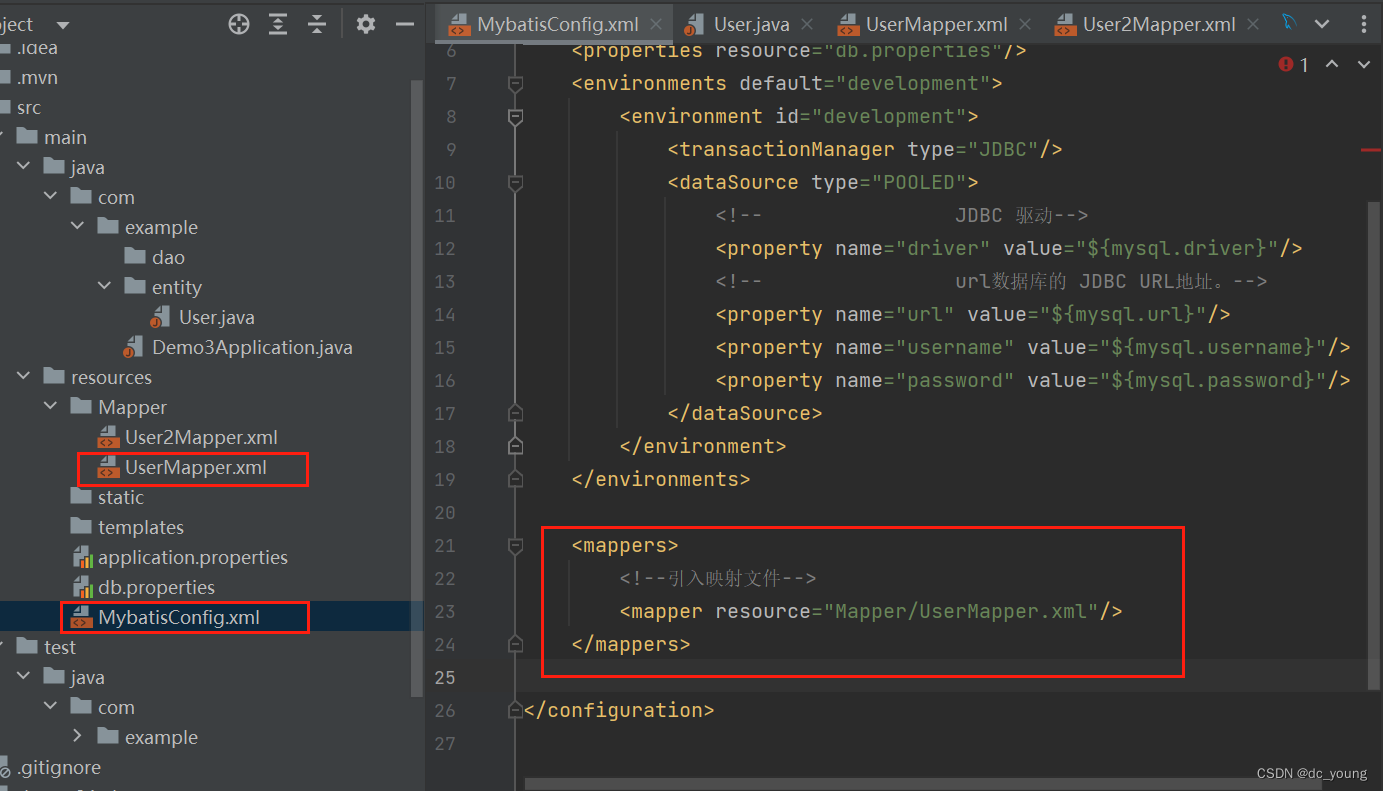
 <mappers>
        <!--引入映射文件-->
        <mapper resource="Mapper/UserMapper.xml"/>
    </mappers>
继续打开我们前面已经创建好的 MybatisConfig.xml 文件,现在我们给它配置文件路径,至于刚刚为什么没有配置,是因为这个路径就是映射文件所在的位置,所以我们先把映射文件编写完再返回来给 MybatisConfig.xml 设置路径。
14.编写测试类
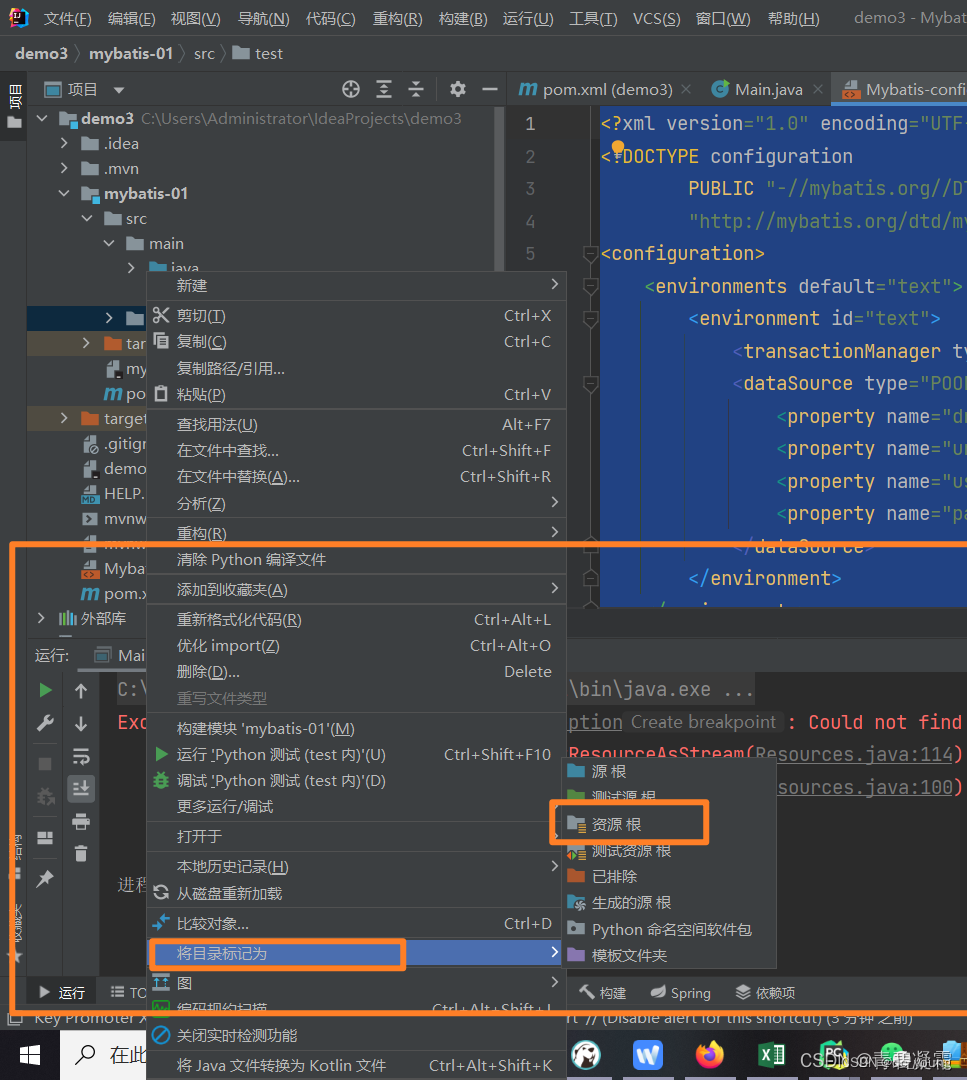
注意:如果报错:Could not find resource MybatisConfig.xml
问题:测试类启动,报错:Could not find resource MybatisConfig.xml
原因:
1.resources文件夹下 没有MybatisConfig.xml文件(MybatisConfig.xml文件路径不对)
2.resources文件夹没有被标记为资源根目录
解决:
1.MybatisConfig.xml文件放到resources文件夹下
2.如果MybatisConfig.xml文件已经resources文件夹下,且resources文件夹没有如图黄色块标识(资源根目录标识),则将其添加为资源根目录。 
四、使用MybatisGenerator工具
(一)、MyBatis Generator 简介
官网的MyBatis Generator使用介绍,请点击下面的链接:
链接
MyBatis Generator 生成的文件包含三类:
(1)Model实体文件,一个数据库表对应生成一个 Model 实体;
(2)Mapper接口文件,数据数操作方法都在此接口中定义;
(3)Mapper XML配置文件
(二)、使用步骤
1.引入MyBatis Generator相关依赖
在pom.xml文件添加如下依赖:
<dependency>
    <groupId>org.mybatis.generator</groupId>
    <artifactId>mybatis-generator-core</artifactId>
    <version>1.3.7</version>
</dependency>
2.配置MybatisGeneratorConfig.xml文件
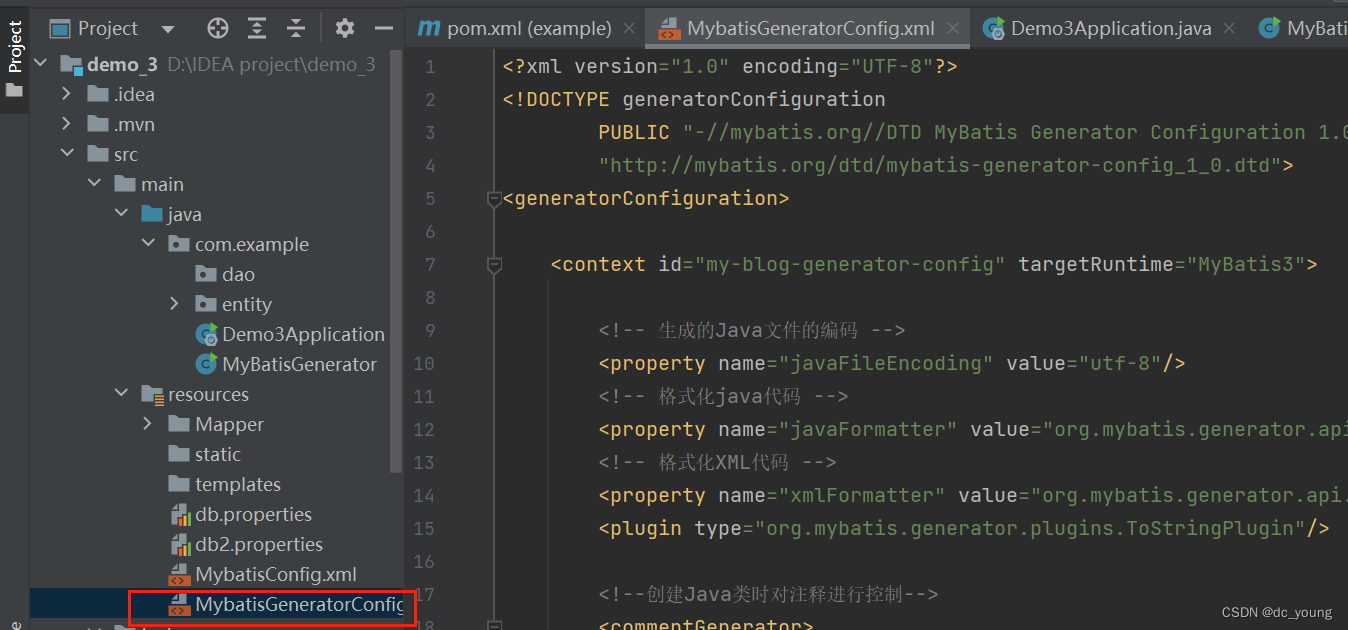
代码如下(示例):
<?xml version="1.0" encoding="UTF-8"?>
<!DOCTYPE generatorConfiguration
        PUBLIC "-//mybatis.org//DTD MyBatis Generator Configuration 1.0//EN"
        "http://mybatis.org/dtd/mybatis-generator-config_1_0.dtd">
<generatorConfiguration>

    <context id="my-blog-generator-config" targetRuntime="MyBatis3">

        <!-- 生成的Java文件的编码 -->
        <property name="javaFileEncoding" value="utf-8"/>
        <!-- 格式化java代码 -->
        <property name="javaFormatter" value="org.mybatis.generator.api.dom.DefaultJavaFormatter"/>
        <!-- 格式化XML代码 -->
        <property name="xmlFormatter" value="org.mybatis.generator.api.dom.DefaultXmlFormatter"/>
        <plugin type="org.mybatis.generator.plugins.ToStringPlugin"/>

        <!--创建Java类时对注释进行控制-->
        <commentGenerator>
            <property name="suppressDate" value="true"/>
            <!-- 是否去除自动生成的注释 true:是 : false:否 -->
            <property name="suppressAllComments" value="true"/>
        </commentGenerator>

        <!--数据库地址及登陆账号密码 改成你自己的配置-->
        <jdbcConnection
                driverClass="com.mysql.cj.jdbc.Driver"
                connectionURL="jdbc:mysql://localhost:3306/databaseTest2"
                userId="root"
                password="123456">
        </jdbcConnection>

        <javaTypeResolver>
            <property name="forceBigDecimals" value="false"/>
        </javaTypeResolver>

        <!--生成实体类设置,改成你自己的配置,注意修改targetPackage参数和targetProject参数-->
        <javaModelGenerator targetPackage="com.example.entity" targetProject="src/main/java">
            <property name="enableSubPackages" value="true"/>
            <property name="trimStrings" value="true"/>
        </javaModelGenerator>

        <!--生成Mapper文件设置,改成你自己的配置,注意修改targetPackage参数和targetProject参数-->
        <sqlMapGenerator targetPackage="Mapper" targetProject="src/main/resources">
            <property name="enableSubPackages" value="true"/>
        </sqlMapGenerator>

        <!--生成Dao类设置,改成你自己的配置,注意修改targetPackage参数和targetProject参数-->
        <javaClientGenerator type="XMLMAPPER" targetPackage="com.example.dao"
                             targetProject="src/main/java">
            <property name="enableSubPackages" value="true"/>
        </javaClientGenerator>

        <!--需要自动生成代码的表及对应的类名设置-->
        <!--        <table tableName="generator_test" domainObjectName="GeneratorTest"-->
        <!--               enableCountByExample="false"-->
        <!--               enableUpdateByExample="false"-->
        <!--               enableDeleteByExample="false" enableSelectByExample="false" selectByExampleQueryId="false">-->
        <!--        </table>-->

        <!--配置数据库表名tableName和实体类名domainObjectName,改成你自己的配置-->
        <table tableName="users2" domainObjectName="User2"
               enableCountByExample="false"
               enableUpdateByExample="false"
               enableDeleteByExample="false" enableSelectByExample="false" selectByExampleQueryId="false">
        </table>

    </context>

</generatorConfiguration>
3.创建MyBatisGenerator类
在src/main/java/com/example/下创建util文件夹,并在util下创建MyBatisGenerator类

MyBatisGenerator.java 代码如下
package com.example;

import org.mybatis.generator.config.Configuration;
import org.mybatis.generator.config.xml.ConfigurationParser;
import org.mybatis.generator.internal.DefaultShellCallback;

import java.io.InputStream;
import java.util.ArrayList;
import java.util.List;

public class MyBatisGenerator {
    public static void main(String[] args) throws Exception {
        //MBG 执行过程中的警告信息
        List<String> warnings = new ArrayList<String>();
        //当生成的代码重复时,覆盖原代码
        boolean overwrite = true;
        //读取我们的 MBG 配置文件
        InputStream is = MyBatisGenerator.class.getResourceAsStream("/MybatisGeneratorConfig.xml");
        ConfigurationParser cp = new ConfigurationParser(warnings);
        Configuration config = cp.parseConfiguration(is);
        is.close();

        DefaultShellCallback callback = new DefaultShellCallback(overwrite);
        //创建 MBG
        org.mybatis.generator.api.MyBatisGenerator myBatisGenerator = new org.mybatis.generator.api.MyBatisGenerator(config, callback, warnings);
        //执行生成代码
        myBatisGenerator.generate(null);
        //输出警告信息
        for(String warning : warnings){
            System.out.println(warning);
        }
    }
}
执行代码,然后刷新目录就可以看到生成的类以及xml了 。
4.注意:
1.如果代码执行失败,且报错如下:
org.apache.ibatis.exceptions.PersistenceException :
### Error building SqlSession.
### The error may exist in com/erp/webservice/mapper/UsersMapper.xml
### The error occurred while processing mapper_resultMap[BaseResultMap]
···
原因:运行了多次自动生成代码的程序,导致了resources/Mapper/Users2Mapper.xml 的内容多出来很多,原来自动生成代码的时候生成的XML代码不是覆盖原来的,而是附加的XML的尾部的。
解决办法:
只要删掉原来的Users2Mapper.XML,然后重新运行自动生成代码的程序即可。
2.如果代码执行成功,但项目目录没有看到申城的类和xml,可能是IDEA没有自动更新目录,需手动更新。
更新目录方式:
1.更新整个项目目录:左上角菜单栏file -> Reload ALL from Disk
2.更新指定文件夹目录:右键指定文件夹 -> Reload from Disk
(三)、测试
1.数据库建表
在src/main下创建文件夹sql,在sql文件夹下创建mysqlCode.sql文件,并复制如下sql代码
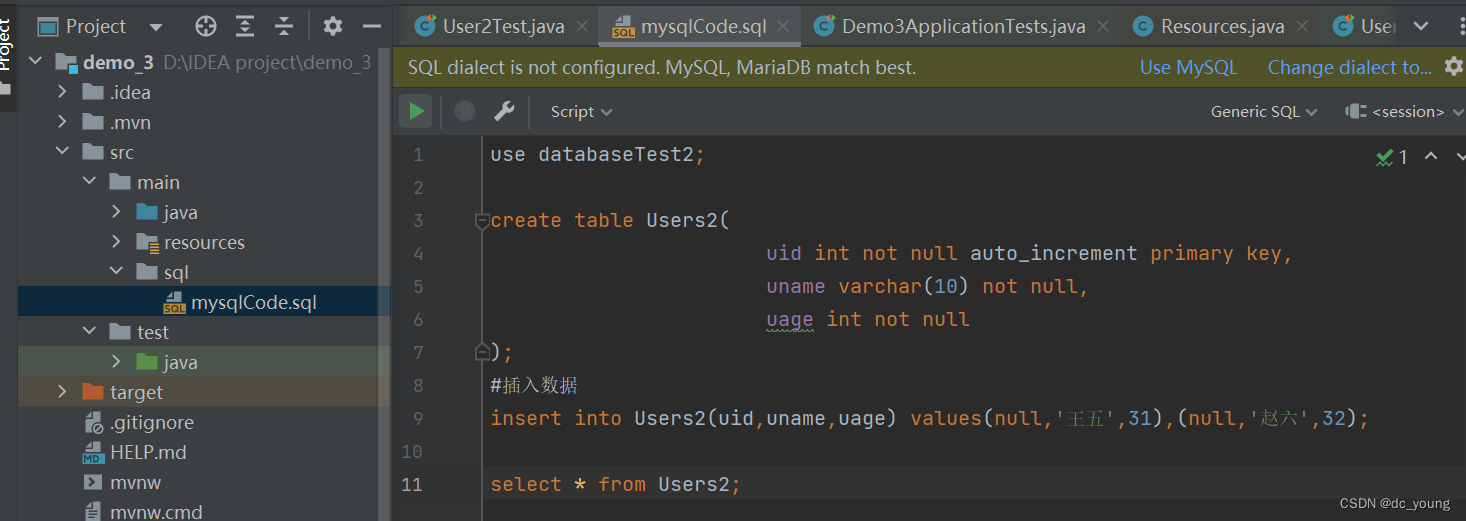
use databaseTest2;

create table Users2(
                       uid int not null auto_increment primary key,
                       uname varchar(10) not null,
                       uage int not null
);
#插入数据
insert into Users2(uid,uname,uage) values(null,'王五',31),(null,'赵六',32);

select * from Users2;
点击“use MySQL”
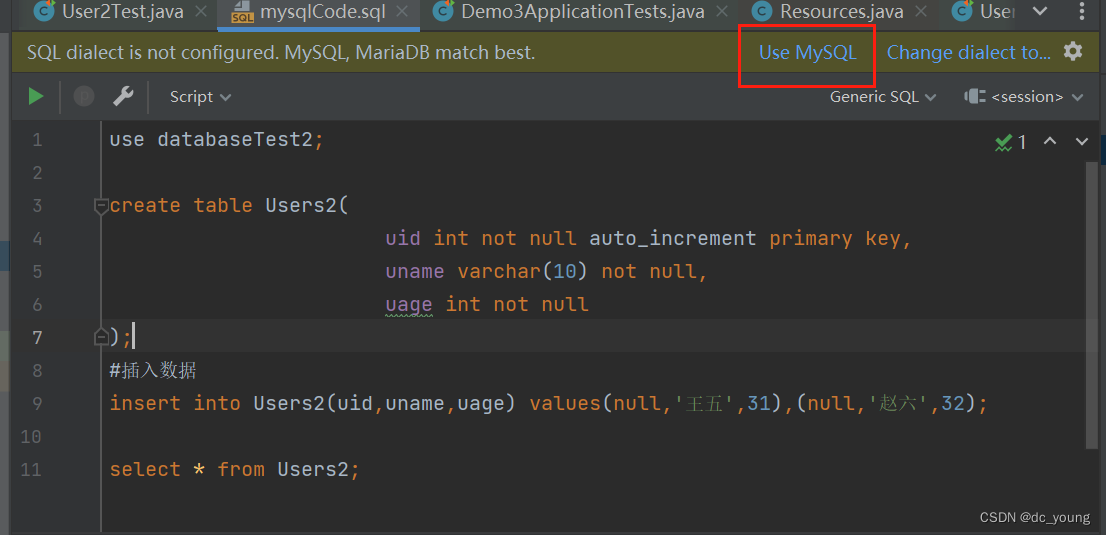
执行上述sql代码,创建用户表,用于后续测试MybatisGenerator工具是否配置成功
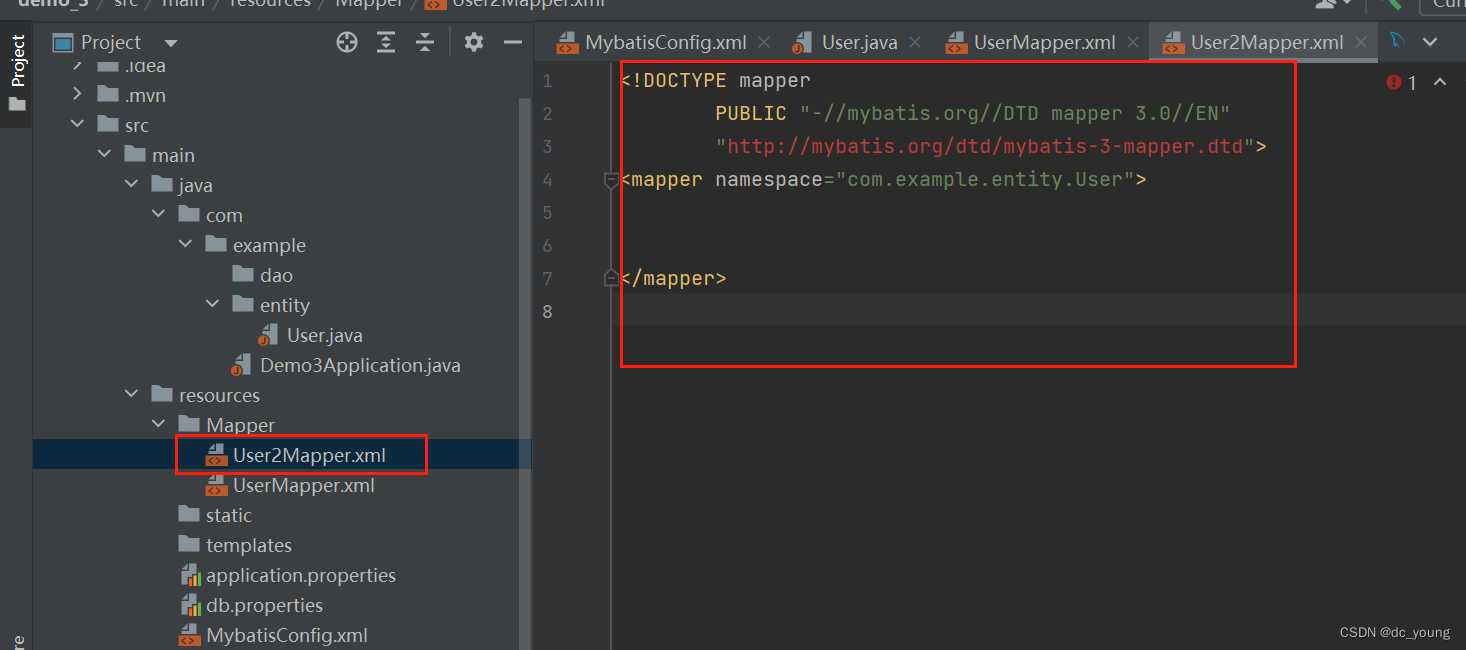
2.修改MybatisConfig.xml配置文件,添加新的映射文件声明
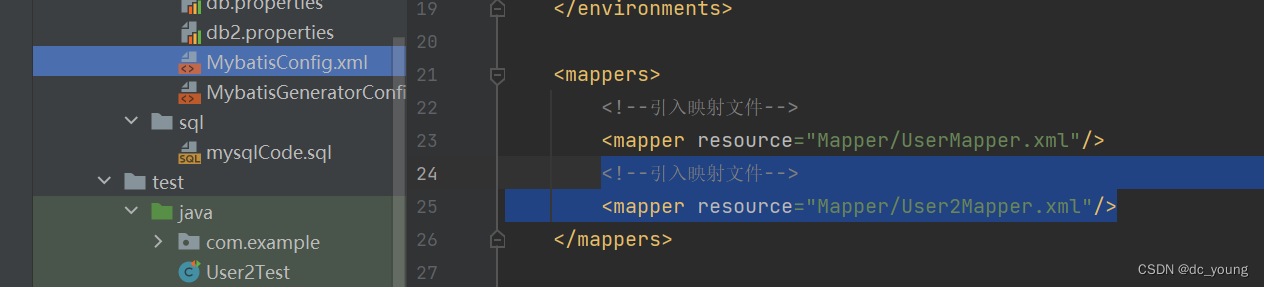
<!--引入映射文件-->
<mapper resource="Mapper/User2Mapper.xml"/>
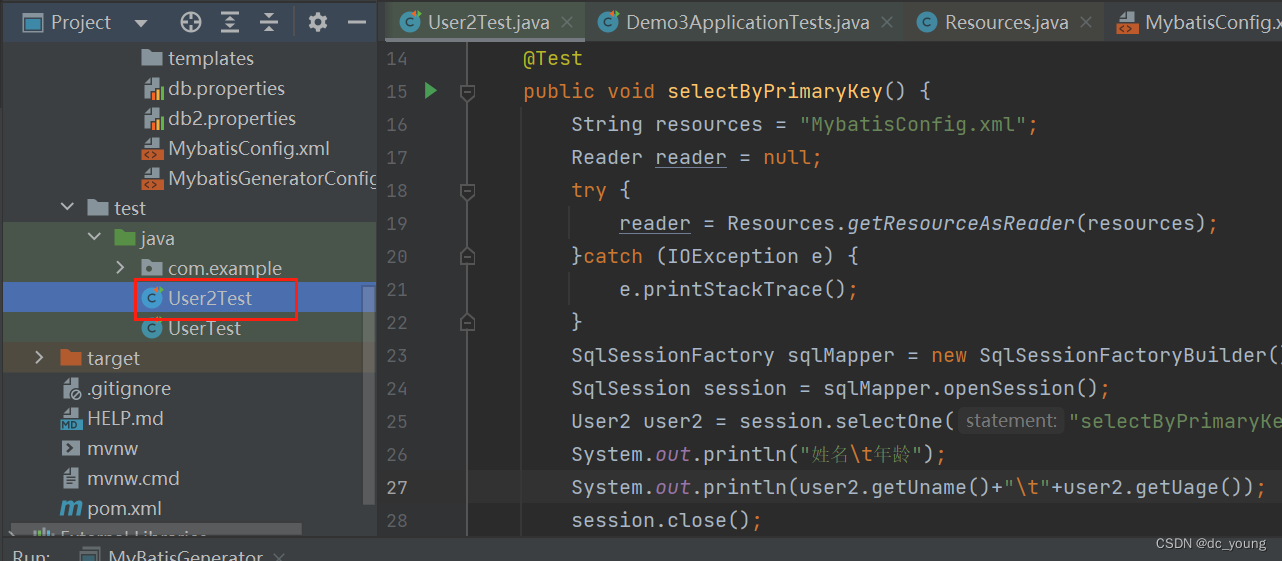
3.编写测试类
在src/test/java路径下创建 User2Test.java文件
import com.example.entity.User2;
import org.apache.ibatis.io.Resources;
import org.apache.ibatis.session.SqlSession;
import org.apache.ibatis.session.SqlSessionFactory;
import org.apache.ibatis.session.SqlSessionFactoryBuilder;
import org.junit.Test;

import java.io.IOException;
import java.io.Reader;

public class User2Test {


    @Test
    public void selectByPrimaryKey() {
        String resources = "MybatisConfig.xml";
        Reader reader = null;
        try {
            reader = Resources.getResourceAsReader(resources);
        }catch (IOException e) {
            e.printStackTrace();
        }
        SqlSessionFactory sqlMapper = new SqlSessionFactoryBuilder().build(reader);
        SqlSession session = sqlMapper.openSession();
        User2 user2 = session.selectOne("selectByPrimaryKey",1);
        System.out.println("姓名\t年龄");
        System.out.println(user2.getUname()+"\t"+user2.getUage());
        session.close();
    }
}
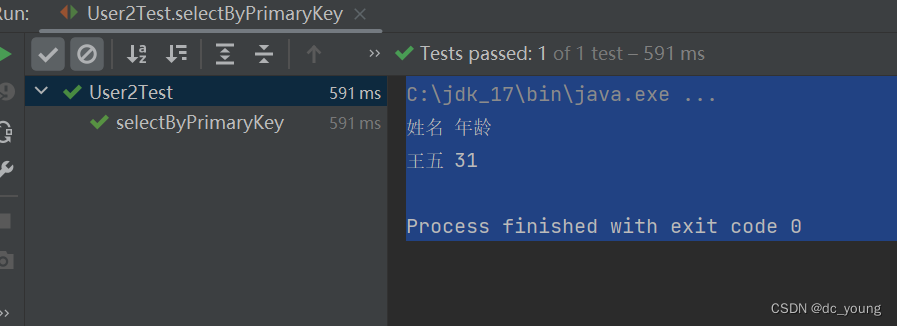
执行测试类,查询出如下数据说明 MybatisGenerator工具配置成功


 647
647


 被折叠的 条评论
为什么被折叠?
被折叠的 条评论
为什么被折叠?
 到【灌水乐园】发言


