


在上一节学习了实例的 options 合并之后,按 new Vue 的初始化流程我们的重点应该是到 Vue 的数据初始化操作了,但是这个过程太庞大繁杂了,所以我决定把这个过程放在 Vue 的重点响应式原理章节里面。那么过了这个数据相关的初始化之后,就是到了模板的挂载渲染了,它就是 $mount。
Vue.prototype._init = function (options) {
  ...
  // options 选项合并
  vm.$options = mergeOptions(
    resolveConstructorOptions(vm.constructor),
    options || {},
    vm
  );

  initProxy(vm);
  vm._self = vm;
  ...
  // 响应式数据相关处理等
  initState(vm);
  ...
  // 挂载渲染
  if (vm.$options.el) {
    vm.$mount(vm.$options.el);
  }
};
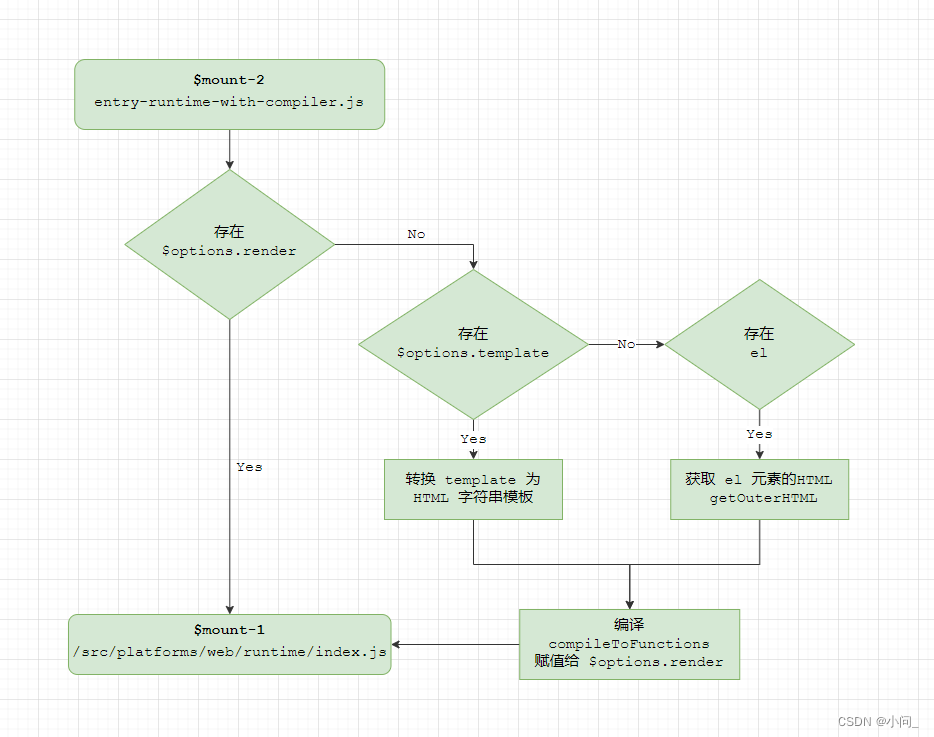
在这个 _init 的最后会判断 $options 合并后的选项里的 el 属性值,这个值在我们 new Vue 实例化 Vue 应用时就传入了,他是整个应用的根 DOM 元素的 CSS 选择器或者是元素 HTMLElement 实例,通常我们赋值为 DOM 元素的 ID 即可。然后把这个 el 传入 $mount调用,这个 $mount 有多个版本的,这里因为我们学习研究的是带编译器 web 版的 Vue,所以它实际是调用了 /src/platforms/web/entry-runtime-with-compiler.js 里的 m o u n t ( mount( mount(mount-2),但在这个文件中,首先另存了在 /src/platforms/web/runtime/index.js 中定义的 m o u n t ( mount( mount(mount-1):
$mount-1:
/src/platforms/web/runtime/index.js
...
Vue.prototype.$mount = function (   // $mount-1
  el?: string | Element,
  hydrating?: boolean
): Component {
  el = el && inBrowser ? query(el) : undefined
  return mountComponent(this, el, hydrating)
}
...
$mount-2:
/src/platforms/web/entry-runtime-with-compiler.js
...
// 先另存 /src/platforms/web/runtime/index.js 中的 $mount
const mount = Vue.prototype.$mount   // $mount-1

Vue.prototype.$mount = function (    // $mount-2
  el?: string | Element,
  hydrating?: boolean
): Component {
    // querySelector 获取元素
  el = el && query(el)
  ...

  const options = this.$options
  // resolve template/el and convert to render function
  if (!options.render) {
    let template = options.template
    if (template) {
      if (typeof template === 'string') {
        if (template.charAt(0) === '#') {
          template = idToTemplate(template)
          ...
        }
      } else if (template.nodeType) {
        template = template.innerHTML
      } else {
        ...
        return this
      }
    } else if (el) {
      template = getOuterHTML(el)
    }
    if (template) {
      ...

      const { render, staticRenderFns } = compileToFunctions(template, {
        outputSourceRange: process.env.NODE_ENV !== 'production',
        shouldDecodeNewlines,
        shouldDecodeNewlinesForHref,
        delimiters: options.delimiters,
        comments: options.comments
      }, this)
      options.render = render
      options.staticRenderFns = staticRenderFns

      ...
    }
  }
  return mount.call(this, el, hydrating)
}

/**
 * Get outerHTML of elements, taking care
 * of SVG elements in IE as well.
 */
function getOuterHTML (el: Element): string {
  if (el.outerHTML) {
    return el.outerHTML
  } else {
    const container = document.createElement('div')
    container.appendChild(el.cloneNode(true))
    return container.innerHTML
  }
}

Vue.compile = compileToFunctions

export default Vue
为了便于描述,我们给它们一个别名,如上代码注释所标分别为 $mount-1 和 $mount-2。在 m o u n t − 2 中,它会先判断有没有 v m . mount-2 中,它会先判断有没有 vm. mount−2中,它会先判断有没有vm.options.render 这个渲染函数,如果有就会直接调用 m o u n t − 1 ;如果没有就判断 v m . mount-1;如果没有就判断 vm. mount−1;如果没有就判断vm.options 中有没有模板选项值 template,有就进入模板编译阶段,没有就调用 getOuterHTML 获取 el 元素的整个 HTML 赋值给模板再进入模板编译阶段。
从这个过程可以看出,对于 render 渲染函数、template 模板选项和 el 选项,在应用实例化时三者任设置一个即可。如果设置了多个,Vue 也会根据 render、template、el 的优先级选择其中一个使用。
对于没有设置 render 渲染函数的情况,template 和 el 选项最终都转换成 template 字符串模板被传入编译函数编译成特定值。编译是通过调用 compileToFunctions 函数进行的,它是从 /src/platforms/web/compiler/index.js 引入的,这个编译函数的具体细节我们在另一个关于编译与渲染的章节中再详细研究学习。
编译后,compileToFunctions 返回的对象取其中的 render 和 staticRenderFns 分别赋给 vm.$options 的 render 和 staticRenderFns,那么最终,template 和 el 选项都转换成了 render 渲染函数,然后就调用 $mount-1 进入下一步。
进入到 $mount-1,它获取 el 元素,然后直接调用 mountComponent,它引入自 /src/core/instance/lifecycle.js
export function mountComponent (
  vm: Component,
  el: ?Element,
  hydrating?: boolean
): Component {
  vm.$el = el
  if (!vm.$options.render) {
    vm.$options.render = createEmptyVNode
    if (process.env.NODE_ENV !== 'production') {
      /* istanbul ignore if */
      if ((vm.$options.template && vm.$options.template.charAt(0) !== '#') ||
        vm.$options.el || el) {
        warn(
          'You are using the runtime-only build of Vue where the template ' +
          'compiler is not available. Either pre-compile the templates into ' +
          'render functions, or use the compiler-included build.',
          vm
        )
      } else {
        warn(
          'Failed to mount component: template or render function not defined.',
          vm
        )
      }
    }
  }
  callHook(vm, 'beforeMount')

  let updateComponent
  /* istanbul ignore if */
  if (process.env.NODE_ENV !== 'production' && config.performance && mark) {
    updateComponent = () => {
      const name = vm._name
      const id = vm._uid
      const startTag = `vue-perf-start:${id}`
      const endTag = `vue-perf-end:${id}`

      mark(startTag)
      const vnode = vm._render()
      mark(endTag)
      measure(`vue ${name} render`, startTag, endTag)

      mark(startTag)
      vm._update(vnode, hydrating)
      mark(endTag)
      measure(`vue ${name} patch`, startTag, endTag)
    }
  } else {
    updateComponent = () => {
      vm._update(vm._render(), hydrating)
    }
  }

  // we set this to vm._watcher inside the watcher's constructor
  // since the watcher's initial patch may call $forceUpdate (e.g. inside child
  // component's mounted hook), which relies on vm._watcher being already defined
  new Watcher(vm, updateComponent, noop, {
    before () {
      if (vm._isMounted && !vm._isDestroyed) {
        callHook(vm, 'beforeUpdate')
      }
    }
  }, true /* isRenderWatcher */)
  hydrating = false

  // manually mounted instance, call mounted on self
  // mounted is called for render-created child components in its inserted hook
  if (vm.$vnode == null) {
    vm._isMounted = true
    callHook(vm, 'mounted')
  }
  return vm
}
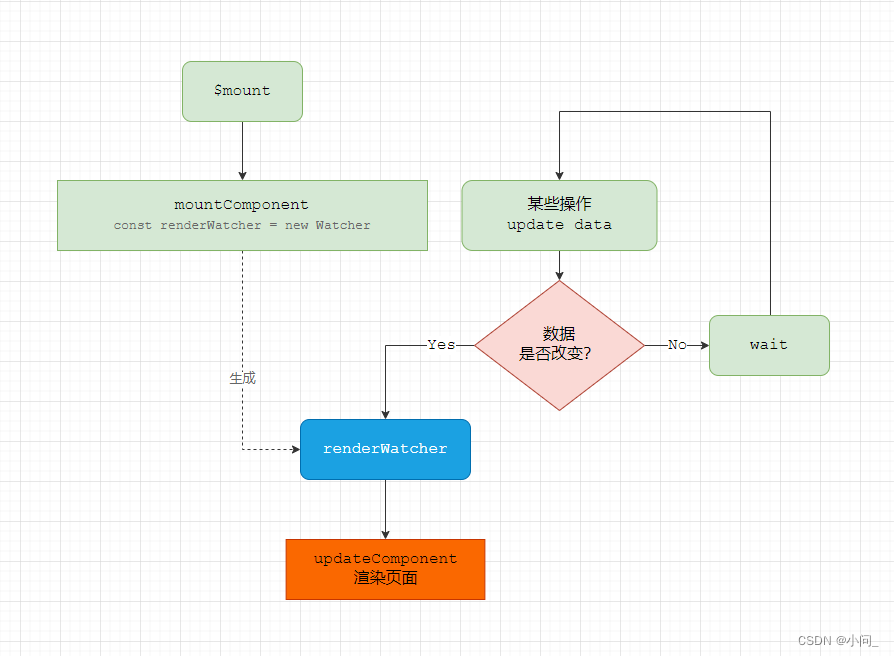
在这个 mountComponent 中,主要做了两件事,一是定义 updateComponent 函数,二是把 updateComponent 等作为参数 new Watcher 实例化了一个 Watcher 类的对象。这个 Watcher 类我们稍后研究,这里只用知道这个对象实例化之后会马上调用 new Watcher 时传入的第二个参数 updateComponent。
updateComponent = () => {
  vm._update(vm._render(), hydrating)
}
在这个 updateComponent 中调用了 vm._update,它先依赖 vm._render 生成的 vnode,vnode 是描述 DOM 元素的一种数据结构,就是我们通称的虚拟节点,然后这个 vnode 传入 vm._update 执行实际的 HTML 页面渲染。
总结:
简而言之,在这个环节 Vue 就是把模板编译成 render 渲染函数,然后 new Watcher 实例化一个 Watcher 对象,在这个对象中调用 updateComponent 执行首次渲染。这个 Watcher 对象很特别,它还会在依赖的响应式数据变动时收到事件通知,然后又会去调用 updateComponent 重复渲染,如此反复循环不息。
这个 _update 和 _render 在后面章节我们会详细研究学习,这里我们先只熟悉挂载渲染的整个流程即可。


 536
536


 被折叠的 条评论
为什么被折叠?
被折叠的 条评论
为什么被折叠?
 到【灌水乐园】发言


