


IOC容器
Ioc有两种类型的bean:一种是普通bean,一种是工厂bean
普通bean:配置文件中定义的bean类型和返回时的类型一样
配置文件中定义bean

返回的类型

工厂bean:定义类型和返回类型可能不一样


bean作用域
在spring里面,设置创建bean默认是单实例,可以指定属性值scope为多实例
scope=singleton默认单实例
scope=prototype多实例
这里测试得到工厂bean下默认是多例,普通bean下才是单例


指定作用域多实例

结果

singleton和prototype区别
1.singleton是单实例,prototype是多实例
2.设置bean中属性值scope=singleton,在加载配置文件的时候就实例化对象
3.设置bean中属性值scope=prototype,不是在加载spring配置文件bean的时候创建对象,在调用getBean方法的时候才创建对象
最后scope属性值还有两个值scope=request,scope=session表示放到request对象中session对象中,不常用
bean 生命周期
生命周期
一个对象的创建到销毁的过程
bean生命周期
不加后置处理器bean的生命周期有五步
1.通过构造器创建bean实例(无参数构造)
2.为bean属性设置值或对其他bean的引用(调用set方法)
3.调用bean的初始化方法(需要配置初始化方法,因为是自己定义的方法不能自动加载)
4.获取bean对象(… getBean)
5.当容器关闭的时候,调用bean销毁方法(手动让bean实例销毁)


加上后置处理器bean的生命周期有七步
1.通过构造器创建bean实例(无参数构造)
2.为bean属性设置值或对其他bean的引用(调用set方法)
3.把bean的实例传递给bean后置处理器的方法
postProcessBeforeInitialization()
4.调用bean的初始化方法(需要配置初始化方法,因为是自己定义的方法不能自动加载)
5.把bean的实例传递给bean后置处理器的方法
postProcessAfterInitialization()
6.获取bean对象(… getBean)
7.当容器关闭的时候,调用bean销毁方法(手动让bean实例销毁)
创建后置处理器
bean自动装配
自动装配:根据指定的装配规则(属性名称或者属性类型),spring自动将匹配的属性值进行注入
根据属性名称自动注入
bean.xml
<?xml version="1.0" encoding="UTF-8"?>
<beans xmlns="http://www.springframework.org/schema/beans"
       xmlns:xsi="http://www.w3.org/2001/XMLSchema-instance"
       xsi:schemaLocation="http://www.springframework.org/schema/beans http://www.springframework.org/schema/beans/spring-beans.xsd">


    <bean id="autowrite" class="com.spring.spring5.ioc.autowriteBean.Autowrite" autowire="byName">

    </bean>
    <bean id="autowrite2" class="com.spring.spring5.ioc.autowriteBean.Autowrite" autowire="byType">

    </bean>
    <bean id="dept" class="com.spring.spring5.ioc.Dept">
        <property name="dname" value="hahha"></property>
    </bean>
</beans>
Autowrite类
package com.spring.spring5.ioc.autowriteBean;

import com.spring.spring5.ioc.Dept;

/**
 * @program:com.spring.spring5.ioc.autowriteBean
 * @description:自动装配
 * @author:Mr.bing
 * @create:2022-03-22-21-32
 **/
public class Autowrite {
    private Dept dept;


    public void setDept(Dept dept) {
        this.dept = dept;
    }

    @Override
    public String toString() {
        return "Autowrite{" +
                "dept=" + dept +
                '}';
    }
}
Dept类
package com.spring.spring5.ioc;

/**
 * @program:com.spring.spring5.ioc
 * @description:部门类、
 * @author:Mr.bing
 * @create:2022-03-17-11-01
 **/
public class Dept {
    private String dname;

    public void setDname(String dname) {
        this.dname = dname;
    }

    @Override
    public String toString() {
        return "Dept{" +
                "dname='" + dname + '\'' +
                '}';
    }
}
TestBean类
package com.spring.spring5.ioc.autowriteBean;

import org.junit.Test;
import org.springframework.context.support.ClassPathXmlApplicationContext;

/**
 * @program:com.spring.spring5.ioc.autowriteBean
 * @description:测试自动装配
 * @author:Mr.bing
 * @create:2022-03-22-21-36
 **/
public class TestBean {

    @Test
    public void testBean(){
        ClassPathXmlApplicationContext classPathXmlApplicationContext = new ClassPathXmlApplicationContext("com/spring/spring5/ioc/autowriteBean/bean.xml");
        Autowrite autowrite = classPathXmlApplicationContext.getBean("autowrite", Autowrite.class);

        System.out.println(autowrite.toString());
        Autowrite autowrite2 = classPathXmlApplicationContext.getBean("autowrite2", Autowrite.class);
        System.out.println(autowrite2.toString());

    }
}
测试结果
Autowrite{dept=Dept{dname='hahha'}}
Autowrite{dept=Dept{dname='hahha'}}

Process finished with exit code 0
bean 外部属性文件
这里拿数据库连接为例
配置德鲁伊连接池
引入德鲁伊连接池依赖jar包

mysql连接

在beanxml文件中直接配置数据库连接
<?xml version="1.0" encoding="UTF-8"?>
<beans xmlns="http://www.springframework.org/schema/beans"
       xmlns:xsi="http://www.w3.org/2001/XMLSchema-instance"
 xsi:schemaLocation="http://www.springframework.org/schema/beans http://www.springframework.org/schema/beans/spring-beans.xsd">

    <!--直接配置连接池-->
    <bean id="druidDataSource" class="com.alibaba.druid.pool.DruidDataSource">
        <property name="driverClassName" value="com.mysql.jdbc.Driver"></property>
        <property name="url" value="jdbc:mysql://localhost:3306/hepha-ip"></property>
        <property name="username" value="hepha"></property>
        <property name="password" value="hepha123"></property>
    </bean>
</beans>
引入外部属性文件
<?xml version="1.0" encoding="UTF-8"?>
<beans xmlns="http://www.springframework.org/schema/beans"
       xmlns:xsi="http://www.w3.org/2001/XMLSchema-instance"
       xmlns:context="http://www.springframework.org/schema/context"
       xsi:schemaLocation="http://www.springframework.org/schema/beans http://www.springframework.org/schema/beans/spring-beans.xsd
                            http://www.springframework.org/schema/context http://www.springframework.org/schema/context/spring-context.xsd">

    <!--引入外部属性文件-->
    <context:property-placeholder location="classpath:com/spring/spring5/ioc/outProDruidExample/jdbc.properties"></context:property-placeholder>
    <!--配置连接池-->
    <bean id="druidDataSource" class="com.alibaba.druid.pool.DruidDataSource">
        <property name="driverClassName" value="${pro.driverClassName}"></property>
        <property name="url" value="${pro.url}"></property>
        <property name="username" value="${pro.username}"></property>
        <property name="password" value="${pro.password}"></property>
    </bean>
</beans>
bean管理 注解方式创建对象
什么是注解:
- 注解是代码特殊标记,格式:@注解名称(属性名称=属性值,属性名称=属性值…)
- 注解作用在类,方法,属性上
- 注解的目的:简化xml配置
spring 针对bean管理中创建对象提供注解
1.@Component
2.@Service
3.@Reposity
4.@Controller
上面四个注解功能都一样,都是创建bean实例【创建对象】,按照规范使用在规定的层,理论上都可以使用在任意层
- 使用注解创建对象步骤:
1.引入aop包

2.开启组件扫描
<?xml version="1.0" encoding="UTF-8"?>
<beans xmlns="http://www.springframework.org/schema/beans"
       xmlns:xsi="http://www.w3.org/2001/XMLSchema-instance"
       xmlns:context="http://www.springframework.org/schema/context"
       xsi:schemaLocation="http://www.springframework.org/schema/beans http://www.springframework.org/schema/beans/spring-beans.xsd
                            http://www.springframework.org/schema/context http://www.springframework.org/schema/context/spring-context.xsd">


    <!--开启组件扫描-->
    <context:component-scan base-package="com.spring.spring5.ioc.annotation"></context:component-scan>
</beans>
3.创建类,在类上加入创建对象注解
package com.spring.spring5.ioc.annotation;

import org.springframework.stereotype.Component;

/**
 * @program:com.spring.spring5.ioc.annotation
 * @description:测试注解实例化对象
 * @author:Mr.bing
 * @create:2022-03-24-21-27
 **/

//在注解里面value的属性值可以省略不写,默认是类名,首字母小写
//@Component(value = "userService")
@Component
public class UserService {
    public void add(){
        System.out.println("userService add...");
    }
}
4.测试注解创建对象
package com.spring.spring5.ioc.annotation;

import org.junit.Test;
import org.springframework.context.support.ClassPathXmlApplicationContext;

/**
 * @program:com.spring.spring5.ioc.annotation
 * @description:测试注解
 * @author:Mr.bing
 * @create:2022-03-24-21-28
 **/
public class TestAnnotation {

    @Test
    public void testBean(){

        //加载配置文件
        ClassPathXmlApplicationContext classPathXmlApplicationContext = new ClassPathXmlApplicationContext("com/spring/spring5/ioc/annotation/bean.xml");

        //获取被bean实例化的对象
        UserService userService = classPathXmlApplicationContext.getBean("userService", UserService.class);
        userService.add();
    }

}
结果
userService add...

Process finished with exit code 0
组件扫描配置
<?xml version="1.0" encoding="UTF-8"?>
<beans xmlns="http://www.springframework.org/schema/beans"
       xmlns:xsi="http://www.w3.org/2001/XMLSchema-instance"
       xmlns:context="http://www.springframework.org/schema/context"
       xsi:schemaLocation="http://www.springframework.org/schema/beans http://www.springframework.org/schema/beans/spring-beans.xsd
                            http://www.springframework.org/schema/context http://www.springframework.org/schema/context/spring-context.xsd">


    <!--开启组件扫描-->
    <context:component-scan base-package="com.spring.spring5.ioc.annotation"></context:component-scan>


    <!--use-default-filters="false" 表示现在不使用默认filter,自己配置filter-->
    <!--context:include-filter,设置扫描哪些内容 下面表示只扫描org.springframework.stereotype.Controller下的注解-->

    <context:component-scan base-package="com.spring.spring5" use-default-filters="false">
        <context:include-filter type="annotation" expression="org.springframework.stereotype.Controller"></context:include-filter>
    </context:component-scan>


    <!--设置扫描哪些内容不进行扫描-->
    <context:component-scan base-package="com.spring.spring5" use-default-filters="false">
        <context:exclude-filter type="annotation" expression="org.springframework.stereotype.Controller"></context:exclude-filter>
    </context:component-scan>
</beans>
基于注解方式实现属性注入
- @Autowired 根据属性类型自动装配
第一步,把service和dao对象创建,在service和dao类添加创建对象注解
package com.spring.spring5.ioc.annotation.attribute.dao;

/**
 * @program:com.spring.spring5.ioc.annotation.attribute.dao
 * @description:user接口
 * @author:Mr.bing
 * @create:2022-03-24-22-19
 **/
public interface UserDao {
    public void add();
}
package com.spring.spring5.ioc.annotation.attribute.dao;

import com.spring.spring5.ioc.User;
import org.springframework.stereotype.Repository;
import org.springframework.stereotype.Service;

/**
 * @program:com.spring.spring5.ioc.annotation.attribute.dao
 * @description:实现UserDao接口
 * @author:Mr.bing
 * @create:2022-03-24-22-19
 **/
//默认名称是userDaoImpl
@Repository
public class UserDaoImpl implements UserDao {

    @Override
    public void add() {

        System.out.println("userDaoImpl add...");
    }
}
第二步,在service中注入dao对象,在service类添加dao类型属性,在属性上面使用注解
package com.spring.spring5.ioc.annotation.attribute.service;

import com.spring.spring5.ioc.annotation.attribute.dao.UserDao;
import org.springframework.beans.factory.annotation.Autowired;
import org.springframework.stereotype.Service;

/**
 * @program:com.spring.spring5.ioc.annotation.attribute.service
 * @description:userService类
 * @author:Mr.bing
 * @create:2022-03-24-22-20
 **/
@Service
public class UserService {

    //定义dao类型属性
    //添加注入属性的注解,不需要添加set方法,内部帮我们处理
     //这里根据类型注入因为UserDao是一个接口不确定有哪些类实现,可能有多个类实现该接口,那么根据类型注入就不知道到底找哪个类
    //此时可以配合@Qulifier来使用,当然如果能保证一个接口项目中只有一个实现类只用@Autowired也是一样
    @Autowired
    private UserDao userDao;
    public void add(){
        System.out.println("userService add...");
        userDao.add();
    }
}
测试
package com.spring.spring5.ioc.annotation.attribute;

import com.spring.spring5.ioc.annotation.attribute.service.UserService;
import org.junit.Test;
import org.springframework.context.support.ClassPathXmlApplicationContext;

/**
 * @program:com.spring.spring5.ioc.annotation.attribute
 * @description:测试属性注入
 * @author:Mr.bing
 * @create:2022-03-24-22-22
 **/
public class TestAttr {

    @Test
    public void testBean(){
        ClassPathXmlApplicationContext classPathXmlApplicationContext = new ClassPathXmlApplicationContext("com/spring/spring5/ioc/annotation/attribute/bean.xml");
        UserService userService = classPathXmlApplicationContext.getBean("userService", UserService.class);
        userService.add();
    }
}
结果
userService add...
userDaoImpl add...
Process finished with exit code 0
- @Qualifier 根据对象名称【就是在配置文件中bean标签【实例化对象】中的id属性值】进行注入
这个@Qualifier的使用和上面的@Autowrited一起使用;
如下面例子中的userService使用@Qualifier
package com.spring.spring5.ioc.annotation.attribute.service;

import com.spring.spring5.ioc.annotation.attribute.dao.UserDao;
import org.springframework.beans.factory.annotation.Autowired;
import org.springframework.beans.factory.annotation.Qualifier;
import org.springframework.stereotype.Service;

/**
 * @program:com.spring.spring5.ioc.annotation.attribute.service
 * @description:userService类
 * @author:Mr.bing
 * @create:2022-03-24-22-20
 **/
@Service
public class UserService {

    //定义dao类型属性
    //添加注入属性的注解,不需要添加set方法,内部帮我们处理
    //这里根据类型注入因为UserDao是一个接口不确定有哪些类实现,可能有多个类实现该接口,那么根据类型注入就不知道到底找哪个类
    //此时可以配合@Qulifier来使用
    @Autowired
    @Qualifier(value = "userDaoImpl")//根据对象的名称来注入
    private UserDao userDao;
    public void add(){
        System.out.println("userService add...");
        userDao.add();
    }
}
- @Resource 可以根据类型注入,可以根据对象名称注入
这里Resource是来自javax包中,不是bean 通常用上述两个
package com.spring.spring5.ioc.annotation.attribute.service;

import com.spring.spring5.ioc.annotation.attribute.dao.UserDao;
import org.springframework.beans.factory.annotation.Autowired;
import org.springframework.beans.factory.annotation.Qualifier;
import org.springframework.stereotype.Service;

import javax.annotation.Resource;

/**
 * @program:com.spring.spring5.ioc.annotation.attribute.service
 * @description:userService类
 * @author:Mr.bing
 * @create:2022-03-24-22-20
 **/
@Service
public class UserService {

    //定义dao类型属性
    //添加注入属性的注解,不需要添加set方法,内部帮我们处理
    //这里根据类型注入因为UserDao是一个接口不确定有哪些类实现,可能有多个类实现该接口,那么根据类型注入就不知道到底找哪个类
    //此时可以配合@Qulifier来使用
//    @Autowired
//    @Qualifier(value = "userDaoImpl")//根据类的名称来注入
//    private UserDao userDao;


//    @Resource//默认根据类型注入和@Autowired一样
    @Resource(name = "userDaoImpl")//bean管理中的bean标签中的id属性值,默认实例化类的小驼峰
    private UserDao userDao;

    public void add(){
        System.out.println("userService add...");
        userDao.add();
    }
}
-
@Value注入普通类型属性,上面三种都是对象
@Value(value = “abc”)
private String name;
把value中的值注入name中
AOP
简述
AOP(aspect oriented programming)面向切面编程,OOP(object oriented programming)面向对象编程;AOP是对OOP的补充
通俗来讲:不通过修改源代码方式就能在原有的功能里面新增功能
1.基于配置实现aop操作
2.基于注解实现aop操作
AOP术语
1.切入点 —被增强的类中的方法叫做切入点
2.切面 --把增强类作用在切入点的过程叫做切面
3.增强(消息)—新增的逻辑代码叫做增强
JdbcTemplate
jdbcTemplate基础框架
1.引入jar包
2.配置连接池
3.创建jdbcTemplate对象,注入DataSource
<?xml version="1.0" encoding="UTF-8"?>
<beans xmlns="http://www.springframework.org/schema/beans"
       xmlns:xsi="http://www.w3.org/2001/XMLSchema-instance"
       xmlns:context="http://www.springframework.org/schema/context"
       xsi:schemaLocation="http://www.springframework.org/schema/beans http://www.springframework.org/schema/beans/spring-beans.xsd
                            http://www.springframework.org/schema/context http://www.springframework.org/schema/context/spring-context.xsd">

    <!--配置数据库连接池-->
    <bean id="druidDataSource" class="com.alibaba.druid.pool.DruidDataSource">
        <property name="driverClassName" value="com.mysql.jdbc.Driver"></property>
        <property name="url" value="jdbc:mysql://localhost:3306/spring5"></property>
        <property name="username" value="hepha"></property>
        <property name="password"value="hepha123"></property>
    </bean>
    <!--配置jdbcTemplate对象,注入数据库连接池-->
    <bean id="jdbcTemplate" class="org.springframework.jdbc.core.JdbcTemplate">
        <!--注入dataSource 查看JdbcTemplate源码可以知道通过setDataSource设置属性可以注入-->
        <property name="dataSource" ref="druidDataSource"></property>
    </bean>
</beans>
4.创建service类,dao类,在dao中注入jdbcTemplate对象
jdbcTemplate增删改查【单条】
jdbcTemplate增删改查【批量】
简述
spring框架对原有的jdbc进行封装就是jdbcTemplate,jdbcTemplate方便对数据库进行操作
事务
事务方法:对数据库表中数据进行变化的操作
propagation:事务传播行为
spring框架的事务传播行为有七种
多事务方法直接进行调用,这个过程中事务是如何进行管理的
REQUIRED required
如果add方法本身有事务,调用update方法之后,update方法使用add方法中的事务
REQUIRES_NEW requires_new
使用add方法调用update方法,无论add是否有事务,都创建新的事务
SUPPORTS supports
MANDATORY mandatory
NOT_SUPPORTED not_supported
NEVER never
NESTED nested
isolation事务隔离
事务读问题:脏读,不可重复读,虚或幻读
readOnly只读
读指的是对数据库增删改查操作,默认readOnly=false,设置true表示只能查询
timeout超时
事务需要在一定时间提交,如果没有提交需要回滚操作
默认-1,没有超时时间,秒为单位
rollbackFor回滚
设置出现哪些异常进行事务回滚操作
noRollbackFor不回滚
设置出现哪些异常不进行事务回滚
spring5新特性
- 真个spring5框架代码基于java8,运行时兼容jdk9,删除了许多之前不推荐的类和方法
- spring5自带了通用的日志封装
移除了log4j ConfigListener,增加了log4j2;
spring框架整合log4j2:
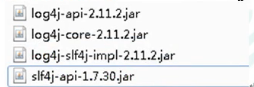
第一步:引入jar包 包含
第二步:创建log4j2配置文件,命名log4j2.xml,默认在项目的src目录下


 751
751


 被折叠的 条评论
为什么被折叠?
被折叠的 条评论
为什么被折叠?
 到【灌水乐园】发言


