


本文参照了 http://www.blogjava.net/jelver/articles/143082.html,http://www.blogjava.net/athrunwang/archive/2011/09/28/359680.html,《android SDK开发范例大全(第2版)》
上次做了一个demo,试验如何用node.js响应get post请求,http请求使用的浏览器。我现在正在学android,所以决定写一个两者结合的demo。node.js做服务端接收get post请求,android做客户端发送get post请求。
先上node.js的代码(保存为example6.js):
var http = require('http');
var server = http.createServer();
var querystring = require('querystring');


var postResponse = function(req, res) {
	var info ='';
	req.addListener('data', function(chunk){
		info += chunk;
     })
	.addListener('end', function(){
		info = querystring.parse(info);
		res.setHeader('content-type','text/html; charset=UTF-8');//响应编码
		res.end('Hello World POST ' + info.name,'utf8');
	 })
}

var getResponse = function (req, res){
  res.writeHead(200, {'Content-Type': 'text/plain'});
  var name = require('url').parse(req.url,true).query.name
  res.end('Hello World GET ' + name,'utf8');
}

var requestFunction = function (req, res){
	req.setEncoding('utf8');//请求编码

	if (req.method == 'POST'){
		return postResponse(req, res);
	}

	return getResponse(req, res);
}

server.on('request',requestFunction);
server.listen(8080, "192.168.9.194");

console.log('Server running at http://192.168.9.194:8080/');
代码基本和上次一样,主要是绑定的地址和端口变了(这个很重要,后边再讲)
再上android源代码:
layout main,xml如下
<?xml version="1.0" encoding="utf-8"?>
<LinearLayout xmlns:android="http://schemas.android.com/apk/res/android"
    android:layout_width="fill_parent"
    android:layout_height="fill_parent"
    android:orientation="vertical" >

    <TextView
        android:id="@+id/textView1"
        android:layout_width="wrap_content"
        android:layout_height="wrap_content"/>

    <LinearLayout
        android:layout_width="match_parent"
        android:layout_height="wrap_content" >

        <Button
            android:layout_width="wrap_content"
            android:layout_height="wrap_content"
            android:text="java get"
            android:onClick="javaGet"/>

        <Button
            android:layout_width="wrap_content"
            android:layout_height="wrap_content"
            android:text="java post"
            android:onClick="javaPost"/>
    </LinearLayout>

    <LinearLayout
        android:layout_width="match_parent"
        android:layout_height="wrap_content" >

        <Button
            android:layout_width="wrap_content"
            android:layout_height="wrap_content"
            android:text="apache get"
            android:onClick="apacheGet"/>

        <Button
            android:layout_width="wrap_content"
            android:layout_height="wrap_content"
            android:text="apache post"
            android:onClick="apachePost"/>
    </LinearLayout>
</LinearLayout>
AndroidManifest.xml需要添加如下内容:
<uses-permission android:name="android.permission.INTERNET"/>package com.zhang.test08_01;
import java.io.BufferedInputStream;
import java.io.BufferedOutputStream;
import java.io.BufferedReader;
import java.io.IOException;
import java.io.InputStream;
import java.io.InputStreamReader;
import java.io.OutputStream;
import java.io.OutputStreamWriter;
import java.io.UnsupportedEncodingException;
import java.io.Writer;
import java.net.HttpURLConnection;
import java.net.MalformedURLException;
import java.net.ProtocolException;
import java.net.URL;
import java.net.URLEncoder;
import java.util.ArrayList;
import java.util.List;
import org.apache.http.HttpEntity;
import org.apache.http.HttpResponse;
import org.apache.http.NameValuePair;
import org.apache.http.ParseException;
import org.apache.http.client.ClientProtocolException;
import org.apache.http.client.HttpClient;
import org.apache.http.client.entity.UrlEncodedFormEntity;
import org.apache.http.client.methods.HttpGet;
import org.apache.http.client.methods.HttpPost;
import org.apache.http.client.methods.HttpUriRequest;
import org.apache.http.impl.client.DefaultHttpClient;
import org.apache.http.message.BasicNameValuePair;
import org.apache.http.protocol.HTTP;
import org.apache.http.util.EntityUtils;
import android.app.Activity;
import android.os.Bundle;
import android.view.View;
import android.widget.TextView;
public class Test08_01Activity extends Activity {
private TextView textView1;
// You can't use localhost; localhost is the (emulated) phone. You need
//to specify the IP address or DNS name of the actual web server.
private static final String TEST_URL = "http://192.168.9.194:8080/";
@Override
public void onCreate(Bundle savedInstanceState) {
super.onCreate(savedInstanceState);
setContentView(R.layout.main);
textView1 = (TextView)findViewById(R.id.textView1);
}
public void javaGet(View v) {
String str = "";
try {
str = URLEncoder.encode("抓哇", "UTF-8");
} catch (UnsupportedEncodingException e) {
}
URL url = null;
try {
url = new URL(TEST_URL + "?name=javaGet"+str);
} catch (MalformedURLException e) {
}
HttpURLConnection urlConnection = null;
try {
urlConnection = (HttpURLConnection) url.openConnection();
} catch (IOException e) {
textView1.setText(e.getMessage());
return;
}
//method The default value is "GET".
getResponseJava(urlConnection);
}
public void javaPost(View v) {
URL url = null;
try {
url = new URL(TEST_URL);
} catch (MalformedURLException e) {
}
HttpURLConnection urlConnection = null;
try {
urlConnection = (HttpURLConnection) url.openConnection();
} catch (IOException e) {
textView1.setText(e.getMessage());
return;
}
try {
urlConnection.setRequestMethod("POST");
} catch (ProtocolException e) {
}
urlConnection.setDoOutput(true);
urlConnection.setRequestProperty("Content-Type", "application/x-www-form-urlencoded");
OutputStream out = null;
try {
out = new BufferedOutputStream(urlConnection.getOutputStream());//请求
} catch (IOException e) {
urlConnection.disconnect();
textView1.setText(e.getMessage());
return;
}
String str = "";
try {
str = URLEncoder.encode("抓哇", "UTF-8");
} catch (UnsupportedEncodingException e) {
}
Writer writer = null;
try {
writer = new OutputStreamWriter(out,"UTF-8");
} catch (UnsupportedEncodingException e1) {
}
try {
writer.write("name=javaPost"+str);
} catch (IOException e) {
urlConnection.disconnect();
textView1.setText(e.getMessage());
return;
} finally{
try {
writer.flush();
writer.close();
} catch (IOException e) {
}
}
getResponseJava(urlConnection);
}
public void apacheGet(View v) {
HttpGet request = new HttpGet(TEST_URL + "?name=apacheGet阿帕奇");
getResponseApache(request);
}
public void apachePost(View v) {
HttpPost request = new HttpPost(TEST_URL);
List<NameValuePair> params = new ArrayList<NameValuePair>(1);
params.add(new BasicNameValuePair("name", "apachePost阿帕奇"));
HttpEntity formEntity = null;
try {
formEntity = new UrlEncodedFormEntity(params,HTTP.UTF_8);
} catch (UnsupportedEncodingException e) {
}
request.setEntity(formEntity);
getResponseApache(request);
}
private void getResponseJava(HttpURLConnection urlConnection) {
InputStream in = null;
try {
in = new BufferedInputStream(urlConnection.getInputStream());//响应
} catch (IOException e) {
urlConnection.disconnect();
textView1.setText(e.getMessage());
return;
}
BufferedReader reader = null;
try {
reader = new BufferedReader(new InputStreamReader(in,"UTF-8"));
} catch (UnsupportedEncodingException e1) {
}
StringBuilder result = new StringBuilder();
String tmp = null;
try {
while((tmp = reader.readLine()) != null){
result.append(tmp);
}
} catch (IOException e) {
textView1.setText(e.getMessage());
return;
} finally {
try {
reader.close();
urlConnection.disconnect();
} catch (IOException e) {
}
}
textView1.setText(result);
}
private void getResponseApache(HttpUriRequest request) {
HttpClient client = new DefaultHttpClient();
HttpResponse response = null;
try {
response = client.execute(request);
} catch (ClientProtocolException e) {
textView1.setText(e.getMessage());
} catch (IOException e) {
textView1.setText(e.getMessage());
}
if (response == null) {
return;
}
String result = null;
if (response.getStatusLine().getStatusCode() == 200) {
try {
result = EntityUtils.toString(response.getEntity(),"UTF-8");
} catch (ParseException e) {
result = e.getMessage();
} catch (IOException e) {
result = e.getMessage();
}
} else {
result = "error response" + response.getStatusLine().toString();
}
textView1.setText(result);
}
}先启动node.js服务,在命令行中键入 node example6.js
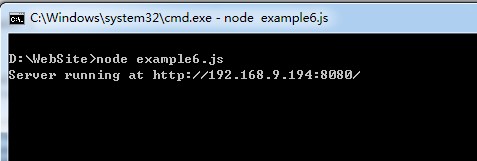
启动成功
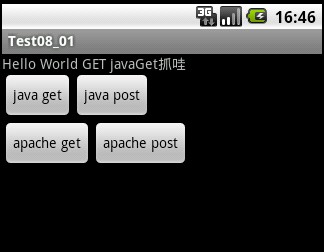
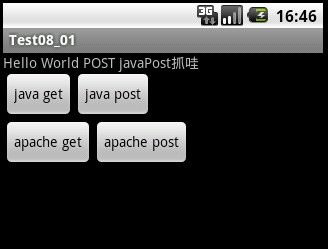
再启动android模拟器
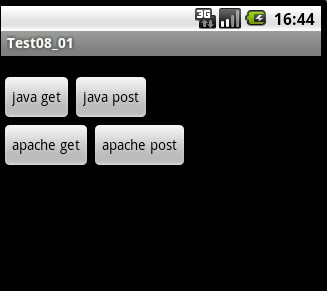
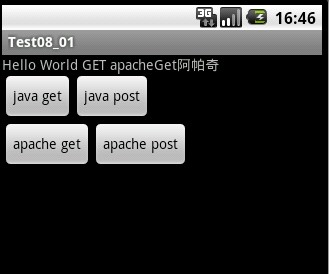
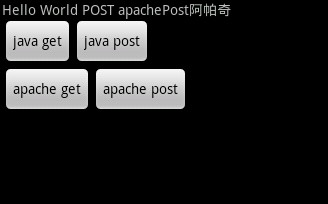
分别点击四个按钮,效果如下:
整个过程最让我晕倒的是,我开始绑定和访问的地址是localhost:8080,可以一直无法访问,后来上网找了以下,发现自己太SB了
http://groups.google.com/group/android-developers/browse_thread/thread/801645febf0523ea

关键这句话:You can't use localhost; localhost is the (emulated) phone. You need
to specify the IP address or DNS name of the actual web server.
我忘了一件很重要的事,我的代码运行时启动的java虚拟机是在android模拟器上,localhost是模拟器啊。。。
以后要注意啊,android写的代码访问的本地文件系统或者网络环境等都是在模拟器上。


 131
131

 被折叠的 条评论
为什么被折叠?
被折叠的 条评论
为什么被折叠?
 到【灌水乐园】发言


