


单元测试不管对于初学编程还是已经工作了很久的开发者来说,都不乐意花时间去写认为没用的代码进行测试,只要交给测试人员就行了,虽然这样也能把软件改出来,但也许你要花上几倍的时间去修改问题,如果在开发的过程中花点时间去写单元测试代码,把尽可能出问题的地方都测试一遍,把问题扼杀在最开始的地方,这样你就不必为后来找问题出处而烦恼。当代码工程越大越需要单元测试。
在Android中添加单元测试需要在AndroidMainfest.xml文件中添加测试库,代码如下
<?xml version="1.0" encoding="utf-8"?>
<manifest xmlns:android="http://schemas.android.com/apk/res/android"
    package="com.example.testcase"
    android:versionCode="1"
    android:versionName="1.0" >

    <uses-sdk
        android:minSdkVersion="8"
        android:targetSdkVersion="17" />

    <application
        android:allowBackup="true"
        android:icon="@drawable/ic_launcher"
        android:label="@string/app_name"
        android:theme="@style/AppTheme" >
        <!--用于引入测试库-->
        <uses-library android:name="android.test.runner" />

        <activity
            android:name="com.example.testcase.MainActivity"
            android:label="@string/app_name" >
            <intent-filter>
                <action android:name="android.intent.action.MAIN" />

                <category android:name="android.intent.category.LAUNCHER" />
            </intent-filter>
        </activity>
    </application>

    <!--
    android:name:测试类名
    android:targetPackage:测试程序所在的包名
    android:label:测试类标题
     -->
    <instrumentation android:name="android.test.InstrumentationTestRunner"
  android:targetPackage="com.example.testcase" android:label="Tests for My App" />

</manifest>
package com.example.testcase;

import android.app.Activity;
import android.os.Bundle;

public class MainActivity extends Activity {

	int sum = 100;
	@Override
	protected void onCreate(Bundle savedInstanceState) {
		super.onCreate(savedInstanceState);
		setContentView(R.layout.main);
	}

	public int add(int x, int y) {
		return (x + y);
	}

	public int dec(int x, int y) {
		return (x - y);
	}

	public int mul(int x, int y) {
		return (x * y);
	}

	public float div(int x, int y) {
		return (x / y);
	}
}
接下来就要编写一个类来测试上面的函数,这个类需要继承AndroidTestCase
Test.java
package com.example.testcase;

import android.test.AndroidTestCase;

public class Test extends AndroidTestCase {

	MainActivity app = new MainActivity();
	public void testAdd() {
		System.out.println(app.add(20, 3));
	}

	public void testDec() {
		System.out.println(app.dec(20, 3));
	}

	public void testMul() {
		System.out.println(app.mul(20, 3));
	}

	public void testDiv() {
		System.out.println(app.div(20, 0));
	}
}
在OutLine就会出现单元测试的几个函数
在对应的函数上右键会出现


选择"Android JUnit Test"就进行测试,如果成功会出现如下界面:

如果失败出现如下界面:

这时我们找错误只关注当前这个函数就行了,如果程序程序复杂度相当大,那么通过单元测试我们可以把问题一步步细化。
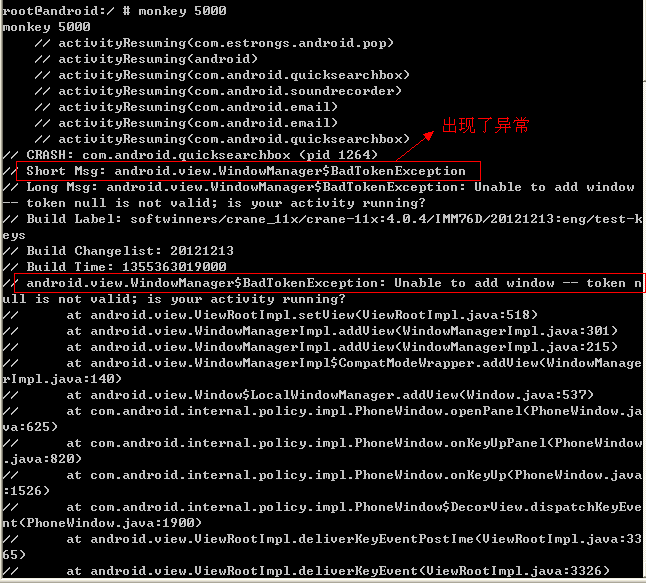
在Android上有一个自带的测试工具:monkey命令
monkey -p com.android.xxxx (包名) -v 300(随机事件次数)

下面操作5000次,出现了异常,我们就需要找到对应的程序来解决这个问题。


 1490
1490

 被折叠的 条评论
为什么被折叠?
被折叠的 条评论
为什么被折叠?
 到【灌水乐园】发言


