


准备工作
android studio 2.2以上
本项目是基于ndk 开发的项目,使用android studio + cmake进行开发
cmake配置详情可参考:
http://www.jianshu.com/p/4eefb16d83e3
http://blog.csdn.net/martin20150405/article/details/53284442
ffmpeg 开源库
http://ffmpeg.org/
网上下载的ffmpeg库为未编译的,需要编译成android 可用的动态库,具体可在网上查找
下面是我用的一个脚本
#!/bin/bash
NDK=D:/eclips_adt/android-ndk-r10d
SYSROOT=$NDK/platforms/android-9/arch-arm/
TOOLCHAIN=$NDK/toolchains/arm-linux-androideabi-4.8/prebuilt/windows-x86_64
function build_one {
./configure \
–prefix=$PREFIX \
–disable-shared \
–enable-static \
–disable-doc \
–disable-ffmpeg \
–disable-ffplay \
–disable-ffprobe \
–disable-ffserver \
–disable-doc \
–disable-symver \
–cross-prefix=$TOOLCHAIN/bin/arm-linux-androideabi- \
–target-os=linux \
–arch=arm \
–enable-cross-compile \
–sysroot=$SYSROOT \
–extra-cflags=”-Os -fpic $ADDI_CFLAGS” \
–extra-ldflags=”$ADDI_LDFLAGS” \
$ADDITIONAL_CONFIGURE_FLAG
make clean
make
make install
}
CPU=arm
PREFIX=D:/conpile_android/android_encode/ffmpeg
ADDI_CFLAGS=”-marm”
build_one
编码:
编码之前介绍下android 采集的视屏格式:
anroid 通过android.hardware.Camera 采集的视频源数据为nv21格式的数据,属于yuv420sp格式的一种,所以数据的总长度为:width*height*3/2
uv为交错方式呈现,具体格式如下:
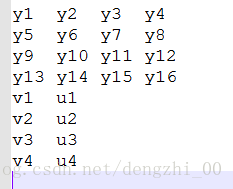
要转换成420p的数据格式,数据格式如下:
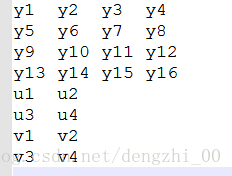
y:u:v = 4:1:1
nv21转420p数据转换算法
void nv21_h264::NV21ToI420(char *dstyuv, char *data, int imageWidth, int imageHeight) {
int Ustart =imageWidth*imageHeight;
//y
memcpy(dstyuv, data, (size_t) Ustart);
//u v 长度
int in = Ustart>>2;
for(int i = 0;i < in;i++){
//u
dstyuv[Ustart + i] = data[Ustart+i+1];
//v
dstyuv[Ustart + in + i] = data[Ustart + i];
}
}
android 采集的视频原始数据是顺时针偏转90度的数据,所以要将数据逆时针旋转90度还原数据,所以旋转之后的数据高度变成了源数据的宽度,宽度变成了源数据的高度,所以初始化编码器时要注意:
pCodecCtx->width = m_height;
pCodecCtx->height = m_width;
旋转算法:
void nv21_h264::n420_spin(char *dstyuv, char *srcdata, int imageWidth, int imageHeight) {
int i = 0, j = 0;
int index = 0;
int tempindex = 0;
int div = 0;
for (i = 0; i < imageWidth; i++) {
div = i + 1;
tempindex = 0;
for (j = 0; j < imageHeight; j++) {
tempindex += imageWidth;
dstyuv[index++] = srcdata[tempindex - div];
}
}
//写y 格式数据
//fwrite(dstyuv, 1, (size_t) m_size, file_y);
//u起始位置
int start = imageWidth * imageHeight;
//u v 数据的长度
int udiv = start >> 2;
//u v 数据宽度
int uWidth = imageWidth >> 1;
//u v 数据高度
int uHeight = imageHeight >> 1;
//数据 下标位置
index = start;
for (i = 0; i < uWidth; i++) {
div = i + 1;
tempindex = start;
for (j = 0; j < uHeight; j++) {
tempindex += uHeight;
dstyuv[index] = srcdata[tempindex - div];
dstyuv[index + udiv] = srcdata[tempindex - div + udiv];
index++;
}
}
}
初始化ffmpeg编码参数
int nv21_h264::init(int width, int height) {
m_width = width;
m_height = height;
m_size = width * height;
//存储 文件
const char *out_file = “/sdcard/ds.h264”;
//ffmpeg 注册复用器,编码器
av_register_all();
pFormatCtx = avformat_alloc_context();
fmt = av_guess_format(NULL, out_file, NULL);
//编码流
pFormatCtx->oformat = fmt;
if (avio_open(&pFormatCtx->pb, out_file, AVIO_FLAG_READ_WRITE) < 0) {
LOGD(“打开编码器失败”);
return -1;
}
video_st = avformat_new_stream(pFormatCtx, 0);
//time_base 时基。通过该值可以把PTS,DTS转化为真正的时间
video_st->time_base.num = 1;
video_st->time_base.den = 25;
if (video_st == NULL) {
LOGD(“video_st初始化失败”);
return -1;
}
pCodecCtx = video_st->codec;
pCodecCtx->codec_id = fmt->video_codec;
pCodecCtx->codec_type = AVMEDIA_TYPE_VIDEO;
pCodecCtx->pix_fmt = AV_PIX_FMT_YUV420P;
//由于 nv21 数据是顺时针旋转了90度,所以要最终数据要逆时针旋转90度,长度变宽度,宽度变长度,
//所以 将最终编码的宽度设置为源数据的高度,高度设置为源数据的宽度
pCodecCtx->width = m_height;
pCodecCtx->height = m_width;
pCodecCtx->time_base.num = 1;
pCodecCtx->time_base.den = 25;
pCodecCtx->bit_rate = 400000;
pCodecCtx->gop_size = 250;
pCodecCtx->qmin = 10;
pCodecCtx->qmax = 51;
pCodecCtx->max_b_frames = 3;
AVDictionary *param = 0;
if (pCodecCtx->codec_id == AV_CODEC_ID_H264) {
av_dict_set(¶m, “preset”, “slow”, 0);
av_dict_set(¶m, “tune”, “zerolatency”, 0);
}
if (pCodecCtx->codec_id == AV_CODEC_ID_H265) {
av_dict_set(¶m, “preset”, “ultrafast”, 0);
av_dict_set(¶m, “tune”, “zero-latency”, 0);
}
av_dump_format(pFormatCtx, 0, out_file, 1);
pCodec = avcodec_find_encoder(pCodecCtx->codec_id);
if (!pCodec) {
LOGD(“decoder失败”);
return -1;
}
if (avcodec_open2(pCodecCtx, pCodec, ¶m) < 0) {
LOGD(“open2 失败”);
return -1;
}
pFrame = av_frame_alloc();
picture_size = avpicture_get_size(pCodecCtx->pix_fmt, pCodecCtx->width, pCodecCtx->height);
picture_buf = (uint8_t *) av_malloc((size_t) picture_size);
avpicture_fill((AVPicture *) pFrame, picture_buf, pCodecCtx->pix_fmt, pCodecCtx->width,
pCodecCtx->height);
avformat_write_header(pFormatCtx, NULL);
av_new_packet(&pkt, picture_size);
//y格式文件
file_y = fopen(“/sdcard/test_y.y”,”w+”);
return 1;
}
参考文献:
雷神的博客:
http://blog.csdn.net/leixiaohua1020/article/details/25430425


 616
616


 被折叠的 条评论
为什么被折叠?
被折叠的 条评论
为什么被折叠?
 到【灌水乐园】发言


