


关于Spring Security的介绍就不再多说,直接上代码整合,此次整合使用的是SQL server数据库,mybatis进行整合
步骤一:
建立spring boot项目,并引入相关的jar包,pom.xml文件如下所示:
<?xml version="1.0" encoding="UTF-8"?>
<project xmlns="http://maven.apache.org/POM/4.0.0" xmlns:xsi="http://www.w3.org/2001/XMLSchema-instance"
         xsi:schemaLocation="http://maven.apache.org/POM/4.0.0 https://maven.apache.org/xsd/maven-4.0.0.xsd">
    <modelVersion>4.0.0</modelVersion>
    <parent>
        <groupId>org.springframework.boot</groupId>
        <artifactId>spring-boot-starter-parent</artifactId>
        <version>2.2.5.RELEASE</version>
        <relativePath/> <!-- lookup parent from repository -->
    </parent>
    <groupId>com.example</groupId>
    <artifactId>demo</artifactId>
    <version>0.0.1-SNAPSHOT</version>
    <name>demo</name>
    <description>Demo project for Spring Boot</description>

    <properties>
        <java.version>1.8</java.version>
    </properties>

    <dependencies>
        <dependency>
            <groupId>org.springframework.boot</groupId>
            <artifactId>spring-boot-starter-security</artifactId>
        </dependency>
        <dependency>
            <groupId>org.springframework.boot</groupId>
            <artifactId>spring-boot-starter-web</artifactId>
        </dependency>

        <dependency>
            <groupId>org.springframework.boot</groupId>
            <artifactId>spring-boot-starter-test</artifactId>
            <scope>test</scope>
            <exclusions>
                <exclusion>
                    <groupId>org.junit.vintage</groupId>
                    <artifactId>junit-vintage-engine</artifactId>
                </exclusion>
            </exclusions>
        </dependency>
        <dependency>
            <groupId>org.springframework.security</groupId>
            <artifactId>spring-security-test</artifactId>
            <scope>test</scope>
        </dependency>
        <dependency>
            <groupId>org.springframework.boot</groupId>
            <artifactId>spring-boot-starter-thymeleaf</artifactId>
        </dependency>


        <!--for mybatis-->
        <dependency>
            <groupId>org.mybatis.spring.boot</groupId>
            <artifactId>mybatis-spring-boot-starter</artifactId>
            <version>1.3.2</version>
        </dependency>

        <!--for SqlServer-->
        <dependency>
            <groupId>com.microsoft.sqlserver</groupId>
            <artifactId>sqljdbc4</artifactId>
            <version>4.0</version>
        </dependency>
        <dependency>
            <groupId>org.mybatis.generator</groupId>
            <artifactId>mybatis-generator-core</artifactId>
            <version>1.3.2</version>
        </dependency>
    </dependencies>

    <build>
        <plugins>
            <plugin>
                <groupId>org.springframework.boot</groupId>
                <artifactId>spring-boot-maven-plugin</artifactId>
                <configuration>
                    <fork>true</fork>
                </configuration>
            </plugin>


            <plugin>
                <groupId>org.mybatis.generator</groupId>
                <artifactId>mybatis-generator-maven-plugin</artifactId>
                <version>1.3.2</version>
                <configuration>
                    <configurationFile>src/main/resources/generatorConfig.xml</configurationFile>
                    <verbose>true</verbose>
                    <overwrite>true</overwrite>
                </configuration>

            </plugin>


        </plugins>
    </build>

</project>
步骤二:建立数据库,目前使用了六个表,分别是用户表,登陆表,角色表,页面资源表,用户-角色表,角色-资源页面访问表
sql语句如下所示:
/*
Navicat SQL Server Data Transfer

Source Server         : yys_sqlserver
Source Server Version : 105000
Source Host           : localhost:1433
Source Database       : SpringSecurity_Test
Source Schema         : dbo

Target Server Type    : SQL Server
Target Server Version : 105000
File Encoding         : 65001

Date: 2020-03-21 14:27:17
*/


-- ----------------------------
-- Table structure for login
-- ----------------------------
DROP TABLE [dbo].[login]
GO
CREATE TABLE [dbo].[login] (
[id] varchar(36) NOT NULL ,
[loginUserName] varchar(36) NOT NULL ,
[loginPassword] varchar(255) NOT NULL ,
[userId] varchar(36) NOT NULL
)


GO

-- ----------------------------
-- Table structure for page
-- ----------------------------
DROP TABLE [dbo].[page]
GO
CREATE TABLE [dbo].[page] (
[id] varchar(36) NOT NULL ,
[pageName] varchar(255) NOT NULL ,
[pageUrl] varchar(255) NOT NULL
)


GO

-- ----------------------------
-- Table structure for role
-- ----------------------------
DROP TABLE [dbo].[role]
GO
CREATE TABLE [dbo].[role] (
[id] varchar(36) NOT NULL ,
[roleName] varchar(255) NOT NULL ,
[roleRemark] varchar(36) NULL
)


GO

-- ----------------------------
-- Table structure for user
-- ----------------------------
DROP TABLE [dbo].[user]
GO
CREATE TABLE [dbo].[user] (
[id] varchar(36) NOT NULL ,
[username] varchar(36) NOT NULL
)


GO

-- ----------------------------
-- Table structure for user_Page
-- ----------------------------
DROP TABLE [dbo].[user_Page]
GO
CREATE TABLE [dbo].[user_Page] (
[id] varchar(36) NOT NULL ,
[userRoleID] varchar(36) NOT NULL ,
[pageId] varchar(36) NOT NULL ,
[roleCode] varchar(20) NULL
)


GO

-- ----------------------------
-- Table structure for user_role
-- ----------------------------
DROP TABLE [dbo].[user_role]
GO
CREATE TABLE [dbo].[user_role] (
[id] varchar(36) NOT NULL ,
[userid] varchar(36) NOT NULL ,
[roleId] varchar(36) NOT NULL
)


GO

-- ----------------------------
-- Indexes structure for table login
-- ----------------------------

-- ----------------------------
-- Primary Key structure for table login
-- ----------------------------
ALTER TABLE [dbo].[login] ADD PRIMARY KEY ([id])
GO

-- ----------------------------
-- Indexes structure for table page
-- ----------------------------

-- ----------------------------
-- Primary Key structure for table page
-- ----------------------------
ALTER TABLE [dbo].[page] ADD PRIMARY KEY ([id])
GO

-- ----------------------------
-- Indexes structure for table role
-- ----------------------------

-- ----------------------------
-- Primary Key structure for table role
-- ----------------------------
ALTER TABLE [dbo].[role] ADD PRIMARY KEY ([id])
GO

-- ----------------------------
-- Indexes structure for table user
-- ----------------------------

-- ----------------------------
-- Primary Key structure for table user
-- ----------------------------
ALTER TABLE [dbo].[user] ADD PRIMARY KEY ([id])
GO

-- ----------------------------
-- Indexes structure for table user_Page
-- ----------------------------

-- ----------------------------
-- Primary Key structure for table user_Page
-- ----------------------------
ALTER TABLE [dbo].[user_Page] ADD PRIMARY KEY ([id])
GO

-- ----------------------------
-- Indexes structure for table user_role
-- ----------------------------

-- ----------------------------
-- Primary Key structure for table user_role
-- ----------------------------
ALTER TABLE [dbo].[user_role] ADD PRIMARY KEY ([id])
GO
数据库中表得数据如下:


步骤三:根据数据库使用mybatis自动生成bean,service等Java类,目录结构如下所示:

generatorConfig.xml
<?xml version="1.0" encoding="UTF-8"?>
<!DOCTYPE generatorConfiguration
        PUBLIC " -//mybatis.org//DTD MyBatis Generator Configuration 1.0//EN"
        "http://mybatis.org/dtd/mybatis-generator-config_1_0.dtd">
<generatorConfiguration>
    <classPathEntry
            location="target/mssql-jdbc-7.4.1.jre8.jar"/>
    <context id="my" targetRuntime="MyBatis3">
        <commentGenerator>
            <property name="suppressDate" value="false"/>
            <property name="suppressAllComments" value="true"/>
        </commentGenerator>
        <jdbcConnection driverClass="com.microsoft.sqlserver.jdbc.SQLServerDriver"
                        connectionURL="jdbc:sqlserver://127.0.0.1:1433;Databasename=SpringSecurity_Test"
                        userId="sa"
                        password="123456">
        </jdbcConnection>
        <javaTypeResolver>
            <property name="forceBigDecimals" value="false"/>
        </javaTypeResolver>
        <javaModelGenerator targetPackage="com.example.demo.bean"
                            targetProject="src/main/java">
            <property name="enableSubPackages" value="true"/>
            <property name="trimStrings" value="true"/>
        </javaModelGenerator>
        <sqlMapGenerator targetPackage="mapper"
                         targetProject="src/main/resources">
            <property name="enableSubPackages" value="true"/>
        </sqlMapGenerator>
        <javaClientGenerator targetPackage="com.example.demo.mapper"
                             targetProject="src/main/java" type="XMLMAPPER">
            <property name="enableSubPackages" value="true"/>
        </javaClientGenerator>
        <table tableName="login" domainObjectName="login"
               enableCountByExample="false" enableUpdateByExample="false"
               enableDeleteByExample="false" enableSelectByExample="false"
               selectByExampleQueryId="false">
        </table>

        <table tableName="page" domainObjectName="page"
               enableCountByExample="false" enableUpdateByExample="false"
               enableDeleteByExample="false" enableSelectByExample="false"
               selectByExampleQueryId="false">
        </table>

        <table tableName="role" domainObjectName="role"
               enableCountByExample="false" enableUpdateByExample="false"
               enableDeleteByExample="false" enableSelectByExample="false"
               selectByExampleQueryId="false">
        </table>

        <table tableName="user" domainObjectName="user"
               enableCountByExample="false" enableUpdateByExample="false"
               enableDeleteByExample="false" enableSelectByExample="false"
               selectByExampleQueryId="false">
        </table>
        <table tableName="user_Page" domainObjectName="user_Page"
               enableCountByExample="false" enableUpdateByExample="false"
               enableDeleteByExample="false" enableSelectByExample="false"
               selectByExampleQueryId="false">
        </table>
        <table tableName="user_role" domainObjectName="user_role"
               enableCountByExample="false" enableUpdateByExample="false"
               enableDeleteByExample="false" enableSelectByExample="false"
               selectByExampleQueryId="false">
        </table>
    </context>
</generatorConfiguration>
步骤四:编写security的Config类,进行security配置:
package com.example.demo.config;

import com.example.demo.DetailService.CustomUserDetailsService;
import org.springframework.beans.factory.annotation.Autowired;
import org.springframework.security.config.annotation.authentication.builders.AuthenticationManagerBuilder;
import org.springframework.security.config.annotation.web.builders.HttpSecurity;
import org.springframework.security.config.annotation.web.configuration.EnableWebSecurity;
import org.springframework.security.config.annotation.web.configuration.WebSecurityConfigurerAdapter;
import org.springframework.security.crypto.bcrypt.BCryptPasswordEncoder;

/**
 * @ClassName securityConfig
 * @Description TODO
 * @Author YYS
 * @Date 2020/3/17 22:08
 * @Version 1.0
 */
@EnableWebSecurity
public class securityConfig extends WebSecurityConfigurerAdapter {

    @Autowired
    CustomUserDetailsService userDetailsService;

    @Override
    protected void configure(HttpSecurity http) throws Exception {
        //关闭防止跨站攻击
        http.csrf().disable();
        //授权
        //首页所有人可以访问,但是功能页只有有权限的人访问
        //这个配置写的不太完善,仅供参考
        http.authorizeRequests().antMatchers("/","/login","/index")
                .permitAll()
                .antMatchers("/index1/**").hasAuthority("P1")
                .antMatchers("/index2/**").hasAuthority("P2")
                .and()
                //登陆成功之后根据权限不同跳转至不同页面
//                .formLogin().loginPage("/login").successHandler(
//                        new AuthenticationSuccessHandler() {
//                            @Override
//                            public void onAuthenticationSuccess(HttpServletRequest arg0, HttpServletResponse arg1, Authentication arg2)
//                                    throws IOException, ServletException {
//                                Object principal = SecurityContextHolder.getContext().getAuthentication().getPrincipal();
//                                if (principal != null && principal instanceof UserDetails) {
//                                    UserDetails user = (UserDetails) principal;
//                                    System.out.println("loginUser:"+user.getUsername());
//                                    //维护在session中
//                                    arg0.getSession().setAttribute("userDetail", user);
//                                    Set<String> roles = AuthorityUtils.authorityListToSet(SecurityContextHolder.getContext().getAuthentication().getAuthorities());
//                                    for (String role: roles){
//                                        System.out.println(role);
//                                        if (role.equals("P1")){
//                                            arg1.sendRedirect("/index1");
//                                        }else {
//                                            arg1.sendRedirect("/index2");
//                                        }
//                                    }
//                                }
//                            }
//                    })
                //登陆成功之后跳转至统一页面
                .formLogin().loginPage("/login").successForwardUrl("/index").failureForwardUrl("/loginerror")
                .and()//注销后会发送请求至Controller,然后根据“/”请求跳转至登陆页
                .logout().logoutUrl("/");
        //开启记住我
        http.rememberMe();
    }

    //认证
    //There is no PasswordEncoder mapped for the id "null"
    //密码要加密,spring secutiry5.0中,新增了许多加密方式
    @Override
    protected void configure(AuthenticationManagerBuilder auth) throws Exception {
        //基于内存的认证
//        auth.inMemoryAuthentication().passwordEncoder(new BCryptPasswordEncoder())
//                .withUser("yys1").password(new BCryptPasswordEncoder().encode("123456")).roles("P1")
//                .and()
//                .withUser("yys2").password(new BCryptPasswordEncoder().encode("123456")).roles("P2");
        //基于数据库的认证
        auth.userDetailsService(userDetailsService).passwordEncoder(new BCryptPasswordEncoder());
    }

}
步骤五:实现UserDetailsService接口,并在其中编写自己的逻辑,从数据库中查找到当前登陆用户的用户名密码,并与输入的进行比对,判断是否可以登陆
CustomUserDetailsService.java
package com.example.demo.DetailService;
import com.example.demo.bean.login;
import com.example.demo.bean.role;
import com.example.demo.bean.user;
import com.example.demo.bean.user_Page;
import com.example.demo.service.LoginService;
import com.example.demo.service.RoleService;
import com.example.demo.service.UserPageService;
import com.example.demo.service.UserService;
import org.slf4j.Logger;
import org.slf4j.LoggerFactory;
import org.springframework.beans.factory.annotation.Autowired;
import org.springframework.security.core.GrantedAuthority;
import org.springframework.security.core.authority.SimpleGrantedAuthority;
import org.springframework.security.core.userdetails.User;
import org.springframework.security.core.userdetails.UserDetails;
import org.springframework.security.core.userdetails.UserDetailsService;
import org.springframework.security.core.userdetails.UsernameNotFoundException;
import org.springframework.security.crypto.bcrypt.BCryptPasswordEncoder;
import org.springframework.stereotype.Component;

import java.util.ArrayList;
import java.util.Collection;
import java.util.List;
import java.util.Set;

/**
 * @Author YYS
 * @Description //TODO
 * @Date 23:39 23:39
 * @Param
 * @return
 **/
@Component
public class CustomUserDetailsService implements UserDetailsService {

    private static final Logger LOGGER = LoggerFactory.getLogger(CustomUserDetailsService.class);

    private UserService userService;

    @Autowired
    private RoleService roleService;

    private BCryptPasswordEncoder bCryptPasswordEncoder = new BCryptPasswordEncoder();

    @Autowired
    private UserPageService userPageService;

    @Autowired
    LoginService loginService;

    @Autowired
    public CustomUserDetailsService(UserService userService) {
        this.userService = userService;
    }

    @Override
    public UserDetails loadUserByUsername(String username) throws UsernameNotFoundException {
        LOGGER.info("对用户 [{}] 进行信息加载...",username);

        user user = userService.findUserByUsername(username);
        /* 从数据库里面查出当前登录用户 */
        login login=loginService.getLoginByUserName(username);
        //登陆用户不存在,直接返回null,系统会直接抛出异常
        if(user==null){
            LOGGER.error("用户 [{}] 未找到",username);
            return null;
        }
        //以下两个是分别获取登陆用户的角色和权限,可以选择利用角色作为授权,或者权限作为授权
        Collection<GrantedAuthority> roleauthorities = new ArrayList<>();
        Collection<GrantedAuthority> pageauthorities = new ArrayList<>();
        //角色
        Set<role> roles = roleService.roles(username);
        //权限
        List<user_Page> user_pages = userPageService.user_Page_List(username);
        //将用户角色放入roleauthorities
        if(roles != null){
            for (role role : roles) {
                SimpleGrantedAuthority authority = new SimpleGrantedAuthority(role.getRolename());
                roleauthorities.add(authority);
            }
        }

        //将用户权限放入pageauthorities
        if (user_pages !=null && !user_pages.isEmpty()){
            for (user_Page userPage:user_pages){
                SimpleGrantedAuthority authority = new SimpleGrantedAuthority(userPage.getRoleCode());
                pageauthorities.add(authority);
            }
        }
        //根据角色授权还是根据权限授权自己选,此处,我根据权限授权,判断用户是否有访问页面的权限
        UserDetails roleuserDetails = new User(login.getLoginusername(),bCryptPasswordEncoder.encode(login.getLoginpassword()),roleauthorities);
        UserDetails pageuserDetails = new User(login.getLoginusername(),bCryptPasswordEncoder.encode(login.getLoginpassword()),pageauthorities);
        LOGGER.info("用户 [{}] 信息加载完成",username);
        LOGGER.info("获取登录用户已具有的角色:{}", roleauthorities.toString());
        LOGGER.info("获取登录用户已具有的权限:{}", pageauthorities.toString());
        //返回userDetails
        return pageuserDetails;
    }
}
Controller文件:
package com.example.demo.controller;

import org.springframework.web.bind.annotation.RequestMapping;

/**
 * @ClassName Controller
 * @Description TODO
 * @Author YYS
 * @Date 2020/3/17 21:38
 * @Version 1.0
 */
@org.springframework.stereotype.Controller
public class Controller {

    @RequestMapping({"/", "/login"})
    public String login() {
        return "login";
    }

    @RequestMapping({"/index"})
    public String index() {
        return "index";
    }

    @RequestMapping({"/index1"})
    public String index1() {
        return "index1";
    }

    @RequestMapping({"/index2"})
    public String index2() {
        return "index2";
    }

    @RequestMapping("/logout")
    public String logout() {
        return "login";
    }

    @RequestMapping("/loginerror")
    public String loginerror() {
        return "loginerror";
    }

}
application.propies文件:
spring.thymeleaf.cache=false

server.port=8080

# 给返回的页面添加后缀名
spring.mvc.view.suffix=.html

# mybatis 配置
mybatis.type-aliases-package=cn.codesheep.springbt_mybatis_sqlserver.entity
mybatis.mapper-locations=classpath:mapper/*.xml
mybatis.configuration.map-underscore-to-camel-case=true

## -------------------------------------------------

## SqlServer 配置
spring.datasource.url=jdbc:sqlserver://127.0.0.1:1433;databasename=SpringSecurity_Test
spring.datasource.driver-class-name=com.microsoft.sqlserver.jdbc.SQLServerDriver
spring.datasource.username=sa
spring.datasource.password=123456
html文件结构:

步骤六:启动项目
访问localhost:8080
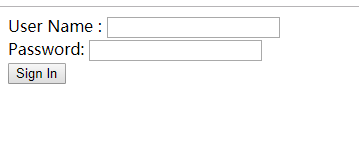
使用yys正确登录:
后台结果显示:


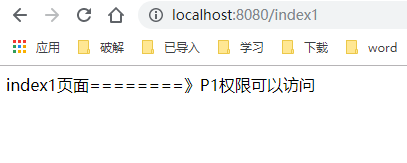
此时,用户只有访问index1的权限,无访问index2的权限
访问index1:
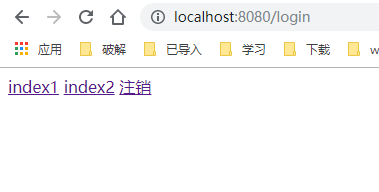
访问index2:

在使用可以访问index2的用户登录:

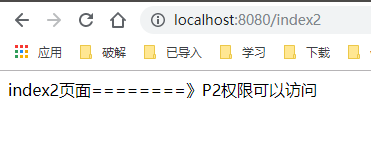
访问有权限的index2
代码地址:https://github.com/yys-518/SpringBoot-SpringSecuity


 1808
1808


 被折叠的 条评论
为什么被折叠?
被折叠的 条评论
为什么被折叠?
 到【灌水乐园】发言


