


引言
自从Google出了RecyclerView后,基本上列表的场景已经完全替代了原来的ListView和GridView,现在不仅仅是列表,多样式(俗称盖楼),复杂页面等,只要我们愿意,RecyclerView几乎可以代替实现80%的布局,GitHub可以发现各种各样给予RecyclerView的开源库,无论是Adapter还是LayoutManager等。阿里对应出的vlayout其实也是RecyclerView的深度拓展,所以最近感觉仅仅了解用法是不够的,使用RecyclerView越多,就越会发现这个组件的深度不能仅仅停留在使用层面,从RecyclerView可以延伸出一系列进阶的使用、拓展、优化、封装等,所以打算从源码角度来看一下RecyclerView的实现机制,更方便我们进行进阶学习使用RecyclerView。
带着问题看源码
由于对RecyclerView使用的程度和频率越来越多,越来越多的不解和疑问让我想要去看一看RecyclerView的源码,总的疑惑有下面几个:
-
1.RecyclerView,LayoutManager,Adapter,ViewHolder,ItemDecoration这些和RecycleView使用息息相关的类到底是什么关系
-
2.RecyclerView作为列表,绘制流程到底什么样的
-
3.RecyclerView有什么不常用的进阶使用方式,但是却很适合RecyclerView作为很“重”的组件的优化,像setRecyclerPool用处到底是什么
-
4.大家都只要要使用RecyclerView替代ListView和GridView,好用,都在用,但是都没有追究到底这背后的原因到底是什么,RecyclerView到底比ListView好在哪里,到底该不该替换,性能到底提升多少。
以上问题不一定看完源码都能解决,但是带着问题来看源码总会有不错的收获,或者大家有什么关于使用RecyclerView的学习博客链接,使用经验和体会都可以在下面评论供大家一起学习讨论。
思路
当打开RecyclerVew的源码会发现非常的复杂,感觉无从下手。那么既然RecyclerView继承的是ViewGroup,也就是说RecyclerView其实就是和LinearLayout等布局一样的一个自定义ViewGroup。
既然涉及到自定义组件,那么当我们自己来实现一个自定义ViewGroup,最重要的步骤无非是下面几点:
- 重写onMeasure用于确定自定义ViewGroup的大小
- 重写onLayout用于布局子view的位置
所以源码的分析也对应从这里开始进行分析。
onMeasure
这里就不放上RecyclerView中的onMeasure的所有源码了,那样只会增加我们的理解难度,所以同样选择利用伪代码进行分析。
protected void onMeasure(int widthSpec, int heightSpec) {
    if (mLayout == null) {
        //layoutManager没有设置的话,直接走default的方法,所以会为空白
        defaultOnMeasure(widthSpec, heightSpec);
        return;
    }
    if (mLayout.mAutoMeasure) {
        final boolean skipMeasure = widthMode == MeasureSpec.EXACTLY
                && heightMode == MeasureSpec.EXACTLY;
        //如果测量是绝对值,则跳过measure过程直接走layout
        if (skipMeasure || mAdapter == null) {
            return;
        }
        if (mState.mLayoutStep == State.STEP_START) {
            //mLayoutStep默认值是 State.STEP_START
            dispatchLayoutStep1();
            //执行完dispatchLayoutStep1()后是State.STEP_LAYOUT
        }
         ..........
        //真正执行LayoutManager绘制的地方
        dispatchLayoutStep2();
        //执行完后是State.STEP_ANIMATIONS
         ..........
        //宽高都不确定的时候,会绘制两次
        // if RecyclerView has non-exact width and height and if there is at least one child
        // which also has non-exact width & height, we have to re-measure.
        if (mLayout.shouldMeasureTwice()) {
         ..........
            dispatchLayoutStep2();
         ..........            }
    } else {
        if (mHasFixedSize) {
            mLayout.onMeasure(mRecycler, mState, widthSpec, heightSpec);
            return;
        }
         ..........
        mLayout.onMeasure(mRecycler, mState, widthSpec, heightSpec);
         ..........
        mState.mInPreLayout = false; // clear
    }
}
源码放上了,现在可以一步一步分析onMeasure的过程了,先从第一个小点开始吧。
if (mLayout == null) {
    //layoutManager没有设置的话,直接走default的方法,所以会为空白
    defaultOnMeasure(widthSpec, heightSpec);
    return;
}
这里的mLayout其实就是我们给RecyclerView设置的LayoutManager对象,这一段代码其实就很好的解释了为什么我们有时候初次使用RecyclerView的时候忘记设置LayoutManager后,RecyclerView会没有按照我们所想的那样显示出来。
这里可以看到,如果mLayout为null的话,会走defaultOnMeasure方法。
void defaultOnMeasure(int widthSpec, int heightSpec) {
    // calling LayoutManager here is not pretty but that API is already public and it is better
    // than creating another method since this is internal.
    final int width = LayoutManager.chooseSize(widthSpec,
            getPaddingLeft() + getPaddingRight(),
            ViewCompat.getMinimumWidth(this));
    final int height = LayoutManager.chooseSize(heightSpec,
            getPaddingTop() + getPaddingBottom(),
            ViewCompat.getMinimumHeight(this));
    setMeasuredDimension(width, height);
}
可以看到这里的chooseSize方法其实就是更新宽高的Mode得到相应的值后,直接调用setMeasuredDimension(width, height)设置宽高了,可以发现这里其实是没有进行child的测量就直接return结束了onMeasure过程的,这也就解释了为什么我们没有设置LayoutManager会导致显示空白了。
接下来技术一个判断
if (mLayout.mAutoMeasure) {
}else{
}
这里其实mAutoMeasure这个值,LinearLayoutManager还是其他两个Manager,默认值都是true。所以接着往下看。
final boolean skipMeasure = widthMode == MeasureSpec.EXACTLY
      && heightMode == MeasureSpec.EXACTLY;
//如果测量是绝对值,则跳过measure过程直接走layout
if (skipMeasure || mAdapter == null) {
    return;
}
这里解释的很清楚,如果宽和高的测量值是绝对值时,直接跳过onMeasure方法。那这里可能有疑问了,如果没有执行onMeasure方法,那么子View没有绘制,会造成空白的情况,但是实际情况是当我们给RecyclerView设置绝对值大小的时候,子View仍可以正常绘制出来。这个问题后面会解答。(onLayout里会执行子View的绘制)
 if (mState.mLayoutStep == State.STEP_START) {
     //mLayoutStep默认值是 State.STEP_START
      dispatchLayoutStep1();
      //执行完dispatchLayoutStep1()后是State.STEP_LAYOUT
 }
接下来就要开始绘制的准备了,这里可以看到首先判断mLayoutStep,这里mLayoutStep的默认值其实就是 State.STEP_START,并且每次绘制流程结束后,会重置为 State.STEP_START。接下来执行dispatchLayoutStep1();方法dispatchLayoutStep1();其实没有必要过多分析,因为分析源码主要是对于绘制思想的理解,如果过多的纠结于每一行代码的含义,那么会陷入很大的困扰中。这里就放上官方对于dispatchLayoutStep1();的注释吧。(顺道翻译一下)
/**
 * The first step of a layout where we;
 * - process adapter updates
 * - decide which animation should run
 * - save information about current views
 * - If necessary, run predictive layout and save its information
 */

	1.处理Adapter的更新
	2.决定那些动画需要执行
	3.保存当前View的信息
	4.如果必要的话,执行上一个Layout的操作并且保存他的信息
接下来就是我们的真正执行LayoutManager绘制的地方dispatchLayoutStep2()。
private void dispatchLayoutStep2() {
    ....
    //重写的getItemCount方法
    mState.mItemCount = mAdapter.getItemCount();
    ....
    // Step 2: Run layout
    mState.mInPreLayout = false;
    mLayout.onLayoutChildren(mRecycler, mState);
     ....
}
同样的,这里放上伪代码,便于理解。
这里注意两个地方,第一个mAdapter.getItemCount(),可以看到我们每次重写Adapter时重写的方法getItemCount方法用到的地方了。
第二个,可以看到mLayout.onLayoutChildren(mRecycler, mState);这个方法,为什么说RecyclerView将View的绘制交给了LayoutManager,这里就是最有力的体现,可以看到,这里将RecycleView内部持有的Recycler和state传给了LayoutManager的onLayoutChildren方法,单从方法的名字其实就可以看出。这里我们进入LayoutManager里看一看。(本次分析基于LinearLayoutManager)
public void onLayoutChildren(RecyclerView.Recycler recycler, RecyclerView.State state) {
   // layout algorithm:
    //找寻锚点
    // 1) by checking children and other variables, find an anchor coordinate and an anchor
    // item position.
    //两个方向填充,从锚点往上,从锚点往下
    // 2) fill towards start, stacking from bottom
    // 3) fill towards end, stacking from top
    // 4) scroll to fulfill requirements like stack from bottom.
    // create layout state
    ....
    // resolve layout direction
    //判断绘制方向,给mShouldReverseLayout赋值,默认是正向绘制,则mShouldReverseLayout是false
    resolveShouldLayoutReverse();
    final View focused = getFocusedChild();
    //mValid的默认值是false,一次测量之后设为true,onLayout完成后会回调执行reset方法,又变为false
    if (!mAnchorInfo.mValid || mPendingScrollPosition != NO_POSITION
            || mPendingSavedState != null) {
    ....
        //mStackFromEnd默认是false,除非手动调用setStackFromEnd()方法,两个都会false,异或则为false
        mAnchorInfo.mLayoutFromEnd = mShouldReverseLayout ^ mStackFromEnd;
        // calculate anchor position and coordinate
        //计算锚点的位置和偏移量
        updateAnchorInfoForLayout(recycler, state, mAnchorInfo);
    ....
    } else if (focused != null && (mOrientationHelper.getDecoratedStart(focused)
            >= mOrientationHelper.getEndAfterPadding()
            || mOrientationHelper.getDecoratedEnd(focused)
            <= mOrientationHelper.getStartAfterPadding())) {
     ....
    }
     ....
    //mLayoutFromEnd为false
    if (mAnchorInfo.mLayoutFromEnd) {
        //倒着绘制的话,先往上绘制,再往下绘制
        // fill towards start
        // 从锚点到往上
        updateLayoutStateToFillStart(mAnchorInfo);
        ....
        fill(recycler, mLayoutState, state, false);
        ....
        // 从锚点到往下
        // fill towards end
        updateLayoutStateToFillEnd(mAnchorInfo);
        ....
        //调两遍fill方法
        fill(recycler, mLayoutState, state, false);
        ....
        if (mLayoutState.mAvailable > 0) {
            // end could not consume all. add more items towards start
        ....
            updateLayoutStateToFillStart(firstElement, startOffset);
            mLayoutState.mExtra = extraForStart;
            fill(recycler, mLayoutState, state, false);
         ....
        }
    } else {
        //正常绘制流程的话,先往下绘制,再往上绘制
        // fill towards end
        updateLayoutStateToFillEnd(mAnchorInfo);
        ....
        fill(recycler, mLayoutState, state, false);
         ....
        // fill towards start
        updateLayoutStateToFillStart(mAnchorInfo);
        ....
        fill(recycler, mLayoutState, state, false);
         ....
        if (mLayoutState.mAvailable > 0) {
            ....
            // start could not consume all it should. add more items towards end
            updateLayoutStateToFillEnd(lastElement, endOffset);
             ....
            fill(recycler, mLayoutState, state, false);
            ....
        }
    }
    ....
    layoutForPredictiveAnimations(recycler, state, startOffset, endOffset);
    //完成后重置参数
    if (!state.isPreLayout()) {
        mOrientationHelper.onLayoutComplete();
    } else {
        mAnchorInfo.reset();
    }
    mLastStackFromEnd = mStackFromEnd;
}
这里虽然已经尽量删减了很多代码,但是还是很多…但是其实原理理解起来还是比较容易的。简单的说其实可以总结缩略为:
先寻找页面当前的锚点
以这个锚点未基准,向上和向下分别填充
填充完后,如果还有剩余的可填充大小,再填充一次
这样理解起来就比较容易了,接下来我们就一步一步来看一下源码。
寻找锚点
   resolveShouldLayoutReverse();
    final View focused = getFocusedChild();
    //mValid的默认值是false,一次测量之后设为true,onLayout完成后会回调执行reset方法,又变为false
    if (!mAnchorInfo.mValid || mPendingScrollPosition != NO_POSITION
            || mPendingSavedState != null) {
    ....
        //mStackFromEnd默认是false,除非手动调用setStackFromEnd()方法,两个都会false,异或则为false
        mAnchorInfo.mLayoutFromEnd = mShouldReverseLayout ^ mStackFromEnd;
        // calculate anchor position and coordinate
        //计算锚点的位置和偏移量
        updateAnchorInfoForLayout(recycler, state, mAnchorInfo);
    ....
    } else if (focused != null && (mOrientationHelper.getDecoratedStart(focused)
            >= mOrientationHelper.getEndAfterPadding()
            || mOrientationHelper.getDecoratedEnd(focused)
            <= mOrientationHelper.getStartAfterPadding())) {
     ....
    }
首先执行的resolveShouldLayoutReverse()方法,从方法的命名上可以理解为是否需要倒着绘制
 //判断绘制方向,给mShouldReverseLayout赋值,默认是正向绘制,则mShouldReverseLayout是false
private void resolveShouldLayoutReverse() {
    // A == B is the same result, but we rather keep it readable
    if (mOrientation == VERTICAL || !isLayoutRTL()) {
        //默认mReverseLayout是false,构造函数,可以通过setReverseLayout来设置
        mShouldReverseLayout = mReverseLayout;
    } else {
        mShouldReverseLayout = !mReverseLayout;
    }
}
可以看到这里我注释写的很清楚,如果我们没有手动调用setReverseLayout()方法,默认情况下,是不会倒着绘制的。
接下来对于几个变量的注释这里解释一下。
首先是mAnchorInfo.mValid,这里mAnchorInfo就是我们要的锚点。mValid的默认值是false,一次测量之后设为true,onLayout完成后会回调执行reset方法,又变为false
再就是mAnchorInfo.mLayoutFromEnd。
mAnchorInfo.mLayoutFromEnd = mShouldReverseLayout ^ mStackFromEnd;
可以看到这里用到了位运算符^异或,前面已经分析了,mShouldReverseLayout默认是fasle的,mStackFromEnd默认是false,除非手动调用setStackFromEnd()方法,两个都会false,异或则为false。
updateAnchorInfoForLayout(recycler, state, mAnchorInfo);
接下来这个方法就是对于锚点位置的确定,里面其实就是对于当前状态的偏移量的计算,得出当前的锚点位置,具体比较复杂,这里就不做分析了。后面就是绘制的地方,主要就是两种方向,正向(先向下再向上),逆向(先向上再向下),所以这里我们就看平常的情况。
{
   //正常绘制流程的话,先往下绘制,再往上绘制
    // fill towards end
    updateLayoutStateToFillEnd(mAnchorInfo);
    ....
    fill(recycler, mLayoutState, state, false);
     ....
    // fill towards start
    updateLayoutStateToFillStart(mAnchorInfo);
    ....
    fill(recycler, mLayoutState, state, false);
     ....
    if (mLayoutState.mAvailable > 0) {
        ....
        // start could not consume all it should. add more items towards end
        updateLayoutStateToFillEnd(lastElement, endOffset);
         ....
        fill(recycler, mLayoutState, state, false);
        ....
    }
}
可以看到这里有两种方法。
1.updateLayoutStateToFill…()
2.fill()
第一个方法其实就是确定当前方向上锚点的相关的状态信息。
这里最主要的就是第二个方法fill(),可以看到这里至少调用了两次fill()方法,当还有剩余可以绘制的时候会再调一次fill()方法。这也证明了我们的想法,是通过锚点分别向上和向下两次绘制。这里放上一张图便于理解

int fill(RecyclerView.Recycler recycler, LayoutState layoutState,
         RecyclerView.State state, boolean stopOnFocusable) {
        .....
        layoutChunk(recycler, state, layoutState, layoutChunkResult);
                     .....
    return start - layoutState.mAvailable;
}
这里fill其实最重要的就是看这里的layoutChunk(recycler, state, layoutState, layoutChunkResult)方法。
void layoutChunk(RecyclerView.Recycler recycler, RecyclerView.State state,
                     LayoutState layoutState, LayoutChunkResult result) {
    //next方法很重要
    View view = layoutState.next(recycler);
    if (view == null) {
        if (DEBUG && layoutState.mScrapList == null) {
            throw new RuntimeException("received null view when unexpected");
        }
       ...
    }
    LayoutParams params = (LayoutParams) view.getLayoutParams();
    if (layoutState.mScrapList == null) {
        if (mShouldReverseLayout == (layoutState.mLayoutDirection
                == LayoutState.LAYOUT_START)) {
            addView(view);
        } else {
            addView(view, 0);
        }
    } else {
        if (mShouldReverseLayout == (layoutState.mLayoutDirection
                == LayoutState.LAYOUT_START)) {
            addDisappearingView(view);
        } else {
            addDisappearingView(view, 0);
        }
    }
    //测量ChildView
    measureChildWithMargins(view, 0, 0);
    ......
    // We calculate everything with View's bounding box (which includes decor and margins)
    // To calculate correct layout position, we subtract margins.
    //layout Child
    layoutDecoratedWithMargins(view, left, top, right, bottom);
    ......
}
这个方法其实我是不忍注释的,满满的干货啊,首先是我们的next方法,千万不要因为这个next短小不起眼,就认为不重要。我只能说这个方法很重要。
View next(RecyclerView.Recycler recycler) {
    //默认mScrapList=null,但是执行layoutForPredictiveAnimations方法的时候不会为空
    if (mScrapList != null) {
        return nextViewFromScrapList();
    }
    //重要,从recycler获得View,mScrapList是被LayoutManager持有,recycler是被RecyclerView持有
    final View view = recycler.getViewForPosition(mCurrentPosition);
    mCurrentPosition += mItemDirection;
    return view;
}
第一个mSrapList其实默认是空的,只有执行layoutForPredictiveAnimations前不为空,执行完后又变为空,所以这里暂时不需要考虑。
可以看到View view = recycler.getViewForPosition(mCurrentPosition)终于看到RecyclerView中缓存策略的身影,RecyclerView的缓存不会在这篇博客讲解,但是这里不得不让我们注意下面从流程上简单的看一下View view = recycler.getViewForPosition(mCurrentPosition);这个方法
public View getViewForPosition(int position) {
    return getViewForPosition(position, false);
}
View getViewForPosition(int position, boolean dryRun) {
    return tryGetViewHolderForPositionByDeadline(position, dryRun, FOREVER_NS).itemView;
}
/**
 * Attempts to get the ViewHolder for the given position, either from the Recycler scrap,
 * cache, the RecycledViewPool, or creating it directly.
 */
/**
 * 注释写的很清楚,从Recycler的scrap,cache,RecyclerViewPool,或者直接create创建
 */
@Nullable
ViewHolder tryGetViewHolderForPositionByDeadline(int position,
        boolean dryRun, long deadlineNs) {
  //一堆判断之后,如果不成立
    holder = mAdapter.createViewHolder(RecyclerView.this, type);
}
可以看到这里,getViewForPosition会调用tryGetViewHolderForPositionByDeadline方法,tryGetViewHolderForPositionByDeadline方法的注释写的很清楚从Recycler的scrap,cache,RecyclerViewPool,或者直接create创建,这里我们也看到了我们最熟悉的mAdapter.createViewHolder(RecyclerView.this, type); 方法!
关于RecyclerView的缓存策略不出意外应该会在下篇博客进行分析
next()方法分析结束后,其实就比较容易了。
LayoutParams params = (LayoutParams) view.getLayoutParams();
if (layoutState.mScrapList == null) {
    if (mShouldReverseLayout == (layoutState.mLayoutDirection
            == LayoutState.LAYOUT_START)) {
        addView(view);
    } else {
        addView(view, 0);
    }
} else {
    if (mShouldReverseLayout == (layoutState.mLayoutDirection
            == LayoutState.LAYOUT_START)) {
        addDisappearingView(view);
    } else {
        addDisappearingView(view, 0);
    }
}
剩下的就是RecyclerView的addView方法。添加完View后会调用
//测量ChildView
measureChildWithMargins(view, 0, 0);

//----------------------------------------------------------
public void measureChildWithMargins(View child, int widthUsed, int heightUsed) {
    final LayoutParams lp = (LayoutParams) child.getLayoutParams();
    //设置分割线中的回调方法
    final Rect insets = mRecyclerView.getItemDecorInsetsForChild(child);
    widthUsed += insets.left + insets.right;
    heightUsed += insets.top + insets.bottom;
    final int widthSpec = getChildMeasureSpec(getWidth(), getWidthMode(),
            getPaddingLeft() + getPaddingRight()
                    + lp.leftMargin + lp.rightMargin + widthUsed, lp.width,
            canScrollHorizontally());
    final int heightSpec = getChildMeasureSpec(getHeight(), getHeightMode(),
            getPaddingTop() + getPaddingBottom()
                    + lp.topMargin + lp.bottomMargin + heightUsed, lp.height,
            canScrollVertically());
    if (shouldMeasureChild(child, widthSpec, heightSpec, lp)) {
        //子View的测量
        child.measure(widthSpec, heightSpec);
    }
}
从这个方法里我们看到了子View的测量,当然还有一个需要我们注意的地方那就是mRecyclerView.getItemDecorInsetsForChild(child)
Rect getItemDecorInsetsForChild(View child) {
    final LayoutParams lp = (LayoutParams) child.getLayoutParams();
    if (!lp.mInsetsDirty) {
        return lp.mDecorInsets;
    }
    if (mState.isPreLayout() && (lp.isItemChanged() || lp.isViewInvalid())) {
        // changed/invalid items should not be updated until they are rebound.
        return lp.mDecorInsets;
    }
    final Rect insets = lp.mDecorInsets;
    insets.set(0, 0, 0, 0);
    final int decorCount = mItemDecorations.size();
    for (int i = 0; i < decorCount; i++) {
        mTempRect.set(0, 0, 0, 0);
        //getItemOffsets()实现分割线的回调方法!
        mItemDecorations.get(i).getItemOffsets(mTempRect, child, this, mState);
        insets.left += mTempRect.left;
        insets.top += mTempRect.top;
        insets.right += mTempRect.right;
        insets.bottom += mTempRect.bottom;
    }
    lp.mInsetsDirty = false;
    return insets;
}
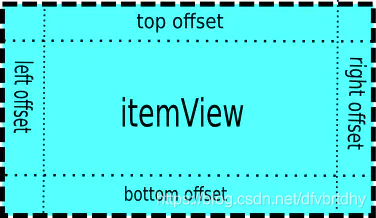
其实可以看到这里在测量子View的时候是将我们实现自定义分割线重写的getItemOffsets方法。这里其实也就可以理解了自定义分割线的原理就是在子View的测量过程前给上下左右加上自定义分割线所对应设置给这个child的边距。
测量完成后,紧接着就调用了layoutDecoratedWithMargins(view, left, top, right, bottom)对子View完成了layout。
public void layoutDecoratedWithMargins(View child, int left, int top, int right,int bottom) {
    final LayoutParams lp = (LayoutParams) child.getLayoutParams();
    final Rect insets = lp.mDecorInsets;
    //layout
    child.layout(left + insets.left + lp.leftMargin, top + insets.top + lp.topMargin,
            right - insets.right - lp.rightMargin,
            bottom - insets.bottom - lp.bottomMargin);
}
终于到此,我们对于onMeasure方法分析结束了,这里分析完成对于后面的onLayout的分析就比较简单了。
onLayout
@Override
protected void onLayout(boolean changed, int l, int t, int r, int b) {
    ...
    dispatchLayout();
    ...
}

void dispatchLayout() {
    ....
    if (mState.mLayoutStep == State.STEP_START) {
        dispatchLayoutStep1();
     ...
        dispatchLayoutStep2();
    } else if (mAdapterHelper.hasUpdates() || mLayout.getWidth() != getWidth()
            || mLayout.getHeight() != getHeight()) {
        // First 2 steps are done in onMeasure but looks like we have to run again due to
        // changed size.
     ...
        dispatchLayoutStep2();
    } else {
        // always make sure we sync them (to ensure mode is exact)
        mLayout.setExactMeasureSpecsFrom(this);
    }
    dispatchLayoutStep3();
}
这里的代码就比较好理解了,并且上面提到的问题也就迎刃而解了,当我们给RecyclerView设置固定的宽高的时候,onMeasure是直接跳过了执行,那么为什么子View仍然能绘制出来。
这里可以看到,如果onMeasure没有执行,mState.mLayoutStep == State.STEP_START就成立,所以仍然会执行 dispatchLayoutStep1(), dispatchLayoutStep2();也就对应的会绘制子View。
而后面的注释也比较清楚,由于我们在Layout的时候改变了宽高,也会导致dispatchLayoutStep2();,也就是子View的重新绘制。
如果上面情况都没有,那么onLayout的作用就仅仅是dispatchLayoutStep3(),而 dispatchLayoutStep3()方法的作用除了重置一些参数,外还和执行动画有关。
private void dispatchLayoutStep3() {
     //重置参数
    if (mState.mRunSimpleAnimations) {
        // Step 3: Find out where things are now, and process change animations.
        // traverse list in reverse because we may call animateChange in the loop which may
        // remove the target view holder.
        //需要动画的情况。找出ViewHolder现在的位置,并且处理改变动画。最后触发动画。
        }
        // Step 4: Process view info lists and trigger animations
        mViewInfoStore.process(mViewInfoProcessCallback);
    }
    //成功回调
}
到此!!!对于RecyclerView的绘制流程其实我们有了一个大体的了解,总结一下关键点:
1.RecyclerView是将绘制流程交给LayoutManager处理,如果没有设置不会测量子View。
2.绘制流程是区分正向绘制和倒置绘制。
3.绘制是先确定锚点,然后向上绘制,向下绘制,fill()至少会执行两次,如果绘制完还有剩余空间,则会再执行一次fill()方法。
4.LayoutManager获得View是从RecyclerView中的Recycler.next()方法获得,涉及到RecyclerView的缓存策略,如果缓存没有拿到,则走我们自己重写的onCreateView方法。
5.如果RecyclerView宽高没有写死,onMeasure就会执行完子View的measure和Layout方法,onLayout仅仅是重置一些参数,如果写死,子View的measure和layout会延后到onLayout中执行
转载:https://www.jianshu.com/p/c52b947fe064


 264
264

 被折叠的 条评论
为什么被折叠?
被折叠的 条评论
为什么被折叠?
 到【灌水乐园】发言


