


 本文详细介绍了如何使用Python的Tkinter库和Canvas组件实现一个动态的棒棒糖下落效果,包括图片处理、类定义、实体生成和窗体透明度设置。跟随教程,你将学会创建一个简单的图形界面应用。
python+tkinter+canvas实现天降棒棒糖,生活甜甜蜜蜜。
一、先看看效果吧。
直接开始介绍了吧。
二、准备资源图片

通过ps或者ppt软件把这个图片抠图干净,就会出来的效果好看些。
三、实现逻辑
(一)自定义棒棒糖类
class Ball:

    def __init__(self, canvas,root):
        self.canvas = canvas
        self.root = root
        self.image = Image.open('bbt.png').resize((30, 30))

    def create_ball(self):

        self.xpos = randint(50,self.root.winfo_width()-50)
        self.ypos = randint(-self.root.winfo_height(),0)
        self.vect = randint(1,3)

        self.tkimage = ImageTk.PhotoImage(self.image)
        self.canvas_obj = canvas.create_image(self.xpos, self.ypos, image=self.tkimage)


    def move_ball(self):
        # self.xpos += 1
        self.ypos += self.vect
        if self.ypos > self.root.winfo_height():
            self.xpos = randint(50, self.root.winfo_width() - 50)
            self.ypos = randint(-50, 0)
            self.vect = randint(1,3)
        self.tkimage = ImageTk.PhotoImage(self.image)
        self.canvas_obj = canvas.create_image(self.xpos, self.ypos, image=self.tkimage)
(二)随机生成棒棒糖实体
    balls = []
    num = 50
    for i in range(num):
        ball = Ball(canvas, tk)
        ball.create_ball()
        balls.append(ball)
(三)不断update位置信息
    move_balls()
    def move_balls():
    for ball in balls:
        ball.move_ball()
    canvas.after(20, move_balls)
(四)让窗体透明
def on_resize(evt):
    tk.configure(width=evt.width,height=evt.height)
    canvas.create_rectangle(0, 0, canvas.winfo_width(), canvas.winfo_height(), fill=TRANSCOLOUR, outline=TRANSCOLOUR)
四、完整代码
from tkinter import *
from random import *
import math
from PIL import Image,ImageTk
class Ball:
def __init__(self, canvas,root):
self.canvas = canvas
self.root = root
self.image = Image.open('bbt.png').resize((30, 30))
def create_ball(self):
self.xpos = randint(50,self.root.winfo_width()-50)
self.ypos = randint(-self.root.winfo_height(),0)
self.vect = randint(1,3)
self.tkimage = ImageTk.PhotoImage(self.image)
self.canvas_obj = canvas.create_image(self.xpos, self.ypos, image=self.tkimage)
def move_ball(self):
# self.xpos += 1
self.ypos += self.vect
if self.ypos > self.root.winfo_height():
self.xpos = randint(50, self.root.winfo_width() - 50)
self.ypos = randint(-50, 0)
self.vect = randint(1,3)
self.tkimage = ImageTk.PhotoImage(self.image)
self.canvas_obj = canvas.create_image(self.xpos, self.ypos, image=self.tkimage)
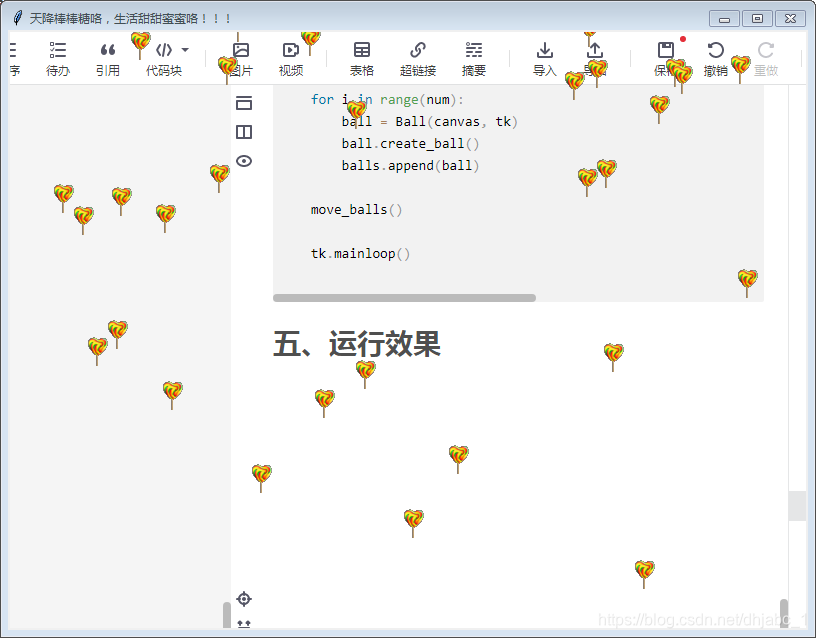
def move_balls():
for ball in balls:
ball.move_ball()
canvas.after(20, move_balls)
def on_resize(evt):
tk.configure(width=evt.width,height=evt.height)
canvas.create_rectangle(0, 0, canvas.winfo_width(), canvas.winfo_height(), fill=TRANSCOLOUR, outline=TRANSCOLOUR)
# canvas.create_oval(240, 30, 330, 200,
# outline='yellow', # 边框颜色
# fill='pink', # 填充颜色
# width=4 # 边框宽度
# )
print(canvas.winfo_width())
if __name__ == '__main__':
TRANSCOLOUR = 'gray'
tk = Tk()
tk.geometry('800x600+300+100')
tk.title('天降棒棒糖咯,生活甜甜蜜蜜咯!!!')
tk.wm_attributes('-transparentcolor', TRANSCOLOUR)
tk.wm_attributes("-topmost", 1)
tk.bind('<Configure>', on_resize)
# tk.overrideredirect(1)
canvas = Canvas(tk)
tk.winfo_width()
canvas.pack(fill=BOTH, expand=Y)
# canvas.config(highlightthickness=0)
tk.update()
balls = []
num = 50
for i in range(num):
ball = Ball(canvas, tk)
ball.create_ball()
balls.append(ball)
move_balls()
tk.mainloop()
五、运行效果
好吧,写完,希望对你有帮忙。


 被折叠的 条评论
为什么被折叠?
被折叠的 条评论
为什么被折叠?
 到【灌水乐园】发言


