


接上一篇:IdentityServer4实现OAuth2.0四种模式之授权码模式
前面写的四种OAuth2.0实现模式只涉及到IdentityServer4的OAuth2.0特性,并没有涉及到OenId方面的。OpenIdConnect是OAuth2.0与OpenId的结合,并加入了一个重要的概念:id_token。我们之前所讲的token是用于访问授权的access_token,而id_token是用于身份验证的,作用完全不同,这一点要区分开来。access_token是OAth2.0特性,而id_token是OpenIdConnect方案为改善OAuth2.0方案在身份验证方面的薄弱而加入的特性。
客户端获取Id_token与隐藏模式和授权码模式一样,都是通过redirect_url参数返回的,所以前面的四种模式中的客户端模式与密码模式不支持获取id_token,而授权码模式受限于流程,必需先取得Code才能取到token,所以不能直接支持获取id_token,如果需求是使用授权码模式,同时又需要id_token,OpenIdConnect支持第五种模式:混合模式(Hybrid),就是基于隐藏模式与授权码模式的结合。
一,IdentityServer服务配置
1)添加IdentityResouces
之前的OAuth2.0四种模式已经接触过ApiResouces,ApiResources作用是用于标志Api接口域,与Client配合决定了一个access_token所能访问的api区间,并且允许随access_token携带一些指定的用户Claim。IdentityResources是用于决定了一个id_token可以携带那些用户的身份信息(Claim),其中,如果要从IdentityServer取得id_token,名为"openid"的IdentityResource是必需的
- 使用IdentityServer4定义好的IdentityResource
IdentityServer.Config.GetIdentityResources
public static IEnumerable<IdentityResource> GetIdentityResources()
        {
            return new IdentityResource[]
            {
                new IdentityResources.OpenId()
            };
        }
IdentityResources.OpenId的实现源码如下
public OpenId()
            {
                Name = IdentityServerConstants.StandardScopes.OpenId;
                DisplayName = "Your user identifier";
                Required = true;
                UserClaims.Add(JwtClaimTypes.Subject);
            }
实际上new IdentityResources.OpenId()等效于:
new IdentityResource(IdentityServerConstants.StandardScopes.OpenId,"Your user identifier",new List<string>(){JwtClaimTypes.Subject})
或者
new IdentityResource("openid","Your user identifier",new List<string>(){ "sub"})
所用的重载方法说明最后一个参数List<string>决定了这个IdentityResource携带的Claim,“sub”是Client中定义的Subject属性。
        // 摘要:
        //     Initializes a new instance of the IdentityServer4.Models.IdentityResource class.
        //
        // 参数:
        //   name:
        //     The name.
        //
        //   displayName:
        //     The display name.
        //
        //   claimTypes:
        //     The claim types.
        //
        // 异常:
        //   T:System.ArgumentNullException:
        //     name
        //
        //   T:System.ArgumentException:
        //     Must provide at least one claim type - claimTypes
        public IdentityResource(string name, string displayName, IEnumerable<string> claimTypes);
IdentityServer4预定义了OenId,Profile,Email,Phone,Addrss这5个IdentityResource,其中Profile是比较重要的,他默认可携带包括用户的名字、生日、个人网站等信息。Profile映射的Claim的源码如下
 { IdentityServerConstants.StandardScopes.Profile, new[]
                            {
                                JwtClaimTypes.Name,
                                JwtClaimTypes.FamilyName,
                                JwtClaimTypes.GivenName,
                                JwtClaimTypes.MiddleName,
                                JwtClaimTypes.NickName,
                                JwtClaimTypes.PreferredUserName,
                                JwtClaimTypes.Profile,
                                JwtClaimTypes.Picture,
                                JwtClaimTypes.WebSite,
                                JwtClaimTypes.Gender,
                                JwtClaimTypes.BirthDate,
                                JwtClaimTypes.ZoneInfo,
                                JwtClaimTypes.Locale,
                                JwtClaimTypes.UpdatedAt
                            }},
- 添加自定义的IdentityResource
尽管IdentityServer定义好了这么多IdentityResource,但肯定不能包含所有用户信息。比如我需要在id_token中携带用户手机型号和用户手机价格二个Claim。可以这样自定义一个IdentityResource。
new IdentityResource("PhoneModel","User's phone Model",new List<string>(){ "phonemodel","phoneprise"})
2)将IdentityResource添加到IdentityServer
IdentityServer.StartUp
  var builder = services.AddIdentityServer()
                //身份信息资源
                .AddInMemoryIdentityResources(Config.GetIdentityResources())

                //API授权资源
                .AddInMemoryApiResources(Config.GetApis())
                //客户端
                .AddInMemoryClients(Config.GetClients())
                //添加用户
                .AddTestUsers(Config.GetUsers());
3)配置用户的Claim信息
 new TestUser()
                {
                    //用户名
                     Username="apiUser",
                     //密码
                     Password="apiUserPassword",
                     //用户Id
                     SubjectId="0",

                     Claims=new List<Claim>(){
                         new Claim(ClaimTypes.Role,"admin"),
                         new Claim(ClaimTypes.Name,"apiUser"),
                         new Claim("prog","正式项目"),
                         new Claim("phonemodel","huawei"),
                         new Claim("phoneprise","5000元"),

                     }
                },
4)配置隐藏模式客户端允许访问该IdentityResource
在前边的四种模式中只有隐藏模式支持直接获取id_token
 new Client()
                {
                    //客户端Id
                     ClientId="apiClientImpl",
                     ClientName="ApiClient for Implicit",
                     //客户端授权类型,Implicit:隐藏模式
                     AllowedGrantTypes=GrantTypes.Implicit,
                     //允许登录后重定向的地址列表,可以有多个
                    RedirectUris = {"https://localhost:5002/auth.html"},
                     //允许访问的资源
                     AllowedScopes={
                        "secretapi",
                        IdentityServerConstants.StandardScopes.OpenId,
                        "PhoneModel"
                    },
                     //允许将token通过浏览器传递
                     AllowAccessTokensViaBrowser=true,
                     //允许ID_TOKEN附带Claims
                     AlwaysIncludeUserClaimsInIdToken=true
                }
5)添加混合模式客户端并配置AllowedSopes
 new Client()
                {
                     AlwaysIncludeUserClaimsInIdToken=true,
                    //客户端Id
                     ClientId="apiClientHybrid",
                     ClientName="ApiClient for HyBrid",
                     //客户端密码
                     ClientSecrets={new Secret("apiSecret".Sha256()) },
                     //客户端授权类型,Hybrid:混合模式
                     AllowedGrantTypes=GrantTypes.Hybrid,
                     //允许登录后重定向的地址列表,可以有多个
                    RedirectUris = {"https://localhost:5002/auth.html"},
                     //允许访问的资源
                     //允许访问的资源
                     AllowedScopes={
                        "secretapi",
                        IdentityServerConstants.StandardScopes.OpenId,
                        "PhoneModel"
                    },
                      AllowOfflineAccess = true,
                     AllowAccessTokensViaBrowser=true
                }
二,隐藏模式获取id_token
先来回顾一下隐藏模式怎么请求access_token的
根据OAuth2.0协议,隐藏模式获取access_token需要传的参数如下所示。
client_id:客户端Id
redirect_uri=重定向Url,用户登录成功后跳回此地址
response_type=token,固定值,表示获取token
scope=secretapi,此token需要访问的api
接受参数的地址则是IdentityServer的Discover文档中的authorization_endpoint节点。把参数和地址拼接成以下地址:http://localhost:5000/connect/authorize?client_id=apiClientImpl&redirect_uri=https://localhost:5002/auth.html&response_type=token&scope=secretapi,直接访问,会跳转到用户登录页面, 确认后,浏览器将会自动跳转到redirect_url。
获取id_token也是同样的方法,但要注意以下四点
- response_type:隐藏模式支持三种response_type,上面获取access_token已经使用了一种,第二种是获取id_token:id_token。第三种是同时获取access_token和id_token:token id_token
- scope:上面的scope值"scretapi"是一个ApiResource,我们要获取Id_token,必需加入"openid",这是一个IdentityResource。其它的profile,email等按需添加。
- 除开上面的四个参数外,还需要添加一个参数:nonce。这个参数作用是协助你验证这个id_token是否由你自己发出的,可以是一个随机值,也可以是你自己的请求特征加密字符串,会随id_token一并返回供你验证。
- 可以选择性添加一个参数:response_mode。这个参数的作用是指定id_token传到redirect_Url的方法。支持三种方法:
1,query,用于获取授权码,通过url的Query部份传递。如(http://redirect_url.com?code=)。支持授权码模式客户端
2,fragment。和隐藏模式获取access_token一样,通过url的fragment部份传递,如(http://redirect_url.com#token=&id_token=)。支持隐藏模式和混合模式客户端
3,form_post模式,通过form表单(x-www-form-urlencoded)Post到指定url。支持混合模式客户端
根据这四点注意事项,请求url就变成了这样
http://localhost:5000/connect/authorize?client_id=apiClientImpl&redirect_uri=https://localhost:5002/auth.html&response_type=token%20id_token&scope=secretapi%20openid%20PhoneModel&nonce=123&response_model=fragment使用之前创建apiUser登录成功后出现如下授权界面
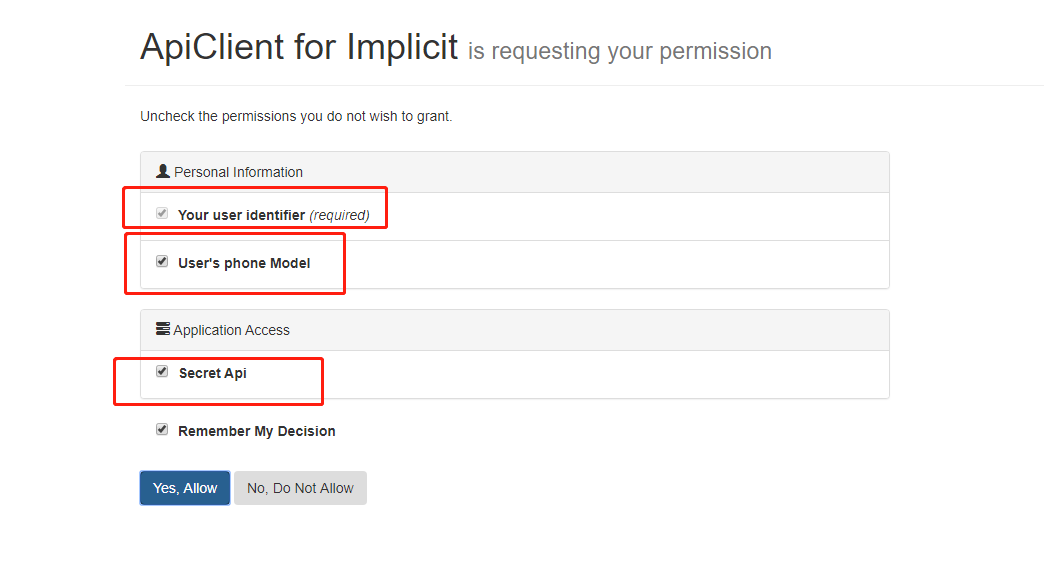
三个红色的方框代表请求的三个scope。
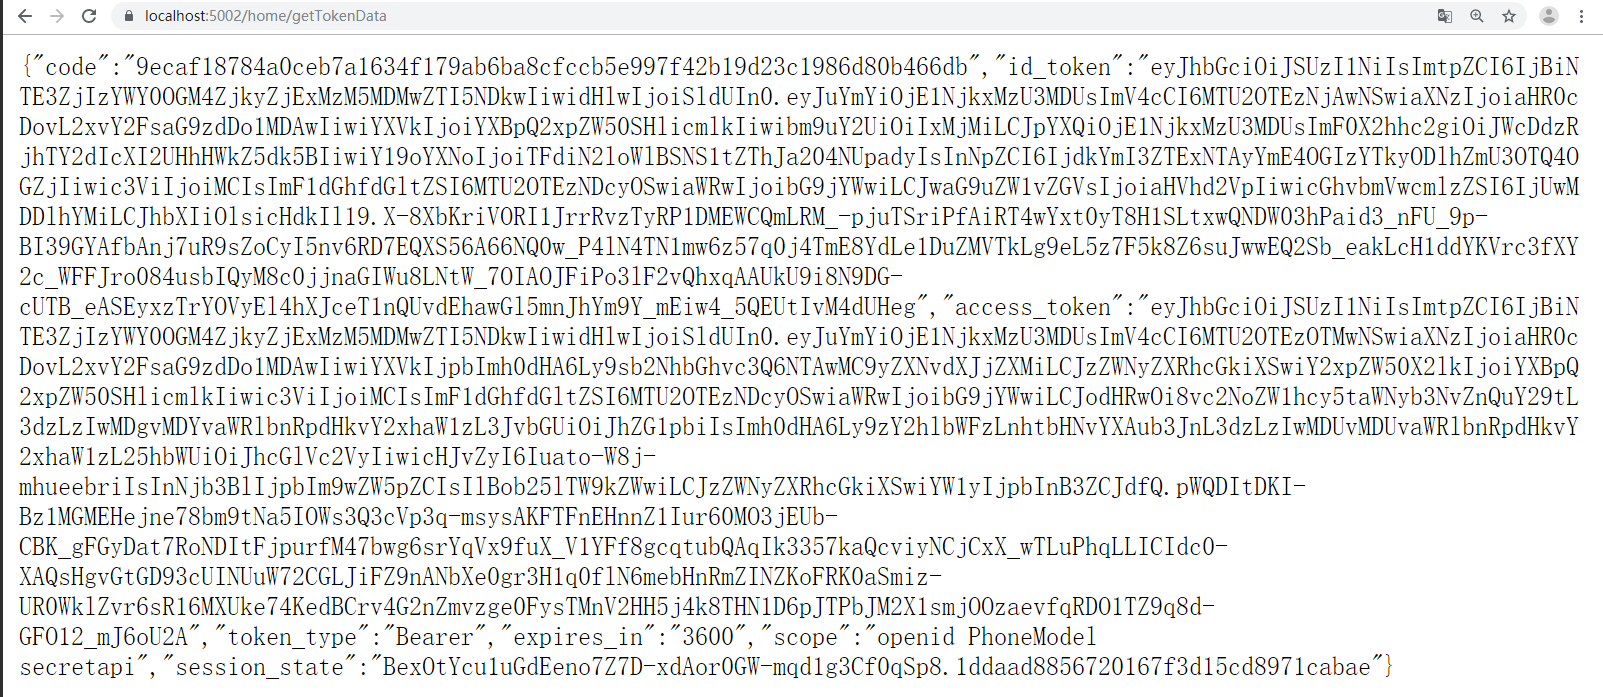
同意授权后,将会跳转回redirect_url,id_token和access_token都获取到了

在jwt.io中解析一下这个id_token
{
  "nbf": 1569059940,
  "exp": 1569060240,
  "iss": "http://localhost:5000",
  "aud": "apiClientImpl",
  "nonce": "123",
  "iat": 1569059940,
  "at_hash": "PJZyIPRkonv7BWTF42asJw",
  "sid": "4b2901045d883a8ba7cf6169b976a113",
  "sub": "0",
  "auth_time": 1569059940,
  "idp": "local",
  "phonemodel": "huawei",
  "phoneprise": "5000元",
  "amr": [
    "pwd"
  ]
}
jwt.io中基本支持所有平台对jwt格式的解析和验证,详见https://jwt.io/
三,混合模式获取id_token
1,使用fragment方式
混合模式获取Id_token与隐藏模式获取id_token大体相同,只有以下二点要注意
- 把client_id改成第一步创建的混合模式客户端id
- 隐藏模式支持三种response_type:token、id_token、token id_token,分别用于请求access_token,id_token以及同时请求二者。而混合模式支持四种:code,code token,code id_token,code token id_token。可用于请求code,id_token,access_token以及同时请求三者。
根据这两点,混合模式的请求url变成了
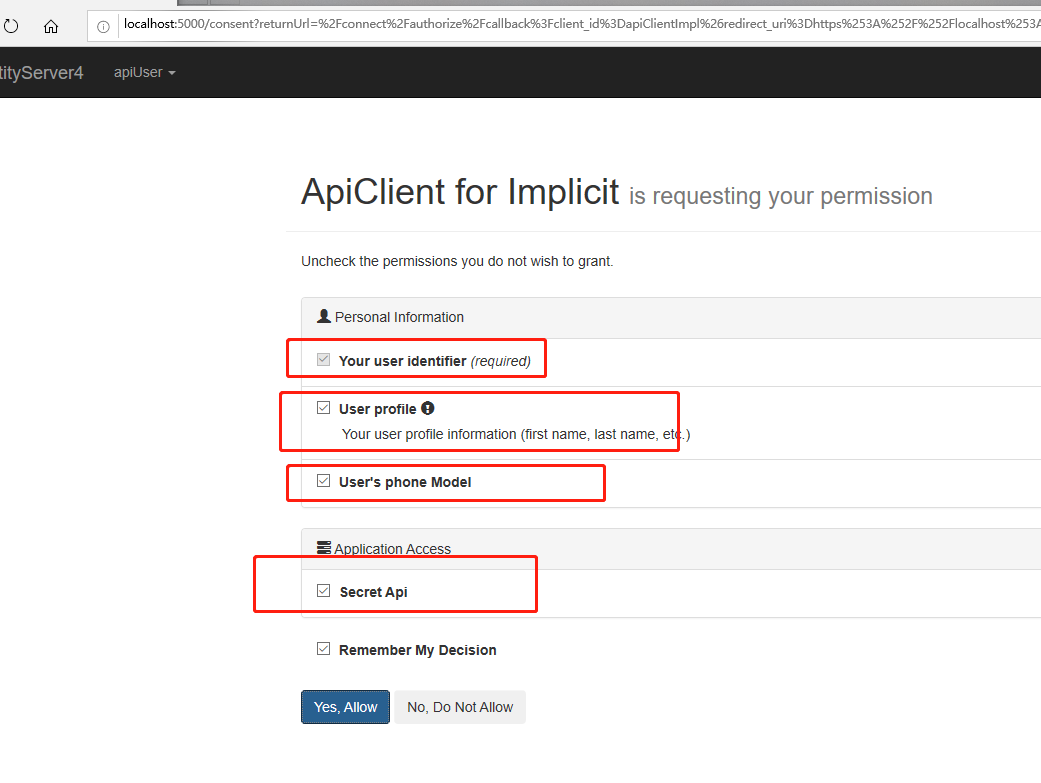
http://localhost:5000/connect/authorize?client_id=apiClientHybrid&redirect_uri=https://localhost:5002/auth.html&response_type=code token id_token&scope=secretapi openid PhoneModel&nonce=123&response_mode=fragment
用户登录并授权后重定向到redirect_url

可以看到code,id_token,access_code都返回了。拿到code后可以根据code去获取access_token用于访问被保护的api,参考之前的文章:IdentityServer4 实现OAuth2.0授权码模式。也可以直接拿返回的acess_token用,直接返回的access_token由于是和隐藏模式一样以url参数带过来的,为安全考虑,这个access_code的有效时间很段,默认是一个小时。
2,使用form_post方式
先在IdentityMvc项目新建一个Mvc控制器,用于接收post数据请求。
TokenData类用于包装从IdentityServer处Post回来的token数据
public class TokenData
    {
        public string code { get; set; }
        public string id_token { get; set; }
        public string access_token { get; set; }
        public string token_type { get; set; }
        public string expires_in { get; set; }
        public string scope { get; set; }
        public string session_state { get; set; }
    }
HomeController.GetTokenData,用于identityserver的redirect_url
[HttpPost]
        public IActionResult GetTokenData(TokenData data)
        {
            return new JsonResult(data);
        }
建好控制器后,把该控制器的访问路径添加IdentityServer的混合模式客户端的RedirectUris
 new Client()
                {
                     AlwaysIncludeUserClaimsInIdToken=true,
                    //客户端Id
                     ClientId="apiClientHybrid",
                     ClientName="ApiClient for HyBrid",
                     //客户端密码
                     ClientSecrets={new Secret("apiSecret".Sha256()) },
                     //客户端授权类型,Hybrid:混合模式
                     AllowedGrantTypes=GrantTypes.Hybrid,
                     //允许登录后重定向的地址列表,可以有多个
                    RedirectUris = {"https://localhost:5002/auth.html","https://localhost:5002/home/gettokendata"},
                     //允许访问的资源
                     //允许访问的资源
                     AllowedScopes={
                        "secretapi",
                        IdentityServerConstants.StandardScopes.OpenId,
                        "PhoneModel"
                    },
                      AllowOfflineAccess = true,
                     AllowAccessTokensViaBrowser=true
                }
构造请求url。把response_mode设置为form_post,把redirect_url设置为控制器路径
http://localhost:5000/connect/authorize?client_id=apiClientHybrid&redirect_uri=https://localhost:5002/home/getTokenData&response_type=code token id_token&scope=secretapi openid PhoneModel&nonce=123&response_mode=form_post
四,id_token应用:单点登录
id_token包含了用户在openid和用户基本信息,这表明了该用户是有来源的,不是黑户口,如果op(openid provider)值得依赖,第三方客户端完全可以通过解析id_token获取用户信息允许用户登录,而不需要用户重新注册账户,重新登录。
对于web应用来说,实现思路一般是这样的:用户打开页面后,先在Cookie里查询有没有id_token信息,如果有,验证该id_token,验证成功则允许访问,验证失败或者Cookie里没有存储id_token则去op请求id_token,用户在op登录成功并授权后,op返回id_token到第三方应用后,第三方应用把id_token存储到cookie里,用户下次再打开页面就走重新验证id_token过程。如何验证id_token,请参考https://jwt.io/
按时这个思路,可以在任何平台实现单点登录。如果你用的是asp.net core Mvc平台,微软已经把一切都用中间件封装好了,只需要几行简单的配置代码。
测试步骤:
1,由于asp.net core的OpenIdConnect验证方案默认会添加"openid"以及"profile"两个IdentityResource的请求权限,所以需要在IdentityServer添加这两个IdentityResource
IdentityServer.Config
 public static IEnumerable<IdentityResource> GetIdentityResources()
        {
            return new IdentityResource[]
            {
                new IdentityResources.OpenId(),
                new IdentityResources.Profile(),
                new IdentityResource("PhoneModel","User's phone Model",new List<string>(){ "phonemodel","phoneprise"})

            };
        }
把这两个请求权限授权Client
IdentityServer.Config.GetClients
  AllowedScopes={
                        "secretapi",
                        IdentityServerConstants.StandardScopes.OpenId,
                        IdentityServerConstants.StandardScopes.Profile,
                        "PhoneModel"
                    }
2,由asp.net core的OpenIdConnect验证方案默认的登录重定向地址为signin-oidc,所以把这个地址加入到Client的RedirectUris
RedirectUris = {"https://localhost:5002/auth.html","https://localhost:5002/home/gettokendata","https://localhost:5002/signin-oidc"},
附asp.net core OpenIdConnect验证方案默认设置源码,有几个地方需要注意:
CallbackPath:用于登录重定向地址
SingedOutCallbackPath:注销登录回调地址,后边我们加入注销功能时会用到这个地址
RemoteSignOutPath:注销登录重定向地址
Scope.Add("openid")和Scope.Add("profile")解释了上面第一步为什么要添加这两个IdentityResource。
Microsoft.AspNetCore.Authentication.OpenIdConnect
 public OpenIdConnectOptions()
        {
            CallbackPath = new PathString("/signin-oidc");
            SignedOutCallbackPath = new PathString("/signout-callback-oidc");
            RemoteSignOutPath = new PathString("/signout-oidc");

            Events = new OpenIdConnectEvents();
            Scope.Add("openid");
            Scope.Add("profile");

            ClaimActions.DeleteClaim("nonce");
            ClaimActions.DeleteClaim("aud");
            ClaimActions.DeleteClaim("azp");
            ClaimActions.DeleteClaim("acr");
            ClaimActions.DeleteClaim("iss");
            ClaimActions.DeleteClaim("iat");
            ClaimActions.DeleteClaim("nbf");
            ClaimActions.DeleteClaim("exp");
            ClaimActions.DeleteClaim("at_hash");
            ClaimActions.DeleteClaim("c_hash");
            ClaimActions.DeleteClaim("ipaddr");
            ClaimActions.DeleteClaim("platf");
            ClaimActions.DeleteClaim("ver");

            // http://openid.net/specs/openid-connect-core-1_0.html#StandardClaims
            ClaimActions.MapUniqueJsonKey("sub", "sub");
            ClaimActions.MapUniqueJsonKey("name", "name");
            ClaimActions.MapUniqueJsonKey("given_name", "given_name");
            ClaimActions.MapUniqueJsonKey("family_name", "family_name");
            ClaimActions.MapUniqueJsonKey("profile", "profile");
            ClaimActions.MapUniqueJsonKey("email", "email");

            _nonceCookieBuilder = new OpenIdConnectNonceCookieBuilder(this)
            {
                Name = OpenIdConnectDefaults.CookieNoncePrefix,
                HttpOnly = true,
                SameSite = SameSiteMode.None,
                SecurePolicy = CookieSecurePolicy.SameAsRequest,
                IsEssential = true,
            };
        }
3,修改IdentityMvc的Privacy视图控制器,使其必需经过id_token验证后方能访问
IdentityMvc.HomeController
    [Microsoft.AspNetCore.Authorization.Authorize]
        public IActionResult Privacy()
        {
            return View();
        }
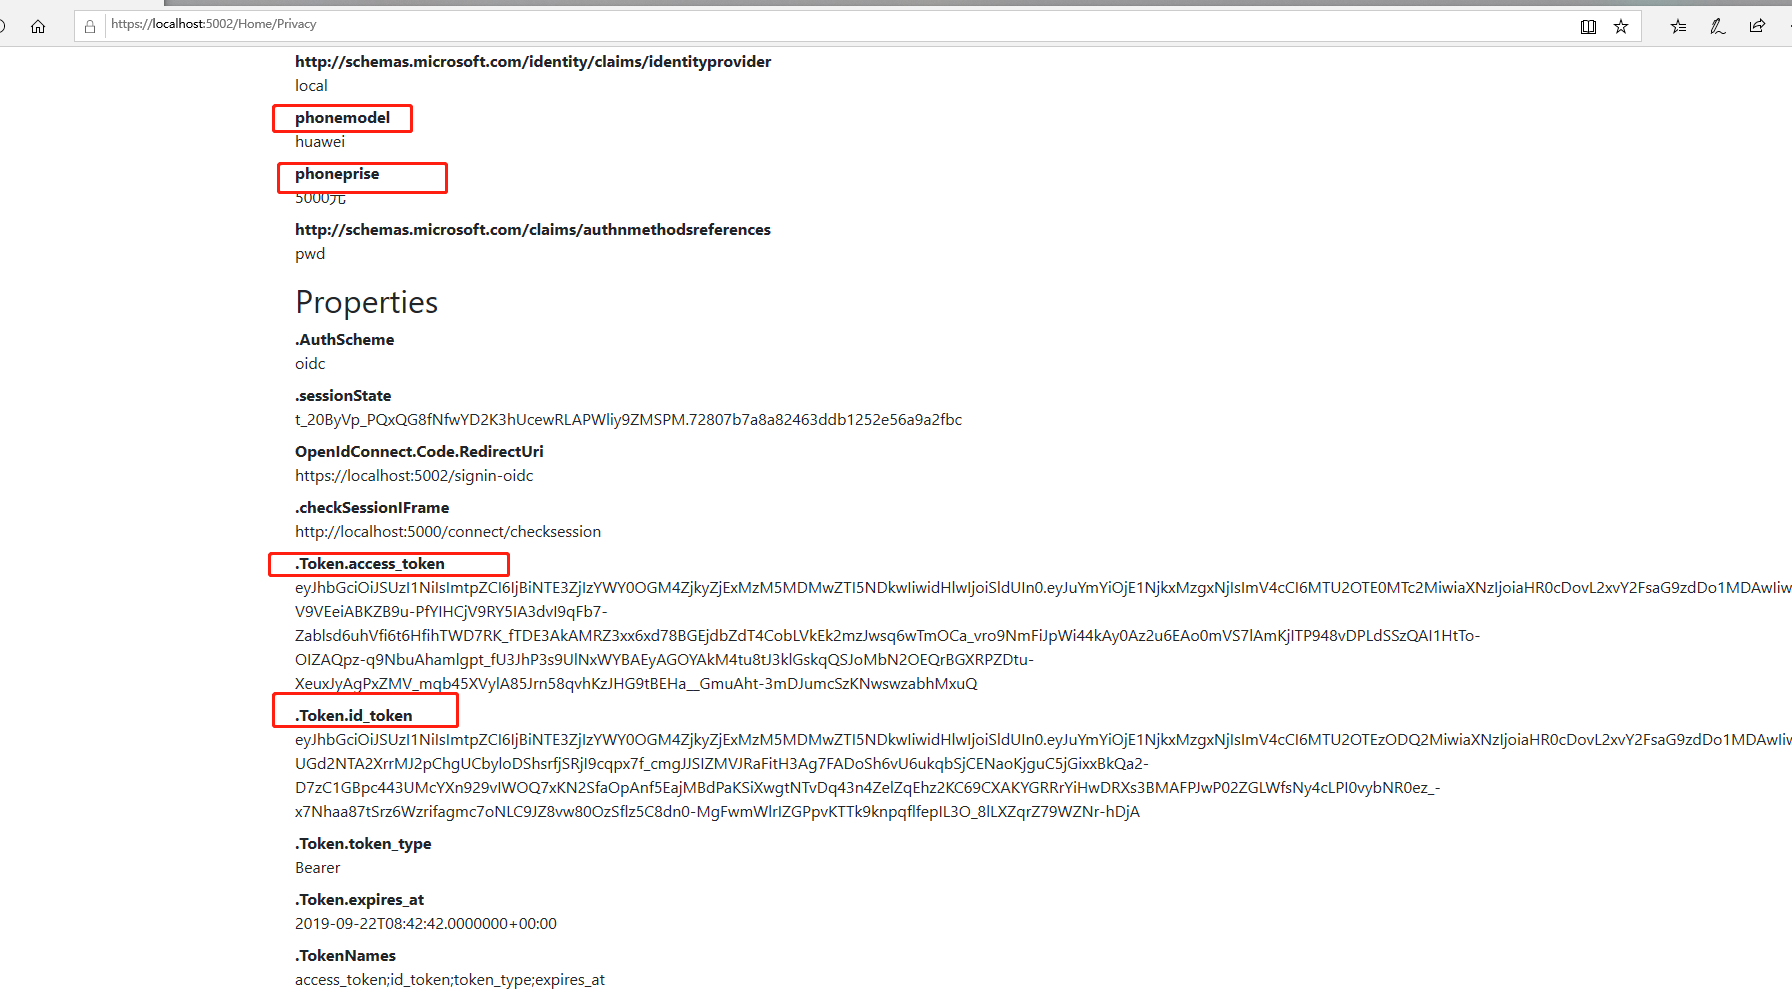
4,修改Privacy视图,展示id_token信息
Privacy.cshtml
@{
    ViewData["Title"] = "Privacy Policy";

}
<h1>@ViewData["Title"]</h1>

<h2>Claims</h2>

<dl>
    @foreach (var claim in User.Claims)
    {
        <dt>@claim.Type</dt>
        <dd>@claim.Value</dd>
    }
</dl>
5,配置客户端
IdentityMvc.StartUp.ConfigureServices
 services.AddAuthentication(opt=> {
                //默认验证方案
                opt.DefaultScheme = "Cookies";
                //默认token验证失败后的确认验证结果方案
                opt.DefaultChallengeScheme = "oidc";
            })
                //先添加一个名为Cookies的Cookie认证方案
                .AddCookie("Cookies")
                //添加OpenIdConnect认证方案
                .AddOpenIdConnect("oidc", options =>
                {
                    //指定远程认证方案的本地登录处理方案
                    options.SignInScheme = "Cookies";
                    //远程认证地址
                    options.Authority = "http://localhost:5000";
                    //Https强制要求标识
                    options.RequireHttpsMetadata = false;
                    //客户端ID(支持隐藏模式和授权码模式,密码模式和客户端模式不需要用户登录)
                    options.ClientSecret = "apiSecret";
                    //令牌保存标识
                    options.SaveTokens = true;
                    //添加访问secretapi域api的权限,用于access_token
                    options.Scope.Add("secretapi");
                    //请求授权用户的PhoneModel Claim,随id_token返回
                    options.Scope.Add("PhoneModel");
                    //使用隐藏模式
                    options.ClientId = "apiClientImpl";
                    //请求返回id_token以及token
                    options.ResponseType = OpenIdConnectResponseType.IdTokenToken;
                });
IdentityMvc.Start.Config
        app.UseCookiePolicy();
            app.UseAuthentication();
            app.UseMvc(routes =>
            {
                routes.MapRoute(
                    name: "default",
                    template: "{controller=Home}/{action=Index}/{id?}");
            });
注意:UseAuthentication必需在UseMvc前面。
6,访问https://localhost:5002/Home/Privacy,会重定向到IdentityServer登录界面
用户授权后重定向回Mvc客户端,已经进入Privacy视图了。
7,上面是隐藏模式测试,试一下混合模式,把ClientId改成混合模式Client的Id,ResponseType改成CodeIdTokenToken
  services.AddAuthentication(opt=> {
                //默认验证方案
                opt.DefaultScheme = "Cookies";
                //默认token验证失败后的确认验证结果方案
                opt.DefaultChallengeScheme = "oidc";
            })
                //先添加一个名为Cookies的Cookie认证方案
                .AddCookie("Cookies")
                //添加OpenIdConnect认证方案
                .AddOpenIdConnect("oidc", options =>
                {
                    //指定远程认证方案的本地登录处理方案
                    options.SignInScheme = "Cookies";
                    //远程认证地址
                    options.Authority = "http://localhost:5000";
                    //Https强制要求标识
                    options.RequireHttpsMetadata = false;
                    //客户端ID(支持隐藏模式和授权码模式,密码模式和客户端模式不需要用户登录)
                    options.ClientSecret = "apiSecret";
                    //令牌保存标识
                    options.SaveTokens = true;
                    //添加访问secretapi域api的权限,用于access_token
                    options.Scope.Add("secretapi");
                    //请求授权用户的PhoneModel Claim,随id_token返回
                    options.Scope.Add("PhoneModel");
                    //使用混合模式
                    options.ClientId = "apiClientHybrid";
                    //请求返回code,id_token以及token
                    options.ResponseType = OpenIdConnectResponseType.CodeIdTokenToken;
                });
8,加入注销登录功能
8.1 配置IdentityServer 客户端的PostLogoutRedirectUris属性,值为第2步讲的SingedOutCallbackPath值
IdentityServer.Config.GetClients
                     //允许登录后重定向的地址列表,可以有多个
                    RedirectUris = {"https://localhost:5002/auth.html","https://localhost:5002/signin-oidc"},
                    //注销登录的回调地址列表,可以有多个
                    PostLogoutRedirectUris = { "https://localhost:5002/signout-callback-oidc" },
8.2,在IdentityMvc项目的HomeController添加一个新的视图控制器,用于注销登录
 public IActionResult Logout()
        {
            return SignOut("Cookies", "oidc");
        }
8.3,把这个控制器加入布局页的菜单
<li class="nav-item">
                            <a class="nav-link text-dark" asp-area="" asp-controller="Home" asp-action="Index">Home</a>
                        </li>
                        <li class="nav-item">
                            <a class="nav-link text-dark" asp-area="" asp-controller="Home" asp-action="Privacy">Privacy</a>
                        </li>
                        <li class="nav-item">
                            <a class="nav-link text-dark" asp-area="" asp-controller="Home" asp-action="Logout">Logout</a>
                        </li>
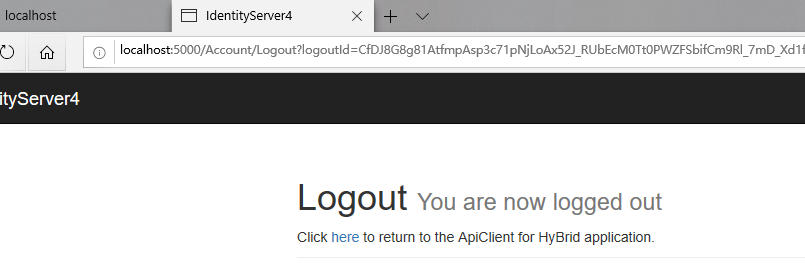
登录后访问Privacy页面,然后访问Logout视图,会重定向到IdentityServer执行注销逻辑
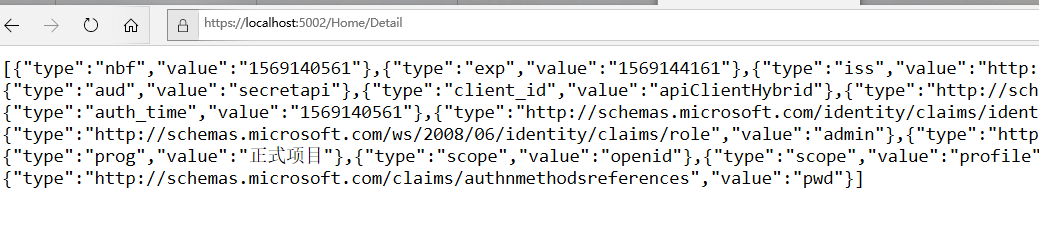
9,利用access_token访问被保护的Api
IdentityMvc.HomeController.Detail
  [Microsoft.AspNetCore.Authorization.Authorize]
        public async Task<IActionResult> Detail()
        {
            var client = new HttpClient();
            var token =await HttpContext.GetTokenAsync("access_token");
            client.SetBearerToken(token);
            string data = await client.GetStringAsync("https://localhost:5001/api/identity");
            JArray json = JArray.Parse(data);
            return new JsonResult(json);
        }
访问https://localhost:5002/home/detail,获取access_token后请求被保护的api并显示api返回结果。
示例中的客户端数据、资源数据、用户数据都是放在Config类中,如果这些数据需要实时配置,可以与Sql结合实现,下一篇IdentityServer4结合Mysql


 3047
3047


 被折叠的 条评论
为什么被折叠?
被折叠的 条评论
为什么被折叠?
 到【灌水乐园】发言


