CSS笔记

CSS is a collection of styles that allows you to change the appearance of HTML elements on Web pages.
CSS 是样式的集合,允许您更改网页上 HTML 元素的外观。
It can be used to define a set of formatting options that can be used to format text and other HTML elements.
它可用于定义一组可用于设置文本和其他 HTML 元素格式的格式选项。
It defines a set of standard rules that provides a better control over the page layout and the
appearance.
它定义了一组标准规则,可以更好地控制页面布局和外观。

1. Identifying the Syntax of CSS 认识CSS语法

CSS allows the creation of one or more rules for defining the style characteristics of HTML
elements. Each rule consists of the following parts:
CSS 允许创建一个或多个规则来定义 HTML 元素的样式特征。每个规则由以下部分组成:
Selector : A selector specifies the HTML element that you want to style. You can have one or
more selectors in a rule.
选择器指定要设置样式的 HTML 元素。规则中可以有一个或多个选 择器。
Declaration Block : A declaration block follows a selector in a CSS rule and is enclosed in curly braces. Each declaration consists of the following parts:
声明块跟在 CSS 规则中的选择器后面,并括在大括号中。每个声明由以下部分组成:
1. Property : It is the attribute name of the element. 它是元素的属性名称
2. Value : It is the value of the attribute. 它是属性的值
The following syntax can be used to define a CSS rule:
以下语法可用于定义 CSS 规则
selector
{
    //Declaration
    Block
    property:
    value;
}
For example, consider the following code to create the HTML document:
例如,请考虑以下代码来创建 HTML 文档 :
<!DOCTYPE HTML>
<HTML>
    <BODY>
        <H1>Welcome to BookYourHotel website.</H1>
        <H2>This site is very user friendly.</H2>
        <H1>You can book your hotel while sitting at home.</H1>
    </BODY>
</HTML>

Now, you want to display the text inside the <H1> tag in italics and red color. In addition, the text inside the<H2>tag should be displayed as bold. You can perform this task by defining CSS rules using the following code snippet:

现在,您希望 <H1> 以斜体和红色显示标签内的文本。此外,里面的文字 <H2> 标记应显示为粗
体。您可以通过使用以下代码片段定义 CSS 规则来执行此任务:
 
h1 {color:red; font-style:italic;}
h2 {font-weight:bold;}

Example:

<!DOCTYPE HTML>
<HTML>
    <head>
        <title>This is CSS</title>
        <style>
            h1{
                color:red;
                font-style:italic;
              }
            h2 {
                font-weight:bold;
              }
        </style>
    </head>
    <BODY>
        <H1>Welcome to Genshin Impact website.</H1>
        <H2>There are many dog users.</H2>
        <H1>You can use this website to get yuan_stone.</H1>
    </BODY>
</HTML>

2. Identifying the Types of Style Sheets认识样式表的类型

a. Inline style 内联样式

To customize only few elements on a Web page, inline styles can be applied. For example,
you want to display a particular paragraph in red color on one of the Web pages.
若要仅自定义网页上的几个元素,可以应用内联样式。例如,您希望在其中一个网页
上以红色显示特定段落:
<!DOCTYPE HTML>
<HTML>
    <BODY>
        <P style="font-size: 24pt; color: red">Hotel booking from the comfort of your room.</P>
        <P>Compare and book from more than 5000 hotels. </P>
    </BODY>
</HTML>

b. Internal style sheet 内部样式表

An internal style sheet is used when there is a need to stylize the multiple occurrences of an
element on a Web page with the same style. It is also known as an embedded style sheet. For
example, you want to format all the <P> and <H1> tags of a Web page. In this case, it would be
advisable to define separate style rules for the <P> and <H1> tags once, and then refer to these
definitions, wherever needed.
当需要对具有相同样式的网页上多次出现的元素进行样式化时,将使用内部样式表。它
也被称为嵌入式样式表。例如,您希望设置 <P> <H1> 网页的所有 和 标记的格式。在这
种情况下,建议为 和 标签定义一次单独的样式规则 <P> <H1> ,然后在需要时引用这些
定义。
<!DOCTYPE HTML>
<HTML>
    <HEAD>
        <STYLE type="text/css">
            p
            {
                color:red;
                font-size:20pt;
                font-style:italic;
            }
        </STYLE>
        </HEAD>
    <BODY>
        <P> Hotel booking from the comfort of your room.</P>
        <P> Compare and book from more than 5000 hotels.</P>
    </BODY>
</HTML>

c. External style sheet 外部样式表

An external style sheet is used when multiple Web pages are to be styled in the same manner to ensure the consistent look and feel across the entire website. An external style contains only the formatting rules for the desired HTML elements. Therefore, it separates the design of a Web page from its content. An external style sheet can be simultaneously linked to multiple HTML documents. Therefore, a consistent style can be applied on multiple pages of the website by defining an external style sheet.
当需要对具有相同样式的网页上多次出现的元素进行样式化时,将使用内部样式表。它也被称
为嵌入式样式表。例如,您希望设置 <P> <H1> 网页的所有 和 标记的格式。在这种情况下,
建议为 和 标签定义一次单独的样式规则 <P> <H1> ,然后在需要时引用这些定义。
An external style sheet is a text document that consists of CSS formatting rules. This document can be written in a simple text editor, such as Notepad, and then saved with the .css file extension. To associate a Web page with an external style sheet, you need to use the <LINK> tag inside the head section of the HTML document. The following code displays the <LINK> tag along with its some commonly-used attributes:
外部样式表是由 CSS 格式规则组成的文本文档。本文档可以在简单的文本编辑器(如记事本)中编 写,然后以 .css 文件扩展名保存。若要将网页与外部样式表关联,需要在 <LINK> HTML 文档的  head 部分中使用该标记。以下代码显示 <LINK> 标记及其一些常用属性:
<LINK type="text/css" rel="stylesheet" href="externalstylesheet.css" />
In the preceding syntax:
type : Specifies the type of content in the linked document.
              指定链接文档中的内容类型
href : Specifies the location of the linked external style sheet.
              指定链接的外部样式表的位置
rel : Specifies the relationship between the CSS document and the HTML document. The rel
attribute is specified with value, stylesheet , which specifies that the current HTML
document is importing an external style sheet.
              指定 CSS 文档和 HTML 文档之间的关系。 rel 属性是用 value stylesheet 指定的,它指定当前 HTML 文档正在导入外部样式表
Consider the following code to associate an external style sheet with the HTML document:
请考虑使用以下代码将外部样式表与 HTML 文档相关联:
<!DOCTYPE HTML>
<HTML>
    <HEAD>
        <TITLE> An External Style Sheet </TITLE>
        <LINK type="text/css" rel="stylesheet" href="externalstyle.css" />
    </HEAD>
    <BODY>
        <H1> Hotel booking from the comfort of your room. </H1>
        <P> Compare and book from more than 5000 hotels. </P>
    </BODY>
</HTML>
The <LINK> tag in the preceding code associates the external style sheet named
externalstyle.css with the HTML document. The content of the file, externalstyle.css ,
is shown in the following code snippet:
<LINK> 前面代码中的标记将名为 externalstyle.css 的外部 样式表与 HTML 文档相关联。文件的内容 externalstyle.css 显示在以下代码片段中:
p
{
color:red;
font-size:20pt; 
font-style:italic;
}
h1
{
color:blue; 
font-size:25pt;
font-weight:bold;
}

3. Applying Multiple Style Sheets 使用多个样式表

Consider an example where you have defined different formatting rules for the <P> tag in
the form of an inline style, as well as in the form of an internal style in the same HTML
document. Therefore, properties have been set for the same selector in multiple style sheets.
In such a case, the style that is most specific to the element and has the highest priority will
be used to stylize the element. The following list displays the priority of style sheets in
descending order:
考虑一个示例,其中您以 <P> 内联样式的形式以及同一 HTML 文档中的内部样式的
形式为标记定义了不同的格式设置规则。因此,已在多个样式表中为同一选择器设置
了属性。在这种情况下,将使用最特定于元素且具有最高优先级的样式来设置元素的
样式。以下列表按降序显示样式表的优先级
Inline style——内联样式
Internal style sheet——内部样式表
External style sheet——外部样式表
Browser default——浏览器默认值
注:
The browser default is the default style applied on HTML elements, if no style type has
been defined.
浏览器默认样式是在 未定义样式类型的情况下 应用于HTML元素的默认样式。
Consider the following code snippet for the externalstylesheet.css file:
请考虑外部样式表 .css 文件的以下代码片段:
p{ 
color:blue;
font-size:12pt;
font-weight:bold;
}

Consider the following code to associate multiple style sheets with the HTML page:

请考虑以下代码将多个样式表与 HTML 页相关联:
<!DOCTYPE HTML>
    <HTML>
        <HEAD>
            <LINK type="text/css" rel="stylesheet" href="externalstylesheet.css" />
            <STYLE>
                h1{ 
                    color:red;
                    font-size:12pt;
                    font-style:italic;
                }
            </STYLE>
        </HEAD>
        <BODY>
            <P>Welcome to BookYourHotel website.</P>
            <H1 style="font-size: 24pt; color: green"> Hotel booking from the
                comfort of your room.</H1>
            <H1> Compare and book from more than 5000 hotels. </H1></BODY>
</HTML>

In the preceding code, the first heading will appear in green with font size, 24, since the inline style defined for the first <H1> tag will override the internal style defined in the <STYLE> tag. However, the second heading will appear in italics, red color with font-size, 12, according to the internal style defined for the <H1> tag. The paragraph will be styled according to the external style sheet as no internal or inline style has been applied on it.

在前面的代码中,第一个标题将显示为绿色,字体大小为 24 像素 ,因为为第一个标签定义的内联样式 <H1> 将覆盖标签中定义的内部样式 <STYLE> 。但是,根据为标签定义的内部样式,第二个标题 将以斜体显示,红色,字体大小为 12 像素  。该段落将根据外部样式表设置样式,因为未对其应 用内部或内联样式。

4. Identifying CSS Selectors 认识 CSS 选择器

a. ID selector - hash symbol ( # )
b. Class selector --- dot symbol ( . )

a. Implementing the ID Selector 实现 ID 选择器

CSS styles can be applied to an element with a specific ID by using an ID selector. An ID selector is used to identify an element that you need to style differently from the rest of the page. An ID selector is defined by using the hash symbol (# ).
CSS 样式可以使用 ID 选择器应用于具有特定 ID 的元素。 ID 选择器用于标识需要以不同于页
面其余部分设置样式的元素。 ID 选择器是使用哈希符号 ( # ) 定义的。
Consider a scenario where you need to specify a unique style for the paragraph that displays the
welcome message on your website. This can be accomplished by adding an ID attribute to the
paragraph that displays this message and using that ID to specify the style that needs to be applied to this paragraph.
考虑这样一种情况:您需要为在网站上显示欢迎消息的段落指定唯一样式。这可以通过向显示
此消息的段落添加 ID 属性并使用该 ID 指定需要应用于此段落的样式来实现:
<!DOCTYPE HTML>
<HTML>
    <HEAD>
        <STYLE>
            p
            {
                color:red;
            }
            #pname
            {
                color:green; font-size=20;
                font-weight:bold;
            }
        </STYLE>
    </HEAD>
    <BODY>
        <P ID="pname">Welcome to BookYourHotel Website.</P>
        <P> Hotel booking facility at your doorstep.</P>
        <p>this is one the best hotel</p>
    </BODY>
<HTML>

b. Implementing the Class Selector 实现类选择器

A CSS style can be applied to a group of elements by using the class selector. The class selector is used when there is a need to apply the same style on different types of elements in the HTML document. Multiple elements can belong to the same class. Hence, you can set a particular style for many HTML elements with the same class. The class selector is defined by using a dot (.).
考虑这样一种情况:您需要为在网站上显示欢迎消息的段落指定唯一样式。这可以通过向显示此消息的段落添加 ID 属性并使用该 ID 指定需要应用于此段落的样式来实现:
<!DOCTYPE HTML>
<HTML>
     <HEAD>
       <STYLE>
             . color1 { color:blue; }
             . color2 { color:red; }
       </STYLE>
       </HEAD>
       <BODY>
            <H4 class="color1"> Welcome to BookYourHotel website.</H4>
            <P class="color1">Provides online booking of domestic and international hotels.</P>
            <P class="color2"> Avail great discounts and offers. </P>
       </BODY>
</HTML>

5.Styling HTML Elements 设置 HTML 元素样式

<!DOCTYPE HTML>
<HTML>
    <HEAD>
    </HEAD>
    <BODY>
        <H1>About Us</H1><HR>
        <P>BookYourHotel is the most trusted name in the destination management 
        industry. We are one of the pioneers for hotel booking. Currently we 
        are operating out of our head office in Chicago. In addition, we have 
        our presence across all the major cities in the US and Europe. Our 
        primary focus is on customer satisfaction and comfort.</P>
        <P>With a manpower strength of over 400 employees spread across the US,
        we ensure a quick and customized response to all your travel related 
        queries.</P>
        <P>Our regional offices are situated at the following locations:
        <UL>
            <LI>Alabama</LI>
            <LI>Florida</LI>
            <LI>California</LI>
            <LI>Colorado</LI>
            <LI>Texas</LI>
            <LI>New York</LI>
        </UL>
        <P>We are also planning to expand our services to other states.</P>
        <P>Regarding any further queries or feedback, click at the
        following link:</P> <A href="contactus.html">BookYourHotel</A>
    </BODY>
</HTML>
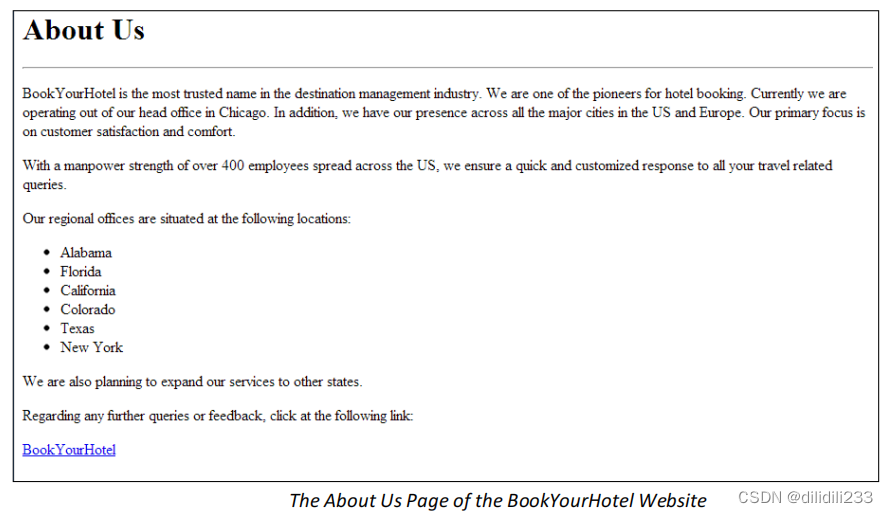
The About Us page of the BookYourHotel website is displayed, as shown in the following figure.
进入“预订您的酒店”网站的“关于我们”页面,如下图所示:
To improve the look and feel of this page, you need to incorporate the following style guidelines:
若要改进此页面的外观,需要合并以下样式准则:
The text in the paragraphs should have the font family as Helvetica and the font size as 20.
The Heading level one should appear in small caps, it aligns the heading in red color and in center and in Italic form.
The background should appear in grey color.
The space between letters in a paragraph should be 2 points. Also, the line height should be 12 points.
The symbol of the list bullets should appear as a square.
段落中的文本的字体系列应为 Helvetica,字体大小应为 20。
标题级别 1 应以小写字母显示,它以红色和中间和斜体形式对齐标题。
背景应显示为灰色。
段落中字母之间的间距应为 2 磅。此外,行高应为 12 磅。
列表项目符号的符号应显示为正方形。
The preceding style guidelines can be applied by setting the corresponding CSS properties. A CSS property represents a characteristic of the HTML element that can be customized. You need to use these CSS properties to define styles for HTML elements. The CSS properties can be divided into the following categories:
可以通过设置相应的 CSS 属性来应用上述样式指南。 CSS 属性表示可以自定义的 HTML
素的特征。您需要使用这些 CSS 属性来定义 HTML 元素的样式。 CSS 属性可分为以下几
类:
Font
Text
Link
List
Background
示例:
//The text in the paragraphs should have the font family as Helvetica and the font size as 20.
//段落中的文本的字体为 Helvetica,字体大小应为 20。 
     p{
         font-family: "Helvetica"; Font-size:20px;
        }

//The Heading level one should appear in small caps, it aligns the heading in red color and in centerand in Italic form.
//标题级别 1 应以小写字母显示,它以红色和中间和斜体形式对齐标题。 
     h1{ 
        font-variant:small-caps; 
        font-style:italic;
    }
     h1{
         Color: red;
         text-align: center;
     }

//The background should appear in lavender color.
//背景应以 lavender color 显示。 
<STYLE>
    body{
        background-color:lavender;
    }
</STYLE>

//The space between letters in a paragraph should be 2 points. Also, the line height should be 12 points.
//段落中字母之间的间距应为 2 磅。此外,行高应为 12 磅。 
    p{
         letter-spacing:2pt; line-height:12pt;
     }
 
//The symbol of the list bullets should appear as a square.
//列表项目符号的符号应显示为正方形。
    ul{
        list-style-type:square; 
        list-style-position: inside;
    }

6.The CSS Link properties CSS 链接属性

The CSS Link properties are used to customize the appearance of links in the HTML document. A
link can attain one of the following states in the HTML document:
CSS 链接属性用于自定义 HTML 文档中链接的外观。链接可以在 HTML 文档中达到以下状
态之一:
link : An unvisited link 未访问的链接
visited : A visited link 访问过的链接
hover : A link as it appears when the mouse is placed or moved over it 放置鼠标或将鼠标移到其上时 显示的链接
active : A link as it appears when it is clicked 单击时显示的链接
In the BookYourHotel scenario, consider the following CSS code snippet to make a link appear in
red color on hover and to have a blue background and underline, when clicked:
BookYourHotel 方案中,请考虑以下 CSS 代码片段,以使链接在悬停时显示为红色,并在
单击时具有蓝色背景和下划线:
<STYLE>
    a:link { 
        color:#FF0000;
    }
    a:visited { 
        color:#00FF00;
    }
    a: hover {
        color: #0000FF;
    }
    a: active { 
        color: #FF00FF;
        text-decoration:underline;
    }
</STYLE>

7. Grouping and Nesting Styles 分组和嵌套样式

Grouping of Styles 样式分组

Consider a scenario where you want all your heading levels to have the same color. Instead of
making a CSS rule for each heading separately or applying a class selector on each heading
separately, you can rather group them. Similarly, you may also want to apply the same foreground color on the paragraphs and the second level headings in a Web page. For this, instead of writing the same styling code once for the paragraph tag and again for the heading tag, CSS provides you the functionality to group HTML elements.
考虑这样一种情况:您希望所有标题级别具有相同的颜色。与其单独为每个标题创建 CSS 规
则或单独对每个标题应用类选择器,不如对它们进行分组。同样,您可能还希望对网页中的
段落和二级标题应用相同的前景色。为此,CSS 为您提供了对 HTML 元素进行分组的功能,
而不是为段落标签编写一次相同的样式代码,然后再为标题标签编写相同的样式代码。
With the help of grouping, you can apply the same style on more than one HTML element without
repeating them in the style sheet.
在分组的帮助下,您可以在多个 HTML 元素上应用相同的样式,而无需在样式表中重复它们。
Consider the following code to create the home page of the BookYourHotel website:
请考虑使用以下代 码来创建 BookYourHotel 网站的主页:
<!DOCTYPE HTML>
<HTML>
    <HEAD>
        <STYLE>
            h1{
                text-align:center;
            }
        </STYLE>
    </HEAD>
    <BODY>
        <H1>BookYourHotel</H1>
        <UL>
            <LI><A href="aboutus.html">About Us</A></LI>
            <LI><A href="rooms.html">Rooms</A></LI>
            <LI><A href="facilities.hmtl">Facilities</A></LI>
            <LI><A href="contactus.html">Contact Us</A></LI>
        </UL>
        <HR>
        <H3> Welcome to the Home page</H3>
        <P> BookYourHotel welcomes you with warmth and a feeling that each guest is                 truly special. It offers acozy and intimate experience amidst the glitz and glamour of South America. Our caring and courteous staffs are ever eager to ensure that all individual needs are cared for with professional expertise and a personal touch.                                                 
        </P>
        <P>The rooms have been designed with different floor plans to create             individual spaces. We have Deluxe Rooms, Double and Single Rooms each with ensuite Bathrooms fitted with all modern conveniences. All room has Air- Conditioning and is equipped with well stocked Mini-bars, Television with Cable T.V. Conference facilities available for approximately 40 persons. Our multi-cuisine restaurant offers, a plethora of tasty local and international dishes to satisfy all palates. This with the elegant ambience makesfor a truly unique experience. </P>
     </BODY>
</HTML>
To customize the look and feel of this page, you need to incorporate the following style guidelines:
若要自定义此页面的外观,需要合并以下样式准则:
The links inside the list should be displayed in red color and horizontal way.
The heading three should be positioned at the top left corner of the Web page.
The text inside the heading one and paragraphs should be colored red.
列表中的链接应以红色和水平方式显示。
标题三应位于网页的左上角。
标题一和段落中的文本应为红色。

Grouping Styles 分组样式

Grouping styles are used to apply the same styles on more than one selector by combining them into a
single group. The selectors in this group are separated with commas. The following syntax is used to
group the elements for applying a common style:
分组样式用于通过将多个选择器组合到一个组中来将相同的样式应用于多个选择器。此组中的选择器 用逗号分隔。以下语法用于对元素进行分组以应用通用样式:
selector1, selector2
{
property:value;
}
In the preceding syntax:
在前面的语法中:
selector1 : Specifies the name, id, or class of the first element to be stylized. 指定要样式化的第一个 元素的名称、 ID 或类
selector2 : Specifies the name, id, or class of the second element to be stylized. 指定要样式化的第 二个元素的名称、 ID 或类
property : Specifies the attribute name of an element. An element can be stylized by
customizing its attributes. 指定元素的属性名称。可以通过自定义元素的属性来设置元素的
样式
value : Specifies the value of the property. 指定属性的值
Consider the following code snippet to stylize the text of both, the H1 element and the P element, in same color, with grouping styles:
请考虑以下代码片段,以相同的颜色和分组样式对 H1 元素和 P 元素的文本进行样式化:
h1,p
{ 
    color:red;
}

Nesting of Styles 嵌套样式

Consider a Web page where a list or a paragraph is nested inside the div element. You may want to apply styles to the nested elements to enhance its look and feel. Styles can be applied to the nested elements by using the class or ID selectors. However, using such selectors may sometimes increase the size of the code or add to its complexity. Therefore, to achieve code optimization, CSS introduces nesting of styles. With nesting styles, you can apply style for an element within an element. It is an economic way of styling elements within an element, which discards the usage of class or ID selectors in the code.
考虑一个网页,其中列表或段落嵌套在 div 元素内。您可能希望将样式应用于嵌套元素以增强
其外观。可以使用类或 ID 选择器将样式应用于嵌套元素。但是,使用此类选择器有时可能会
增加代码的大小或增加其复杂性。因此,为了实现代码优化, CSS 引入了样式嵌套。使用嵌套
样式,可以为元素中的元素应用样式。这是一种在元素中设置元素样式的经济方法,它放弃了
代码中类或 ID 选择器的使用。
In the home page of the BookYourHotel website, the <A> tag is nested inside the <LI> tag.
Therefore, to stylize the <A> tag, you can apply nesting styles. Consider the following code snippet to apply nested styles on <A> elements:
BookYourHotel 网站的主页中,标签 <A> 嵌套在 <LI> 标签内。因此,要设置标签的样式
<A> ,可以应用嵌套样式。请考虑以下代码片段,以对元素应用嵌套样式 <A>
li a{ 
    color:red;
    text-decoration:none;
}

You can apply various nesting styles on HTML elements. The following table lists the nesting styles.

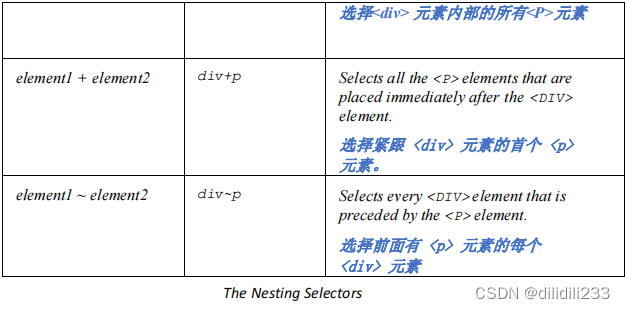
您可以 HTML 元素上应用各种嵌套样式。下表列出了嵌套样式。
Consider the following code snippet to stylize only the paragraph tags that are placed immediately after the <DIV> tag:
请考虑以下代码片段,以仅对紧靠标签之后的段落标签进行样式化 <DIV>
<!DOCTYPE HTML>
<HTML>
    <HEAD>
        <STYLE>
            div+p
            {
                background-color:blue;
            }
        </STYLE>
    </HEAD>
    <BODY>
        <H1>Welcome to the page.</H1>
        <DIV>
            <P>This is paragraph 1.</P>
        </DIV>
        <P>This is paragraph 2.</P>
        <P>This is paragraph 3.</P>
    </BODY>
</HTML>

In the preceding code, only the <P> tag that is placed immediately after the <DIV> tag gets stylized

in blue color. The output of the preceding code snippet is shown in the following figure.
在前面的代码中,只有 <P> 紧跟在标记之后放置的 <DIV> 标记才会以蓝色进行样式化。上述
代码片段的输出如下图所示:


8. Controlling the Visibility of Elements 控制元素的可见性

Consider an example where you have created a menu bar on a Web page. You want to control the visibility of the submenus in such a way that they should be visible only when the user moves the mouse pointer on the corresponding top-level menu item. You can perform this by defining visibility styles on HTML elements. CSS visibility styles can have the following categories:
考虑一个在网页上创建菜单栏的示例。您希望控制子菜单的可见性,以便仅当用户将鼠标指
针移到相应的顶级菜单项上时,子菜单才应可见。您可以通过在 HTML 元素上定义可见性
样式来执行此操作。 CSS 可见性样式可以具有以下类别:
Display 显示
Visibility 可见度

Display

The display property is used to set the appearance of an element on a Web page. The following
syntax can be used to apply the display property:
显示属性用于设置网页上元素的外观。以下语法可用于应用显示属性:
display: none| block| inline
In the preceding syntax: 在前面的语法中:
none : Hides an element from a Web page without consuming any space.
隐藏网页中的元素而不占用 任何空间。
block : Shows the elements by consuming the full width available. It has a line break before and
after it. Here, elements flow down the page in the normal flow.
通过消耗可用的完整宽度来显 示元素。它前后都有一个换行符。在这里,元素以正常流程向动。
inline : Shows elements by consuming as much width as necessary. It does not have line breaks. Here, elements are laid out within the line. It is the default value that is set to the display
property.
通过根据需要消耗尽可能多的宽度来显示元素。它没有换行符。在这里,元素被 布置在线条内。它是设置为显示属性的默认值。
In the BookYourHotel scenario, consider the following snippet code to horizontally display the links inside the list on the home page:
通过根据需要消耗尽可能多的宽度来显示元素。它没有换行符。在这里,元素被布置在线条
内。它是设置为显示属性的默认值。
li{
    display: inline;
    list-style-type:none;
}

In the preceding code snippet, links are horizontally displayed, as shown in the following figure.
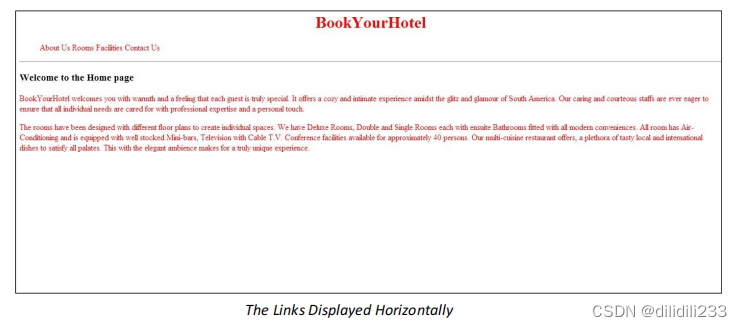
在前面的代码片段中,链接是水平显示的,如下图所示。

Visibility可见度

The visibility property is used to specify whether an element should be visible or not. The
following syntax can be used to apply the visibility property:
可见性属性用于指定元素是否应可见。以下语法可用于应用可见性属性:
visibility: hidden| visible
In the preceding syntax:
hidden : Hides an element from a Web page. However, it will consume the space occupied by that element.
隐藏网页中的元素。但是,它将占用该元素占用的空间。
visible : Shows the element on a Web page. It is the default value assigned to the
visibility property.
在网页上显示元素。它是分配给可见性属性的默认值。
Consider the following code snippet to use the visibility property:
<!DOCTYPE HTML>
<HTML>
    <HEAD>
        <STYLE>
        h2{ 
            visibility:hidden;
        }
        </STYLE>
    </HEAD>
    <BODY>
        <H1>Welcome to BookYourHotel website. </H1>
        <H2>This site is very user friendly.</H2>
        <H3>You can book your hotel while sitting at home.</H3>
    </BODY>
</HTML>

The preceding code snippet will hide the text inside the <H3> tag. However, it will occupy the space required to display the heading. The output of the visibility property is displayed, as shown in the following figure.
前面的代码片段将隐藏标记中的文本 <H3> 。但是,它将占用显示标题所需的空间。将显示可

见性属性的输出,如下图所示。


9.Positioning HTML Elements 定位 HTML 元素

In HTML, elements flow one after another in the same sequence as they appear in the code. This is known as static positioning. However, you may need to change the default positioning of the elements in certain cases. For example, you need to place an element behind the other to show some overlapping effect. HTML, however, does not allow users to control the positioning of the elements on a page. This functionality of controlling the placement of elements on a Web page can be implemented by using CSS.
HTML 中,元素以与代码中出现的顺序相同的顺序一个接一个地流动。这称为静态定位。但是, 在某些情况下,您可能需要更改元素的默认位置。例如,您需要将一个元素放在另一个元素后面以 显示一些重叠效果。但是, HTML 不允许用户控制元素在页面上的位置。可以使用 CSS 实现控制网 页上元素位置的此功能。
The styles for the placement of elements can have the following categories:
元素放置的样式可以具有以下类别:
Position 位置
Float 浮动

Position 位置

The position property is used to position an element on a Web page. The following table displays the
positioning methods that can be used to position the HTML element.
位置属性用于在网页上定位元素。下表显示了可用于定位 HTML 元素的定位方法。

With the help of the position property, you can specify the type of the positioning method used
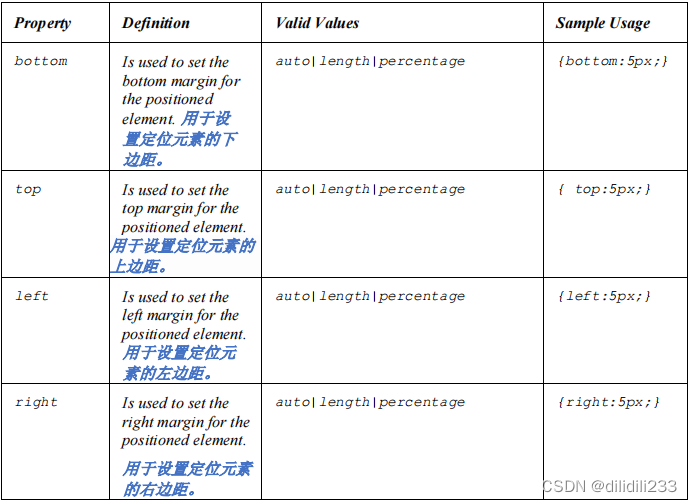
for the HTML element. Further, you can also define the exact location for HTML elements by using the positioning properties. The following table lists the CSS positioning properties.
借助位置属性,您可以指定用于 HTML 元素的定位方法的类型。此外,您还可以使用定位属性
定义 HTML 元素的确切位置。下表列出了 CSS 定位属性。
In the BookYourHotel scenario, consider the following code snippet to position the <H3> tag at the top of the page:
BookYourHotel 方案中,请考虑使用以下代码片段将代码定位在 <H3> 页面顶部:
h3{
    position: absolute;
    top:0px;
}

Source Code

<!DOCTYPE HTML>
<HTML>
    <HEAD>
        <STYLE>
        h1{
            text-align:center;
        }
        h3{
            position: absolute;
            top:0px;
        }
        li{
            display: inline;
            list-style-type:none;
        }
        li a{ 
            color:red;
            text-decoration:none;
        }
        h1,p{ 
            color:red;
        }
        </STYLE>
    </HEAD>
    <BODY>
        <H1>BookYourHotel</H1>
        <UL>
            <LI><A href="aboutus.html">About Us</A></LI>
            <LI><A href="rooms.html">Rooms</A></LI>
            <LI><A href="facilities.hmtl">Facilities</A></LI>
            <LI><A href="contactus.html">Contact Us</A></LI>
        </UL>
        <HR>
        <H3> Welcome to the Home page</H3>
        <P> BookYourHotel welcomes you with warmth and a feeling that each guest is truly special. It offers a cozy and intimate experience amidst the glitz and glamour of South America. Our caring and courteous staffs are ever eager to 
ensure that all individual needs are cared for with professional expertise and 
a personal touch.</P>
        <P>The rooms have been designed with different floor plans to create 
individual spaces. We have Deluxe Rooms, Double and Single Rooms each with 
ensuite Bathrooms fitted with all modern conveniences. All room has AirConditioning and is equipped with well stocked Mini-bars, Television with 
Cable T.V. Conference facilities available for approximately 40 persons. Our 
multi-cuisine restaurant offers, a plethora of tasty local and international 
dishes to satisfy all palates. This with the elegant ambience makes for a 
truly unique experience.</P>
    </BODY>
</HTML>
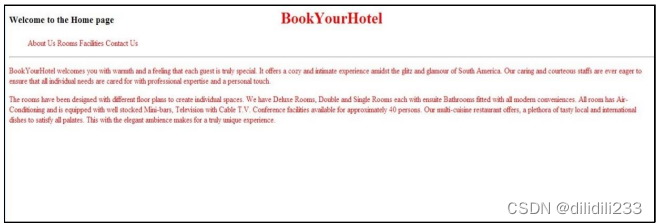
In the preceding code snippet, the text inside the <H3> tag is positioned at the top of the Web page.
在前面的代码片段中,标签内的文本 <H3> 位于网页的顶部。
效果如下:

Float 浮动

The float property is used to place HTML elements to the left or right margin, in relation to the
other HTML elements. It allows you to wrap the HTML elements around the floated element. The
concept of the float property is similar to magazines, where photos are aligned to one side, while the paragraph or text flows to the other side. The following syntax is used to specify the float property:
float 属性用于相对于其他 HTML 元素将 HTML 元素放置在左边距或右边距。它允许您将
HTML 元素包装在浮动元素周围。 float 属性的概念类似于杂志,其中照片向一侧对齐,而段
落或文本流向另一侧。以下语法用于指定 float 属性:
float: left|right|none
In the preceding syntax:
left : Sets the element to the left. 将元素设置为左侧
right : Sets the element to the right. 将元素设置为右侧
none : Specifies that the element does not float. It is the default value given to the float property. 指定 元素不浮动。它是给定给浮点属性的默认值
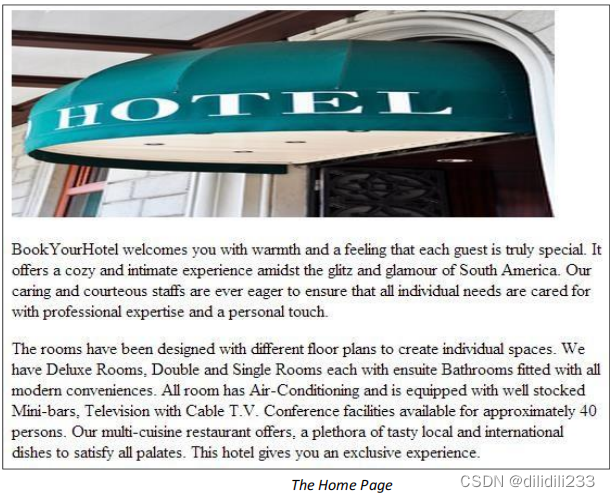
Consider an example of the BookYourHotel website. You have added an image to the Home page and it is currently formatted, as shown in the following figure.
考虑一个 BookYourHotel 网站的例子。您已将图像添加到主页,并且该图像当前已格式化,
如下图所示:
Now, you want to place the paragraphs to the right of the image. For this, consider the following
code to float an image with text wrapped around it:
现在,您要将段落放在图像的右侧。为此,请考虑以下代码来浮动图像,并在其周围环绕文
本:
<!DOCTYPE HTML>
<HTML>
    <HEAD>
        <STYLE>
            img {
                float: left;
                }
        </STYLE>
    </HEAD>
    <BODY>
        <IMG src= "dep_6777368-Hotel-entrance.jpg" width=500 height=200>
        <P> BookYourHotel welcomes you with warmth and a feeling that each guest is truly special. It offers a cozy and intimate experience amidst the glitz and glamour of South America. Our caring and courteous staffs are ever eager to ensure that all individual needs are cared for with professional expertise and a personal touch.</P>
        <P>The rooms have been designed with different floor plans to create individual spaces. We have Deluxe Rooms, Double and Single Rooms each with ensuite Bathrooms fitted with all modern conveniences. All room has Air- Conditioning and is equipped with well stocked Minibars, Television with Cable T.V. Conference facilities available for approximately 40 persons. Our multi-cuisine restaurant offers, a plethora of tasty local and international dishes to satisfy all palates. This hotel gives you an exclusive experience.</P>
    </BODY>
</HTML>
In the preceding code, the image is made to float to the left margin. Therefore, the text that appears after
the image will flow to the right side of the image.
在前面的代码中,图像浮动到左边距。因此,图像后面显示的文本将流向图像的右侧。
The output displaying the use of the float property is shown in the following figure.
下图显示了显示 float 属性使用情况的输出。

Clear

Whenever you apply the float property on any HTML element, all the elements after the floating element will be placed around it. This can be avoided by using the clear property. The clear property is used to turn off the float effect on HTML elements. The following syntax can be used to apply the clear property:
每当在任何 HTML 元素上应用 float 属性时,浮动元素之后的所有元素都将放置在其周围。这可以
通过使用 clear 属性来避免。 clear 属性用于关闭 HTML 元素上的浮动效果。以下语法可用于应用

clear 属性:

clear: both|left|right;
In the preceding syntax:
both: Clears float from either direction. 清除从任一方向浮动元素
left: Clears float from the left direction. 清除从左侧方向浮动元素
right: Clears float from the right direction. 清除从右侧方向浮出的浮动元素
You may want one paragraph to be displayed on the right side and another to be displayed below the image. This can be achieved by using the clear property.
您可能希望一个段落显示在右侧,另一个段落显示在图像下方。这可以通过使用 clear 属性来实现
Consider the following code snippet for applying the clear property:
请考虑以下代码片段来应用 clear 属性
<!DOCTYPE HTML>
<HTML>
    <HEAD>
        <STYLE>
            img {
                float: left;
            }
            .auto-style{ 
                clear:both;
            }
        </STYLE>
    </HEAD>
    <BODY>
        <IMG src= "dep_6777368-Hotel-entrance.jpg" width=500 height=200>
        <P> BookYourHotel welcomes you with warmth and a feeling that each guest is truly special. It offers a cozy and intimate experience amidst the glitz and glamour of South America. Our caring and courteous staffs are ever eager to ensure that all individual needs are cared for with professional expertise and a personal
touch.</P>
        <P class="auto-style">The rooms have been designed with different floor plans to create individual spaces. We have Deluxe Rooms, Double and Single Rooms each with ensuite Bathrooms fitted with all modern
conveniences. All room has Air-Conditioning and is equipped with well stocked Mini-bars, Television with Cable T.V. Conference facilities available for approximately 40 persons. Our multi-cuisine restaurant offers, a plethora of tasty local and international dishes to satisfy all palates. This hotel gives you an exclusive
experience.</P>
    </BODY>
</HTML>

The preceding code displays a paragraph on the right side and another paragraph below the image on the Web page.

前面的代码在网页上图像的右侧显示一个段落,在图像下方显示另一个段落。
The output displaying the use of the clear property is shown in the following figure.
下图显示了显示 clear 属性使用情况的输出。

评论 1
添加红包

请填写红包祝福语或标题

红包个数最小为10个

红包金额最低5元

当前余额3.43前往充值 >
需支付:10.00
成就一亿技术人!
领取后你会自动成为博主和红包主的粉丝 规则
hope_wisdom
发出的红包
实付
使用余额支付
点击重新获取
扫码支付
钱包余额 0

抵扣说明:

1.余额是钱包充值的虚拟货币,按照1:1的比例进行支付金额的抵扣。
2.余额无法直接购买下载,可以购买VIP、付费专栏及课程。

余额充值