


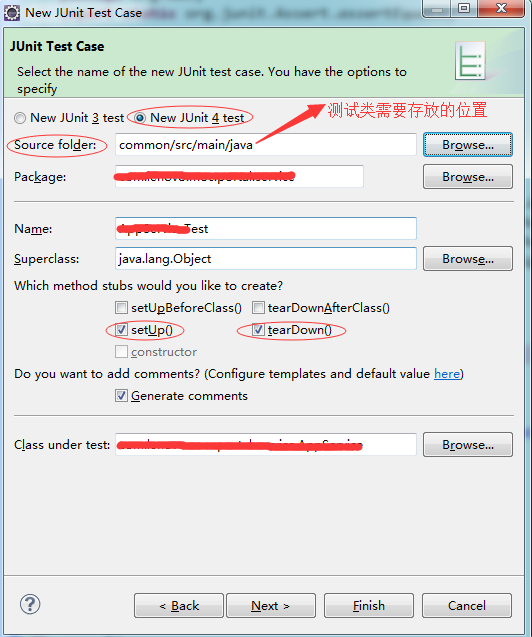
1、选中需要进行测试的service类,右键->new->other->JUnit Test Case,如下图:
2、编写测试代码如下:
AppServiceTest.java


import static org.junit.Assert.assertEquals;
import java.io.IOException;
import javax.servlet.ServletException;
import org.junit.After;
import org.junit.Before;
import org.junit.Test;
import org.junit.runner.RunWith;
import org.springframework.beans.factory.annotation.Autowired;
import org.springframework.mock.web.MockHttpServletRequest;
import org.springframework.mock.web.MockHttpServletResponse;
import org.springframework.test.context.ContextConfiguration;
import com.lenovo.moc.portal.service.AppService;

/**
 * @author Administrator
 *
 */
@RunWith(JUnit4ClassRunner.class)
// 由于本测试类位于src/test/java下,而app-context.xml处于src/main/java下,所以需要使用file来获取,
// 否则使用@ContextConfiguration(locations={"classpath:WEB-INF/app-context.xml"})来获取
@ContextConfiguration(locations={"file:src/main/webapp/WEB-INF/app-context.xml"})
public class AppServiceTest{

    private MockHttpServletRequest request;
    private MockHttpServletResponse response;

    @Autowired
    private AppService appService;
    /**
     * @throws java.lang.Exception
     */
    @Before
    public void setUp() throws Exception {
        request = new MockHttpServletRequest();
        request.setCharacterEncoding("UTF-8");
        response = new MockHttpServletResponse();
    }

    /**
     * @throws java.lang.Exception
     */
    @After
    public void tearDown() throws Exception {
    }

    /**
     * Test method for {@link AppService#login(javax.servlet.http.HttpServletRequest, javax.servlet.http.HttpServletResponse)}.
     */
    @Test
    public void testAdminAppLogin() {

        try {
            request.setParameter("key", "value");
            appService.login(request, response);
            assertEquals(response.getStatus(), 200);
        } catch (IOException e) {
            // TODO Auto-generated catch block
            e.printStackTrace();
        } catch (ServletException e) {
            // TODO Auto-generated catch block
            e.printStackTrace();
        }
    }
}
JUnit4ClassRunner.java
import java.io.FileNotFoundException;
import org.junit.runners.model.InitializationError;
import org.springframework.test.context.junit4.SpringJUnit4ClassRunner;
import org.springframework.util.Log4jConfigurer;

public class JUnit4ClassRunner extends SpringJUnit4ClassRunner {
    static {
        try {
            // 控制台打印日志
            Log4jConfigurer.initLogging("file:src/main/webapp/WEB-INF/log4j.properties");
        } catch (FileNotFoundException ex) {
            System.err.println("Cannot Initialize log4j");
        }
    }
    public JUnit4ClassRunner(Class<?> clazz) throws InitializationError {
        super(clazz);
    }
}
log4j.properties
log4j.rootLogger=INFO, stdout, logfile

log4j.appender.stdout=org.apache.log4j.ConsoleAppender
log4j.appender.stdout.layout=org.apache.log4j.PatternLayout
#log4j.appender.stdout.layout.ConversionPattern=%d %p [%c] - %m%n
log4j.appender.stdout.layout.ConversionPattern=- %m%n

log4j.appender.logfile=org.apache.log4j.RollingFileAppender
log4j.appender.logfile.File=${catalina.home}/logs/appTest.log
log4j.appender.logfile.MaxFileSize=512MB
# Keep three backup files.
log4j.appender.logfile.MaxBackupIndex=3
# Pattern to output: date priority [category] - message
log4j.appender.logfile.layout=org.apache.log4j.PatternLayout
log4j.appender.logfile.layout.ConversionPattern=%d %p [%c] - %m%n

log4j.logger.com.opensymphony.xwork2=ERROR

# Control logging for other open source packages
log4j.logger.org.springframework=ERROR
log4j.logger.org.quartz=ERROR
log4j.logger.net.sf.ehcache=ERROR
log4j.logger.net.sf.navigator=ERROR
log4j.logger.org.apache.commons=ERROR
log4j.logger.org.apache.struts=ERROR

# Struts OgnlUtil issues unimportant warnings
log4j.logger.com.opensymphony.xwork2.util.OgnlUtil=error
log4j.logger.com.opensymphony.xwork2.ognl.OgnlValueStack=error
3、maven包:
        <dependency>
        <groupId>javax.servlet</groupId>
        <artifactId>javax.servlet-api</artifactId>
        <version>3.0.1</version>
    </dependency>
    <dependency>
            <groupId>junit</groupId>
            <artifactId>junit</artifactId>
            <version>4.11</version>
            <scope>test</scope>
        </dependency>
4、右键测试文件进行测试即可。
PS: ApplicationContext applicationContext = new FileSystemXmlApplicationContext("src/main/webapp/WEB-INF/applicationContext.xml");
等价于
@RunWith(SpringJUnit4ClassRunner.class) @ContextConfiguration(locations={"file:src/main/webapp/WEB-INF/applicationContext.xml"})
ApplicationContext applicationContext = new ClassPathXmlApplicationContext("applicationContext.xml");
等价于
@RunWith(SpringJUnit4ClassRunner.class) @ContextConfiguration(locations={"classpath:applicationContext.xml"})


 7111
7111


 被折叠的 条评论
为什么被折叠?
被折叠的 条评论
为什么被折叠?
 到【灌水乐园】发言


