


我认为可以肯定地说, Java EE在Java开发人员中享有很高的声誉。 尽管多年来确实在各个方面都有所改善,甚至将其改名为Eclipse Foundation成为Jakarta EE ,但其苦味仍然相当浓厚。 另一方面,我们拥有Spring框架 (或者为了更好地反映现实,一个成熟的Spring平台 ):出色,轻巧,快速,创新和高产的Java EE替代品。 那么,为什么要打扰Java EE ?
我们将通过展示使用大多数Java EE规范构建现代Java应用程序有多么容易来回答这个问题。 成功的关键要素是Eclipse Microprofile : 微服务时代的企业Java。
我们将要构建的应用程序就是RESTful Web API,用于管理人员,就这么简单。 在Java中构建RESTful Web服务的标准方法是使用JAX-RS 2.1 ( JSR-370 )。 因此, CDI 2.0 ( JSR-365 )将负责依赖注入,而JPA 2.0 ( JSR-317 )将涵盖数据访问层。 当然, Bean Validation 2.0 ( JSR-380 )正在帮助我们处理输入验证。
我们将要依赖的唯一非Java EE规范是OpenAPI v3.0 ,它有助于提供RESTful Web API的可用描述。 这样,让我们开始使用PersonEntity域模型(将getter和setter省略为不太相关的细节):
@Entity
@Table(name = "people")
public class PersonEntity {
    @Id @Column(length = 256)
    private String email;

    @Column(nullable = false, length = 256, name = "first_name")
    private String firstName;

    @Column(nullable = false, length = 256, name = "last_name")
    private String lastName;

    @Version
    private Long version;
}
它只是具有绝对最小的一组属性。 JPA存储库非常简单,并实现了一组典型的CRUD方法。
@ApplicationScoped
@EntityManagerConfig(qualifier = PeopleDb.class)
public class PeopleJpaRepository implements PeopleRepository {
    @Inject @PeopleDb private EntityManager em;

    @Override
    @Transactional(readOnly = true)
    public Optional<PersonEntity> findByEmail(String email) {
        final CriteriaBuilder cb = em.getCriteriaBuilder();

        final CriteriaQuery<PersonEntity> query = cb.createQuery(PersonEntity.class);
        final Root<PersonEntity> root = query.from(PersonEntity.class);
        query.where(cb.equal(root.get(PersonEntity_.email), email));

        try {
            final PersonEntity entity = em.createQuery(query).getSingleResult();
            return Optional.of(entity);
        } catch (final NoResultException ex) {
            return Optional.empty();
        }
    }

    @Override
    @Transactional
    public PersonEntity saveOrUpdate(String email, String firstName, String lastName) {
        final PersonEntity entity = new PersonEntity(email, firstName, lastName);
        em.persist(entity);
        return entity;
    }

    @Override
    @Transactional(readOnly = true)
    public Collection<PersonEntity> findAll() {
        final CriteriaBuilder cb = em.getCriteriaBuilder();
        final CriteriaQuery<PersonEntity> query = cb.createQuery(PersonEntity.class);
        query.from(PersonEntity.class);
        return em.createQuery(query).getResultList();
    }

    @Override
    @Transactional
    public Optional<PersonEntity> deleteByEmail(String email) {
        return findByEmail(email)
            .map(entity -> {
                em.remove(entity);
                return entity;
            });
    }
}事务管理(即@Transactional批注)需要一些解释。 在典型的Java EE应用程序中,容器运行时负责管理事务。 由于我们不想随身携带应用程序容器,而是保持精简,因此我们可以使用EntityManager来启动/提交/回滚事务。 当然可以解决,但是会污染样板代码。 可以说,更好的选择是使用Apache DeltaSpike CDI扩展进行声明式事务管理 (这是@Transactional和@EntityManagerConfig注释的来源)。 下面的代码段说明了如何进行集成。
@ApplicationScoped
public class PersistenceConfig {
    @PersistenceUnit(unitName = "peopledb")
    private EntityManagerFactory entityManagerFactory;

    @Produces @PeopleDb @TransactionScoped
    public EntityManager create() {
        return this.entityManagerFactory.createEntityManager();
    }

    public void dispose(@Disposes @PeopleDb EntityManager entityManager) {
        if (entityManager.isOpen()) {
            entityManager.close();
        }
    }
}
太棒了,最难的部分已经过去了! 接下来是人员 数据传输对象和服务层。
public class Person {
    @NotNull private String email;
    @NotNull private String firstName;
    @NotNull private String lastName;
}
老实说,为了使示例应用程序尽可能小,我们可以完全跳过服务层,直接进入存储库。 但这通常不是一个很好的做法,因此无论如何让我们介绍PeopleServiceImpl 。
@ApplicationScoped
public class PeopleServiceImpl implements PeopleService {
    @Inject private PeopleRepository repository;

    @Override
    public Optional<Person> findByEmail(String email) {
        return repository
            .findByEmail(email)
            .map(this::toPerson);
    }

    @Override
    public Person add(Person person) {
        return toPerson(repository.saveOrUpdate(person.getEmail(), person.getFirstName(), person.getLastName()));
    }

    @Override
    public Collection<Person> getAll() {
        return repository
            .findAll()
            .stream()
            .map(this::toPerson)
            .collect(Collectors.toList());
    }

    @Override
    public Optional<Person> remove(String email) {
        return repository
            .deleteByEmail(email)
            .map(this::toPerson);
    }

    private Person toPerson(PersonEntity entity) {
        return new Person(entity.getEmail(), entity.getFirstName(), entity.getLastName());
    }
}剩下的唯一部分是JAX-RS应用程序和资源的定义。
@Dependent
@ApplicationPath("api")
@OpenAPIDefinition(
    info = @Info(
        title = "People Management Web APIs",
        version = "1.0.0",
        license = @License(
            name = "Apache License",
            url = "https://www.apache.org/licenses/LICENSE-2.0"
        )
    )
)
public class PeopleApplication extends Application {
}
不多说,可能就这么简单。 不过, JAX-RS资源实现更加有趣( OpenAPI注释占据了大部分位置)。
@ApplicationScoped
@Path( "/people" )
@Tag(name = "people")
public class PeopleResource {
    @Inject private PeopleService service;

    @Produces(MediaType.APPLICATION_JSON)
    @GET
    @Operation(
        description = "List all people",
        responses = {
            @ApiResponse(
                content = @Content(array = @ArraySchema(schema = @Schema(implementation = Person.class))),
                responseCode = "200"
            )
        }
    )
    public Collection<Person> getPeople() {
        return service.getAll();
    }

    @Produces(MediaType.APPLICATION_JSON)
    @Path("/{email}")
    @GET
    @Operation(
        description = "Find person by e-mail",
        responses = {
            @ApiResponse(
                content = @Content(schema = @Schema(implementation = Person.class)),
                responseCode = "200"
            ),
            @ApiResponse(
                responseCode = "404",
                description = "Person with such e-mail doesn't exists"
            )
        }
    )
    public Person findPerson(@Parameter(description = "E-Mail address to lookup for", required = true) @PathParam("email") final String email) {
        return service
            .findByEmail(email)
            .orElseThrow(() -> new NotFoundException("Person with such e-mail doesn't exists"));
    }

    @Consumes(MediaType.APPLICATION_JSON)
    @Produces(MediaType.APPLICATION_JSON)
    @POST
    @Operation(
        description = "Create new person",
        requestBody = @RequestBody(
            content = @Content(schema = @Schema(implementation = Person.class)),
        ),
        responses = {
            @ApiResponse(
                 content = @Content(schema = @Schema(implementation = Person.class)),
                 headers = @Header(name = "Location"),
                 responseCode = "201"
            ),
            @ApiResponse(
                responseCode = "409",
                description = "Person with such e-mail already exists"
            )
        }
    )
    public Response addPerson(@Context final UriInfo uriInfo,
            @Parameter(description = "Person", required = true) @Valid Person payload) {

        final Person person = service.add(payload);
        return Response
             .created(uriInfo.getRequestUriBuilder().path(person.getEmail()).build())
             .entity(person)
             .build();
    }

    @Path("/{email}")
    @DELETE
    @Operation(
        description = "Delete existing person",
        responses = {
            @ApiResponse(
                responseCode = "204",
                description = "Person has been deleted"
            ),
            @ApiResponse(
                responseCode = "404",
                description = "Person with such e-mail doesn't exists"
            )
        }
    )
    public Response deletePerson(@Parameter(description = "E-Mail address to lookup for", required = true ) @PathParam("email") final String email) {
        return service
            .remove(email)
            .map(r -> Response.noContent().build())
            .orElseThrow(() -> new NotFoundException("Person with such e-mail doesn't exists"));
    }
}
至此,我们完成了! 但是,我们如何将所有这些部件组装并连接在一起? 这是Microprofile进入舞台的时间。 有许多实现可供选择,本文中将使用的是Project Hammock 。 我们唯一要做的就是指定我们要使用的CDI 2.0 , JAX-RS 2.1和JPA 2.0实现,它们分别转换为Weld , Apache CXF和OpenJPA (通过Project Hammock依赖关系表示)。 让我们看一下Apache Maven pom.xml文件。
<properties>
    <deltaspike.version>1.8.1</deltaspike.version>
    <hammock.version>2.1</hammock.version>
</properties>

<dependencies>
    <dependency>
        <groupId>org.apache.deltaspike.modules</groupId>
        <artifactId>deltaspike-jpa-module-api</artifactId>
        <version>${deltaspike.version}</version>
        <scope>compile</scope>
    </dependency>

    <dependency>
        <groupId>org.apache.deltaspike.modules</groupId>
        <artifactId>deltaspike-jpa-module-impl</artifactId>
        <version>${deltaspike.version}</version>
        <scope>runtime</scope>
    </dependency>

    <dependency>
        <groupId>ws.ament.hammock</groupId>
        <artifactId>dist-microprofile</artifactId>
        <version>${hammock.version}</version>
    </dependency>

    <dependency>
        <groupId>ws.ament.hammock</groupId>
        <artifactId>jpa-openjpa</artifactId>
        <version>${hammock.version}</version>
    </dependency>

    <dependency>
        <groupId>ws.ament.hammock</groupId>
        <artifactId>util-beanvalidation</artifactId>
        <version>${hammock.version}</version>
    </dependency>

    <dependency>
        <groupId>ws.ament.hammock</groupId>
        <artifactId>util-flyway</artifactId>
        <version>${hammock.version}</version>
    </dependency>

    <dependency>
        <groupId>ws.ament.hammock</groupId>
        <artifactId>swagger</artifactId>
        <version>${hammock.version}</version>
    </dependency>
</dependencies>事不宜迟,让我们立即构建和运行应用程序(如果您好奇应用程序正在使用什么关系数据存储,则它是H2 ,并且数据库已在内存中配置)。
> mvn clean package
> java -jar target/eclipse-microprofile-hammock-0.0.1-SNAPSHOT-capsule.jar确保我们的人员管理RESTful Web API完全正常运行的最佳方法是向其发送几个请求:
>  curl -X POST http://localhost:10900/api/people -H "Content-Type: application\json" \
     -d '{"email": "a@b.com", "firstName": "John", "lastName": "Smith"}'

HTTP/1.1 201 Created
Location: http://localhost:10900/api/people/a@b.com
Content-Type: application/json

{
    "firstName":"John","
    "lastName":"Smith",
    "email":"a@b.com"
}如何确保Bean验证正常工作呢? 要触发该请求,让我们发送部分准备好的请求。
>  curl  --X POST http://localhost:10900/api/people -H "Content-Type: application\json" \
     -d '{"firstName": "John", "lastName": "Smith"}'

HTTP/1.1 400 Bad Request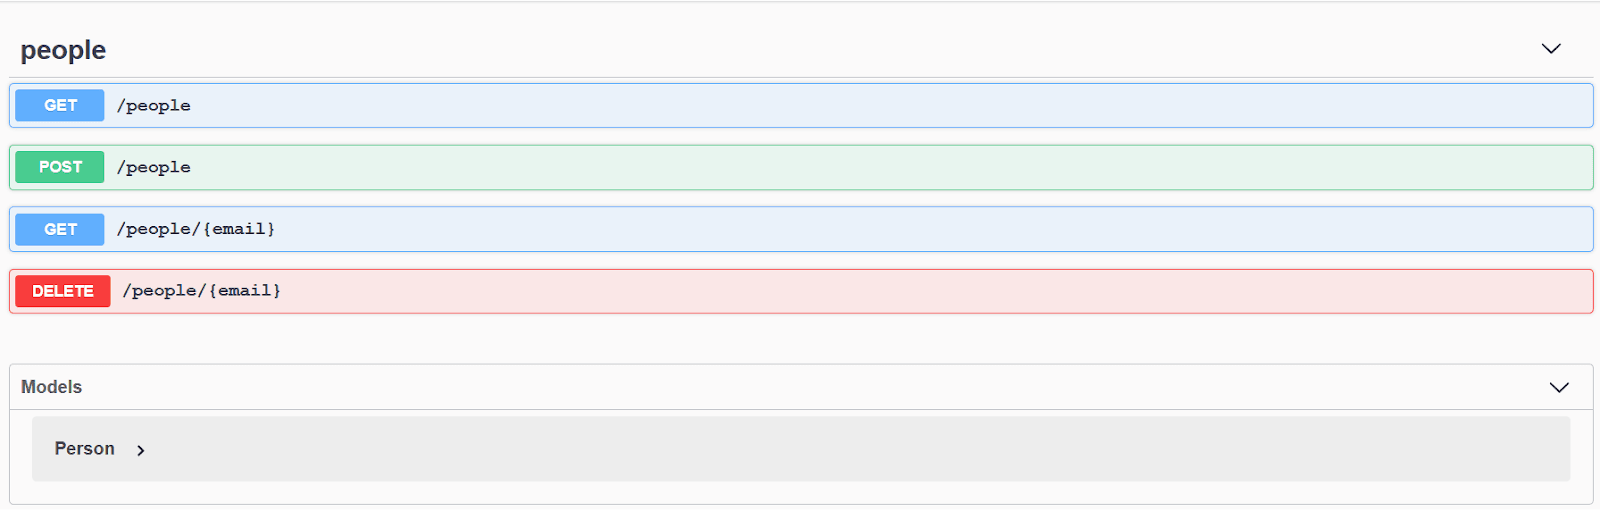
Content-Length: 0还可以在http:// localhost:10900 / index.html?url = http:// localhost:10900 / api / openapi.json上获得OpenAPI规范和预捆绑的Swagger UI分发。
到目前为止,到目前为止还算不错,但实际上我们还没有谈论过测试应用程序。 假设要增加一个人,要进行集成测试有多难? 事实证明,围绕测试Java EE应用程序的框架有了很大的改进。 特别是,使用Arquillian测试框架(以及最受欢迎的JUnit和REST Assured )非常容易完成。 一个真实的例子值得一千个单词。
@RunWith(Arquillian.class)
@EnableRandomWebServerPort
public class PeopleApiTest {
    @ArquillianResource private URI uri;

    @Deployment
    public static JavaArchive createArchive() {
        return ShrinkWrap
            .create(JavaArchive.class)
            .addClasses(PeopleResource.class, PeopleApplication.class)
            .addClasses(PeopleServiceImpl.class, PeopleJpaRepository.class, PersistenceConfig.class)
            .addPackages(true, "org.apache.deltaspike");
    }

    @Test
    public void shouldAddNewPerson() throws Exception {
        final Person person = new Person("a@b.com", "John", "Smith");

        given()
            .contentType(ContentType.JSON)
            .body(person)
            .post(uri + "/api/people")
            .then()
            .assertThat()
            .statusCode(201)
            .body("email", equalTo("a@b.com"))
            .body("firstName", equalTo("John"))
            .body("lastName", equalTo("Smith"));
    }
}
太神奇了,不是吗? 它实际上是一个很大的乐趣,以发展现代的Java EE应用程序,可能有人会说了, 春节的方式! 实际上,与Spring的相似之处并非偶然,因为它令人鼓舞,正在鼓舞,而且无疑将继续激发Java EE生态系统中的许多创新。
未来如何? 我认为,对于Jakarta EE和Eclipse Microprofile来说 , 绝对是光明的。 后者刚刚推出了2.0版 ,其中包含大量新规范,旨在满足微服务架构的需求。 见证这些转变的发生真是太棒了。
该项目的完整资源可在Github上找到 。
翻译自: https://www.javacodegeeks.com/2018/11/building-java-applications-spring-way.html


 434
434

 被折叠的 条评论
为什么被折叠?
被折叠的 条评论
为什么被折叠?
 到【灌水乐园】发言


