


企业应用程序的常见要求是在登录页面后面保护所有JSF页面。 有时,您甚至希望在应用程序内部具有保护区,只有拥有特定角色的用户才能访问这些保护区。 Java EE标准附带实现受某些安全性约束保护的Web应用程序所需的所有方法。 在此博客文章中,我们希望开发一个简单的应用程序,以演示这些方法的用法,并展示如何为两个不同的角色构建完整的JSF应用程序。 由于该解决方案乍看之下可能会直截了当,因此有一些陷阱需要注意。
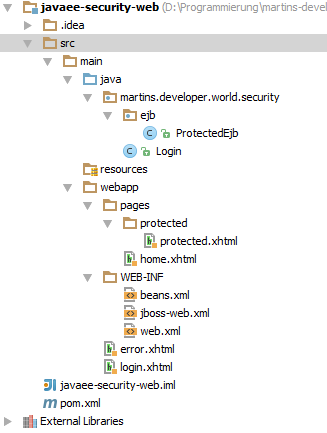
我们要关心的第一点是应用程序的文件夹布局。 我们有三种不同的页面:
- 所有用户都应该可以访问登录页面和错误页面。
- 我们有一个主页,只有经过身份验证的用户才能访问。
- 我们有一个受保护的页面,该页面仅对角色roleed-role的用户可见。
因此,将这三种类型的页面放在三个不同的文件夹中:根文件夹src / main / webapp,文件夹src / main / webapp / pages和受保护的页面位于src / main / webapp / pages / protected:
web.xml文件是定义我们要使用的角色以及如何将某些URL模式的可访问性映射到这些角色的位置:
<security-constraint>
    <web-resource-collection>
        <web-resource-name>pages</web-resource-name>
        <url-pattern>/pages/*</url-pattern>
        <http-method>PUT</http-method>
        <http-method>DELETE</http-method>
        <http-method>GET</http-method>
        <http-method>POST</http-method>
    </web-resource-collection>
    <auth-constraint>
        <role-name>security-role</role-name>
        <role-name>protected-role</role-name>
    </auth-constraint>
</security-constraint>
<security-constraint>
    <web-resource-collection>
        <web-resource-name>protected</web-resource-name>
        <url-pattern>/pages/protected/*</url-pattern>
        <http-method>PUT</http-method>
        <http-method>DELETE</http-method>
        <http-method>GET</http-method>
        <http-method>POST</http-method>
    </web-resource-collection>
    <auth-constraint>
        <role-name>protected-role</role-name>
    </auth-constraint>
</security-constraint>

<security-role>
    <role-name>security-role</role-name>
</security-role>
<security-role>
    <role-name>protected-role</role-name>
</security-role>
如您所见,我们定义了两个角色:security-role和protected-role。 只有拥有security-role和protected-role角色的用户才能访问与模式/ pages / *匹配的URL,而/ pages / protected / *下的页面仅限于具有protected-role角色的用户。
您可能会偶然发现的另一点是欢迎页面。 乍一看,您希望将登录页面指定为欢迎页面。 但这是行不通的,因为Servlet容器的登录模块会自动将所有未经授权的访问重定向到登录页面。 因此,我们将应用程序的主页指定为欢迎页面。 这已经是一个受保护的页面,但是当用户直接调用其URL时,它将自动重定向到登录页面。
<welcome-file-list>
    <welcome-file>pages/home.xhtml</welcome-file>
</welcome-file-list>
现在我们几乎完成了web.xml页面。 我们要做的就是定义身份验证方法以及登录页面和错误页面,以防用户输入无效凭据时显示。 必须引起注意的是,这两个页面均不包含受保护的URL(例如CSS或JavaScript文件),否则,甚至禁止访问这两个页面,并且用户会看到Application Server特定的错误页面。
<login-config>
    <auth-method>FORM</auth-method>
    <form-login-config>
        <form-login-page>/login.xhtml</form-login-page>
        <form-error-page>/error.xhtml</form-error-page>
    </form-login-config>
</login-config>
在将应用程序部署到JBoss Application Server时,我们提供了一个名为jboss-web.xml的文件,该文件将我们的应用程序连接到安全域:
<?xml version="1.0" encoding="UTF-8"?>
<jboss-web>
    <security-domain>java:/jaas/other</security-domain>
</jboss-web>
在standalone.xml中配置了“其他”安全域。 默认配置要求用户传递“ RealmUsersRoles”登录模块,该模块从配置文件夹中的两个文件application-users.properties和application-roles.properties获取其用户和角色定义。 您可以使用提供的添加用户脚本将新用户添加到该领域:
What type of user do you wish to add?
 a) Management User (mgmt-users.properties)
 b) Application User (application-users.properties)
(a): b

Enter the details of the new user to add.
Realm (ApplicationRealm) :
Username : bart
Password :
Re-enter Password :
What roles do you want this user to belong to? (Please enter a comma separated list, or leave blank for none) : security-role,protected-role
About to add user 'bart' for realm 'ApplicationRealm'
Is this correct yes/no? yes
在这里选择正确的领域(ApplicationRealm)很重要,因为默认情况下,在standalone.xml中为“其他”登录模块配置了该领域。 在这里,您还可以用逗号分隔列表的形式提供用户所拥有的角色。
<form method="POST" action="j_security_check" id="">
	<h:panelGrid id="panel" columns="2" border="1" cellpadding="4" cellspacing="4">
		<h:outputLabel for="j_username" value="Username:" />
		<input type="text" name="j_username"/>
		<h:outputLabel for="j_password" value="Password:" />
		<input type="password" name="j_password"/>
		<h:panelGroup>
			<input type="submit" value="Login"/>
		</h:panelGroup>
	</h:panelGrid>
</form>
下一步是实现一个简单的登录表单,该表单将其数据提交到登录模块。 请注意输入字段的ID以及表单的操作。 通过这种方式,表单被发布到登录模块,该模块从请求中提取输入的用户名和密码。 JSF开发人员可能想知道为什么我们使用标准HTML表单而不是元素。 原因是JSF表单元素跨越了自己的名称空间,因此输入字段的ID带有表单ID的前缀(并且此ID不能为空)。
如果用户已通过登录表单,我们将向他显示一个主页。 但是,只有拥有protected-role角色的用户才能访问到受保护页面的链接。 这可以通过以下呈现条件来完成:
<h:link value="Protected page" outcome="protected/protected" rendered="#{facesContext.externalContext.isUserInRole('protected-role')}"/>最后但并非最不重要的一点是,我们需要注销功能。 对于这种情况,我们实现了一个简单的后备bean,类似于以下实例,它使用户的会话无效并将其重定向回登录页面:
@Named(value = "login")
public class Login {

    public String logout() {
        FacesContext.getCurrentInstance().getExternalContext().invalidateSession();
        return "/login";
    }
}- 像往常一样,完整的源代码可以在github上找到。


 352
352

 被折叠的 条评论
为什么被折叠?
被折叠的 条评论
为什么被折叠?
 到【灌水乐园】发言


