


在本教程中,我将使用JavaFX 2和CSS设计漂亮的Login Form 。
它是经典的登录表单,带有用户名和密码以及登录按钮。
为了遵循本教程,我强烈建议您查看以下这些教程:
用户名: JavaFX2 密码:密码
您可以在上方输入此信息,然后单击“登录”按钮。 它会提示您登录成功,但是如果输入错误信息,则会提示您登录不成功。
本教程的最终输出屏幕截图如下图所示。
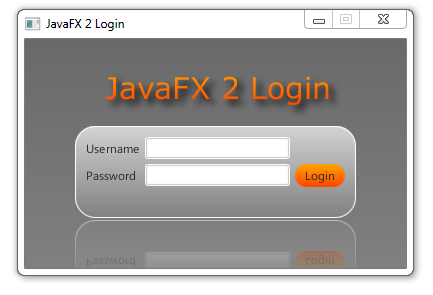 |
| JavaFX 2登录表单 |
这是我们示例的Java代码:
import javafx.application.Application;
import javafx.event.ActionEvent;
import javafx.event.EventHandler;
import javafx.geometry.Insets;
import javafx.scene.Scene;
import javafx.scene.control.Button;
import javafx.scene.control.Label;
import javafx.scene.control.PasswordField;
import javafx.scene.control.TextField;
import javafx.scene.effect.DropShadow;
import javafx.scene.effect.Reflection;
import javafx.scene.layout.BorderPane;
import javafx.scene.layout.GridPane;
import javafx.scene.layout.HBox;
import javafx.scene.paint.Color;
import javafx.scene.text.Font;
import javafx.scene.text.FontWeight;
import javafx.scene.text.Text;
import javafx.stage.Stage;

/**
 *
 * @web http://zoranpavlovic.blogspot.com/
 */
public class Login extends Application {

 String user = "JavaFX2";
 String pw = "password";
 String checkUser, checkPw;

    public static void main(String[] args) {
        launch(args);
    }

    @Override
    public void start(Stage primaryStage) {
        primaryStage.setTitle("JavaFX 2 Login");

        BorderPane bp = new BorderPane();
        bp.setPadding(new Insets(10,50,50,50));

        //Adding HBox
        HBox hb = new HBox();
        hb.setPadding(new Insets(20,20,20,30));

        //Adding GridPane
        GridPane gridPane = new GridPane();
        gridPane.setPadding(new Insets(20,20,20,20));
        gridPane.setHgap(5);
        gridPane.setVgap(5);

       //Implementing Nodes for GridPane
        Label lblUserName = new Label("Username");
        final TextField txtUserName = new TextField();
        Label lblPassword = new Label("Password");
        final PasswordField pf = new PasswordField();
        Button btnLogin = new Button("Login");
        final Label lblMessage = new Label();

        //Adding Nodes to GridPane layout
        gridPane.add(lblUserName, 0, 0);
        gridPane.add(txtUserName, 1, 0);
        gridPane.add(lblPassword, 0, 1);
        gridPane.add(pf, 1, 1);
        gridPane.add(btnLogin, 2, 1);
        gridPane.add(lblMessage, 1, 2);


        //Reflection for gridPane
        Reflection r = new Reflection();
        r.setFraction(0.7f);
        gridPane.setEffect(r);

        //DropShadow effect
        DropShadow dropShadow = new DropShadow();
        dropShadow.setOffsetX(5);
        dropShadow.setOffsetY(5);

        //Adding text and DropShadow effect to it
        Text text = new Text("JavaFX 2 Login");
        text.setFont(Font.font("Courier New", FontWeight.BOLD, 28));
        text.setEffect(dropShadow);

        //Adding text to HBox
        hb.getChildren().add(text);

        //Add ID's to Nodes
        bp.setId("bp");
        gridPane.setId("root");
        btnLogin.setId("btnLogin");
        text.setId("text");

        //Action for btnLogin
        btnLogin.setOnAction(new EventHandler() {
         public void handle(ActionEvent event) {
          checkUser = txtUserName.getText().toString();
          checkPw = pf.getText().toString();
          if(checkUser.equals(user) && checkPw.equals(pw)){
           lblMessage.setText("Congratulations!");
           lblMessage.setTextFill(Color.GREEN);
          }
          else{
           lblMessage.setText("Incorrect user or pw.");
           lblMessage.setTextFill(Color.RED);
          }
          txtUserName.setText("");
          pf.setText("");
         }
         });

        //Add HBox and GridPane layout to BorderPane Layout
        bp.setTop(hb);
        bp.setCenter(gridPane);

        //Adding BorderPane to the scene and loading CSS
     Scene scene = new Scene(bp);
     scene.getStylesheets().add(getClass().getClassLoader().getResource("login.css").toExternalForm());
     primaryStage.setScene(scene);
       primaryStage.titleProperty().bind(
                 scene.widthProperty().asString().
                 concat(" : ").
                 concat(scene.heightProperty().asString()));
     //primaryStage.setResizable(false);
     primaryStage.show();
    }
}为了正确设置此应用程序的样式,您需要在项目的/ src文件夹中创建login.css文件。 如果您不知道该怎么做,请查看JavaFX 2:样式按钮教程 。
这是我们示例CSS代码:
#root {
 -fx-background-color:  linear-gradient(lightgray, gray);
 -fx-border-color: white;
 -fx-border-radius: 20;
 -fx-padding: 10 10 10 10;
 -fx-background-radius: 20;

}

#bp {
 -fx-background-color:  linear-gradient(gray,DimGrey );

}

#btnLogin {
    -fx-background-radius: 30, 30, 29, 28;
    -fx-padding: 3px 10px 3px 10px;
    -fx-background-color: linear-gradient(orange, orangered );
}

#text {
 -fx-fill:  linear-gradient(orange , orangered);
}
多数民众赞成在本教程中,如果您有任何意见或问题,请随时发表评论。 如果您喜欢本教程,则可以在此博客上查看更多JavFX 2教程。
您可能想看一下下面的这些教程:
参考: JavaFX 2:在Zoran Pavlovic博客博客上,从我们的JCG合作伙伴 Zoran Pavlovic 创建尼斯登录表单 。
翻译自: https://www.javacodegeeks.com/2012/06/in-this-tutorial-i-will-design-nice.html


 802
802

 被折叠的 条评论
为什么被折叠?
被折叠的 条评论
为什么被折叠?
 到【灌水乐园】发言


