


Android之基本UI的学习
这两天根据《第一行代码》学习了Android的一些基本的UI,例如四种布局、ListView。
基本布局
布局与控件的关系
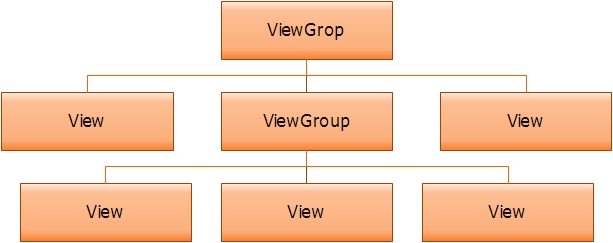
布局是一种可用于放置很多控件的容器,并且可以按照规律去调整顺序。类似于html中的div。布局与控制的关系如下图所示
四种基本的布局
布局的基本参数
xxdp: 占用xx个设备独立像素,常用
xxsp: 常用语字体大小的标识中。
xxpx: 占用xx个像素,不利于屏幕适配,一般不用
android:laout_width和android:layout_height属性表示该控件的宽度和高度,可取如下值:
wrap_content 控件占用自身大小的空间
match_content 控件占满其父空间,早期版本叫做fill_content
android:layout_margin**(Left, Right, Top, Bottom) 设置控件距离其他控件左右上下的间距。
android:padding_**(Left, Right, Top, Bottom) 设置控件内容距离空间的左右上下边界的间距。
android:layout_gravity属性用于设置控件在父控件中的对其属性,如left(左对齐)right(右对齐)center(居中)等
android:gravity是设置当前控件的内容在当前控件内部的对其属性,可取值与layout_gravity一样。
android:id 为控件指定相应的ID
android:text 指定控件当中显示的文字,需要注意的是,这里尽量使用strings.xml文件当中的字符串
android:textSize 指定控件当中字体的大小
android:background 指定该控件所使用的背景色,RGB命名法
android:width 指定控件的宽度
android:height 指定控件的高度
LinerLayout(线性布局)
线性布局的特点是它所包含的特点在线性方向上依次排列。我们可以通过设置android:orientation属性来设置排列的方向。具体的参数参考Layout的基本参数。
RelativeLayou(相对布局)
相对布局较为随机,可以通过该布局,使控件在任何位置。
其常用属性:
常用的XML属性
android:layout_toLeftOf=”@+id/name” 指定控件的左边
android:layout_toRightOf=”@+id/name” 指定控件的右边
android:layout_above=”@+id/name” 指定控件的上边
android:layout_below=”@+id/name” 指定控件的下边
ndroid:layout_alignLeft=”@+id/name” 与指定控件左对齐
android:layout_alignRight=”@+id/name” 与指定控件右对齐
android:layout_alignTop=”@+id/name” 与指定控件顶部对齐
android:layout_alignBottom=”@+id/name” 与指定控件底部对齐
android:layout_alignParentLeft=”true” 与父控件的左边对齐
android:layout_alignParentRight=”true” 与父控件的右边对齐
android:layout_alignParentTop=”true” 与父控件顶部对齐
android:layout_alignParentBottom=”true” 与父控件底部对齐
android:layout_centerHorizontal=”true” 在父控件中水平居中
android:layout_centerVertical=”true” 在父控件中垂直居中
android_layout_centerInParent=”true” 在父控件中中部居中
FrameLayout
所有的控件都会摆放在布局的左上角。
TableLayout
类似于HTML中的table元素。
表格布局,是LinearLayout的子类,以行和列的形式存放子控件,它通常由多个TableRow布局控件组成,TableRow由多个单元格(cell)组成,每个cell设置为View对象 ,表格布局的子控件可以设置权重,但是不能设置方向
自定义控件
自定义布局文件
首先自定义布局文件,建立相应的xml文件。例如:
<?xml version="1.0" encoding="utf-8"?>
<LinearLayout xmlns:android="http://schemas.android.com/apk/res/android"
    android:layout_width="match_parent"
    android:layout_height="wrap_content">
    <Button
        android:id="@+id/title_left"
        android:layout_width="wrap_content"
        android:layout_height="wrap_content"
        android:text="上一页" />
    <TextView
        android:text="这是标题头"
        android:layout_width="wrap_content"
        android:layout_height="wrap_content"
        android:layout_weight="1"
        android:gravity="center" />
    <Button
        android:id="@+id/title_right"
        android:text="下一页"
        android:layout_width="wrap_content"
        android:layout_height="wrap_content" />
</LinearLayout>然后在需要使用的Activity布局文件中包含该布局文件,使用<include layout=""/>进行包含。
自定义控件
根据需求建立控件。此处新建控件继承于LineLayout,当然也可以继承于其他的布局。
public class TitleLayout extends LinearLayout {
    public TitleLayout(Context context, AttributeSet attrs) {
        super(context, attrs);
        LayoutInflater.from(context).inflate(R.layout.title, this);
        Button left = (Button) findViewById(R.id.title_left);
        left.setOnClickListener(new OnClickListener() {
            @Override
            public void onClick(View view) {
                Toast.makeText(getContext(), "You click left button", Toast.LENGTH_LONG).show();
            }
        });
        Button right = (Button) findViewById(R.id.title_right);
        right.setOnClickListener(new OnClickListener() {
            @Override
            public void onClick(View view) {
                Toast.makeText(getContext(), "You click right button", Toast.LENGTH_LONG).show();
            }
        });
    }
}
此处实现了布局按钮的点击监听事件。
这样一个控件就自定义完成,然后到MainActivity中添加该控件。
ListView的使用
ArrayAdapter
为了给ListView传递数据,我们需要借助于适配器来完成,Android中有较多的实现类,学习的时候学习了ArrayAdapter以及集成自该类的用法。该类的构造器接受3个参数,分别是上下文、布局文件、数据。
自定义Adapter
系统自带的ArrayAdapter实现的功能较为简单,我们需要针对特定的布局进行重载,主要是重载getView()方法。此处介绍聊天界面的ListView布局。
建立item的布局文件
<?xml version="1.0" encoding="utf-8"?>
<LinearLayout xmlns:android="http://schemas.android.com/apk/res/android"
    android:orientation="vertical"
    android:layout_width="match_parent"
    android:layout_height="match_parent">
    <LinearLayout
        android:id="@+id/left_layout"
        android:layout_width="wrap_content"
        android:layout_height="wrap_content"
        android:layout_gravity="left"
        android:background="@drawable/message_left">
        <TextView
            android:layout_width="wrap_content"
            android:layout_height="wrap_content"
            android:layout_gravity="center"
            android:textColor="#fff"
            android:id="@+id/left_msg"/>
    </LinearLayout>
    <LinearLayout
        android:id="@+id/right_layout"
        android:layout_width="wrap_content"
        android:layout_height="wrap_content"
        android:layout_gravity="right"
        android:background="@drawable/message_right">
        <TextView
            android:layout_width="wrap_content"
            android:layout_height="wrap_content"
            android:layout_gravity="center"
            android:textColor="#fff"
            android:id="@+id/right_msg"/>
    </LinearLayout>
</LinearLayout>
之所以定义两个线性布局,是因为左侧与右侧的样式是不同的,我们可以通过visible来设置是否显式。
重载ArrayAdapter:MsgAdapter
package com.it592.viewtest;

import android.content.Context;
import android.view.LayoutInflater;
import android.view.View;
import android.view.ViewGroup;
import android.widget.ArrayAdapter;
import android.widget.ImageView;
import android.widget.LinearLayout;
import android.widget.TextView;
import java.util.List;
public class MsgAdapter extends ArrayAdapter<Msg> {
    private  int resourceId;
    public  MsgAdapter(Context context, int textViewResourceId, List<Msg> objects){
        super(context,textViewResourceId,objects);//三个参数,分别是上下文、布局文件、数据数组
        resourceId = textViewResourceId;
    }
    /*
position 我们需要得到的视图的数据项的位置(The position of the item within the adapter's data set of the item whose view we want.)
convertView: 旧视图缓存,如果之前已经调用,则会被缓存。
parent:这个视图将会被放在什么视图中
    */
    public View getView(int position, View convertView, ViewGroup parent){
        Msg msg = getItem(position);
        View view;
        MagViewHolder viewHolder;
        if(convertView == null){
            view = LayoutInflater.from(getContext()).inflate(resourceId,null);
            viewHolder = new MagViewHolder();
            viewHolder.left = (LinearLayout)view.findViewById(R.id.left_layout);
            viewHolder.right = (LinearLayout)view.findViewById(R.id.right_layout);
            viewHolder.left_msg = (TextView)view.findViewById(R.id.left_msg);
            viewHolder.right_msg = (TextView)view.findViewById(R.id.right_msg);
            view.setTag(viewHolder);
        }else{
            view = convertView;
            viewHolder = (MagViewHolder) view.getTag();
        }
        if(msg.getType() == Msg.TTPE_SEND){
            viewHolder.left.setVisibility(View.VISIBLE);
            viewHolder.right.setVisibility(View.GONE);
            viewHolder.left_msg.setText(msg.getContent());
        }else{
            viewHolder.left.setVisibility(View.GONE);
            viewHolder.right.setVisibility(View.VISIBLE);
            viewHolder.right_msg.setText(msg.getContent());
        }
        return view;
    }
}
class MagViewHolder {
    LinearLayout left;
    LinearLayout right;
    TextView right_msg;
    TextView left_msg;
}
package com.it592.viewtest;
import java.util.Date;
public class Msg {
public static final int TYPE_RECEVIED = 0;
public static final int TTPE_SEND = 1;
private String content;
private int type;
private Date date;
public Msg(String content,int type,Date date){
this.content = content;
this.type = type;
this.date = date;
}
public int getType() {
return type;
}
public String getContent() {
return content;
}
@Override
public String toString() {
return "Msg{" +
"content='" + content + '\'' +
", type=" + type +
'}';
}
}
这样一个自定义的Adapter就已经完成,在Activity中调用它。
package com.it592.viewtest;

import android.app.Activity;
import android.os.Bundle;
import android.support.v7.app.AppCompatActivity;
import android.view.View;
import android.widget.AdapterView;
import android.widget.Button;
import android.widget.EditText;
import android.widget.ListView;
import android.widget.Toast;

import java.util.ArrayList;
import java.util.Date;
import java.util.List;

public class MainActivity extends AppCompatActivity {


    private List<Msg> msgList = new ArrayList<Msg>();
    private ListView msg;
    @Override
    protected void onCreate(Bundle savedInstanceState) {
        super.onCreate(savedInstanceState);
        setContentView(R.layout.activity_main);
        final MsgAdapter adapter = new MsgAdapter(MainActivity.this,R.layout.msg,msgList);
        final EditText input = (EditText)findViewById(R.id.sendbox);
        Button send = (Button)findViewById(R.id.send);
        msg = (ListView)findViewById(R.id.msg);
        msg.setAdapter(adapter);
        send.setOnClickListener(new View.OnClickListener() {
            @Override
            public void onClick(View view) {
                String content = input.getText().toString();
                if(content ==""){

                }else{
                    Msg msg1 =  new Msg(content,Msg.TTPE_SEND,new Date());
                    msgList.add(msg1);
                    Msg msg2 =  new Msg("哈哈哈哈哈 我收到了你的信息",Msg.TYPE_RECEVIED,new Date());
                    msgList.add(msg2);
                    adapter.notifyDataSetChanged();
                    msg.setSelection(msgList.size());
                    input.setText("");
                }
            }
        });
    }
}
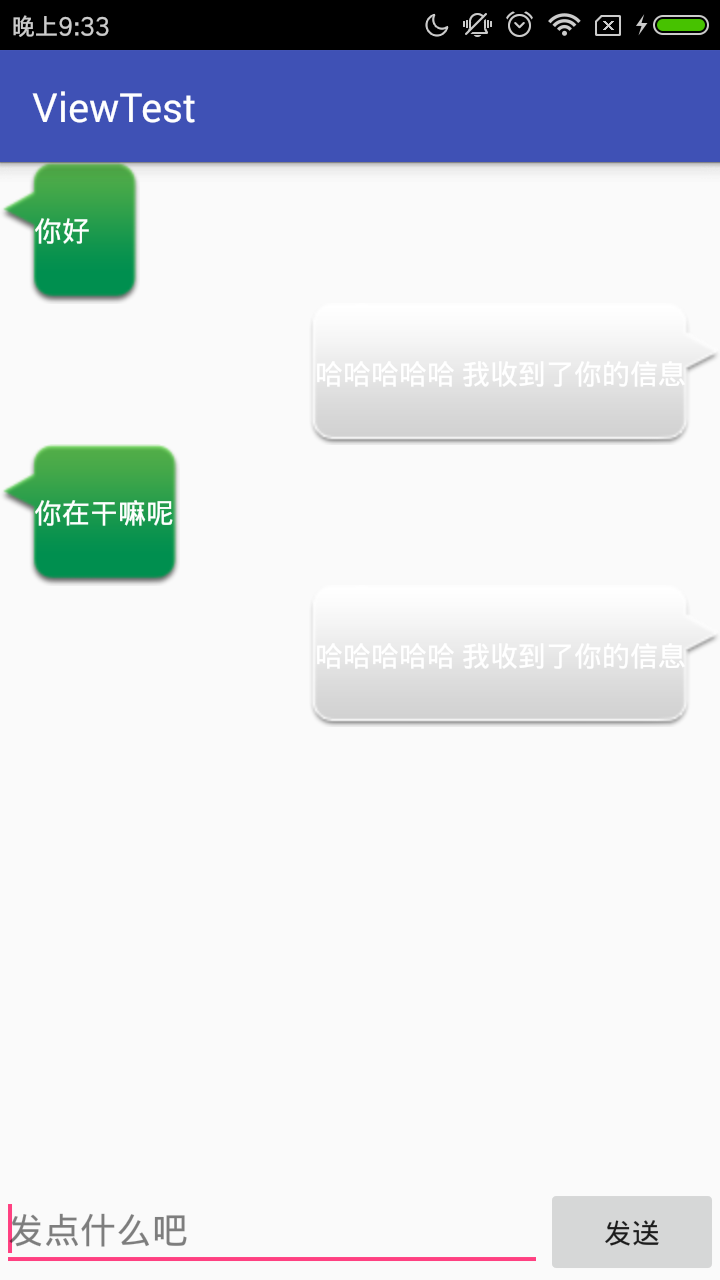
大概结果如下。


 142
142

 被折叠的 条评论
为什么被折叠?
被折叠的 条评论
为什么被折叠?
 到【灌水乐园】发言


