


用户认证在上一篇用户认证
用户授权
总体流程:

在SpringSecurity中,会使用默认的FilterSecurityInterceptor来进行权限校验。在FilterSecurityInterceptor中会从SecurityContextHolder获取其中的Authentication,然后获取其中的权限信息。判断当前用户是否拥有访问当前资源所需的权限。
SpringSecurity中的Authentication类:
public interface Authentication extends Principal, Serializable {
	//权限数据列表
    Collection<? extends GrantedAuthority> getAuthorities();

    Object getCredentials();

    Object getDetails();

    Object getPrincipal();

    boolean isAuthenticated();

    void setAuthenticated(boolean var1) throws IllegalArgumentException;
}
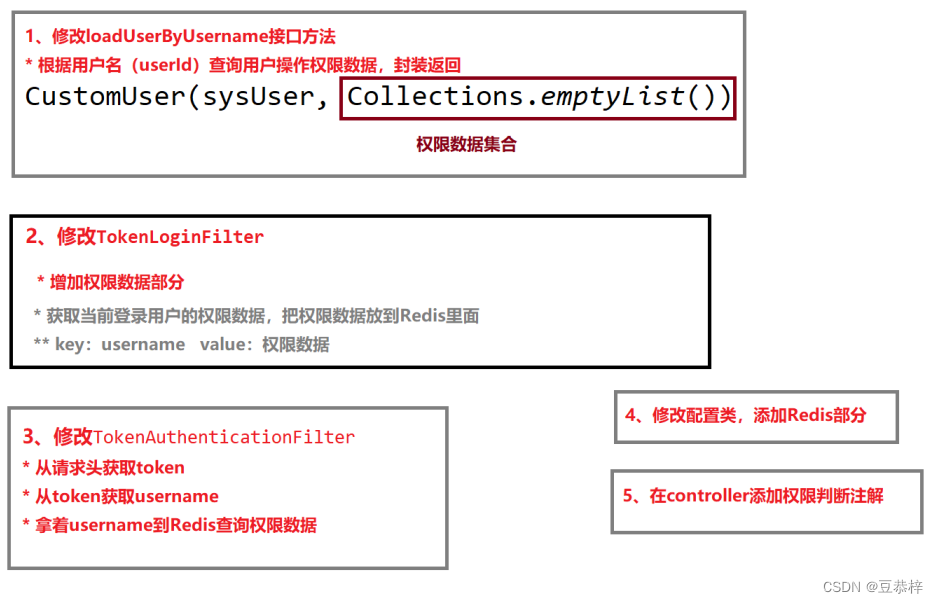
前面登录时执行loadUserByUsername方法时,return new CustomUser(sysUser, Collections.emptyList());后面的空数据对接就是返回给Spring Security的权限数据。
在TokenAuthenticationFilter中怎么获取权限数据呢?登录时我们把权限数据保存到redis中(用户名为key,权限数据为value即可),这样通过token获取用户名即可拿到权限数据,这样就可构成出完整的Authentication对象。
1、修改loadUserByUsername接口方法
增加返回权限的功能:
   @Override
    public UserDetails loadUserByUsername(String username) throws UsernameNotFoundException {
        //根据用户名进行查询
        SysUser sysUser = sysUserService.getUserByUserName(username);
        if(null == sysUser) {
            throw new UsernameNotFoundException("用户名不存在!");
        }

        if(sysUser.getStatus().intValue() == 0) {
            throw new RuntimeException("账号已停用");
        }

        //根据userid查询用户操作权限数据
        List<String> userPermsList = sysMenuService.findUserPermsByUserId(sysUser.getId());
        //创建list集合,封装最终权限数据 权限是SimpleGrantedAuthority类型
        List<SimpleGrantedAuthority> authList = new ArrayList<>();
        //查询list集合遍历
        for (String perm : userPermsList) {
            authList.add(new SimpleGrantedAuthority(perm.trim()));
        }
        return new CustomUser(sysUser, authList);
    }
}
2、spring-security模块配置redis
添加依赖
<dependency>
    <groupId>org.springframework.boot</groupId>
    <artifactId>spring-boot-starter-data-redis</artifactId>
</dependency>
3、修改TokenLoginFilter登录成功方法
登录成功我们将权限数据保存到reids
public class TokenLoginFilter extends UsernamePasswordAuthenticationFilter {

    private RedisTemplate redisTemplate;

    public TokenLoginFilter(AuthenticationManager authenticationManager, RedisTemplate redisTemplate) {
        this.setAuthenticationManager(authenticationManager);
        this.setPostOnly(false);
        //指定登录接口及提交方式,可以指定任意路径
        this.setRequiresAuthenticationRequestMatcher(new AntPathRequestMatcher("/admin/system/index/login","POST"));
        this.redisTemplate = redisTemplate;
    }
        //登录认证
    //获取输入的用户名和密码,调用方法认证
    public Authentication attemptAuthentication(HttpServletRequest request,
                                                HttpServletResponse response)
            throws AuthenticationException {
        try {
            //获取用户信息  loginVo(用户名 密码)
            LoginVo loginVo = new ObjectMapper().readValue(request.getInputStream(), LoginVo.class);
            //将用户信息封装成对象Authentication
            Authentication authenticationToken =
                    new UsernamePasswordAuthenticationToken(loginVo.getUsername(), loginVo.getPassword());
            //调用方法 校验(loadUserByUsername方法已经被重写 从数据库中查询用户信息)
            return this.getAuthenticationManager().authenticate(authenticationToken);
        } catch (IOException e) {
            throw new RuntimeException(e);
        }
    }

    //认证成功调用方法
    protected void successfulAuthentication(HttpServletRequest request,
                                            HttpServletResponse response,
                                            FilterChain chain,
                                            Authentication auth)
            throws IOException, ServletException {
        //获取当前用户
        CustomUser customUser = (CustomUser)auth.getPrincipal();
        //生成token
        String token = JwtHelper.createToken(customUser.getSysUser().getId(),
                customUser.getSysUser().getUsername());

        //获取当前用户权限数据,放到Redis里面 key:username   value:权限数据
        redisTemplate.opsForValue().set(customUser.getUsername(),
                JSON.toJSONString(customUser.getAuthorities()));

        //返回
        Map<String,Object> map = new HashMap<>();
        map.put("token",token);
        ResponseUtil.out(response, Result.ok(map));
    }

    //认证失败调用方法
    protected void unsuccessfulAuthentication(HttpServletRequest request,
                                              HttpServletResponse response,
                                              AuthenticationException failed)
            throws IOException, ServletException {
        ResponseUtil.out(response,Result.build(null, ResultCodeEnum.LOGIN_ERROR));
    }
4、修改TokenAuthenticationFilter
认证是从redis里面获取权限数据
完整代码:
public class TokenAuthenticationFilter extends OncePerRequestFilter {

    private RedisTemplate redisTemplate;

    public TokenAuthenticationFilter(RedisTemplate redisTemplate) {
        this.redisTemplate = redisTemplate;
    }

    @Override
    protected void doFilterInternal(HttpServletRequest request,
                                    HttpServletResponse response,
                                    FilterChain chain)
            throws ServletException, IOException {
        //如果是登录接口,直接放行 不登录哪来token呢?
        if("/admin/system/index/login".equals(request.getRequestURI())) {
            chain.doFilter(request, response);
            return;
        }

        //请求头中是否有token
        UsernamePasswordAuthenticationToken authentication = getAuthentication(request);
        if(null != authentication) {
            //authentication不为空 放入SecurityContex中
            SecurityContextHolder.getContext().setAuthentication(authentication);
            chain.doFilter(request, response);
        } else {
            ResponseUtil.out(response, Result.build(null, ResultCodeEnum.LOGIN_ERROR));
        }
    }

    private UsernamePasswordAuthenticationToken getAuthentication(HttpServletRequest request) {
        //请求头是否有token
        String token = request.getHeader("token");
        //token不为空
        if(!StringUtils.isEmpty(token)) {
            String username = JwtHelper.getUsername(token);
            if(!StringUtils.isEmpty(username)) { //username不为空 则封装对象返回
                //当前用户信息放到ThreadLocal里面
                LoginUserInfoHelper.setUserId(JwtHelper.getUserId(token));
                LoginUserInfoHelper.setUsername(username);
                //通过username从redis获取权限数据
                String authString = (String)redisTemplate.opsForValue().get(username);
                //把redis获取字符串权限数据转换要求集合类型 List<SimpleGrantedAuthority>
                if(!StringUtils.isEmpty(authString)) {
                    List<Map> maplist = JSON.parseArray(authString, Map.class);
                    System.out.println(maplist);
                    List<SimpleGrantedAuthority> authList = new ArrayList<>();
                    for (Map map:maplist) {
                        String authority = (String)map.get("authority");
                        authList.add(new SimpleGrantedAuthority(authority));
                    }
                    return new UsernamePasswordAuthenticationToken(username,null, authList);
                } else {
                    return new UsernamePasswordAuthenticationToken(username,null, new ArrayList<>());
                }
            }
        }
        return null;
    }
}
5、修改配置类
修改WebSecurityConfig类
配置类添加注解:
开启基于方法的安全认证机制,也就是说在web层的controller启用注解机制的安全确认
@EnableGlobalMethodSecurity(prePostEnabled = true)
添加注入bean:
@Autowired
private RedisTemplate redisTemplate;
添加参数:
连个fillter添加redisTemplate参数
完整代码如下:
@Configuration
@EnableWebSecurity //@EnableWebSecurity是开启SpringSecurity的默认行为
@EnableGlobalMethodSecurity(prePostEnabled = true)
public class WebSecurityConfig extends WebSecurityConfigurerAdapter {

    @Autowired
    private RedisTemplate redisTemplate;

    @Autowired
    private UserDetailsService userDetailsService;

    @Autowired
    private CustomMd5PasswordEncoder customMd5PasswordEncoder;

    @Bean
    @Override
    protected AuthenticationManager authenticationManager() throws Exception {
        return super.authenticationManager();
    }

    @Override
    protected void configure(HttpSecurity http) throws Exception {
        // 这是配置的关键,决定哪些接口开启防护,哪些接口绕过防护
        http
                //关闭csrf跨站请求伪造
                .csrf().disable()
                // 开启跨域以便前端调用接口
                .cors().and()
                .authorizeRequests()
                // 指定某些接口不需要通过验证即可访问。登陆接口肯定是不需要认证的
                //.antMatchers("/admin/system/index/login").permitAll()
                // 这里意思是其它所有接口需要认证才能访问
                .anyRequest().authenticated()
                .and()
                //TokenAuthenticationFilter放到UsernamePasswordAuthenticationFilter的前面,
                //这样做就是为了除了登录的时候去查询数据库外,其他时候都用token进行认证。
                .addFilterBefore(new TokenAuthenticationFilter(redisTemplate),
                        UsernamePasswordAuthenticationFilter.class)
                .addFilter(new TokenLoginFilter(authenticationManager(),redisTemplate));

        //禁用session
        http.sessionManagement().sessionCreationPolicy(SessionCreationPolicy.STATELESS);
    }

    @Override
    protected void configure(AuthenticationManagerBuilder auth) throws Exception {
        // 指定UserDetailService和加密器
        auth.userDetailsService(userDetailsService).passwordEncoder(customMd5PasswordEncoder);
    }

    /**
     * 配置哪些请求不拦截
     * 排除swagger相关请求
     * @param web
     * @throws Exception
     */
    @Override
    public void configure(WebSecurity web) throws Exception {
        web.ignoring().antMatchers("/admin/modeler/**","/diagram-viewer/**","/editor-app/**","/*.html",
                "/admin/processImage/**",
                "/admin/wechat/authorize","/admin/wechat/userInfo","/admin/wechat/bindPhone",
                "/favicon.ico","/swagger-resources/**", "/webjars/**", "/v2/**", "/swagger-ui.html/**", "/doc.html");
    }
}
6、service-oa模块添加redis配置
application-dev.yml配文件
spring:
  redis:
    host: localhost
    port: 6379
    database: 0
    timeout: 1800000
    password:
    jedis:
      pool:
        max-active: 20 #最大连接数
        max-wait: -1    #最大阻塞等待时间(负数表示没限制)
        max-idle: 5    #最大空闲
        min-idle: 0     #最小空闲
7、控制controller层接口权限
Spring Security默认是禁用注解的,要想开启注解,需要在继承WebSecurityConfigurerAdapter的类上加@EnableGlobalMethodSecurity注解,来判断用户对某个控制层的方法是否具有访问权限
通过@PreAuthorize标签控制controller层接口权限
public class SysRoleController {

    @Autowired
    private SysRoleService sysRoleService;

    @PreAuthorize("hasAuthority('bnt.sysRole.list')")
    @ApiOperation(value = "获取分页列表")
    @GetMapping("{page}/{limit}")
    public Result index(
            @ApiParam(name = "page", value = "当前页码", required = true)
            @PathVariable Long page,

            @ApiParam(name = "limit", value = "每页记录数", required = true)
            @PathVariable Long limit,

            @ApiParam(name = "roleQueryVo", value = "查询对象", required = false)
                    SysRoleQueryVo roleQueryVo) {
        Page<SysRole> pageParam = new Page<>(page, limit);
        IPage<SysRole> pageModel = sysRoleService.selectPage(pageParam, roleQueryVo);
        return Result.ok(pageModel);
    }

    @PreAuthorize("hasAuthority('bnt.sysRole.list')")
    @ApiOperation(value = "获取")
    @GetMapping("get/{id}")
    public Result get(@PathVariable Long id) {
        SysRole role = sysRoleService.getById(id);
        return Result.ok(role);
    }

    @PreAuthorize("hasAuthority('bnt.sysRole.add')")
    @ApiOperation(value = "新增角色")
    @PostMapping("save")
    public Result save(@RequestBody @Validated SysRole role) {
        sysRoleService.save(role);
        return Result.ok();
    }

    @PreAuthorize("hasAuthority('bnt.sysRole.update')")
    @ApiOperation(value = "修改角色")
    @PutMapping("update")
    public Result updateById(@RequestBody SysRole role) {
        sysRoleService.updateById(role);
        return Result.ok();
    }

    @PreAuthorize("hasAuthority('bnt.sysRole.remove')")
    @ApiOperation(value = "删除角色")
    @DeleteMapping("remove/{id}")
    public Result remove(@PathVariable Long id) {
        sysRoleService.removeById(id);
        return Result.ok();
    }

    @PreAuthorize("hasAuthority('bnt.sysRole.remove')")
    @ApiOperation(value = "根据id列表删除")
    @DeleteMapping("batchRemove")
    public Result batchRemove(@RequestBody List<Long> idList) {
        sysRoleService.removeByIds(idList);
        return Result.ok();
    }
    ...
}
9、异常处理
异常处理有2种方式:
1、扩展Spring Security异常处理类:AccessDeniedHandler、AuthenticationEntryPoint
2、在spring boot全局异常统一处理
第一种方案说明:如果系统实现了全局异常处理,那么全局异常首先会获取AccessDeniedException异常,要想Spring Security扩展异常生效,必须在全局异常再次抛出该异常。
我们使用第二种方案。
全局异常添加处理
操作模块:service-util
/**
 * spring security异常
 * @param e
 * @return
 */
@ExceptionHandler(AccessDeniedException.class)
@ResponseBody
public Result error(AccessDeniedException e) throws AccessDeniedException {
    return Result.build(null, ResultCodeEnum.PERMISSION);
}
AccessDeniedException需要引入依赖,Spring Security对应的异常
在service-util模块引入依赖
<dependency>
    <groupId>org.springframework.boot</groupId>
    <artifactId>spring-boot-starter-security</artifactId>
    <scope>provided</scope>
</dependency>


 598
598


 被折叠的 条评论
为什么被折叠?
被折叠的 条评论
为什么被折叠?
 到【灌水乐园】发言


