


【NodeJs-5天学习】第三天实战篇③ ——基于MQTT的环境温度检测
面向读者群体
- ❤️ 电子物联网专业同学,想针对硬件功能构造简单的服务器,不需要学习专业的服务器开发知识 ❤️
- ❤️ 业余爱好物联网开发者,有简单技术基础,想针对硬件功能构造简单的服务器❤️
- ❤️ 本篇创建记录 2023-03-12 ❤️
- ❤️ 本篇更新记录 2023-03-12 ❤️
技术要求
- 有HTML、CSS、JavaScript基础更好,当然也没事,就直接运行实例代码学习
专栏介绍
- 通过简短5天时间的渐进式学习NodeJs,可以了解到基本的服务开发概念,同时可以学习到npm、内置核心API(FS文件系统操作、HTTP服务器、Express框架等等),最终能够完成基本的物联网web开发,而且能够部署到公网访问。
🙏 此博客均由博主单独编写,不存在任何商业团队运营,如发现错误,请留言轰炸哦!及时修正!感谢支持!🎉 欢迎关注 🔎点赞 👍收藏 ⭐️留言📝
1. 前言
说到物联网,基本上离不开一个网络协议——MQTT。而在NodeJs中集成MQTT服务器也是非常简单易行,这里我们就构建一个简单的基于本地MQTT服务器的环境温度检测小系统。
2.实现思路
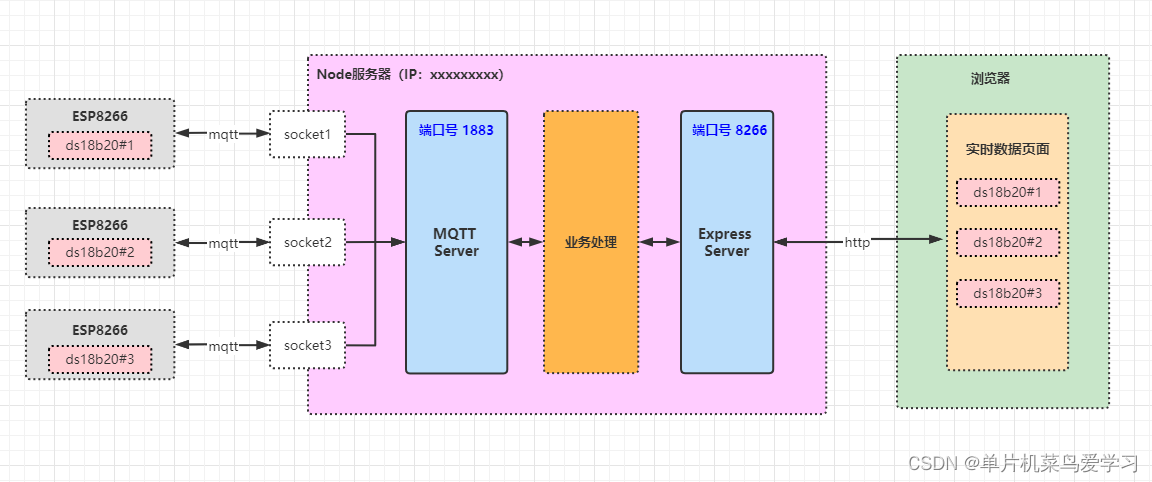
- ① 本地部署一个
MQTT服务器,端口号是1883,负责监听ESP8266通过mqtt协议上传上来的温度数据 - ② 本地部署一个
Express服务器,端口号是8266,负责处理浏览器请求静态UI数据展示页面,静态页面由html、css、js编写 - ③ 核心业务处理包括处理温度数据,记录数据到
fs文件系统 - ④ 设备端存在多个ESP8266, 每个8266都是一个Node节点的概念,上传该节点对应的ds18b20数据,我们需要对ds18b20进行
编号,类似于#1,#2,#3等等。
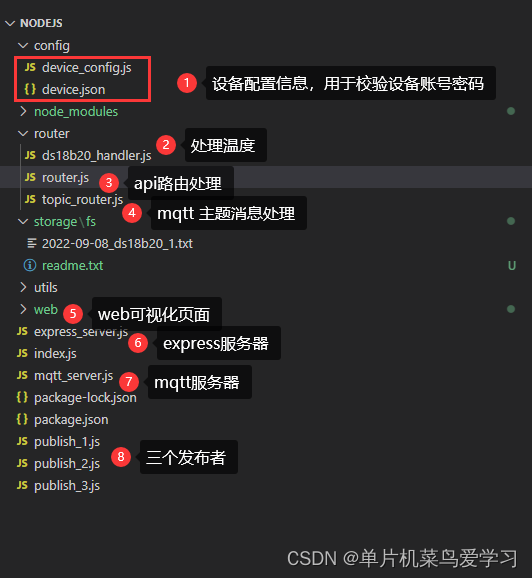
2.1 NodeJs服务器代码
服务器代码包括两部分:
- mqtt服务器,负责和设备端进行通信
- express服务器,负责web页面展示数据
2.2.1 本地部署MQTT服务器,端口1883
const {mqttTopic} = require('./router/topic_router.js')
const {getIPAdress} = require('./utils/utils.js')
const deviceConfig = require('./config/device_config.js')
// 2、创建web服务器
const myHost = getIPAdress();
const aedes = require('aedes')()
const server = require('net').createServer(aedes.handle)
const port = 1883
server.listen(port, function () {
console.log("mqtt 服务器启动成功 mqtt://"+ myHost +":" + port);
});
// API文档:https://github.com/moscajs/aedes/blob/main/docs/Aedes.md
/********************************客户端连接状态************************************************************/
//Some Use Cases:
// - Rate Limit / Throttle by client.conn.remoteAddress
// - Check aedes.connectedClient to limit maximum connections
// - IP blacklisting
// Any error will be raised in connectionError event.
aedes.preConnect = function(client, packet, callback) {
// 这个时候还没有 client.id
console.log('服务器收到客户端: \x1b[31m' + (client ? client.conn.remoteAddress : client) + '\x1b[0m preConnect');
callback(null, true)
}
// aedes.preConnect = function(client, packet, callback) {
// callback(new Error('connection error'), client.conn.remoteAddress !== '::1')
// }
// 连接身份验证,这个方法在preConnect之后
aedes.authenticate = function (client, username, password, callback) {
console.log('客户端连接身份验证: \x1b[31m' + (client ? client.id : client) + '\x1b[0m authenticate');
if (client.id && deviceConfig.authID(client.id)) {
callback(null, deviceConfig.authLogin(client.id, username, password.toString()))
return
}
var error = new Error('Auth error,非法ID')
error.returnCode = 4
callback(error, null)
}
// aedes.authenticate = function (client, username, password, callback) {
// var error = new Error('Auth error')
// error.returnCode = 4
// callback(error, null)
// }
// 客户端正在连接
aedes.on('client', function (client) {
console.log('\x1b[33m' + (client ? client.id : client) + '\x1b[0m', '客户端正在连接到 broker', aedes.id);
});
// 客户端连接成功
aedes.on('clientReady', function (client) {
console.log('\x1b[33m' + (client ? client.id : client) + '\x1b[0m', '客户端连接成功到 broker', aedes.id);
});
// 客户端连接断开
aedes.on('clientDisconnect', function (client) {
console.log('\x1b[31m' + (client ? client.id : client) + '\x1b[0m', '客户端连接断开 clientDisconnect');
});
// 客户端连接错误
aedes.on('clientError', function (client, error) {
console.log('\x1b[31m' + (client ? client.id : client) + '\x1b[0m', '客户端连接错误 clientError');
});
// 客户端连接异常
// Emitted when an error occurs. Unlike clientError it raises only when client is uninitialized.
aedes.on('connectionError', function (client, error) {
console.log('\x1b[31m' + (client ? client.id : client) + '\x1b[0m', '客户端连接异常 connectionError');
});
// CONNACK —— 确认连接请求
// (服务端发送CONNACK报文响应从客户端收到的CONNECT报文。服务端发送给客户端的第一个报文必须是CONNACK)
aedes.on('connackSent', function (packet , client ) {
console.log('服务端确认连接给到\x1b[31m' + (client ? client.id : client) + '\x1b[0m connackSent', packet);
});
/********************************客户端连接状态************************************************************/
/********************************心跳应答************************************************************/
// 客户端连接超时
aedes.on('keepaliveTimeout', function (client, error) {
console.log('\x1b[31m' + (client ? client.id : client) + '\x1b[0m', '客户端心跳连接超时 keepaliveTimeout');
});
// Emitted an QoS 1 or 2 acknowledgement when the packet successfully delivered to the client.
aedes.on('ack', function (packet , client) {
console.log('服务端应答客户端: \x1b[31m' + (client ? client.id : client) + '\x1b[0m 内容:', packet);
});
// Emitted when client sends a PINGREQ.
aedes.on('ping', function (packet , client) {
console.log('\x1b[31m' + (client ? client.id : client) + '\x1b[0m', '客户端发送过来心跳 Ping');
});
/********************************心跳应答************************************************************/
/********************************主题相关************************************************************/
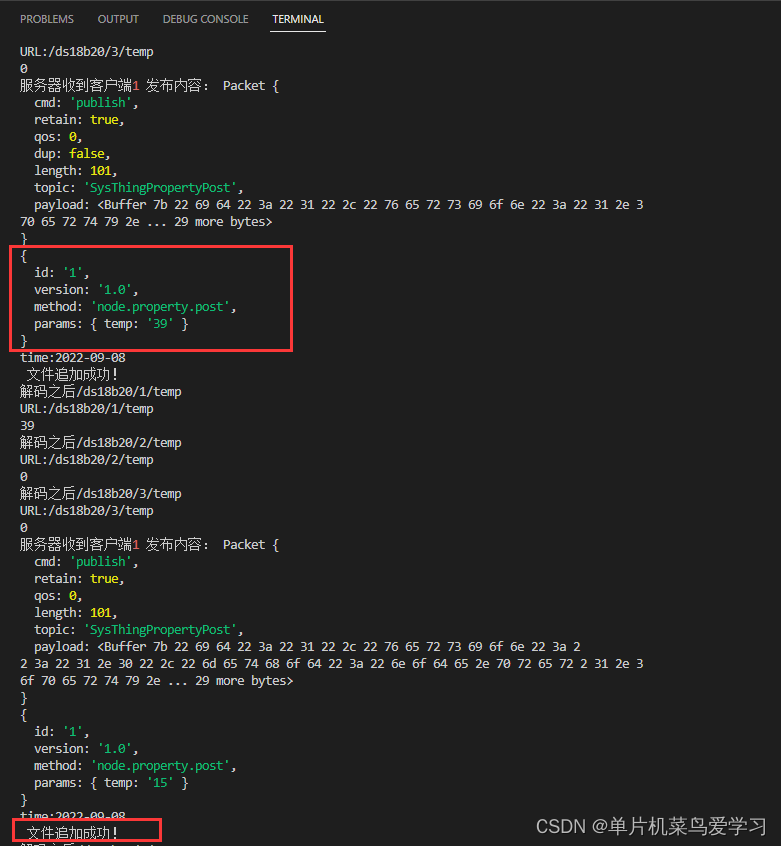
aedes.on('publish', function (packet, client) {
if(client) {
console.log('服务器收到客户端\x1b[31m' + (client ? client.id : client) + '\x1b[0m', '发布内容:', packet);
mqttTopic.route(packet.topic, packet.payload)
} else {
console.log('服务器发布内容:', packet);
}
});
// Emitted when client successfully subscribe the subscriptions in server.
aedes.on('subscribe', function (subscriptions , client) {
console.log('服务器收到客户端: \x1b[31m' + (client ? client.id : client) + '\x1b[0m', '主题订阅:', subscriptions);
});
// 对订阅主题进行校验
aedes.authorizeSubscribe = function (client, sub, callback) {
// if (sub.topic === 'aaaa') {
// return callback(new Error('wrong topic'))
// }
// if (sub.topic === 'bbb') {
// // overwrites subscription
// sub.topic = 'foo'
// sub.qos = 1
// }
callback(null, sub)
}
// Emitted when client successfully unsubscribe the subscriptions in server.
aedes.on('unsubscribe', function (unsubscriptions , client) {
console.log('服务器收到客户端: \x1b[31m' + (client ? client.id : client) + '\x1b[0m', '主题注销:', unsubscriptions);
});
/********************************主题相关************************************************************/
2.2.1.1 用户校验
// 连接身份验证,这个方法在preConnect之后
aedes.authenticate = function (client, username, password, callback) {
    console.log('客户端连接身份验证: \x1b[31m' + (client ? client.id : client) + '\x1b[0m authenticate');

    if (client.id && deviceConfig.authID(client.id)) {
       callback(null, deviceConfig.authLogin(client.id, username, password.toString()))
       return
    }
    var error = new Error('Auth error,非法ID')
    error.returnCode = 4
    callback(error, null)
}
这里会对clientid进行校验,通过之后再进行校验用户名字和密码。相当于三元组都得通过。
校验配置:
[{
	"id": "1",
	"mac": "B0:E1:7E:70:25:CD",
    "name": "user",
    "psw": "123456"
}, {
	"id": "2",
	"mac": "78:DA:07:04:5D:18",
    "name": "user",
    "psw": "123456"
}, {
	"id": "3",
	"mac": "30:FC:68:19:52:A4",
    "name": "user",
    "psw": "123456"
}]
包括四个元素:
- clientid
- mac地址
- 用户名字name
- 用户密码psw
接下来看看校验代码实现:
const fs = require('fs')

// 设备配置信息,需要通过配置校验才会通过
var fileName = './config/device.json';
var config = JSON.parse(fs.readFileSync(fileName));
var idToMacMap = new Map()
var idToValueMap = new Map()
config.forEach(element => {
  var id = element.id
  var mac = element.mac
  if (idToMacMap.has(id)) {
    throw console.error('device_config配置文件出现重复ID,请检查!' + id);
  }
  idToMacMap.set(id, mac)
  idToValueMap.set(id, element)
})

console.log("用户设备配置信息:")
console.log(idToValueMap)

// 判断设备是否是合法设备,这里只是判断名字,最好是连着mac地址一起判断
function authID(deviceId, mac) {
    return idToMacMap.has(deviceId)
}

function authLogin(deviceId, name, psw) {
    var value = idToValueMap.get(deviceId)
    console.log(value)
    if (!value){
        console.log('不存在ID:' + deviceId)
        return false
    }

    return value.name === name && value.psw === psw
}

module.exports = {
    authID,
    authLogin
}
主要是把配置文件变成一个map映射对象,key是clientid。判断规则主要是判断是否存在对应的clientid,再把具体值拿出来进行下一轮比较。
2.2.1.2 主题消息处理
// 导入所需插件模块
const fs = require('fs')
const querystring = require('querystring')
const ds18b20Handler = require('./ds18b20_handler')

var mqttTopic = {}
var routes = []

const USE_DEFAULT = 0
const USE_JSON = 1
const USE_FORM = 2

// 注入主题和处理方法
mqttTopic.use = function(path, dataType, action){
    if (!dataType) dataType = USE_DEFAULT
    routes.push([path, dataType, action])
}

// 路由匹配
mqttTopic.route = function(topic, payload) {
    for (let index = 0; index < routes.length; index++) {
      const route = routes[index];
      var key = route[0]
      var dataType = route[1]
      var action = route[2]
      if (topic === key) {
        var rawBody = payload.toString()
        if (dataType == USE_JSON) {
            try {
                action(JSON.parse(rawBody))
            } catch (e) {
               // 异常内容
               console.log('Invalid JSON')
            }
        } else if(dataType == USE_FORM) {
            action(querystring.parse(req.rawBody))
        } else {
            action(payload)
        }
      }
    }
}

mqttTopic.use('SysThingPropertyPost',USE_JSON, (payload)=>{
    console.log(payload)
    if (payload.params.temp) {
        ds18b20Handler.setCurrentTemp(payload.id, payload.params.temp)
        ds18b20Handler.saveToFile(payload.id, payload.params.temp)
    }
 })

module.exports = {
    mqttTopic
}
主要是处理映射对应的mqtt主题,目前这里是处理 SysThingPropertyPost,这里是8266订阅的主题。
2.2.2 本地部署Express服务器,端口8266
// 1、导入所需插件模块
const express = require("express");
const {getIPAdress} = require('./utils/utils.js')
const bodyParser = require('body-parser')
const {router} = require('./router/router.js')

// 2、创建web服务器
let app = express();
const port = 8266; // 端口号
const myHost = getIPAdress();

// 3、注册中间件,app.use 函数用于注册中间件
// 3.1 预处理中间件
app.use(bodyParser.json());
app.use(bodyParser.urlencoded({ extended: true }));

app.use(function(req, res, next){
    // url地址栏出现中文则浏览器会进行iso8859-1编码,解决方案使用decode解码
    console.log('解码之后' + decodeURI(req.url));
    console.log('URL:' + req.url);
    if (req.method.toLowerCase() === 'post') {
        console.log(req.body);
    }
    next()
})

// 3.2 路由中间件
app.use(router)
app.use(express.static('web')) // express.static()方法,快速对外提供静态资源

// 3.3 错误级别中间件(专门用于捕获整个项目发生的异常错误,防止项目奔溃),必须注册在所有路由之后
app.use((err, req, res, next) => {
    console.log('出现异常:' + err.message)
    res.send('Error: 服务器异常,请耐心等待!')
})

// 4、启动web服务器
app.listen(port,() => {
    console.log("express 服务器启动成功 http://"+ myHost +":" + port);
});
这里注入了api路由和静态文件路由。
// 3.2 路由中间件
app.use(router)
app.use(express.static('web')) // express.static()方法,快速对外提供静态资源
2.2.2.1 api路由中间件
// 1、导入所需插件模块
const express = require("express")
const ds18b20Handler = require('./ds18b20_handler.js')

// 2、创建路由对象
const router = express.Router();

// 3、挂载具体的路由
// 配置add URL请求处理
// 参数1:客户端请求的URL地址
// 参数2:请求对应的处理函数
//        req:请求对象(包含与请求相关属性方法)
//        res:响应对象(包含与响应相关属性方法)

// 处理DS18B20 GET 和 POST请求
router.get('/ds18b20/:id/temp', (req, res) => {

    var id = req.params.id
    var temp = ds18b20Handler.getCurrentTemp(`${id}`)

    console.log(`${temp}`)

    temp ? res.send(`${temp}`) : res.send('0')
})

// 4、向外导出路由对象
module.exports = {
    router
}
这里注册了 /ds18b20/:id/temp,设置了一个动态参数id,用来区分不同的ds18b20设备,同时这个接口提供给浏览器调用。
2.2.2.2 静态路由
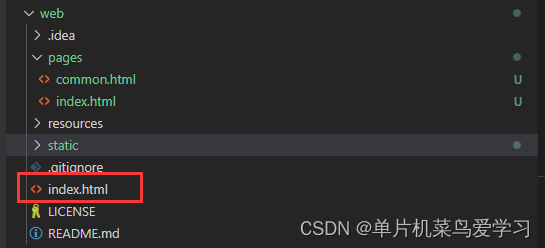
具体web代码可以细看这一块,主要是用到了echart来绘制曲线图。
2.2.3 核心业务处理
主要就是处理json数据,格式如下:
{
  id: '1',
  version: '1.0',
  method: 'node.property.post',
  params: { temp: '15' }
}
最终我们会把这些数据存到文件里面。
mqttTopic.use('SysThingPropertyPost',USE_JSON, (payload)=>{
    console.log(payload)
    if (payload.params.temp) {
        ds18b20Handler.setCurrentTemp(payload.id, payload.params.temp)
        // 保存到文件
        ds18b20Handler.saveToFile(payload.id, payload.params.temp)
    }
 })
2.2 ESP8266代码,这里以#1为例
/**
 * 功能: 串口输出 DS18B20 数据,并且在WebServer页面展示
 *
 * 运行前提:
 *  这里尽量把第三方库集成在工程目录下,如出现xxxx库找不到,请按照下面方式进行安装。
 *
 *  - 缺少 onewire。 工具 -> 管理库 -> 搜索 onewire -> 安装最新版本
 *  - 缺少 dallas。 工具 -> 管理库 -> 搜索 Dallas -> 安装最新版本
 *  - 缺少 PubSubClient。 工具 -> 管理库 -> 搜索 PubSubClient -> 安装
 *  - 缺少 ArduinoJson。工具 -> 管理库 -> 搜索 ArduinoJson -> 安装下载6.x版本
 *
 * 详细描述:
 *   1、esp8266通过 D4 IO和 DS18B20 通信
 *   2、读取 DS18B20 传感器数据
 *   3、串口输出 传感器数据
 *
 * 硬件材料:
 *   1、ESP8266-12 NodeMcu板子
 *   2、面包板
 *   3、DS18B20 模块
 *   4、电源模块
 *   5、若干杜邦线
 *
 * 接线:
 * 1. DS18B20 Vcc ----> NodeMcu 3V3
 *    DS18B20 GND ----> NodeMcu GND
 *    DS18B20 Data ----> NodeMcu D4
 */
#include <OneWire.h>            // 引入单总线库
#include <DallasTemperature.h>  // 引入DS18B20库
#include <ESP8266WiFi.h>        // 引入WiFi核心库
#include "PubSubClient.h"       // 引入MQTT处理库
#include "NodeIoTSDK.h"         // 引入巴法云 IoT SDK
#include <Ticker.h>

/******************* 常量声明 **********************/
#define SSID "TP-LINK_5344"         // 填入自己的WiFi账号
#define PASSWORD "zzzzz"     // 填入自己的WiFi密码
#define INTERVAL 10000       // 读取时间间隔,默认10s

#define DS18B20_PIN D4       // DS18B20 数据口
#define BUFFER_SIZE 200
//-------- mqtt设置信息 -------//
// 三元组信息
#define ID "1" // 表示不同的设备 "2" "3"
#define NAME "user"
#define PSW "123456"

#define MQTT_SERVER "192.168.1.105"
#define MQTT_PORT   1883
//-------- mqtt设置信息 -------//
/******************* 常量声明 **********************/

/******************* 函数声明 **********************/
void DS18B20_Read(void);    // 读取 DS18B20
void DS18B20_Init(void);    // 初始化 DS18B20
void initWifiConnect(void);   // 初始化Wifi连接
void doWiFiConnectTick(void); // 检测WiFi连接状态
void readDSTemperatureF(void); // 读取华氏温度
void readDSTemperatureC(void); // 读取摄氏温度
void initNodeIotSDK(void);   // 初始化Node IOT SDK
void sendDataToNode(void);  // 发送数据到MQTT平台
/******************* 函数声明 **********************/

/******************* 变量定义 **********************/
OneWire oneWire(DS18B20_PIN);        // 建立单总线访问入口
DallasTemperature sensors(&oneWire); // 单总线入口和DS18B20绑定

float temperatureC = 0.0;     // 记录当前摄氏温度
float temperatureF = 0.0;     // 记录当前华氏温度
unsigned long previousMillis = 0; // 记录上次读取的时间戳
Ticker delayTimer;                   // 表示定时模块,用来做一个定时器
unsigned int  maxCount = 0; // 记录连续超过阈值的次数
char data[BUFFER_SIZE];
static WiFiClient espClient; // TCP Client
/******************* 变量定义 **********************/

void setup() {
  delay(2000); // 延时2秒,用于等待系统上电稳定
  Serial.begin(115200); // 初始化串口,波特率 115200
  Serial.println("");
  Serial.println("project run~");

  DS18B20_Init();      // 初始化 DS18B20
  initWifiConnect();   // 初始化Wifi连接
  initNodeIotSDK();    // 初始化Node IOT SDK
  ESP.wdtEnable(5000); //  启用看门狗
}

void loop() {
  ESP.wdtFeed();// 定时喂狗
  doWiFiConnectTick(); // wifi连接状态检测以及重连
  unsigned long currentMillis = millis();        // 获取当前时间戳
  if(currentMillis - previousMillis >= INTERVAL) // 每隔一段时间读取一下传感器数据 interval为时间间隔
  {
    previousMillis = currentMillis; // 记录当前时间戳
    DS18B20_Read();                  // 获取 DS18B20 数据,并且串口输出
    sendDataToNode();                 // 发送数据到Node服务器
  }

  // Wifi处于连接状态
  if (WiFi.status() == WL_CONNECTED) {
     // 检测MQTT
     NodeIoTSDK::loop();
  }

  delay(2000); // 延时2秒
}

/**
 * 初始化IOT SDK
 */
void initNodeIotSDK(void)
{
  // 初始化 iot sdk,需传入 wifi 的 client,和设备产品信息
  NodeIoTSDK::begin(espClient, ID, NAME, PSW, MQTT_SERVER, MQTT_PORT);
}

/**
 * 读取 DS18B20 温度
 */
void DS18B20_Read(void)
{
  readDSTemperatureC(); // 读取摄氏温度
  readDSTemperatureF(); // 读取华氏温度
}

/**
 * 初始化 DS18B20
 */
void DS18B20_Init(void)
{
  sensors.begin();  // 启动DS18B20 传感器
}

/**
 * 检测WiFi连接状态
 */
void doWiFiConnectTick(void)
{
  static uint32_t lastWiFiCheckTick = 0; // 记录最近一次检测WiFi连接状态的时间点
  static uint32_t disConnectCount = 0;   // 记录WiFi断开连接的次数

  if(WiFi.status() == WL_CONNECTED) // 当前WiFi处于连接状态
  {
    disConnectCount = 0;// 重置WiFi断开连接为0
    return;
  }

  if(millis() - lastWiFiCheckTick > 1000) // 检测间隔大于1秒
  {
    lastWiFiCheckTick = millis();       // 记录时间点
    Serial.println("WiFi disConnect!"); // 串口输出.表示设备已经断开连接

    disConnectCount++;      // WiFi断开连接的次数累计加1
    if(disConnectCount>=40) // 断开连接累计次数达到40次,表示可能wifi连接异常
    {
      delayRestart(1);      //一直连接不上就重启ESP系统
    }
  }
}

/**
 * 延时t秒后重启ESP
 * @param t t秒
 */
void delayRestart(float t)
{
  Serial.print("Restart after ");
  Serial.print(t);
  Serial.println("s");
  // 开启一个定时器,定时时间为t秒
  delayTimer.attach(t, []() {
    Serial.println("\r\nRestart now!");
    ESP.restart();// 重启ESP模块
  });
}

/**
 * 初始化Wifi连接
 */
void initWifiConnect(void)
{
  Serial.printf("Connecting to WiFi:%s\n",SSID);// 串口打印当前WiFi热点的名字
  WiFi.disconnect();   // 默认断开之前的连接,回归初始化非连接状态
  WiFi.mode(WIFI_STA); // 设置ESP工作模式为Station模式
  WiFi.begin(SSID, PASSWORD);  // 连接到WiFi

  int cnt = 0; // 记录重试次数
  while (WiFi.status() != WL_CONNECTED) // 当还没有连接上WiFi热点时
  {
     delay(1000);       // 延时等待1秒
     cnt++;             // 累计次数+1
     Serial.print("."); // 串口输出.表示设备正在连接WiFi热点
     if(cnt>=40)        // 超过40秒还没有连接上网络
     {
       delayRestart(1); //一直连接不上就重启ESP系统
     }
  }

  Serial.println(WiFi.localIP()); // 打印当前IP地址
}

/**
 * 读取温度
 */
char* getSensorReadings(){
  memset(data, 0, BUFFER_SIZE);      //清空缓存数据
  sprintf(data,"{\"temperature\":%s}", String(temperatureC).c_str());
  Serial.println(data);
  return data;
}

/**
 * 读取摄氏温度
 */
void readDSTemperatureC(void)
{
  // Call sensors.requestTemperatures() to issue a global temperature and Requests to all devices on the bus
  sensors.requestTemperatures();            // 请求温度
  temperatureC = sensors.getTempCByIndex(0); // 读取温度值

  if(temperatureC == -127.00) // 如果温度等于 -127,证明数据无效
  {
    Serial.println("Failed to read from DS18B20 sensor"); // 串口输出无效提示信息
  } else {
    Serial.printf("Temperature Celsius: %.2f *C\n", temperatureC); // 串口输出当前温度
  }
}

/**
 * 读取华氏温度
 */
void readDSTemperatureF(void)
{
  // Call sensors.requestTemperatures() to issue a global temperature and Requests to all devices on the bus
  sensors.requestTemperatures();            // 请求温度
  temperatureF = sensors.getTempFByIndex(0); // 读取温度值

  if(int(temperatureF) == -196) // 如果温度等于 -196,证明数据无效
  {
    Serial.println("Failed to read from DS18B20 sensor"); // 串口输出无效提示信息
  } else {
    Serial.printf("Temperature Fahrenheit: %.2f *C\n", temperatureF); // 串口输出当前温度
  }
}

/**
 * 发送数据到云平台
 */
void sendDataToNode(void)
{
  memset(data, 0, BUFFER_SIZE);      //清空缓存数据
  sprintf(data,"{\"temp\":%s}", String(temperatureC).c_str()); // 构成需要上传的Json数据
  Serial.printf("param:%s\n", data); // 串口输出最终发送的数据
  NodeIoTSDK::send(data);          // 发送数据到Node
}
2.3 测试效果
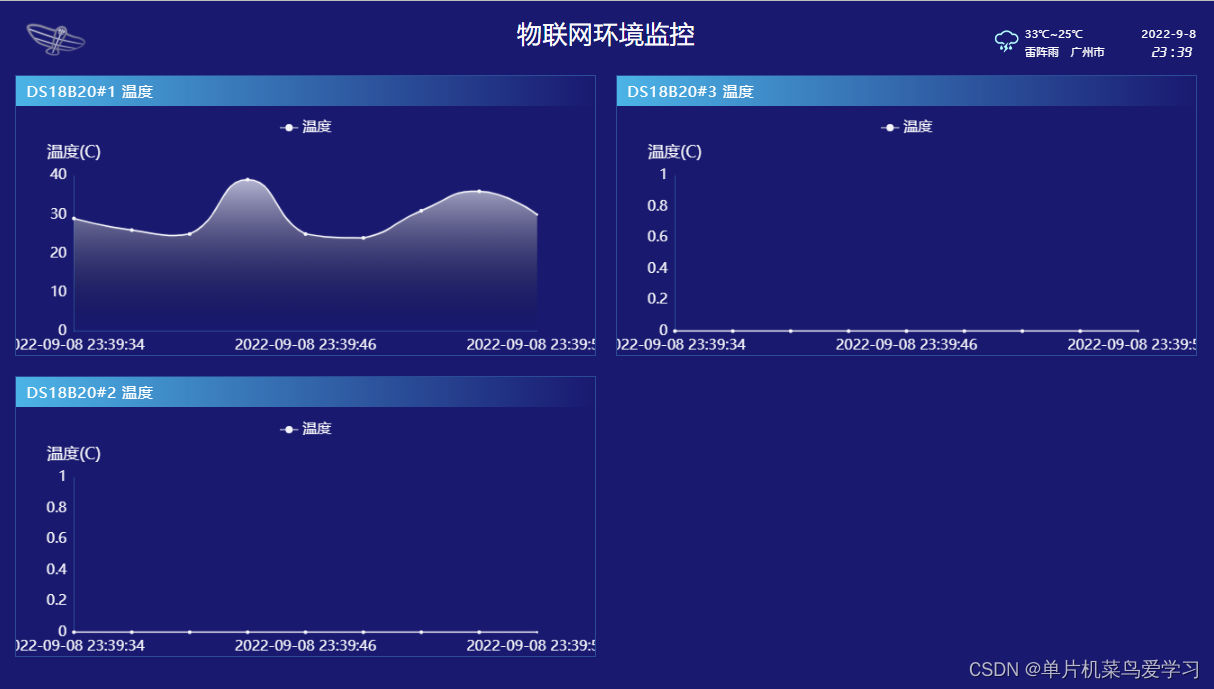
至此,一个简单的基于MQTT的环境温度检测系统就可以了。
4.总结
篇③结合ESP8266来开发简单物联网应用——获取多个ds18b20节点的温度,上报到本地部署的mqtt服务器,同时启动express服务器,提供一个可视化页面查看曲线图。麻雀虽小五脏俱全,初学者需要理解文件系统、服务请求等等对应的知识点并加以实际应用。


 6588
6588


 被折叠的 条评论
为什么被折叠?
被折叠的 条评论
为什么被折叠?
 到【灌水乐园】发言


