主要功能:
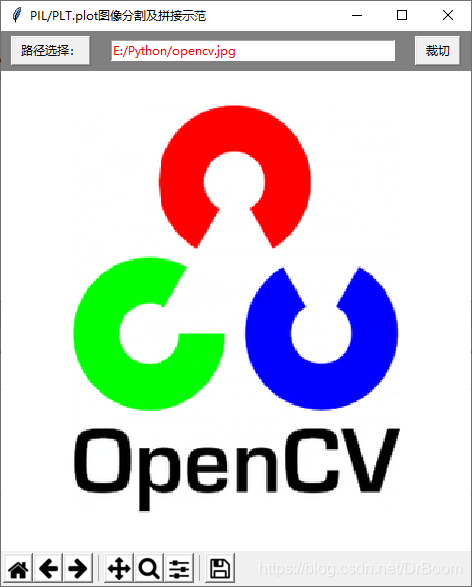
选择一张图片,裁剪为9宫格图片并保存,通过plt分别显示在GUI里面,图片之间存在间距,下一实例将用Canvas实现无间隔显示,可与原图比较。
# -*- coding: utf-8 -*-
"""
Created on Tue Oct 29 16:26:58 2019

@author: Roger Liu
"""

import tkinter as tk
from tkinter.filedialog import askdirectory,askopenfilename
from PIL import Image,ImageDraw
import sys
import numpy as np
import matplotlib.pyplot as plt
from matplotlib.backends.backend_tkagg import FigureCanvasTkAgg, NavigationToolbar2Tk
from matplotlib.backend_bases import key_press_handler
from matplotlib.figure import Figure


#将图片填充为正方形
def fill_image(image):
    width, height = image.size
    #选取长和宽中较大值作为新图片的
    new_image_length = width if width > height else height
    #生成新图片[白底]
    new_image = Image.new(image.mode, (new_image_length, new_image_length), color='white')
    #将之前的图粘贴在新图上,居中
    if width > height:#原图宽大于高,则填充图片的竖直维度
        #(x,y)二元组表示粘贴上图相对下图的起始位置
        new_image.paste(image, (0, int((new_image_length - height) / 2)))
    else:
        new_image.paste(image, (int((new_image_length - width) / 2),0))
    return new_image
#切图
def cut_image(image):
    width, height = image.size
    item_width = int(width / 3)
    box_list = []
    # (left, upper, right, lower)
    for i in range(0,3):#两重循环,生成9张图片基于原图的位置
        for j in range(0,3):
            #print((i*item_width,j*item_width,(i+1)*item_width,(j+1)*item_width))
            box = (j*item_width,i*item_width,(j+1)*item_width,(i+1)*item_width)
            box_list.append(box)

    image_list = [image.crop(box) for box in box_list]
    return image_list
#保存
def save_images(image_list):
    index = 1
    for image in image_list:
        image.save('./result/python'+str(index) + '.png', 'PNG')
        index += 1

def image_compose(image_list):
    width, height = image_list[0].size
    to_image = Image.new('RGB', (3 * width, 3 * height)) #创建一个新图
    # 循环遍历,把每张图片按顺序粘贴到对应位置上
    for y in range(3):
        for x in range(3):
            draw=ImageDraw.Draw(image_list[3*y+x])
            draw.rectangle((0,0,width,height), outline="gray", width=1)
            to_image.paste(image_list[3*y+x], ((x * width, y * height)))
    to_image.show()
    return to_image

def selectPath():
    path_ = askopenfilename()
#    enty['fg'] = 'black'
    enty.configure(fg='red')
    path.set(path_)

    o_image = Image.open(path_)
    ax=plt.figure()
    plt.axis('off')
    plt.imshow(o_image)
    canvas = FigureCanvasTkAgg(ax, master=frame2)
    canvas.draw()
    canvas.get_tk_widget().pack(fill=tk.X)
    toolbar = NavigationToolbar2Tk(canvas, frame2)
    toolbar.update()


def cut_img():
    filepath=path.get()
    image = Image.open(filepath)
    image = fill_image(image)
    image_list = cut_image(image)
    save_images(image_list)
#    print(image_list)
    draw_fig(image_list)
    return image

def draw_fig(image_list):
    ax=plt.figure()
    ax.tight_layout()
    ax.subplots_adjust(wspace =0, hspace =0)#调整子图间距
    for y in range(3):
        for x in range(3):
            bx=ax.add_subplot(3,3,3*y+x+1)
#            plt.subplot(3,3,3*y+x+1)
#            plt.axis('off')
            plt.axis('off')
            data=image_list[3*y+x]
            width, height=data.size
#            print(width,height)
            rect=plt.Rectangle((0,0),width,height,fill=False, edgecolor = 'gray',linewidth=1) #加外框
            bx.add_patch(rect)
            bx.imshow(data)

    for canvas in frame2.winfo_children():
#        print(canvas)
#        canvas.destroy()
        canvas.pack_forget()

    canvas = FigureCanvasTkAgg(ax, master=frame2)
    canvas.draw()
#    canvas.get_tk_widget().place(x=10,y=40,anchor='nw')
    # matplotlib的导航工具栏显示上来(默认是不会显示它的)
    toolbar = NavigationToolbar2Tk(canvas, frame2)
    toolbar.update()
#    canvas._tkcanvas.place(x=10,y=40,anchor='nw')
    canvas.get_tk_widget().pack(fill=tk.X)
#    plt.show()

###########################################################################

root = tk.Tk()
root.title('PIL/PLT.plot图像分割及拼接示范')
root.geometry('470x555')

path = tk.StringVar(value=r'请选择目标图片文件...')

frame = tk.Frame(root, bg="gray")
frame2 = tk.Frame(root, bg="whitesmoke")

tk.Button(frame, text = "路径选择:", height=1,width=10,command = selectPath).pack(side=tk.LEFT, padx=10,pady=5)
enty=tk.Entry(frame, textvariable = path,fg = 'gray',width=40) #单独句柄,用于后面更改参数
enty.pack(side=tk.LEFT, padx=10,pady=5)
tk.Button(frame, text = "裁切",height=1, width=10,command=cut_img).pack(side=tk.LEFT, padx=10,pady=5)

frame.pack(fill=tk.X)
frame2.pack(fill=tk.X)


tk.mainloop()
GUI 如下:

简化优化重写函数,避免重复调用:
def selectPath():
    path_ = askopenfilename()
#    enty['fg'] = 'black'
    enty.configure(fg='black')
    path.set(path_)

    fig.clf()
#    plt.cla() # 清除axes,即当前 figure 中的活动的axes,但其他axes保持不变。
#    plt.clf() # 清除当前 figure 的所有axes,但是不关闭这个 window,所以能继续复用于其他的 plot。
#    plt.close() # 关闭 window,如果没有指定,则指当前 window。
#    path_=r'.\opencv.jpg'
    o_image = Image.open(path_)
    ax=fig.add_subplot()
    ax.imshow(o_image)
    ax.set_axis_off()
    canvas.draw()
    plt.close(fig)


def draw_fig(image_list):

    fig.clf()
    plt.axis('off')
    for y in range(3):
        for x in range(3):

            ax=fig.add_subplot(3,3,3*y+x+1)
            data=image_list[3*y+x]
            width, height=data.size
#            print(width,height)
#            rect=plt.Rectangle((0,0),width,height,fill=False, edgecolor = 'gray',linewidth=1) #加外框
#            ax.add_patch(rect)
            ax.imshow(data)
#            ax.set_xticks([])
#            ax.set_yticks([])
            ax.set_axis_off()

    canvas.draw()
    print(plt.get_fignums())
    plt.close(1)


###########################################################################


fig=plt.figure(1,figsize=(5,4.8))
fig.tight_layout()
fig.subplots_adjust(wspace =0, hspace =0)#调整子图间距
plt.close(fig)
canvas = FigureCanvasTkAgg(fig, master=frame2)
canvas.draw()
toolbar = NavigationToolbar2Tk(canvas, frame2)
toolbar.update()
canvas.get_tk_widget().pack(fill=tk.X)


 941
941


 被折叠的 条评论
为什么被折叠?


