


写了个spring boot例子,的确是零配置,平时需要写个web例子测试之类的时候,用它还挺方便的。现在开发都搞微服务,api端之前都是dubbo或jesry,现在也可以用spring boot了。
现在记录下spring boot的小例子,maven构造的。
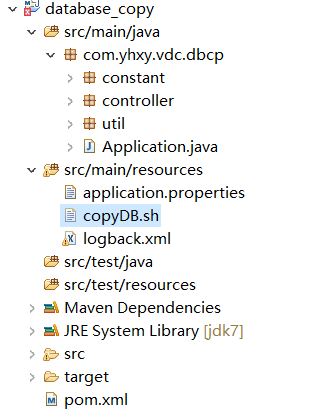
创建个maven项目,jar或war都行,jar的话打包后通过main方法启动,war的话打包后直接扔到tomcat即可。
创建个war的maven项目。
其中pom.xml
<project xmlns="http://maven.apache.org/POM/4.0.0" xmlns:xsi="http://www.w3.org/2001/XMLSchema-instance" xsi:schemaLocation="http://maven.apache.org/POM/4.0.0 http://maven.apache.org/xsd/maven-4.0.0.xsd">
  <modelVersion>4.0.0</modelVersion>
  <groupId>com.yhxy.vdc.dbcp</groupId>
  <artifactId>database_copy</artifactId>
  <version>0.0.1-SNAPSHOT</version>
  <packaging>war</packaging>

  <properties>
   <spring_versin>1.4.3.RELEASE</spring_versin>
  </properties>
   <!--  <parent>
	    <groupId>org.springframework.boot</groupId>
	    <artifactId>spring-boot-starter-parent</artifactId>
	    <version>1.4.3.RELEASE</version>
	</parent>   -->
	<dependencies>
	    <dependency>
	        <groupId>org.springframework.boot</groupId>
	        <artifactId>spring-boot-starter-web</artifactId>
	        <version>${spring_versin}</version>
	        <exclusions>
                <exclusion>
                    <groupId>org.springframework.boot</groupId>
                    <artifactId>spring-boot-starter-tomcat</artifactId>
                </exclusion>
            </exclusions>
	    </dependency>
	    <dependency>
        	<groupId>org.springframework.boot</groupId>
       	 	<artifactId>spring-boot-starter-tomcat</artifactId>
       	    <version>${spring_versin}</version>
        	<scope>provided</scope>
		</dependency>

	    <dependency>
    		<groupId>com.alibaba</groupId>
    		<artifactId>fastjson</artifactId>
    		<version>1.2.7</version>
		</dependency>


        <!-- jsp -->
		<dependency>
			<groupId>javax.servlet</groupId>
			<artifactId>javax.servlet-api</artifactId>
			<version>3.1.0</version>
			<scope>provided</scope>
		</dependency>
		<dependency>
			<groupId>javax.servlet.jsp</groupId>
			<artifactId>javax.servlet.jsp-api</artifactId>
			<version>2.2.1</version>
			<scope>provided</scope>
		</dependency>
		<dependency>
			<groupId>jstl</groupId>
			<artifactId>jstl</artifactId>
			<version>1.2</version>
		</dependency>
		<dependency>
			<groupId>taglibs</groupId>
			<artifactId>standard</artifactId>
			<version>1.1.2</version>
		</dependency>

	</dependencies>
  <build>
    <sourceDirectory>src</sourceDirectory>
    <plugins>
      <plugin>
        <artifactId>maven-compiler-plugin</artifactId>
        <version>3.1</version>
        <configuration>
          <source>1.7</source>
          <target>1.7</target>
        </configuration>
      </plugin>
    </plugins>
  </build>

</project>
我把parent注释掉了,使用的话,pom.xml文件报错,不知道是不是本地环境问题,去掉也无所谓。
controller的部分代码
@RestController
@EnableAutoConfiguration
@RequestMapping("/dbcp")
public class DatabaseCopyController {


	private static Logger LOG =Logger.getLogger(DatabaseCopyController.class.getName());


	@RequestMapping("/hello")
	@ResponseBody
	public String hello(HttpServletRequest request){
		LOG.info("os=" + System.getProperty("os.name"));


		return "hello....";
	}
package com.yhxy.vdc.dbcp;

import org.springframework.boot.SpringApplication;
import org.springframework.boot.autoconfigure.SpringBootApplication;
import org.springframework.boot.builder.SpringApplicationBuilder;
import org.springframework.boot.web.support.SpringBootServletInitializer;

@SpringBootApplication
public class Application extends SpringBootServletInitializer{

	 @Override
    protected SpringApplicationBuilder configure(SpringApplicationBuilder application) {
        return application.sources(Application.class);
    }


	 public static void main(String[] args) throws Exception {
	        SpringApplication.run(Application.class, args);
	    }
}
如果是直接run的方式运行的话,会使用spring boot里内嵌的tomcat或jetty(还没进行研究)。
如果不想使用内嵌的tomcat,而是使用自己的tomcat(方便优化之类的),那只要把项目打包war后扔进自己的tomcat即可。
日志配置,spring boot是默认使用logback.xml的,所以想自定义的话,在resources下自定义个logback.xml,比如
<!-- Logback configuration. See http://logback.qos.ch/manual/index.html -->
<configuration scan="true" scanPeriod="10 seconds">
    <include resource="org/springframework/boot/logging/logback/base.xml" />

<appender name="STDOUT" class="ch.qos.logback.core.ConsoleAppender">
    <!-- encoders are assigned the type
         ch.qos.logback.classic.encoder.PatternLayoutEncoder by default -->
    <encoder>
      <pattern>%d{yyyy-MM-dd HH:mm:ss.SSS} [%thread] %-5level %logger{36} - %msg%n</pattern>
    </encoder>
  </appender>

    <appender name="INFO_FILE" class="ch.qos.logback.core.rolling.RollingFileAppender">
        <File>${LOG_PATH}/info.log</File>
        <rollingPolicy class="ch.qos.logback.core.rolling.TimeBasedRollingPolicy">
            <fileNamePattern>${LOG_PATH}/info-%d{yyyyMMdd}.log.%i</fileNamePattern>
            <timeBasedFileNamingAndTriggeringPolicy class="ch.qos.logback.core.rolling.SizeAndTimeBasedFNATP">
                <maxFileSize>500MB</maxFileSize>
            </timeBasedFileNamingAndTriggeringPolicy>
            <maxHistory>2</maxHistory>
        </rollingPolicy>
        <layout class="ch.qos.logback.classic.PatternLayout">
            <Pattern>%d{yyyy-MM-dd HH:mm:ss.SSS} [%thread] %-5level %logger{36} -%msg%n
            </Pattern>
        </layout>
    </appender>

    <appender name="ERROR_FILE" class="ch.qos.logback.core.rolling.RollingFileAppender">
        <filter class="ch.qos.logback.classic.filter.ThresholdFilter">
            <level>ERROR</level>
        </filter>
        <File>${LOG_PATH}/error.log</File>
        <rollingPolicy class="ch.qos.logback.core.rolling.TimeBasedRollingPolicy">
            <fileNamePattern>${LOG_PATH}/error-%d{yyyyMMdd}.log.%i
            </fileNamePattern>
            <timeBasedFileNamingAndTriggeringPolicy class="ch.qos.logback.core.rolling.SizeAndTimeBasedFNATP">
                <maxFileSize>500MB</maxFileSize>
            </timeBasedFileNamingAndTriggeringPolicy>
            <maxHistory>2</maxHistory>
        </rollingPolicy>
        <layout class="ch.qos.logback.classic.PatternLayout">
            <Pattern>%d{yyyy-MM-dd HH:mm:ss.SSS} [%thread] %-5level %logger{36} -%msg%n

            </Pattern>
        </layout>
    </appender>


    <root level="INFO">
        <appender-ref ref="STDOUT" />
        <appender-ref ref="INFO_FILE" />
        <appender-ref ref="ERROR_FILE" />
    </root>

</configuration>
logging.config=classpath:logback.xml
logging.path=/logs


 4799
4799


 被折叠的 条评论
为什么被折叠?
被折叠的 条评论
为什么被折叠?
 到【灌水乐园】发言


