一、Vue认识
1、Vue简介
官网:https://cn.vuejs.org
Vue是一个渐进式框架渐进式意味着你可以将Vue作为你应用的一部分嵌入其中,带来更丰富的交互体验,或者将更多的业务逻辑使用Vue实现,那么Vue的核心库以及其生态系统,比如Core+Vue-router+Vuex,也可以满足你各种各样的需求。
2、Vue特点
- 解耦视图和数据
- 可复用的组件
- 前端路由技术
- 状态管理
- 虚拟DOM
二、Vue安装
1、安装Vue
(1)方式一(CDN引入)
<!-- 开发环境版本,包含了有帮助的命令行警告 -->
<script src="https://cdn.jsdelivr.net/npm/vue/dist/vue.js"></script>

<!-- 生产环境版本,优化了尺寸和速度 -->
<script src="https://cdn.jsdelivr.net/npm/vue"></script>
(2)方式二(下载和引入)
开发环境: https://vuejs.org/js/vue.js
生产环境: https://vuejs.org/js/vue.min.js
(3)方式三(NPM安装)
一般都是用此种方式
npm install vue
三、Vue基础使用
1、初体验
这里我使用的是
WebStorm这个软件
目录结构:

01-Hello-Vuejs.html:
<!DOCTYPE html>
<html lang="en">
<head>
    <meta charset="UTF-8">
    <title>Title</title>
</head>
<body>
<div id="app">{{message}}</div>
<div>{{message}}</div>
<script src="../js/vue.js"></script>
<script>
    // let(变量/const(常量))
    // 变成范式:声明式编程
    const app = new Vue({
        el: '#app', //用于挂载要管理的元素
        data: {     //定义数据
            message: 'hello,Vue!!!'
        }
    })
</script>
</body>
</html>
结果:


2、Vue列表
<!DOCTYPE html>
<html lang="en">
<head>
    <meta charset="UTF-8">
    <title>Title</title>
</head>
<body>
<div id="app">
    <ul>
        <li v-for="item in movies">{{item}}</li>
    </ul>
</div>

<script src="../js/vue.js"></script>
<script>
    const app = new Vue({
        el: '#app',
        data: {
            message: 'hello,Vue',
            movies: ['星际穿越', '大话西游']
        }
    })
</script>
</body>
</html>


3、计数器案例
<!DOCTYPE html>
<html lang="en">
<head>
    <meta charset="UTF-8">
    <title>Title</title>
</head>
<body>
<div id="app">
    <h2>当前计数:{{counter}}</h2>
    <!--<button v-on:click="counter++">+</button>-->
    <!--<button v-on:click="counter--;">-</button>-->
    <button v-on:click="add">+</button>
    <button v-on:click="sub">-</button>
</div>
<script src="../js/vue.js"></script>
<script>
    const app = new Vue({
        el:'#app',
        data: {
            counter: 0
        },
        methods: {
            add: function () {
                console.log('add被执行');
                this.counter++   //当前对象
            },
            sub: function () {
                console.log('sub被执行');
                this.counter--
            }
        }
    })
</script>
</body>
</html>

4、MVVM介绍
- Model:代表数据模型,数据和业务逻辑都在Model层中定义
- View:代表UI视图,负责数据的展示
- ViewModel:就是与界面(view)对应的Model。因为,数据库结构往往是不能直接跟界面控件一一对应上的,所以,需要再定义一个数据对象专门对应view上的控件。而ViewModel的职责就是把model对象封装成可以显示和接受输入的界面数据对象
5、创建Vue传入的options(目前掌握)
-
el:
- 类型:string|HTMLElement
- 作用:决定之后Vue实例会管理哪一个DOM
-
data:
- 类型:Object|Fucntion(组件当中data必须是一个函数)
- 作用:Vue实例对应的数据对象
-
methods:
- 类型:{[key: string]:Function}
- 作用:定义属于Vue的一些方法,可以在其他地方调用,也可以在指令中使用
四、Vue插值操作
1、Mustache(双大括号)

2、v-once指令
数据不会跟着界面修改而改变
<!DOCTYPE html>
<html lang="en">
<head>
    <meta charset="UTF-8">
    <title>Title</title>
</head>
<body>
<div id="app">
    {{message}}
    <h1 v-once>{{message}}</h1>
</div>
<script src="../js/vue.js"></script>
<script>
    const app = new Vue({
        el: '#app',
        data: {
            message: 'hello,Vue'
        }
    })
</script>
</body>
</html>

3、v-html指令
<!DOCTYPE html>
<html lang="en">
<head>
    <meta charset="UTF-8">
    <title>Title</title>
</head>
<body>
<div id="app">
    {{url}}
    <h1 v-html="url"></h1>
</div>
<script src="../js/vue.js"></script>
<script>
    const app = new Vue({
        el: '#app',
        data: {
            message: 'hello,Vue',
            url: '<a href="http://www.baidu.com">百度一下</a>'
        }
    })
</script>
</body>
</html>

4、v-test指令
与Mustache相似:都是讲数据显示在界面中,通常接受string类型,但是其无法拼接,一般还是使用Mustache
<!DOCTYPE html>
<html lang="en">
<head>
    <meta charset="UTF-8">
    <title>Title</title>
</head>
<body>
<div id="app">
    <h1>{{message}}</h1>
    <h1 v-text="message"></h1>
</div>
<script src="../js/vue.js"></script>
<script>
    const app = new Vue({
        el: '#app',
        data: {
            message: 'hello,Vue'
        }
    })
</script>
</body>
</html>
5、v-pre指令
用于跳过这个元素和它子元素的编译过程,用于显示原本的Mustache语法
<!DOCTYPE html>
<html lang="en">
<head>
    <meta charset="UTF-8">
    <title>Title</title>
</head>
<body>
<div id="app">
    <h1>{{message}}</h1>
    <h1 v-pre>{{message}}</h1>
</div>
<script src="../js/vue.js"></script>
<script>
    const app = new Vue({
        el: '#app',
        data: {
            message: 'hello,Vue'
        }
    })
</script>
</body>
</html>

6、v-cloak指令
未渲染完成时,不显示!!!
<!DOCTYPE html>
<html lang="en">
<head>
    <meta charset="UTF-8">
    <title>Title</title>
    <style>
        [v-cloak] {
            display: none;
        }
    </style>
</head>
<body>
<div id="app" v-cloak>
    {{message}}
</div>
<script src="../js/vue.js"></script>
<script>
    // 在Vue解析之前,div中有一个属性v-cloak
    // 在Vue解析之后,div中没有一个属性v-cloak
    setTimeout(function () {
        const app = new Vue({
            el: '#app',
            data: {
                message: 'hello,Vue'
            }
        })
    },1000)
</script>
</body>
</html>
五、v-bind动态绑定属性
1、v-bind基本使用
<!DOCTYPE html>
<html lang="en">
<head>
    <meta charset="UTF-8">
    <title>Title</title>
</head>
<body>
<div id="app">
    <img v-bind:src="imgURL" alt="">
    <a v-bind:href="aHref">百度一下</a>
    <!--语法糖的写法-->
    <a :href="aHref">百度一下</a>
</div>
<script src="../js/vue.js"></script>
<script>
    const app = new Vue({
        el: '#app',
        data: {
            message: 'hello,Vue',
            imgURL:'https://img.alicdn.com/imgextra/i2/6000000001761/TB2v6eYX8USMeJjy1zjXXc0dXXa_!!0-tbCommonAudio.jpg_180x180q90.jpg_.webp',
            aHref:'http://www.baiud.com'
        }
    })
</script>
</body>
</html>

2、动态绑定class(对象语法)
<!DOCTYPE html>
<html lang="en">
<head>
    <meta charset="UTF-8">
    <title>Title</title>
    <style>
        .active {
            color: red;
        }
    </style>
</head>
<body>
<div id="app">
    <!--<h1 v-bind:class="{{类名1: boolean, ;类名2: boolean}}">{{message}}</h1>-->
    <h1 v-bind:class="{active: isActive, line: isLine}">{{message}}</h1>
    <button v-on:click="btnClick">按钮</button>
</div>
<script src="../js/vue.js"></script>
<script>
    const app = new Vue({
        el: '#app',
        data: {
            message: 'hello,Vue',
            isActive: true,
            isLine: true
        },
        methods: {
            btnClick: function () {
                this.isActive = !this.isActive
            }
        }
    })
</script>
</body>
</html>

<!DOCTYPE html>
<html lang="en">
<head>
    <meta charset="UTF-8">
    <title>Title</title>
    <style>
        .active {
            color: red;
        }
    </style>
</head>
<body>
<div id="app">
    <!--<h1 v-bind:class="{{类名1: boolean, ;类名2: boolean}}">{{message}}</h1>-->
    <h1 v-bind:class="{active: isActive, line: isLine}">{{message}}</h1>
    <h1 v-bind:class="getClasses()">{{message}}</h1>
    <button v-on:click="btnClick">按钮</button>
</div>
<script src="../js/vue.js"></script>
<script>
    const app = new Vue({
        el: '#app',
        data: {
            message: 'hello,Vue',
            isActive: true,
            isLine: true
        },
        methods: {
            btnClick: function () {
                this.isActive = !this.isActive
            },
            getClasses: function () {
                return {active: this.isActive, line: this.isLine}
            }
        }
    })
</script>
</body>
</html>

3、动态绑定class(数组语法)
<!DOCTYPE html>
<html lang="en">
<head>
    <meta charset="UTF-8">
    <title>Title</title>
</head>
<body>
<div id="app">
    <h1 class="title" :class="[active, line]">{{message}}</h1>
    <h1 class="title" :class="getClasses()">{{message}}</h1>
</div>
<script src="../js/vue.js"></script>
<script>
    const app = new Vue({
        el: '#app',
        data: {
            message: 'hello,Vue',
            active: 'aaaa',
            line: 'bbbb'
        },
        methods: {
            getClasses: function () {
                return [this.active, this.line]
            }
        }
    })
</script>
</body>
</html>

4、动态绑定style(对象语法)
<!DOCTYPE html>
<html lang="en">
<head>
    <meta charset="UTF-8">
    <title>Title</title>
</head>
<body>
<div id="app">
    <!--<h1 :style="{key(属性名): value(属性值)}">{{message}}</h1>-->
    <!--'50px'必须加上单引号-->
    <h1 :style="{fontSize: '50px'}">{{message}}</h1>

    <h1 :style="{fontSize: finalSize + 'px'}">{{message}}</h1>
</div>
<script src="../js/vue.js"></script>
<script>
    const app = new Vue({
        el: '#app',
        data: {
            message: 'hello,Vue',
            finalSize: 100
        }
    })
</script>
</body>
</html>

5、动态绑定style(数组语法)
<!DOCTYPE html>
<html lang="en">
<head>
    <meta charset="UTF-8">
    <title>Title</title>
</head>
<body>
<div id="app">
    <h1 :style="[baseStyle, baseStyle1]">{{message}}</h1>
</div>
<script src="../js/vue.js"></script>
<script>
    const app = new Vue({
        el: '#app',
        data: {
            message: 'hello,Vue',
            baseStyle: {backgroundColor: 'red'},
            baseStyle1: {fontSize: '100px'}
        }
    })
</script>
</body>
</html>

六、计算属性
计算属性相对于methods的优势就是,只会调用一次!!!
1、基本使用
<!DOCTYPE html>
<html lang="en">
<head>
    <meta charset="UTF-8">
    <title>Title</title>
</head>
<body>
<div id="app">
    <h1>{{getFullName()}}</h1>
    <h1>{{fullName}}</h1>
</div>
<script src="../js/vue.js"></script>
<script>
    const app = new Vue({
        el: '#app',
        data: {
            firstName: 'Lebron',
            lastName: "Kobe"
        },
        // 计算属性
        computed: {
            fullName: function () {
                return this.firstName + ' ' + this.lastName
            }
        },
        methods: {
            getFullName() {
                return this.firstName + ' ' + this.lastName
            }
        }
    })
</script>
</body>
</html>

2、复杂使用
<!DOCTYPE html>
<html lang="en">
<head>
    <meta charset="UTF-8">
    <title>Title</title>
</head>
<body>
<div id="app">
<h1>总价格:{{totalPrice}}</h1>
</div>
<script src="../js/vue.js"></script>
<script>
    const app = new Vue({
        el: '#app',
        data: {
            books: [
                {id: 100, name: 'Unix编程艺术', price: 120},
                {id: 101, name: '代码大全', price: 140},
                {id: 102, name: '现代操作系统', price: 110}
            ]
        },
        computed: {
            totalPrice: function () {
                let result = 0;
                for (let i=0; i < this.books.length;i++){
                    result += this.books[i].price
                }
                return result
            }
        }
    })
</script>
</body>
</html>

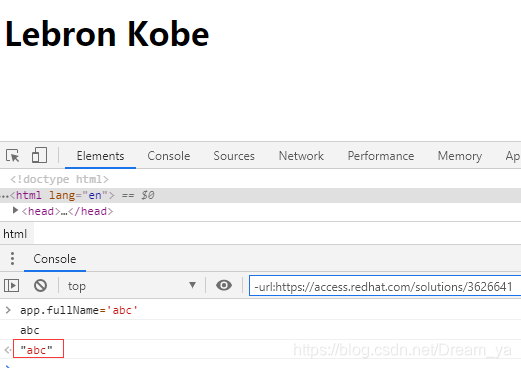
3、setter和getter
<!DOCTYPE html>
<html lang="en">
<head>
    <meta charset="UTF-8">
    <title>Title</title>
</head>
<body>
<div id="app">
    <h1>{{fullName}}</h1>
</div>
<script src="../js/vue.js"></script>
<script>
    const app = new Vue({
        el: '#app',
        data: {
            firstName: 'Lebron',
            lastName: "Kobe"
        },
        computed: {
            // 计算属性一般是没有set方法,只读属性,所以上面是省略的写法
            fullName: {
                set: function (newValue) {
                    console.log(newValue);
                },
                get: function () {
                    return this.firstName + ' ' + this.lastName
                }
            },
        }
    })
</script>
</body>
</html>

七、练习
点击列表中的那一项,那么该项的文字变成红色
<!DOCTYPE html>
<html lang="en">
<head>
    <meta charset="UTF-8">
    <title>Title</title>
    <style>
        .active {
            color: red;
        }
    </style>
</head>
<body>
<div id="app">
<ul>
    <li v-for="(item,index) in movies" :class="{active: currentIndex === index}" @click="onClick(index)">{{index}}--{{item}}</li>
</ul>

</div>
<script src="../js/vue.js"></script>
<script>
    const app = new Vue({
        el: '#app',
        data: {
            movies: ['海贼王','火影忍者','进击的巨人'],
            currentIndex: 0
        },

        methods: {
            onClick: function (index) {
                this.currentIndex = index
            }
        }
    })
</script>
</body>
</html>
下一篇文章>Vue入门(一)之作用域、v-on事件监听、条件判断、书籍购物车、高阶函数(filter、map、reduce)


 251
251

 被折叠的 条评论
为什么被折叠?


